DIY flannelograph
Tweet
Hello, friends! Do you know what flannelgraph is? To be honest, until recently, I had no idea about flannelgraph! But it turns out that the flannelgraph is a very convenient device for conducting educational games with children. Yulia Loginova made just such a developmental guide for her daughter and she is ready to share a master class on making a flannelgraph with the readers of my site. In addition to the master class itself, you can download for free the hero figures for 100 fairy tales that Julia prepared for her daughter. I give the floor to Yulia.
Hello, dear mothers!
My name is Yulia, I am the mother of a girl named Polina, she is 1 year 10 months old. My daughter is very active - she is restless, it is difficult to keep her occupied with anything. The flannelgraph copes with this task perfectly!!! While we do not combine reading fairy tales with illustrating using a flannelgraph, because... Polina is distracted from the story by the action. But she herself “plays” beautifully—arranging the characters as she pleases, removing them, then arranging them again. In general, he gets carried away for about 30 minutes at a time, telling the characters something.
The idea of doing something like this has been in my head for a long time. But it was formed after I accidentally found someone’s note on the Internet about how to easily and quickly make a flannelgraph. And the work began to boil. I made 2 flannelographs at the same time - for my daughter and for my nephews. There is nothing complicated in this lesson, the only thing is monotonous image processing. But the result is worth it!!!
I suggest you make a flannelgraph for your children.
Required:
- Plywood
(can be replaced with thick cardboard from a box) - my size is 40*60 cm; - Flannel, fleece
or any other fleecy or non-woven material - for me these are non-woven floor rags, for example Mermaid (new, of course) - you need such an amount to sew plywood into the material, i.e. 40 * 120 + for allowances; number of rags – 2 (their size is 50*60 cm); - Thread, needle, scissors
; - Cardboard for drawing
- I took paper for drawing with gouache (it is quite thick - there is no need to further compact it, the density of such paper is 180-200 g/cm³). This paper is necessary for printing characters; - Transparent self-adhesive film
(if any) - to increase strength and as an additional feature. protection; - A little patience, time and money
)))
Everything else can be downloaded:
- Heroes (archive Pictures);
- Fairy tales.
Now about the work itself:
To make it clear right away that everything is simple, look at the photo:
I sewed the material along a long cut, applied it to the plywood, smoothed it out - the material adhered to the plywood due to the lint. Then I sewed the remaining long sections, and secured the remains on both sides of the flannelgraph in the form of pockets (seen in the photo).
The flannelgraph is ready.
Then you need to print out the fairy tale characters on sheets of cardboard. Let me make a reservation right away that you should not translate ordinary office paper, because... it does not stick to the flannelgraph coating and bends and tears easily. If it is still not possible to use cardboard, then such paper will have to be strengthened (you can use Barney biscuit packaging - they are also rough on the gray side or velvet paper).
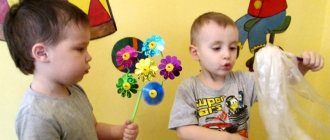
In the photo, my daughter is playing with cardboard characters, whom she simply leans with their “backs” against the flannelgraph and they hold on.
Next, if desired (and possible), you can cover the characters with transparent oracal (self-adhesive) and then cut them out.
The most difficult thing in this whole undertaking is to collect characters from the Internet, process them in Photoshop and compose them, but I have already done this, download links are above.
Playing with flannelgraph is very simple - you can illustrate fairy tales that are familiar to us all (collected in the Fairy Tales archive) - for example, “Grandfather planted a turnip” - there is a grandfather and a turnip on the flannelgraph, “Grandfather called grandmother” - we attach the grandmother, etc.
And you can come up with your own fairy tales.
You can also study shapes and colors - just cut out various shapes from colored cardboard and build flat pictures from them.
_____________________________________
Thank you very much to Yulia for the detailed master class on making a flannelgraph with your own hands. But it is known that not everyone has such abilities and many prefer to buy a ready-made toy. So, if you are one of them, then I suggest you pay attention to the wonderful games “Stygis” by Maria Mityushina. Maria is the mother of three daughters and she came up with games especially for them, so maternal warmth is invested in them. I wrote more about Stygis in the article “Flannelograph or Stygis?”
On my own behalf, I would like to add that on a flannelgraph you can study not only shapes and colors, but also numbers, letters, shapes, sizes, learn to read, group, and compare.
Here are some examples of games on flannelgraph:
We study colors, shapes, sizes
We cut out geometric shapes from colored cardboard and make simple drawings from them: a flower, a house, a snowman, a car, a simple geometric pattern, etc. My article “Applique of geometric shapes” will help you here.
During the game, be sure to pronounce the colors, sizes of the figures, and their names.
Game “Find the odd one out, generalization”
We attach different pictures to the flannelgraph. Ask your child to find all the animals, birds, etc.
We attach 2 – 4 pictures (for example, a pear, an apple and a cat) and ask the child to find the extra one. First, you will have to find the extra pictures yourself; be sure to explain why this particular picture is extra.
Games “Who eats what” and “Who lives where”
Before playing, the child must find out who eats what or who lives where. Next, we put cards with three animals on the flannelgraph, opposite the card with food (houses) and ask the child to show what each animal eats.
Consultation for parents “Theater on flannelgraph” consultation on the topic
"Theater on flannelgraph"
The theater of pictures begins with the flannelgraph. It is the easiest to make and display. Pictures on flannel and decorations are flat, they are shown on a special board covered with flannel. Standing at the side of the board, the teacher tells a fairy tale and, as the story progresses, attaches pictures of characters and design to the board one after another. The pictures do not fall, they obediently lie on the colored background of the board, easily and quickly forming a new, larger and brighter picture. Children sit in front of the table, listen with interest to the fairy tale and look at the pictures on the board. Flannelgraph is an original form of illustrated story.
There is undoubtedly a great interest in flannelgraph among preschool workers, and there are many who want to do an exciting and useful job. It can be interestingly used as entertainment, as well as in the classroom. But, without practical and methodological help, without knowing the specifics of the flannelgraph, educators often do not know how to organize it. By making these recommendations, I will try to help them with this.
First you need to make a flannel board. To do this, stretch a light flannel or flannel with the pile outward onto a rectangular board made of plywood, thin plank or thick cardboard, securing its edges to the back side of the board. It is advisable to edge the board on the front side with a low strip. The position of the board must be stable. It is not advisable to replace the board with a frame, since the flannel on the frame is pressed in and the pictures will fall. The board must be stored in a special case, then it can be used for a long time.
It is better, of course, to colorize pictures for display. It is better to cut out drawings with small details, leaving paper white margins, which can then be shaded to match the color of the flannelgraph. This will allow you to use the pictures longer without losing small parts or breaking them.
Before cutting out pictures, they are glued onto flannel with the nap facing out and be sure to dry under a press. When the pictures have dried, they are cut out and placed under the press again so that they do not warp. You cannot iron the pictures, as the pile may become wrinkled and they will not stick when placed on the board.
You need to start working with flannelograph by choosing a literary work. The specificity of the flannelgraph is such that not every work can be shown in it, since the pictures themselves are static and basically only illustrate the teacher’s story. Therefore, you cannot take works where the movement of the characters is important. For example, the effect of showing the fairy tale “Turnip” disappears due to the fact that the flannelgraph cannot show how the turnip is pulled and stretched. It is also impossible to show the fairy tale “Teremok” convincingly enough, since its heroes can neither enter the tower nor look out of it.
For flannelgraph it is better to choose works where the characters are mostly static. They can talk, sit or stand, come and go (when pictures are put on the board and removed).
The greatest effect of display on a flannelgraph is achieved when a new composition is made from the prepared pictures. This requires some rules. For example, you cannot place characters facing the edge of the flannelgraph board: there should always be some space in front of them. It is also undesirable to place pictures on one half of the board; it is necessary to ensure their uniform distribution across the field of the flannelgraph. You need to make sure that the pictures are not too high or low and are proportional to the flannelgraph board, etc. In a word, drawing up a composition is a creative process, and the teacher, of course, should always keep this in mind.
On a flannelgraph board you can depict a forest and meadow with flowers and butterflies, a river and sea with boats and steamships, a city street with transport and pedestrians, the fairy-tale kingdom of Kashchei, space with satellites and spaceships... Naturally, text and its execution. The teacher pronounces it for both the author and the characters, and this requires preparation and a certain skill. The story should be told slowly, giving children the opportunity to understand the content, look at the pictures and evaluate the emerging compositions on the board. Sometimes you can read individual episodes without showing pictures, but you must always remember that the meaning of the spectacle is lost if it does not make the literary work more interesting, vibrant and meaningful.
An important point in preparing a flannelgraph is the selection of pictures. They can be taken from any books: for this, the selected pictures are redrawn and colored. In this regard, you need to remember that the drawings must be expressive, colorful and stylistically unified, that is, executed in the same manner. Therefore, it is good when sets of pictures are compiled for each literary work, and not collected from different books. This helps to maintain the scale of the pictures, their coloristic and stylistic unity.
By the way, the scale on a flannelgraph is a relative thing. A house or tree can be smaller than a person's figure, especially if it is necessary to show that they are located in the distance. The scale must be observed only in relation to characters acting simultaneously. If, for example, a fox and a bear are talking, then the latter should be larger, but not by much. Sometimes pictures in books do not depict an object completely: part of a house or a tree without a top. Such pictures can be used if they are placed on a flannelgraph board so that the frame cuts off the missing part, like the edge of a page in a book. If this needs to be placed in the middle of the board, then the missing part should be completed.
An interesting form of making flannelgraphs is children's drawings. To do this, during classes, children are given the task of drawing an object or a scene from a book they have read. The best drawings are selected and used for display on the flannelgraph.
Having carefully prepared everything necessary for showing a particular scene, the teacher can first practice the show. This will allow him to determine the time required for display and determine the location of the pictures on the flannelgraph board. At the same time, it is advisable to take into account the children’s possible reactions and questions in order to be prepared for additional clarifications.
Before displaying the flannelgraph, the pictures are laid out on the table in the order they appear, face down, and numbered. A device with a flannelgraph is placed against the window, so that the light falls on the board. The teacher stands or sits so as not to block the board and light.
When showing scenes on flannelgraph, everything possible must be done to ensure that they are artistic and contribute as much as possible to aesthetic education.