"Children's animation as a means of cognitive and speech development of preschool children"
- December 19, 2015
Preschool age is the most favorable time when, through the emotional sphere, it is possible to form in a child a cognitive interest in objects, phenomena, and events of the surrounding reality.
The problem of our time is that, against the backdrop of the seeming prosperity of the information space, which provides a huge volume of educational, developmental programs, programs, computer games, children perceive objects and phenomena of the world around them as a given - “He is like this because he cannot be like this.” . To some extent, inertia, passivity of thinking, decreased cognitive activity, and lack of inquisitiveness of mind do not push the child to a deeper study of the properties of an object or phenomenon. I work in a compensatory group for children with GSD (General speech underdevelopment) and this problem is especially acute.
In recent years, significant changes have been taking place in the preschool education system. Various computer technologies are entering our daily professional lives at a rapid pace. This provides enormous opportunities for creating various innovative projects that are widely used in working with children.
The main thing in project activities is that the project is not “tied” to the program, but helps to implement the principle of integration of educational areas and can be aimed at organizing gaming, cognitive-research, communicative, productive children's activities. Children are free in their creativity.
The project is a product of cooperation and co-creation of teachers, children, and parents. The results of completed projects must be tangible, substantive, and ready for use. One of the main tasks of a teacher when organizing project activities for preschoolers is to support children’s initiative. In our preschool educational institution there is a long-term cognitive and creative practice-oriented group joint project for children 5-7 years old “Where Cartoon Lives”.
The goal of the project : to create favorable conditions conducive to the successful development of each child, the realization of creative abilities, the development of cognitive interest and coherent speech in the process of creating an animated film using the method of time-lapse photography using digital technologies in plasticine volumetric and planar techniques.
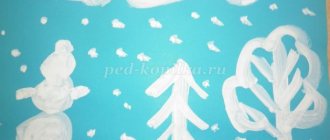
The children and I filmed and voiced six cartoons, lasting from 2 to 10 minutes, with another one on the way. An exciting method that attracts the attention of children in itself, allowing you to solve educational problems set by the teacher, is doubly effective.
The process of creating a cartoon is an interesting, but painstaking task, so the teacher’s task is to think through the load on children in advance; it is advisable to work with small groups in the afternoon.
The process of creating a cartoon can be divided into 5-6 stages
1. Creating a script.
Work is planned in two directions:
- you can use ready-made works of art (stories, fairy tales, poems with an educational idea);
- you can come up with your own story (suggested by a teacher, parent, the child’s own story or joint creativity);
At this time, partial work is carried out within the framework of GCD (acquaintance or clarification-expansion-generalization of knowledge, compiling a story (the plot of a cartoon) according to existing traditional methods); in the evening, the teacher, together with the children, prepares the characters of the future cartoon in accordance with the script, discussing their characteristic features. features, as this can be conveyed through plastic, create scenes-substrates on which the action will take place).
2. Storyboard.
This stage should not be neglected, because this is a kind of plan for your cartoon, where you, in pencil, without emphasis on aesthetics, make for yourself a sketch of future scenes and their sequence (as if mentally replaying your film in your head so as not to miss any part). It can be frustrating when you get to the editing stage and you're missing a scene. As a result, either there is a “failure” in the video track, or you have to return to photographing.
3. Preparing the workplace and equipment for photography.
You will need:
- digital camera.
- Tripod (without a tripod the cartoon cannot be made). The height is preferably such that the child can see the picture he is taking on the camera screen.
- Lighting (I prefer artificial, it is constant, but when a flash or natural light is used, fluctuations are noticeable in the frames).
- The table where the cartoon scene will be located. Preferably for children, so that it is convenient for children to control the process of moving and rearranging characters and scene elements.
- Microphone (it will be needed later, when you get to the stage of voicing the role (I have a microphone on my desktop next to the computer so that the child can see the finished cartoon, it’s easier for him to get into the character, working on intonation, strength and pitch of the voice, logical stress – we haven’t succeeded in everything yet, but children strive to improve their results, in this activity they hear themselves from the outside and are more critical of their speech).
4. Direct filming process.
Here it is important to show children that smooth movements of cartoon characters can be achieved only when the hero makes very small movements on stage. You have to take a lot of photos (for a short cartoon of 1 minute - about 100 photos, for a longer one - 350-450 photos.
5. Editing of the footage (entirely the work of an adult).
For this purpose, we use one of the simplest video editors, Moviemaker, VegasPro. I mastered them quickly with the help of a training video on YouTube. It’s better to look there and do it in parallel.
6. Voice over roles.
When the entire video track is edited, the music directors and I begin selecting melodies for the background; the next audio track is the characters’ lines. I record the children separately (multiple repetitions of lines in order to then choose the most successful one - but without fanaticism, the main thing is not to deprive the child of the joy of the process), I create my own file for each character. After this, audio editing begins.
Dear colleagues! I would like to assure you that this is not so difficult, anyone who knows how to work on a computer at the level of creating a document, folder, file, presentation can handle it. I edit the photos and sound of one cartoon in one evening.
I would also like to add that from the very beginning, when discussing our project with our colleagues, we decided not to make much effort on the technical high-quality design of our cartoons. We are not professional animators, and the goal of our project is completely different. Yes, at the beginning of its implementation, the share of children’s participation is small, but as they master skills and abilities, their independence will grow, and we will let them float freely. So far, our cartoons are the result of joint creativity with sufficient help from the teacher.
Now that there are tangible results of their work that are significant for children, they are vying with each other about what the new cartoon will be like, where I no longer propose my own initiative, but leave the right of choice to the children. The guys, with the need to see something very interesting in the world around them, offer more and more new problematic situations in which their heroes find themselves, and most importantly, options for solving these problems. And all this on a high emotional level and in a friendly atmosphere. We pass the finished products to the younger groups, where educators carry out their work on the cognitive, speech development and moral education of children.
This is what we did with the children:
Bibliography:
Timofeeva L. L. Project method in kindergarten. "Cartoon with your own hands." – SPb.: PUBLISHING HOUSE “CHILDHOOD-PRESS” LLC, 2011.
Belolutskaya F.K. Organization of children's project activities in kindergarten // Mosaic Synthesis. – M., 2009.
Author: Tatyana Valerievna Abramova, teacher-speech therapist of the highest qualification category, Municipal Budgetary Educational Institution No. 79, Tula.
Creating Animation
Once the script is approved, character development can begin.
Character development
Character development usually begins when the main objectives of the cartoon, the target group and stylistic preferences are already known. According to the script, the illustrator or so-called concept artist develops the image of each of the cartoon characters. Sometimes, in a separate stage, even before drawing the characters, a description of the character of each of the characters is developed - such a portrait of each of the heroes in text form. This is done so that the artist, when developing a visual image, already clearly understands the character of the character.
First, as a rule, the artist makes some rough sketches, simple sketches in pencil or on a tablet. At this stage, neither color nor clarity of drawing is important. The main thing is to first find a suitable image. 1-3 different versions of the character's image are created. If you don’t like anything, you can make additional options.
After approval of the sketch, the next stage is its finishing and final drawing in color and vector (if it is a flash cartoon).
This happens with each of the characters. When all the characters are developed and
approved, you can safely start storyboarding.
Storyboard
It should be noted that storyboarding is generally an optional step. A storyboard helps you understand, even before you start creating animation, what the cartoon will roughly look like. Therefore, if there are any special wishes or concerns in this regard, then a storyboard for a cartoon can be useful.
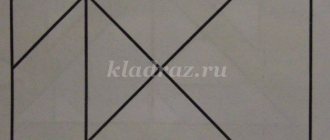
The essence of the storyboard is simple - it is the drawing of the main scenes of the cartoon in static form. From the storyboard you can understand how the scenes in the cartoon will look, their sequence, duration (if the storyboard has timecode), the location of the main objects on the background and also the location of the characters relative to the background.
example storyboard for a cartoon
The storyboard can be black and white in the form of a pencil sketch, or it can be colored in raster or vector. Detailing and drawing can also be different - it all depends on the complexity of the cartoon and the tasks.
Usually, a storyboard is enough to understand how everything will look in the cartoon. Once the storyboard is ready, most often, you can start creating animation. But in some cases (when you need 100% confidence that everything in the cartoon will be exactly as you would like), another intermediate stage is required - an animatic.
Animatic
An animatic is an animated storyboard. These are no longer static pictures, but also not a cartoon—something in between. An animatic is usually created strictly according to the storyboard and the time of the cartoon (if the cartoon is 30 seconds long, then the animatic is made exactly for 30 seconds so that you can understand the duration of each scene before it is replaced by the next one).
An example of creating an animatic
The most important moments can already be animated in animatics (fully or conditionally). Something can be shown schematically with arrows, some additional explanatory frames are inserted, something is labeled with text, etc. The animatic does not have to be clean. Its function is to make the material from the storyboard more understandable.
Making a cartoon
The animatic is ready and approved. Now you can start creating a cartoon. The animator already has everything necessary for this. In parallel with animation, a background artist can work on backgrounds. Also, for a full-fledged cartoon, animation scoring is usually required.
Scoring can be of varying levels of complexity and consist of the following components: narration or the work of actors, dubbing events in a cartoon, adding music, writing poetry, songs, original music, mixing all the material.
But let's get back to animation. Each animator has his own work scheme, which he likes best and to which he is accustomed. Most often, the animator first draws the main locations of the characters using the animatic. After this, the animation of intermediate frames between these locations and everything else begins.
Basic principles of animation
In classical animation (animation), a cartoon is created from a sequence of static pictures (frames). The frame rate can be different (most often, it is from 12 to 30 frames per second). That is, 12-30 frames are viewed per second, each of which is slightly different from the previous one. This creates the appearance of movement.
The more frames per second, the smoother the movement; the fewer, the more choppy. For flash cartoons on the Internet, 12-18 frames per second are most often used - this is due to the fact that making 24-30 frames per second takes 2 times longer than 12-15. For TV the standard is Pal 24-25 frames for NTSC 30 frames per second. But, of course, it is better to do the same 24-25 frames per second for the Internet - such animation looks smoother and more beautiful.
It must be said that cartoons for the Internet are usually flash cartoons. This animation program is aimed specifically at the Internet and has a number of features that make it easier to work on a cartoon and reduce the size of the final file.
The size of a cartoon file was very important a few years ago, when everyone was still using modems and widespread use of online video was out of the question—everything loaded too slowly. Back then the swf format was indispensable for cartoons. However, now the situation has changed a lot - the Internet has become fast and inexpensive, and cartoons are more often transferred to video format.
Video animation in Flash program
As for optimizing the work of an animator, Flash also offers interesting solutions. Classic frame-by-frame animation is very labor-intensive and, as a rule, it is completely unprofitable for the Internet. On Flash you can make animation both frame by frame and by relaying (using motion tweening), also, in the latest versions of the program the ability to create animation on the skeleton has been added, and, of course, the use of symbols (animation pieces can be looped and used many times where needed). All this significantly helps reduce time and make animation faster. Of course, animation by skeleton, repositioning or frame-by-frame will look different in each of these cases. The smartest thing to do is to combine these options to achieve the optimal result.
Post-production, compositing for cartoons
Post-production and compositing for cartoons is work that can be done after the cartoon is ready. This is an optional step (flash cartoons are usually made without it). However, this stage cannot be underestimated when it comes to using beautiful raster images in a cartoon, interesting colorful effects, or creating a cartoon for TV. Animation can be in mixed media. For example, there may be a video of people shot with chromakey (on a green background, which is subsequently removed during compositing). Let's say some people are dancing in this video. You can make animated backgrounds and put these dancing people there, that is, they will dance in such a cartoon country. Or, conversely, photos or videos can be used as a background, and animated characters can be superimposed on top.
You can, for example, film a restaurant, and then make an animated chef who walks around the restaurant and tells how everything works in it. With the help of compositing, you can achieve a beautiful organic combination of animation with backgrounds, make color correction, etc. All this allows you to make the cartoon as attractive and complete as possible.