We invite you to plunge into the world of jokes and laughter and feel the circus atmosphere by completing interesting crafts on the theme: “Cheerful Clown.” We will create this funny little man using the appliqué technique from various materials: fabric, candy wrappers and paper.
We have prepared lessons of varying complexity that are suitable for children of all ages. Each master class contains step-by-step instructions with a detailed description of the entire creative process, which will help novice craftsmen make original masterpieces with their own hands.
Clown made of candy wrappers
You need to prepare:
- candy wrappers;
- colored cardboard;
- White paper;
- scissors;
- pencil;
- markers;
- glue.
To create this application you will have to work a lot with scissors, so it may be difficult for a small child to complete the task on his own and he will need the help of adults.
We cut out the boots according to the template.
We cut off the corners of the candy wrapper. This will give you the pants and sleeves. Draw a face on a white sheet of paper and cut it out along the outline. Twist the wrapper so that you get a bow. Glue it onto the cardboard along with the rest of the made parts.
Draw and cut out a clown hat, eyes, nose, pompom and balls, as in the photo. We add them to the picture. Draw hair and a smile. Glue the remaining parts and our fun craft is complete.
If desired, change the composition by adding different circus elements (ball, stand, rings).
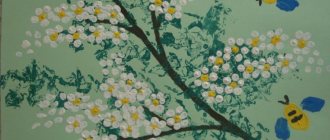
New Year's card "New Year's round dance". Templates. Master class with step-by-step photos.
DIY New Year's card. Master class with step-by-step photos
Greeting card "New Year's round dance". Master class with step-by-step photos.
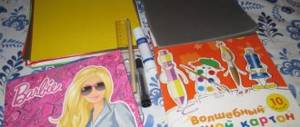
Author: Nechaeva Elena Nikolaevna, primary school teacher, KSU “Secondary school No. 21, Saryozek village” Osakarovsky district, Karaganda region Kazakhstan Description: Children, and adults too, have their most favorite and magical holiday - the New Year. I would like to suggest making a greeting card for this holiday. The card can be made with children 7-9 years old. Work for additional education teachers, educators, primary school teachers. Purpose: DIY greeting card. Goal: making a greeting card for the New Year. Objectives: - teach how to carefully perform appliqué; — develop artistic and creative abilities; — develop fine motor skills while performing the application; - cultivate aesthetic taste. Materials and tools necessary for making an applique: cardboard, colored paper, scissors, glue, pencil, templates, sample work.
New Year is a holiday that everyone loves and everyone looks forward to. The New Year crept up again, Imperceptibly, as always, the city was enveloped in magic, all the houses were shining!
The feeling of miracle is getting stronger, Day after day, Santa Claus on reindeer is coming to every home! He will put a gift under the tree and in your stocking, he will give you joy, the year will pass without worries. Everyone is preparing for the New Year. Children and parents decorate the Christmas tree, parents prepare gifts for children, and children can also make gifts with their own hands. New Year is a holiday of expectation - unusual, beautiful, new. Guys, today we will make a greeting card for the New Year “New Year’s Round Dance”. We will work with scissors, so let's remember safety precautions when working with scissors: - Use scissors with rounded ends. - Store scissors in a certain place, place them with the sharp ends closed away from you. — Pass the scissors rings first with blades closed. - You can’t cut on the go. — When working with scissors, it is necessary to monitor the movement and position of the blades during operation. — Do not use blunt scissors or loose hinges. — Do not hold the scissors with the blade facing up. You have templates on your tables with which we will cut out all the details of our work. And we will carefully begin to do the work.
Step-by-step work:
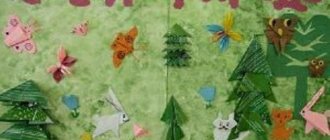
1. First, we will make a round dance of snowmen. You need to take a white A4 sheet (landscape) and fold it in half.
2. Attach the snowman template to the fold of the paper so that his hand is on the fold and trace it.
3. Next, bend the sheet at the level of the snowman’s hand.
4. Cut out a snowman.
5. Expand the snowman part, you have a round dance of snowmen.
6. Using the template, cut out 4 buckets and glue them onto the snowmen. (choose the color yourself)
7. We will glue black eyes to each snowman.
8. Glue on the red mouth.
9. Glue the carrot by cutting it out of orange paper.
10. Cut out the scarves according to the template and glue them onto the snowmen.
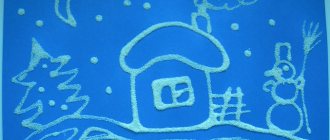
Now these snowmen need to be glued to the postcard. 11. Take the blue cardboard and fold it in half. Place the snowmen on the card so that the fold between the two snowmen matches the fold of the card.
12. Without moving the snowmen from their place, bend the outermost snowman, apply glue to it and, bending it, glue it to the card. Let's also glue the snowman on the other side.
We glue only the outermost snowmen.
13. Similar to cutting out snowmen, let's cut out clouds.
14. Glue the clouds onto the card in the same way as we glued the snowmen. 15. The result is such a voluminous postcard.
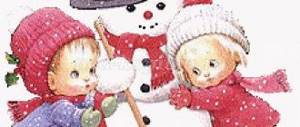
16. Now we need to decorate the card with the inscription “Happy New Year!” Let's cut it out, color it and glue it onto the card. Our greeting card is ready.
We can give a postcard for the New Year, or we can use it as an invitation card to the New Year's carnival.
We recommend watching:
DIY New Year's card. Master class New Year card using scrapbooking technique. Master class with photo New Year's three-dimensional card Christmas tree with do-it-yourself gifts. Step-by-step instructions with photos DIY mini cards for the New Year. Master class step by step with photos
Similar articles:
Beautiful DIY New Year cards
Original DIY New Year's card. Master Class
DIY New Year's card. Master Class
DIY New Year card for the Year of the Horse
Clown made of geometric shapes
For work we will need:
- colored paper;
- cardboard (for the base);
- a simple pencil;
- markers;
- stencil ruler;
- scissors and glue.
We prepare the necessary preparations:
- circles (multi-colored) – 6 pieces (for the face and balls);
- triangles – 5 pcs. (for pants, sleeves and cap);
- asterisk (for collar);
- ovals - two (for boots and hands).
Let's get to work.
We make the main details of the application. Use a special ruler with geometric shapes for this:
Place it on the base of the required color and outline the shapes with a pencil. Cut out the blanks with scissors. Cut one oval in half - these will be the shoes. From the second half we will need, we will also cut it into two - hands. Lay out the parts on cardboard and secure with glue. Draw the face - eyes, nose and mouth. The picture is ready.
Clown made of colored paper
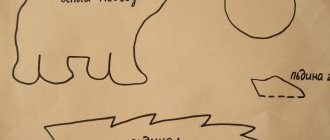
To create an application you will need the following templates:
You can draw them or print them on a printer.
Also prepare:
- paper of different colors;
- black marker;
- PVA glue;
- scissors.
Technique: make applique details from the colored base. Glue the hair to the head:
We put on the clown's hat (using glue). We glue the elements of the face (eyes, nose, eyebrows, cheeks, mouth). Draw ears, eyes and a smile with a marker:
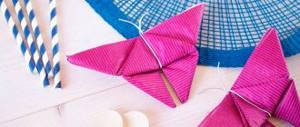
Fabric applique “Clown”
In this type of needlework there are many different techniques for performing crafts. In this MK we will consider the technology of making a clown applique from pieces of fabric. It will also not be difficult for children if adults help them understand the step-by-step description of the work. So, in the preparatory group, children were asked to work with an appliqué made of fabric, pieces of which will be glued to a sheet of cardboard. In addition, children's crafts will look bright and funny if the clown himself is painted. Interesting additions will be applique elements made of fabric, threads or other decorative elements. Another option for clown applique is to apply the contours of the design to a fabric base and secure the details using satin stitches. In this master class we offer several interesting ideas. Pictures can be printed on a printer and then cut out as a stencil.
- To complete the appliqué in these two ways, the preschooler first needs to copy the drawing onto a sheet of paper. Then all parts need to be numbered, starting from the bottom and in turn from bottom to top.
- Cut the pattern into its component parts and cut them out from the prepared piece of fabric.
- Determine the location of the drawing by laying out the blanks in front of you.
- Now glue the individual parts of the clown applique to a cardboard sheet or sew to fabric using a sewing machine. This will be the final stage of the craft.
Volumetric applique with a clown
We will need the following tools and materials:
- paper (velvety and corrugated);
- scissors;
- pencil and ruler;
- office glue.
First, cut out a circle from yellow colored paper - the head of a clown. Create eyes from white and black. To make hair blanks, cut colored corrugated paper into strips (length – 12–14 cm, width – 6–8 cm). Then screw them onto a pencil. Squeeze like an accordion. Roll the resulting tube into a donut and secure the edge with glue. Your hair should look like this.
We make the bow in a similar way, but we cut the strips wider and longer. Glue together two multi-colored curls in the shape of a figure eight. Cut out a small star from paper and decorate the butterfly with it. We assemble a face from these parts, gluing them with glue. And we get this result:
Decorate the clown as you wish. They make different types of hair, for example, from a washcloth, from threads and paper bows, from accordion-folded paper or from puzzles.
Fun clown
Necessary materials:
- colored napkins and paper;
- beautiful button;
- eyes from a creativity kit and glitter;
- paper for background;
- scissors;
- stapler;
- glue;
- threads;
- glitter pencils;
- red felt-tip pen;
- Double-sided tape.
Do all the basic details. For convenience, print out this template:
Glue all the parts of the costume step by step onto a separate white sheet. Cut out the clown outfit with scissors. Sew a button to the vest and stick a bow on top.
We glue double-sided tape to our hands, boots and hat. We secure the nose and eyes with tape. Draw a smile with a red felt-tip pen.
Making fluffy pompoms. To do this, fold the napkin in several layers (the thicker, the fluffier the workpiece will be). Then, using the template, draw a circle (2.5 - 3 cm). Cut it out and fasten the circles with a stapler:
Squeeze the top few layers inward. We do this with all the layers until we get a juggling ball.
Glue the details to the background of the picture and decorate with sparkles.
We can also offer to make charming clowns from scraps of fabric and thread. Look at the selection of photos and choose an interesting option for yourself:
345-games.ru
Everyone, young and old, rejoices at the last fine autumn days. The still warm sun and the riot of colors of the unfallen leaves give a good mood and a desire for creativity. Children of senior preschool and primary school age can be asked to make a symbolic applique from colored paper on the theme of autumn, on which there will be both the sun and multi-colored leaves.
For the autumn application you will need:
- a sheet of A-4 cardboard of blue or light blue color (according to the plan, all the details will be located on a sky background);
- colored paper;
- glue, scissors, pencil, ruler.
Make a circle with a diameter of 8 cm from red paper. Draw it using a compass or stencil, and then carefully cut it out. If your child is bad at cutting along the contour, help him, show him how to smoothly move the scissors along the paper. From yellow (orange) and green paper, cut out leaves approximately 7 cm long and 5 cm wide. The leaves should be the same in size. Don't give any hints, let your child figure out how to make similar parts. If he finds it difficult, offer to draw a stencil and then cut out leaf by leaf using it. The work will speed up if you fold colored paper in several layers and make all the leaves at once. In the latter case, the child will need certain dexterity and good use of scissors. It's better not to rush. Don’t forget that working with scissors has a beneficial effect on the development of fine motor skills and strengthens the hands. Eight leaves will be enough. Fold each leaf in half and make any cuts along the fold. Remember how you also cut out snowflakes in winter. The result should be openwork leaves, each with its own design. Glue a sun circle in the center of the cardboard. Arrange the leaves around them, alternating different colors. Explain that the leaves should be spaced evenly, like the rays of the sun. They should seem to be twirling in a round dance. Figurative comparisons decorate any activity, making it more understandable and interesting for the child. Arranging parts in the right place and in a certain order is an excellent exercise for developing spatial imagination and logical thinking. It is also appropriate to talk with children about such mathematical concepts as length, width, size. The finished picture will become another copy of the folder with applications and will remain as a keepsake. However, it can also be turned into a greeting card if you add an appropriate inscription, or into a bright decoration for a child’s room if you put it in a frame.