History of the fishery
The birthplace of Gorodets painting is the Volga region. Residents of the villages of Khlebaikha, Kurtsevo, Savino, Bukino and some other villages decorated spinning wheels with carvings, and then tinted the ornament in order to later sell the products at the Nizhny Novgorod fair. Over time, colorful patterns completely replaced carved decor, and bright designs began to be called Nizhny Novgorod painting.
The term “Gorodets pattern” appeared only in the 1930s, when the public became aware of the works of one of the most dedicated researchers of Russian folk crafts, V.M. Vasilenko. Gorodets is the main market for painted utensils. The craftsmen took this fact into account, and the patterns reflected the life, customs, and images associated with the town. Over time, the painting became an artistic representation of the culture and flavor of Gorodets and its environs.
Local craftsmen were skilled in wood carving. Forest expanses allowed craftsmen to use cheap and accessible material to create their masterpieces. The flourishing of the craft is associated with the activities of Peter the Great, who demanded that his warships be decorated with carvings and paintings. Over time, the ships were relocated closer to the newly conquered lands, and craftsmen began to look for other directions for applying their accumulated experience.
The heyday of the Gorodets craft began in 1870, when the icon painter Ogurechnikov came to one of the villages. His goal was to update the paintings of the local church. It was he who helped local craftsmen master new skills: “animating” with squirrels, using several balls of paint at once, and other techniques.
Gorodets painting: how to draw a horse?
- To do this you need to use black or brown paint. But for the horse to stand out, the background of the work must be light.
- The horse's body is drawn with a medium brush. First you can draw an outline for it, and then paint it. The limbs, tail and neck are drawn with a thinner brush. The animal's hooves are drawn separately.
- The horse's mane can be painted red.
- A beautiful ornament will decorate and complement the composition. You can make a picture frame for it. You can also draw a horse running towards the sun.
Colors of Gorodets painting
Egg paints were originally used for painting. They were replaced by oil, tempera and gouache compositions. The coloring composition was applied to the canvas in large spots, without first forming clear contours.
Initially, craftsmen worked on primed surfaces. Later, after the Second World War, untreated wood was chosen as the basis. This allowed the drawings to be made lighter, giving them transparency.
- Paintings. For patterns in the form of berries and flowers, the following colors are used: ocher, pink (a mixture of red and white tones), pure red, burgundy (red and black), blue (blue and white), blue. Pure green color is used to decorate the leaves. Small leaves and curls were sometimes decorated with brown paint.
- Tenevka. The main shade colors are black, brown and blue. By using a deep black tone, against which the key elements of the ornament were drawn, it was possible to obtain a bright and rather contrasting pattern. If a brown tone was used for the shade, the painting turned out lighter and more delicate.
- Live-out. White color was used for bait. The yellow tint was used less often. It was needed only if the leaves were given voluminous accents.
Basic colors by numbers
Primary colors that are traditionally used for Gorodets ornaments:
- Ocher (#CC7722);
- Pink (#FFC0CB);
- Red(#FF0000);
- Blue(#00BFFF);
- Blue (#964B00);
- White (#FFFFFF);
- Green(#00FF00);
- Black(#000000);
- Yellow (#FFFF00).
Gorodets painting patterns for the older group
In the middle and senior groups in kindergarten, there is no need to choose too complex elements of painting, because if the child cannot cope with it, then he will be bored. You can opt for a simple ornament and draw a beautiful flower.
Drawing method:
- The work will use white, red, brown and green paints. Children should draw either on wooden boards or on shallow wooden plates.
- Use a pencil to mark the center of the composition and its size.
- Then you can start drawing the flower. A small red circle is drawn in the center. Red paint is then mixed with white to create pink. Another circle is drawn in pink, larger than the first. After that, the circle is red again and pink again. Thus, the flower has a multi-colored middle.
- The petals are made with green and brown paints. It’s better to alternate them, so the work will be more beautiful.
- You can combine green paint with white to get a lighter greenish color. They can be used to draw the petals from the inside. This drawing is done with a thin brush.
In the middle and senior groups in kindergarten there is no need to choose too complex elements of painting
The work is completed by varnishing the surface.
Elements and motifs of Gorodets painting
There are three basic types of compositions. This is a “pure” floral painting, a composition with the inclusion of a “horse” motif, and a complex plot painting.
Floral patterns are the easiest to make. There are several elements of the ornament:
- “Bouquet” is a symmetrical image. These are small compositions consisting of 1 – 3 flowers. Decorate boxes, caskets, cups, salt shakers, cups, bowls;
- “Garland” is a type of “bouquet” when one large flower is located in the center, and a composition with smaller flowers is built around it;
- “Rhombus” is a variation of the “garland”. Several large flowers form the center, and leaves and buds diminish at the top of the diamond. The ornament often decorates large chests, large cutting boards, cabinet doors and bread bins;
- “Flower stripe” is a complex composition consisting of upper and lower tiers. The ornament can be formed from a strip of flowers of the same size or from floral elements of different colors, shapes and types;
- “Wreath” is a variation of the “flower stripe”, but only of a closed type. Usually decorates the surfaces of dishes, trays, boxes, wine barrels.
Motifs “horse” and “bird”
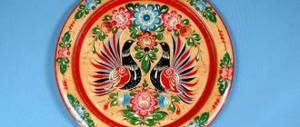
There are symmetrical and asymmetrical compositions. Birds and horses are most often placed in the center of a flowering tree or framed by a wreath. There are sets of products, each of which contains several motifs at once. For example, a chicken and a rooster or two horses of different colors.
Similar patterns look more impressive on black and red canvases. Base color: ocher, gold, orange, yellow. The paired image of birds represents family harmony and well-being. Horses symbolize success and prosperity.
Subject painting
Thematic drawings are placed on large items: chests, dishes, tabletops. Masters traditionally depicted scenes of tea parties and celebrations, weddings against the backdrop of a rich table, tables with cups, flowers and samovars. People's faces turned towards the audience, which often gave a certain implausibility to overly complex compositions.
A favorite theme of the drawings is the exteriors of houses with carved shutters, bright trims, and chimneys. The picture was complemented by wells, wicker fences with flowers or jugs and sitting roosters. In addition, the canvas could be “enriched” with images of other animals - dogs, cats, hens and chicks.
Cutting board decoration
Gorodets painting on a cutting board has become the most popular lately. This essential item for any housewife can become a real work of art in the hands of a good craftsman. By gradually following the instructions from the work diagram, novice craftsmen can create their first creation :
- Draw a sketch of a pattern to decorate the board or print the finished composition.
- Cut out templates of basic shapes using the appliqué principle.
- Prepare a board for painting. To do this, it is sanded with sandpaper.
- If the design provides for a colored background, then prime the sanded board with this color.
- Trace the templates and cut out parts with a pencil.
- The basic forms are painted over.
- After drying, they move on to the shade. At this stage, the coloring of the board takes on more specific forms.
- The final stage of painting is revival. Light colors give the product an elegant, festive look.
- Spray the varnish with a spray bottle, evenly covering the surface of the image and the entire board.
After the varnish has dried, the Gorodets painting template on the cutting board will take on a fabulous look. Thus, by applying the acquired knowledge and using the acquired skills, many from beginners turn into seasoned masters of painting.
Technique of Gorodets painting
The painting is done directly on a wooden base, which is initially primed with yellow, red and black colors. Each primary color is “whitened,” thus doubling the number of colors in the palette.
On the surface, thin lines with a pencil outline the main lines of the painting. Particular attention is paid to the “nodes” of the drawing, that is, the largest and most important elements. Medium and small details act as connectors for large patterns and can be performed during improvisation.
At the painting nodes, a wide brush forms the base of the flower. Typically, this is an irregular round or oval shaped spot. A darker color is applied over the light spots. The entire painting consists of simple elements: staples, arcs, spirals, strokes, drops and the underpainting itself.
The final stage is applying contrasting (black or white) strokes and dots on top of the finished drawing. This stage is carried out using a very thin brush. As soon as the canvas dries, the painting is “fixed” with a thick layer of varnish.
Painting the board with Gorodets painting with children
Particularly interesting for children in kindergarten will be the step-by-step drawing of Gorodets painting on a wooden board as a gift to their parents. You can ask the students in advance to bring materials for work from home. And the lesson itself should be structured as follows:
- We tell you a little about the history of Gorodets painting.
- We determine the center of each board and put a dot there with a pencil.
- Draw a circle with the selected color.
- When it dries, we apply petals on top (choose one flower option for everyone).
- After waiting a little, take a thin brush and apply the veins with white color.
- We allow you to add curls to the remaining space.
- We paint the outline of the board with a solid stripe of the same color as the flower.
This activity will bring a lot of impressions to the children, and the memory will last a lifetime. Recommend varnishing the board at home with your parents so that the paint does not crumble over time.
“Gorodets painting” Summary of educational activities for familiarization with folk crafts in the senior group.
Summary of a lesson on familiarization with folk crafts in the senior group
Topic: "Acquaintance with Gorodets painting"
Goal: To introduce children to Gorodets painting;
To form children’s idea that works of decorative and applied art are created on the basis of established traditions passed on from generation to generation;
Introduce the characteristic features of Gorodets painting (elements, composition, color combinations)
Material:
— Gorodets products and their images;
— stylized images of elements of Gorodets patterns:
buds, flowers of 2-3 types (blooms, roses, leaves, for working with a magnetic board;
Progress of the lesson.
There are a lot of forests in Russia and therefore beautiful things are made from wood in different places.
Today we will get acquainted with interesting wooden objects that are made in the city of Gorodets. There, painting traditions are also passed down from generation to generation, so when you get acquainted with them, you will not confuse it with any other. (Shows Khokhloma products).
What do they make from wood in Gorodets?
And they do various things there that are needed on the farm. These are kitchen boards (shows) one side of which is decorated with a floral pattern, and on the other you can cut vegetables and other products. If you hang such an elegant board on the wall in the kitchen, it will greatly decorate the interior. And here are some other beautiful things for the kitchen: salt shakers, spice boxes, etc.
But Gorodets craftsmen make various items not only for the kitchen.
They paint boxes for different things: buttons, threads, jewelry
(shows).
Masters don’t forget about children either. For you they make rocking chairs in the form of horses, cockerels, children's furniture, etc., and decorate them with a pattern of flowers and leaves. (The teacher puts 3-4 objects in front of the children and draws their attention to the characteristic features of Gorodets painting).
teacher: Look at the patterns with which these things are decorated.
Who noticed the same elements in them? Show.
(Confirms that all patterns have buds. Points to the patterns and attaches the same element to the magnetic board, clearly pronouncing each name: rose, kupavka, chamomile, leaves).
V.: These flowers are called rosean, kupavka, they were invented by artists and only slightly resemble real flowers. Such flowers are called decorative, and most often they are called fabulous. Now let's see what patterns Gorodets artists make from these elements. Notice how the craftsmen combine them into dense flower garlands. In the middle of each garland there is a large flower, and to the left and right of it there are smaller flowers and leaves; small buds are most often painted on the edges of the garland. Thus, from the middle to the edges the garland gradually decreases. Such garlands are called symmetrical because their left and right sides are the same.
Children, let's put this garland on the magnetic board. This is the middle of the garland, this is where the largest flower will be, for example this flower. (Applies a flower to the magnetic board) -And who wants to attach two other, smaller flowers to the left and right of the large flower (One of the children places two identical flowers on the sides, smaller in size, daisies. The next child continues the image on the magnetic board, substituting there are two small buds on both sides).
— What elements are missing in the garland. (Leaves) (Another child places leaves between the flowers, decreasing in size towards the ends of the garland).
-The result is a dense flower garland, the same symmetrical one that Gorodets craftsmen paint on their products. (Next, the teacher determines the color combination of the pattern elements).
He gives each child a flower and asks what color they are (pink or blue). Draws children's attention to the fact that each element combines two similar colors. Most often it is pink with red, blue with blue. And Gorodets flowers are made elegant by white and black animations: dots, arches, strokes. In conclusion, the teacher says that now children will be able to distinguish Gorodets painting from other wood paintings, because in their work Gorodets masters follow the traditions that were passed down to them from their grandfathers and great-grandfathers. At the end of the lesson, the “Answer Correctly” game is played. The teacher asks a question on the topic “Gorodets painting.” Children who answer correctly are given a chip in the form of a Gorodets element. The winner is the one who collects the most chips and can build a Gorodets garland.
1. What type of painting did we get acquainted with today?
2. Who remembered the names of Gorodets flowers? 3. How are the flowers arranged in the garland? 4. How many similar color combinations are used in one element?
5. What products are painted by Gorodets craftsmen? etc.
kopilkaurokov.ru
Technique for applying pictures
Gorodets painting is an image on an uncoated base using a simple technique. Sometimes the base is primed with yellow, red or black cinnabar. All colors must be bright shades. The artist outlines the pattern, dimensions, and main elements with a pencil. And experienced masters immediately paint without a sketch. The main parts of the composition are highlighted in light tones - the underpainting (color spots, circles, outlines of leaves), thick strokes (shading) are placed on them, drawing details (petals, clothing lines). Buds and leaves are drawn between the large details. The completion is the application of liven (white) or liven (black) paint - dots and strokes are made. After drying, the finished item is coated with colorless varnish.
SECTION II. MAIN ELEMENTS OF GORODETS PAINTING
SECTION II. MAIN ELEMENTS OF GORODETS PAINTING
CHAPTER I. LEAVES IN GORODETS PAINTING
Leaves and bushes
In Gorodets painting, the simplest motifs are leaves of a wide variety of types and shapes. In combination with others they form bushes. This motif is repeated in Gorodets ornamental and plot compositions in bouquets and garlands, floral friezes and flowerpots.
Each master not only writes in his own way the forms that we see, but also composes his own. Artists often chose the combination of a brownish-red background with light green leaves, characteristic of Gorodets painting. Against such a background, whitewash and black strokes stand out clearly.
Here we show how this simple motif can be used: it is a single leaf, a combination of three patterned leaves, and bushes consisting of five, seven or more elements. At first glance, it seems that the motifs are completely different, however, if you look closely, you can distinguish two main types of leaves: pointed and teardrop-shaped, rounded at the top. It is on their basis that the diverse forms of bushes are built.
teardrop-shaped leaves
Dip the brush into paint, such as gouache or tempera, diluted to the consistency of liquid sour cream, straighten the brush on the edge of the cup, removing excess paint, and give it a pointed shape. Then, holding the brush strictly vertically between the last phalanges of the middle, index and thumb, touch its sharp tip to the paper and make a short, smooth but energetic movement with pressure in the direction towards you. The result should be a straight drop-shaped leaf stroke. To consolidate the technique, you need to repeat it several times, moving the brush towards yourself and away from you in order to freely write leaves facing up and down.
Then you should try another technique for making a leaf. You should try to move the brush towards yourself and away from you with a slight turn to the right and left in order to get the image of a slightly curved teardrop-shaped leaf. An experienced Gorodets master works quickly and deftly, but a beginner should not rush. Gorodets painting does not tolerate poorly written strokes. The brushstroke is an independent and very significant element of painting; it must be clearly and carefully worked out.
There is another method for writing a similar sheet, which is shown in the table. First movement: use a brush with a sharp tip to make a bracket stroke, then write an opposite bracket and fill the gap between them with paint - you will get a larger sheet rounded at the top. This technique also requires multiple repetitions in order to freely perform such a seemingly simple but important element.
Having mastered the techniques of writing individual leaves, you should try to make a bush out of them. The difficulty here is to correctly calculate (one might say, feel) the required distance between the leaves, to make sure that each of them is read separately, and together they form a single decorative form.
By changing the shape and size of the leaves: making them almost equal in size or uniting them around one larger leaf, drawing them wider or narrower, straight or slightly curved, you can achieve a significant variety of shapes.
Bicolor leaves
New expressive details of floral patterns constantly appear in the works of modern Gorodets masters. One of these relatively new elements was a two-color leaf and bush.
They should be written in two shades of green. First, half of the pointed sheet is painted with a dark green color, for example, chromium oxide, then the second half is painted with a lighter green (chromium oxide with the addition of white). You can paint such a bush with one brush, but it is much more convenient to use two brushes alternately, since the shades of color will alternate repeatedly.
Gorodets masters know how to diversify simple plant forms by using revivals. They decorate Gorodets herbs and leaves with lead white and black soot paint, giving completeness and unique grace to each form.
You can outline each of the sheets with a thin white line, you can lay small “pearls” in the center of the sheet, you can use white to mark the thin veins of the sheet. The combination of white and black animations looks great against the bright backgrounds of Gorodets products. Together they give diversity to plant forms. But the Gorodetsky master will not finish the work here, but with the help of graphic strokes he will “destroy” the picturesque spot. Both the graceful teeth along the edge of the leaf and the depiction of the veins combine the master’s two desires: to be closer to nature, but also not to lose the Gorodets convention in conveying the natural form.
Pointed leaves
Writing a pointed sheet requires a somewhat deeper mastery of the Gorodets style of writing.
Just as in the case of a rounded sheet, the construction of a new form begins with making a bracket, which is half a sheet.
Use a damp pointed brush to pick up some green paint, such as chromium oxide, and start by lightly touching the tip of the brush to the surface of the paper or wood. First, the brush writes a thin line, then pressure is applied with a slight rotation of the brush - a wide part of the bracket appears, then the stroke becomes thinner again, fading to nothing. Half the sheet is ready. Its second half - the counter bracket - is slightly smaller than the first. They write it, trying not to change the pointed silhouette of the sheet.
Pointed leaves are no less common in Gorodets art than rounded ones. Each of the Gorodets masters has their own variations of this form. They differ from each other in size and proportions, and types of bait. Here you can find decorations not only with white paint, but also with yellow paint combined with black strokes. Working on the shape of a pointed leaf, we will continue to learn how to compose a Gorodets bush, gradually gaining a sense of scale, the exact relationship of individual elements to create a beautiful silhouette of a bush.
It is important to think in advance what decorative techniques will be used at the revival stage. Thus, a confident and beautiful whitewash contour stroke can correct an unsuccessfully made leaf shape and give it greater lightness. If the bush is supposed to be decorated with a fringe of thin black “cilia” (there is such a technique), then you need to try to place the side leaves at a sufficient distance from the central leaf so that the bush as a whole and the silhouette of each detail are clearly visible.
CHAPTER II. FLOWERS IN GORODETSKAYA PAINTING –
SYMBOL OF HEALTH
It is impossible to imagine all the richness of flowers invented by Gorodets craftsmen over 150 years of work in the craft. Only the most basic, common and beloved by Gorod residents are shown here. These are primarily roses.
In the 1930s, working with the famous masters of Zhostovo trays, the famous Russian artist P.P. Konchalovsky argued that painting a rose is as difficult as painting a portrait of a person. But painting this royal flower is not only difficult for masters of folk art, but also joyful, otherwise Zhostovo residents and painters of wooden products, embroiderers and even blacksmiths would not turn to it so often.
City residents never tried to make their flowers look like natural ones; the conventionality of decorative techniques is not only not hidden, but even emphasized. A fantastic image of a flower is always created and this is done skillfully, with extraordinary imagination and inspiration.
Among the six types of roses presented in the figure, there are no two identical in shape, color, or the finest bleaching details.
The author of the painting acts here as a subtle colorist: roses are not just red, blue or pink - their subtle color shades are difficult to describe in words. The shapes of roses are no less varied: the cut of the middle of the flower, the number and pattern of the petals vary. Some of them are round, others are smoothly curved, and others are pointed. Each Gorodets flower has its own unique character.
And the rose, and the kupavka, and the chamomile, at first glance at them, seem very intricate and difficult to execute. At first it is difficult to understand how to start working on each flower shape. But it should be remembered that even the most complex forms in folk painting are made up of a number of simple elements.
There are several basic principles underlying the creation of most Gorodets flowers. Some of them are based on the so-called bull's-eye - a fairly large circle, made with a medium-sized brush. Based on its development, additional paints and graphic cuts can be used to create a fairly large number of different colors. This is exactly how Gorodets roses, kupavkas and daisies are formed.
Other flowers - let's call them field geraniums - have a small round center-berry and light petals of different designs, the translucency of which is emphasized by the finest white shading. For the final finishing of flower forms, along with white, black is often used, which is very popular in Gorodets painting.
There is another artistic principle of writing Gorodets flowers - these are the so-called texture flowers. The fact is that traditional Gorodets works were painted, as a rule, on colored backgrounds, but starting from the 1950s, the assortment of the craft began to be dominated by works whose background was natural, unpainted wood. In this regard, the masters had to solve quite a lot of new artistic problems. Experienced Gorodets artists found original decorative solutions for compositions, not only adapting the Gorodets color palette to painting by texture, but also creating new, original techniques for painting colors. Fragments of unpainted wood were incorporated into the flower structure itself.
Gorodets rose
The rose is the most important Gorodets flower. Both an experienced and just beginning artist strives to write it. Often it is by the manner of writing a rose that we recognize the hand of I. Mazin and F. Krasnoyarov, I. Lebedev and A. Konovalov. And the artist V. Smirnov was so partial to these flowers that sometimes they became larger than his riders and their horses, lining the sky above their heads. The roses of Lilia Bespalova and Faina Kasatova, Valentina Chertkova and Praskovya Sorina are good. Over the years of her creative work, Alexandra Sokolova has become a master of amazing roses.
Of the many variants of the Gorodets rose or, as it is also called, the spruce rose, two main ones were chosen: a rose painted on a colored background, and a rose painted on unpainted wood - based on texture. The shape of the flower and its cutting fundamentally depend on the background on which the composition is made.
Option I. Rose with bent petals on the background
First, write a colored circle-apple by turning a vertically placed brush. Next they write the petals: the bottom one - a bow and the side ones - like the pointed leaf we already know.
In the upper part of the central large circle, write a small speckled circle and draw a speckled sickle from it with slight pressure. This ends the shading.
The simplest way to grow a rose is as follows:
— in the center of the speckled circle, place a bleaching point;
- a whitening sickle is passed around the spotted circle with light pressure;
- in the center of the speckled crescent, a rounded petal is written in white, which is cut inside with thin longitudinal white strokes;
- on the sides of the whitening petal two curved whitening stamens are written. If it is more convenient for a novice master to make the stamens by moving towards themselves, then they should turn the drawing and write them, starting with a thin line, which will gradually bend and thicken towards the end.
The bottom row of the table shows three different options for the design of the middle part of the rose, written on a colored background:
Option P. Rose painted on texture
Perform a red circle-apple. Red petal brackets are attached to the circle with pressure. Each bracket must be done so that the background inside is visible. Inside each petal bracket, very thin shading is done in red, which does not cover the background.
The texture of the center of a rose is developed in the same way as the center of a rose on a colored background: a speckled circle and a crescent are written, then a pattern in white, consisting of stamens, small brackets and “pearls”.
A skillfully crafted rose is extraordinarily beautiful and original in texture, light and airy, but never breaks away from the plane of the object being decorated.
Gorodets Kupavka
It is difficult to say which flower served as the prototype for the kupavka, but over the long history of painting it has become one of the favorite flowers of the Gorodets masters. It’s easy to see this by looking at antique bottoms, urine shakers, salt shakers and baskets. A novice master should get acquainted with several options for performing bathing.
Option I
By turning a vertically placed brush, make an apple circle. At the top edge of the apple, in the middle, write a speckled circle. On the sides of the speckled circle, along the circumference of the apple and slightly protruding beyond its edges, a series of speckled brackets are made with pressure, turning the apple into a flower. The bleaching is carried out as follows: a bleaching point is placed in the middle of the spotted circle, a bleaching circle is outlined with a thin bleaching line, and bleaching strokes are drawn from the bleaching line to the spotted brackets, diverging from the center to the edges.
Option II
Perform an apple circle. At the top of the apple, at the edge, write a speckled circle. In the middle of the apple, write a speckled sickle without pressing. Along the edge of the apple, dotted brackets are made with pressure. Bleaching: the speckled circle in the center is filled with a thin bleach spiral, thin bleach petals are written from the center to the edges.
Gorodets chamomile
Chamomile is a very common flower in Gorodets painting. It is not difficult to understand that we are talking about some kind of fantastic flower - multi-petaled and sometimes very unexpected in color: blue and purple, red and orange daisies are not uncommon. The techniques for writing it are as follows: With orange paint, using a medium-sized brush, make a circle approximately 2 cm in diameter. After the paint has completely dried, outline the orange circle with red paint. The width of the stroke is approximately 1 cm. In the center of the orange circle, a small (0.5 cm in diameter) speckled circle is made. The next stage of work - bleaching - is carried out in several successive stages:
- they place a bleaching dot in the center of the speckled circle, and the circle itself is decorated with bleaching “pearls” around its circumference;
- the orange circle is enlivened with small bleaching brackets with pressure: in the center of the red circle a light multi-petal flower is obtained;
- on the outer red edge of the flower, sequentially larger bleaching brackets are made than in the center with pressure;
- the final stage of priming is applying light bleaching strokes with the tip of a thin brush between the brackets of the outer row.
The result is a light openwork flower that can decorate the central part of any garland or bouquet.
Using the techniques already mastered, you can write another version of the chamomile. First, write a circle 1.5-2 cm in diameter in the main color (for example, red). After the red circle has completely dried, in its middle, using the same technique of turning the brush, make a small speckled circle marking the middle of the daisy.
After the first layer of paint has dried, they begin to apply narrow elongated petals, using the technique of writing teardrop-shaped leaves, that is, touching the middle of the chamomile with the tip of the brush, draw the first petal with a gentle movement with self-pressure, then at a short distance from it —
second, then third, fourth - until it is comfortable for your hand to write petals in this position. Then you can turn the drawing or product and continue writing, trying to ensure that the petals are expressive in shape and of the same length. You should learn to calculate the distance between the petals. Beginning artists sometimes paint four petals first, arranging them crosswise, and then several petals between them. This technique makes it possible to achieve a uniform arrangement of the petals, but here you can still see some mechanicalness in the execution, which is not typical of Gorodets painting. It is more likely to allow some unevenness of the petals than their “geometric” arrangement.
Having painted the petals, you should again let the paint dry well and only then start painting. One of the bait options is bleach “pearls” around the speckled center of the chamomile. The second option could be to make a thin bleaching spiral in the middle of the chamomile. This is a very common technique, you should try to master it. The movement of the brush begins exactly in the center of the middle of the daisy. Having placed the whitening point, they begin to move the brush smoothly, without pressure, outlining concentric circles. To perform this technique correctly, you should repeat it several times, achieving a confident and smooth graphic stroke.
Gorodets animals
In Gorodets painting, in comparison with the countless variety of birds, there are not very many images of animals: these are horses, cats, dogs, and less often, fantastic lions. But each of these images is attractive in its own way and has its own special story. The horse, one might say, became the most beloved character of Gorodets art back in the old days. These were the horses of officers and Cossacks, horses in the arena and horses harnessed to carriages and tarantasses. The tradition of painting a horse goes back to the first works of the legendary Melnikov brothers. Gradually, the image of the horse became more and more fabulous, and this is how it has survived to this day. It’s not easy to paint a real Gorodets horse, but it’s even harder to depict a team of two or three. Gorodets masters do this truly masterfully. No less traditional characters of Gorodets painting are cats. One can recall those monumental “cats with whiskers” that I.A. loved to paint so much. Mazin. However, over time these images have changed. Now they write cats in more detail, in more detail.
Small dogs with sharp ears and dashingly curved tails also moved from the everyday life of Gorodets into painting. Once upon a time, back in the era of carved Donets, they certainly ran after carriages or, standing on their hind legs, barked at birds in hunting scenes. And today artists are happy to paint them in genre compositions and fairy-tale plots.
If horses, cats and dogs are associated with everyday life, then lions, which never lived in the Volga region, were undoubtedly borrowed by painting masters from the art of wood carvers. Being one of the most common characters in house carvings throughout the 19th century, lions did not remain a thing of the distant past only thanks to the masters of painting. Today, lions are the indispensable heroes of many fairy-tale compositions, amazing characters - the embodiment of the kindness of Russian folk art, in which even a ferocious beast from overseas does not evoke any other feelings other than surprise and sympathy.
The Gorodets lions are also interesting from the point of view of how the master of painting interprets his primary source with a brush - the image of a lion using the technique of the famous “ship carving” of the Volga region.
Gorodets lady
The work begins with an image of a circle approximately 1.5-2 cm in diameter. Traditionally, the future face of a lady is painted with white paint; the tone of “carnation”—flesh—is much less commonly used. This is more likely due to the fact that the white stands out better against the bright Gorodets backgrounds.
Having written a bleach circle for the “face” and dried it well, they begin to depict the hairstyle, that is, they write, as it were, petals around the middle of a flower, only they do it in black or dark brown.
Next, the Gorodetsky master attaches a neck to the head, knowing in advance what kind of dress and with what neckline he will put on his lady. In our case, the neckline of the dress is triangular, so the neck and neckline of the dress are also covered with whitewash. With this simple technique, the master outlines the axis of the figure, without allowing himself to get lost in proportions.
Painting the shoulders and arms of a female figure requires just two strokes with a wide brush. One stroke indicates the left shoulder and the left arm bent at the elbow, the other - the right shoulder and the outstretched right arm, slightly removed from the body.
Completing the painting of the upper part of the female figure, the master paints the thin waist, applying each of the wide, smooth strokes accurately and in place. The drawing of the figure is completed by writing the hands in white. At this stage, the lady’s face is usually designed. To do this, use the thinnest brush with black paint. According to tradition, the face is written very schematically: thin high eyebrows, round eyes, a nose outlined in one or two strokes, a small mouth, which acquires a kind smiling expression if a bright red dot is placed in the middle of a straight horizontal line - “bow lips”. Sometimes the cheeks are slightly enlivened with a pink color - blush. Each artist has his own techniques for painting faces, but in general the Gorodets style of painting does not imply psychological expressiveness; here the convincingness of the figure, its positioning, gesture, turn of the head, proportions, and color of clothing are much more important. Style unity is very important: how the figurine looks in the surrounding environment - the interior of the Gorodets house, in a flowering garden, on a city street.
An integral part of the costume of the Gorodets dandy has always been a fluffy patterned skirt.
Special mention should be made of the design of the lower edge of the skirt. The Gorodets master will never write it completely straight; he will make a slightly curved “living” line, which is drawn, as a rule, in black, contrasting with the color of the suit. If several female figures stand nearby, then this single black stroke emphasizes all the women’s skirts, from under which pointed shoes are visible. This is one of the characteristic Gorodets techniques, completing the lady’s costume; it can be seen on many Gorodets Donets.
Shoes come in different designs, barely noticeable or completely visible, with high heels. They certainly visually slim the figure. The result is an effect similar to how the character of a bird is changed by its thin, graceful legs.
An important stage of working on a female figure is shading, as well as bleaching her dress. In Gorodets, countless styles of dresses and their trims were invented. It seems that they can be used to study women's fashion of the second half of the 19th century. To decorate dresses, various techniques are used - lines, pokes, shading, working with bleach and colored sponges, etc.
Gorodets Cavalier
The figures of Gorodets cavaliers on ancient bottoms, mochesniks, caskets, and later on the folds of screens are very diverse. They differ in proportions, clothing, poses and gestures, but at the same time retain the traditional features of the Gorodets style: they have dignity, importance, gentle humor, and lyricism. They are based on real, but poeticized by local tradition, images of Gorodets artisans, clerks, as well as brilliant military men, rich merchants, and handsome young recruits who visited Gorodets and Nizhny Novgorod. The accuracy in conveying human types and their manners is especially striking when comparing surviving photographs of city residents at the turn of the 19th and 20th centuries with the characters in the painting. At the same time, here, as when writing young ladies, the master does not strive for a deep disclosure of characters, for the psychological expressiveness of images. The only exception is the very early Donets of the Melnikovs, where in the multi-figure scenes of “guests” there is a noticeable desire to reveal, with the help of facial expressions and gestures, the mood of the participants in the scenes: some faces express respect, others - unfriendliness or wariness.
But more often the artist is interested in people as part of a multicolored picture of the surrounding world, as a participant in some joyful or especially significant family or city event. If we break down the process of painting the figure of a gentleman into separate stages, then here too we will discover a connection between this motif and more developed floral painting.
Just as when painting a female figure, the work begins with the image of a whitewash circle on a colored background - the gentleman’s face. The white is taken quite thick, so that there is no need to cover the background color with several layers of white.
The face is framed with lush curls (most often black), like the center of a flower with petals. At the same time, the nature of men's and women's hairstyles is not very distinguishable at first. Subsequently, the master will decorate the woman’s hairstyle with curls, a bun, weave strings of pearls into the lady’s hair, and decorate the gentleman’s head with a hat, cap, cocked hat or shako. Having painted the gentleman's head, the master begins to build the upper part of his figure from the neck and shoulders: in bright color he paints a neckerchief or a high collar of a blouse and that part of the shirt that is visible in the neckline of a vest or jacket.
Several broad brush strokes indicate shoulders, straighter and wider than those of the lady. The length of the shoulder is approximately equal to the diameter of the face, but this rule is not always followed. The master certainly makes his own author’s adjustments to the construction of each figure.
The next stage is the designation of the upper part of the gentleman’s figure, who can be dressed in a jacket, a longer frock coat, or a long, almost knee-length, colored shirt untucked and a short vest over it. The vests came in both black and colored. As we see in the table, the upper part of the cavalier’s figure at first is almost a rectangle, on the sides of which the elbows of bent arms are indicated. After painting the upper part of the figure, the master begins to depict the lower part. Usually the gentleman is dressed in trousers of a different color than the frock coat. The combination of black with blue or brown is typical. As a rule, this Gorodets character stands leaning on one leg and slightly bending the other. One hand is placed behind the side of the coat with a confident gesture, the other is lowered and slightly bent at the elbow.
The figurine of a gentleman clearly shows some of the features of the Gorodetsky master’s perception of a person’s position in space. The head and shoulders are written frontally, full face, and the legs are often turned in profile - this position of the figure corresponds to the Gorodets tradition. Sometimes both legs of the gentleman are depicted in profile, and sometimes one is depicted in profile, the other is straight, frontal. A responsible operation is the dressing of the cavalier figurine with whitewash. It is done with a thin brush, very carefully and accurately and, as always, after the previous layers of painting have completely dried.
Shading is used here quite rarely; there is simply no need for it. But the preparation is done extremely painstakingly. First, all the details of the jacket or frock coat are drawn - the collar, lapels, rows of buttons, loops and the lower edges of the jacket. The outlines of the sleeves with folds at the elbow and cuffs of the sleeves are carefully prescribed. Usually a shirt trimmed with folds, small buttons, and embroidery is also depicted as elegant. People in Gorodets also love colored patterned vests. In order for the figurine not to fall out of the general decorative structure of the painting, the old Gorodets masters created a technique for making such a decoratively unattractive detail of a man’s suit as trousers. They began to liven them up with a striped or checkered pattern, which, by the way, corresponded to the fashion of that time.
The gentleman's face is painted quite schematically, using the same techniques as the faces of the ladies. Depending on the content of the plot composition and the nature of its characters, the artist carefully depicts either a dandy mustache or a respectable mustache and beard.
Gorodets horseman
The horseman, or sedachok, is a frequently encountered character in Gorodets painting; his image has many variations. Our task is to show the fundamentally important techniques for depicting this hero of Gorodets painting. We will seat our rider on a horse that has already been painted according to all the rules of this type of painting.
The size of the white circle, indicating the rider's head, must be determined by calculating the ratio of the figures of the rider and the horse. Since this does not seem to be a very simple task, we can advise a novice artist, in a departure from the Gorodets tradition, to make a preparatory drawing: having painted a horse, it is very easy to outline the figure of a horse with a thin pencil, and then, adhering to this sketch, begin to paint it with paints. Some bright color that does not match the color of the saddle is used to indicate the figure of a sedachka in a caftan. If the saddle is red, he may be wearing blue clothing, as shown in the table.
First, the high collar of the caftan is painted, then the shoulders and arms extended forward are indicated with two broad strokes. Next, the lower part of the caftan is added - the result is the upper part of the figure. Then write a half-bent leg in a position characteristic of horse riding. Wide colored trousers and pointed boots with heels make the figure of the rider very elegant.
Further, it depends on the specific design of the composition and on the desire of the author what his rider will be like: hair, hat, how the caftan will be painted, what he will hold in his hand - a raised saber or a bouquet of flowers. By outlining all the shapes of the figurine with a thin dark or white line, the artist gives it decorative completeness.
Some painting operations may change order here. You can first paint the sedachka’s face, then do all the whitewashing, and only at the very end paint the hands with whitewash.
Gorodets parade exit
The drawing depicting the Gorodets parade exit combines all the painting techniques that were discussed earlier. This beloved and very common plot in Gorodets requires great skill from the master. Here, brush flower painting is combined (a garland with a brush of blue grapes is placed in the center of the composition) and work using multi-colored sponges (trees in bloom along the edges of the composition). A careful look will also note the graphic techniques used by the master.
Previous1Next