A little history
History indicates that the development of wood studies led to its application on the most unexpected subjects, which included:
- furniture;
- chests;
- sled;
- utensils used indoors.
Most often there was a symbolic character, and the background tones were: green, blue and sometimes black. Particularly popular were and are drawings with specific themes, showing people and animals.
After World War I, art fell into decline, forcing specialists to look for other sources of income. The revival of the popularity of the direction is associated with the name of I.I. Oveshkov, who opened the workshop to the public.
It organized the training of appropriate personnel, which resulted in an increase in those able to process the source code. Involving a new generation in recreating images develops a sense of belonging to the culture of their country and develops artistic thinking on different levels.
Teaching children in kindergarten and primary school
For kindergarten (senior group), painting a board is one of the ways to teach a child fine art and understand it at a certain level. It is preferable to start practice on paper, as it can be used as a sketch that can be transferred to a harder material.
You just need to prepare your brushes and a few spreads from your notebook (for blanks) to get started. Consider aspects:
- paper should be taken in a format close to A4 (in albums or Whatman paper of appropriate size), and for children from five years old, the best option would be to use also less dense sheets for sketches, from which the whole idea will be transferred finally;
- You will need three brushes to get the best result: core brush, squirrel brush and flute brush. The latter is a flat brush used for small strokes that cannot be made with more substantial varieties;
- masters use oil paints in their work, and in art classes for preschoolers (fifth grade can also use templates for training) it is better to teach with gouache. The standard set includes twelve colors, of which you need to take only eight: white, cherry, bright blue, scarlet, yellow, dark green and red. The last 3 must be mixed, and the remaining ones can be used separately.
At a younger age, decorative drawing is easier to demonstrate to teachers step by step (for beginner adults, a similar method of work is also suitable) in the following sequence:
- sketch the diagram in natural size. Minor details are noted that will be carried over to the final version.
- Highlighting the center of the mosaic and the features that will be applied in each section;
- drawing each fragment thoroughly using the specified tools;
- coating the board with varnish - entrust this phase to those who are older.
Educators and teachers need to control the process at the stage of transferring the plan onto the plane in order to prevent paint from flowing out where it is needed, and to eliminate minor errors faster.
The two main sections of the illustration procedure, underpainting and animation, are performed with different brushes (in the case of floristry, shadows are also drawn between them). First you need to paint the background in an even layer, and then start adding details.
The finished product should be dried before varnishing with a transparent product that protects against fading, burnout and dampness.
Technical features of painting
Paintings on spinning wheels have always been characterized by simple subjects and simple compositions. Over time, individual elements became more complex, new themes and characters emerged, writing techniques improved, but any modification was carried out very carefully, without violating the established historical tradition.
Subtleties of the ancient Japanese art of oshibana
Composition and plot
Compositionally, the painting had a two- or three-part structure. The parts arranged from top to bottom - tiers - each carried its own semantic load and, complementing each other, could be considered as completely independent works:
- The upper tier, as a rule, was occupied by everyday or genre scenes, which depicted tea parties, feasts, festivities, village gatherings, elegant gentlemen and ladies in crinolines. And since historically the spinning wheel has always been part of the dowry, wedding motifs - matchmaking, bridesmaids, travel of the bride and groom - are also reflected here.
- The middle one was a belt with various floral patterns. Seemingly playing an auxiliary role—separating the upper tier from the lower—it looked like a completely finished work of painting. Subsequently, floral arrangements developed within the belts became very popular when painting boxes and other small souvenirs.
- The content of the lower one was the image of birds and animals framed by lush floral elements (garlands, ornaments, frames). Each character had a symbolic meaning and filled the master’s work with additional meaning. Thus, the rooster, pheasant, peacock, chicken, Gorodets bird personified home comfort and family happiness. Horse and horse symbolized prosperity and wealth. And what Gorodets painting was especially famous for was flowers—health and success in business.
Over time, the drawings from the spinning wheels migrated to the lids of chests, boxes, salt shakers, cutting boards, and became decorations for children’s furniture and souvenirs. Modernity has made its changes, and today easily recognizable elements can be seen in the airbrushing of cars, in the decoration of mobile phones and other similar devices.
Step by step writing
The immiscibility of colors in the products also determined a special technique of execution: stage-by-stage drawing of Gorodets painting. The paints are superimposed on each other, but each subsequent layer is applied only after the previous one has dried. Masters distinguish 3 main stages of painting:
- Underpainting - painting with flutes (wide flat brushes) all the figures of the composition in 4-5 colors; The technique is the simplest, accessible even to a five-year-old child, and its main task is to create an even, monochromatic background without gaps, drips or paint sagging.
- Shading is the drawing with a thin brush of the contours of a character, animal or flower, for which dark (most often black) saturated colors are used.
- Revival is the final stage of painting, during which strokes, highlights, drops and other small details are applied with white (in very rare cases - yellow ocher), thereby achieving volume, brightness and a feeling of rich splendor of the product.
The clarity of products from Gorodets and the simplicity of step-by-step execution made them accessible for practical mastery by children of senior kindergarten groups and primary school students.
The main plots outlined for the most part
As a rule, they come across works:
- flowers (rosan, daisies, kupavka). Visualized in the form of a symmetrical bouquet, garland, stripe, wreath or diamond;
- birds (swans, peacocks, roosters, pigeons or cuckoos, depending on the author’s purpose);
- The “tree of life” is the personification of nature. These things contain a lot of components (compounds from plants, birds). The draftsman also draws a horse on the left and right, and occasionally lions, leopards and other exotic things.
Professionals also engage in more advanced types, such as plot painting, where there may be miniatures depicting events in real life or literary works.
Both the interior of a residential building and the streets of populated areas are depicted with the maximum possible number of subtleties. Often in such images you can see elements in the manner of domestic animals located at the feet of the owner. Another feature is the presence of vegetation in the winter landscape outside the building.
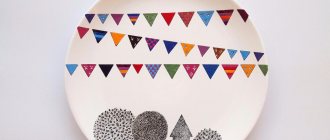
Similar crafts are usually embodied in a rectangular configuration, and the edges are decorated with ornaments. There are also round variations, installed on a shelf as decorative plates, the patterns on which are located on the edge.
The box is capable of containing on its edge a few outlines with various situations, the central one of which is placed on the lid or front wall (on the side where the structure opens).
Decorations for the New Year: decor ideas and options for decorating a house and apartment for New Year's celebrations (135 photos)- Window decoration - simple ideas and step-by-step descriptions of do-it-yourself window decoration (110 photos and videos)
Diaper cake - a step-by-step description of creating a diaper cake. 115 photos and videos of creating a gift
The description of the life of the peasants reflected the reality of the time period in which the master’s work was carried out as meaningfully as possible. Unusual displays, inscribed in a scene from everyday life, enhance the effect of what they see.
The most important actors are located in the center of the canvas - larger than the rest. Shots of tea parties, feasts, weddings and other events - always with a table where dishes are placed or other secondary objects that reveal the essence of what is happening.
Elements based on folk tales are no less popular and in demand - the plot and characters are recognizable at first sight, and the richness depends only on the imagination of the creator.
We paint the panel “Gorodets Birds” in mixed media
The background to this master class began about three weeks ago, when a customer I knew approached me with a request to make her a kitchen decoration “with some Slavic bells and whistles for a gift to her relatives in the village...”. Even then I realized that I would capture this process in a master class, because it’s not every day that you get to paint in such an interesting style. At the moment, my girl, unfortunately, has not decided on the final configuration of the future decoration, whether it will be a kitchen pendant, or a key holder... and I have already prepared the most interesting and colorful part. I'll show it.
For work I chose the following materials:
— acrylic paints “Acrylic Hobby” and glossy varnish from TAIR (light ocher, purple, light green, white, red, ivory, gold, black and brown);
— TAIR acrylic contours, they hold their shape well and do not flow (purple, dark red, golden-green, beige, ivory, pearlescent red, black);
— synthetic brushes No. 10, 12 – for applying paint and varnish, as well as synthetic liners No. 00, 0, 1 – for fine lines:
— auxiliary materials: pencil, eraser, ruler, sandpapers No. 600, 800, 1000, cotton pads, a needle for stretching paint, jars for diluting paints;
- well, and, in fact, the panel itself - I have a wooden square blank measuring 20x20x1.5 cm.
I planned the painting for the future panel in the Gorodets style; most of it is done either on clean, unpainted wood or against a background close to natural. I will work in my favorite mixed technique – the so-called. a symbiosis of brush, contour and dot painting.
The workpiece I came across was excellent, absolutely not requiring pre-treatment, so I sanded it with 600-grit sandpaper and immediately coated it with paint without primer.
From ivory, black and brown colors I create a shade close to the shade of pure wood.
The paint is like thin sour cream; with a brush I “rub” it along the fibers in two layers with intermediate drying and sanding. After two layers of paint, the structure of the wood should show through.
I dry it, cover it with one layer of varnish, and sand it.
I draw a sketch of the future ornament with a pencil, having previously determined the middle of the workpiece. Not greasy, because the brush will still move in its own way during the work, and the pencil lines will have to be erased. It was based on one of the most common protective motifs of Gorodets painting - two birds looking at each other - as a symbol of fidelity, the strength of family ties and protection of the hearth - framed by rosebuds and blueberries - symbols of love, prosperity and fertility.
I do the underpainting with thin white paint. I dry it, lightly remove the unevenness with 1000-grit sandpaper.
From white paint with a drop of red and purple I get a cold pink and draw the buds.
I highlight the central upper flower and large round berries along the edges with light blue.
From a mixture of green, brown, white and ocher I achieve the desired shade for painting the leaves. The color is between grass and marsh, closer to natural.
I highlight the blueberries and the core of the large flower with light purple.
I dried it so as not to accidentally smear it with my hand, and I started working on the birds. I use black + brown in equal proportions to paint the bird’s body and individual tail feathers, and use a mixture of red, brown and black to paint the wings and remaining feathers.
I use the same dark red color to shade the edges of the rosebuds. With “Scythian Gold” I use a thin liner to go along the edges of all the green leaves.
With pure purple color I emphasize the shadow on large berries, the central flower and blueberries. The main brush painting is completed. I protect the painting with a thin layer of varnish, dry it and lightly sand it, removing uneven paint.
Now you can take on the contours. I outline the rose buds with a purple outline, and I use a golden-green outline along all the leaves on the side where there is no golden shadow.
I fill small leaves in buds with metallic red, stretching the paint with a needle.
I draw the berries and the central large flower with a purple outline, and the body of the birds and their legs with black. And now my favorite moment is the revival.
Using beige and light silver (the color is almost white), I use a needle to make droplets in the leaves: I put a large dot and use a needle to stretch it in the desired direction.
I decorate the entire panel with individual dots and curls. On birds, I shade the wings with a beige outline, and the tail feathers with light silver.
Using a thin liner, I draw veins on the blueberries: first purple, and then white on top.
I also draw veins on large round berries.
Along the way, realizing that the shades in the flowers merge, I darken the inner small leaves in the rose buds with dark red paint. That's better.
The panel is almost ready. Here and there I add a few light drops and dots, where, in my opinion, they were missing. I dry the painting within 24 hours. Then I coat it with varnish in several layers with thorough drying in between. It is not yet possible to sand it, because... The painting is voluminous, and the varnish is not yet strong enough. I put it in the dryer for a week. After this, the painting can be very carefully treated with steel wool No. 000, or the hard side of a sponge, after which the surface will become semi-matte, and if you try very hard, even matte. But I don’t achieve this effect, I need a glossy surface. Therefore, after drying, I polish the surface with a special wax for treating painted wood and get a soft glossy shine and protection from moisture. All! The central part for the kitchen panel (or key holder, or pendant...) is ready. I'm going to admire!
I would like to make a remark. At the beginning of this master class, I indicated a production time of 3 days. This concerns the painting process itself for me. I did not take into account the time for intermediate drying of the product and drying in the chamber. The fact is that the process of both the painting itself and the individual stages of processing can take a different amount of time for each master. Plus to this - home, family, main job... and you never know what else. In a word, it took me a week to paint from “A” to “Z” (no one canceled work and family) + another week in the dryer. This is in case it is suddenly extremely important for someone to know how long such work will take.
If you need additional information, or if anything from the master class seems incomprehensible, write and ask. Your questions will not go unnoticed, I will be happy to answer them.
This master class (coincidentally) is participating in the “Slavic Motifs” competition. If you like it, press the “Like” button! – I will be grateful for your comments, reviews and votes! Thank you for your attention!
Where to start
If you decide to exercise yourself or your son or daughter wants to learn it, it is not necessary to attend any courses. It’s enough to start small - find online lessons in a form convenient for you - this can be a text with illustrations, which shows how the work canvas takes on its own shape.
Other modifications are videos, coloring books, stencils, which allow you to clearly understand everything, and ultimately understand it along the way.
When doing work, it is not advisable to rush, trying to apply shades to the surface as quickly as possible - this will only lead to streaks. Use a pencil to outline the outline, but do not apply pressure.
- Patchwork - technique and master class for sewing stylish and beautiful sewing with your own hands (80 photos)
- Tilda doll - a master class in sewing toys with your own hands. 125 photos of the best toy models
How to make a car out of paper: step-by-step description of how to quickly and easily build a high-quality car (75 photos + video)
Another feature of the operation is the concentration of dark spots on top of light ones. All you have to do is choose the direction in which you are going to create, and therefore you will master Gorodets painting. To improve your skills, you can first select paintings online, and then reproduce your own textures or leitmotifs.
Initially, it is far from perfect, but with constant repetition and honing of the skill, the result will become better, giving the right to trade professionally and on a permanent basis.
The emergence of artistic craft
Every phenomenon has its beginning. The starting point, without which Gorodets painting simply would not have come into being, was the most ordinary household spinning wheel - a necessary thing for the housewife in every peasant family at that time.
Place and time
It all started at the end of the 18th century in the Volga region, in villages and hamlets located along the banks of the small river Uzola, which flowed near the ancient Gorodets. In these villages - in Koskovo and Kurtsevo, in Savino and Khlebaikha - handicraft production of home spinning wheels has long been established. All parts of it - the bottom, the hooves, and the comb - were made of wood, fortunately there were enough forests around, and were originally decorated with simple carvings.
Particular attention was paid to the bottom - the board on which the spinner sat while working and which after work was hung on the wall in a visible place. It was indecent for the owner to keep an undecorated “table” in a visible place in the hut. That’s why all sorts of wonderful carvings were made on them, and at the turn of the 18th and 19th centuries, old masters completely mastered the most complex inlay technique, for which they used inserts made of dark, bog oak.
The process, however, turned out to be very labor-intensive, and it took a lot of time to produce one product. The demand for spinning wheels was constantly increasing, and in order to increase their number, oak inserts began to be replaced - first partially, and then completely - with bright, elegant paintings made with tempera paints and varnished for durability. This greatly reduced production time and increased sales of products at the Nizhny Novgorod fair, where Uzol craftsmen brought their goods for sale.
Zentangles - a meditative drawing technique
And the features of drawing, techniques, patterns and main elements, developed over decades, received their final design in the seventies of the 19th century. Then the famous icon painter Ogurechnikov was invited from Gorodets to the village of Kurtsevo to renovate the local church. It was he who, having become interested in the local craft, “brought to mind” the Uzoltsev painting technique, introducing iconographic techniques into it: methods of applying layers of paint, playing with shading arcs and reviving the drawing with whitewash.
origin of name
The fishery was called differently at that time. The peasant masters did not invent any self-names, and in early publications they wrote either about “Nizhny Novgorod painting” based on the location of the fair where the products were sold, or about “Kurtsevo dyers” based on the place of their most widespread and developed production.
At the end of the 19th century, with the advent of large weaving factories and cheap calico, the need for home production of linen disappeared . Nobody needed spinning wheels anymore, and, as a result, the fishery began to fade away. By the First World War it had practically disappeared, continuing to exist only in the form of occasional isolated works by amateur enthusiasts.
The modern name appeared only in the 30s of the 20th century, when, under the patronage of the state, the fishery received a chance for a rebirth. At first, workshops and artels began to be restored in Gorodets. For the plots of their genre scenes, artists traditionally took sketches from the life of Gorodets merchants and townspeople. And the center of product sales has now moved to this city.
All this together gave rise to V. M. Vasilenko, one of the largest researchers of folk culture, to use the term “Gorodets painting” in his works, which was destined to become established since then as the name of this artistic craft in Russia.
Gorodet painting – 65 photo examples
- Paper toys - diagrams, ideas and options for making various toys with your own hands (110 photos)
Dymkovo toy - modern collections, their creation and features of making Dymkovo toys (115 photos and videos)
Knitting openwork patterns - diagrams and step-by-step master class on how to knit an openwork pattern quickly and easily (95 photos + video)