Pavel Bender, iSpring technical support engineer
In this article, I'll show you how to insert triggers and animations into your presentation, customize navigation with hyperlinks, and build a mini-game from scratch using standard PowerPoint tools.
The rules of the game are simple. You are a novice chef who is faced with the difficult task of collecting cutlery to prepare a delicious omelet. Click on the items that will be needed in the case. Only after this you can move to the next slide . Let's see how it works:
Stage 1. Add objects to the slide
To assemble the game, which I prepared.
- Open PowerPoint and create a blank slide.
- Add a kitchen interior to the slide. To do this, go to the tab Insert → Drawing, find the downloaded folder with all the files and select the item Background. Place it on the slide. Leave some space at the bottom for the navigation bar.
- Insert a navigation bar. To do this, go to the menu Insert → Images, select the Bottom Bar graphic and place it at the bottom of the slide.
- Let's add a "Forward" button so that users can move to the next slide in the presentation. To do this, click Insert → Drawing → Forward.
- Let's block navigation. To do this, place a dark rectangular one above the “Forward” button. Select Insert → Picture → Dark Rectangle and cover the button with it.
- To make the game more interactive, let's add a lock to the bottom panel. It will disappear if you select the correct objects. To do this, click Insert → Drawing → Lock.
- For the next objects - cats and bowls - we will set up triggers and animations. But for now, let's just arrange them on the slide.
- So that during the game the user sees feedback and does not accidentally click on another object, we will add a transparent background on top of the entire slide: Insert → Drawing → Transparent background.
- In the game, when choosing a cat, the user will see the message “Interesting idea. But let’s first master the classic technology,” and when you click on the bowl, “Great! This will be useful to us." Messages also need to be added to the slide - you will find them in the resources folder. Place the text one below the other.
To avoid confusing objects while working, rename them. To do this, in PowerPoint, select Home → Arrange → Selection Area . Name the objects like they do on my slide.
Next, we will sequentially set up animations for each object. To ensure that unnecessary pictures on the slide do not interfere while you work, let’s hide them - to do this, click on the eye-shaped icon to the right of the object’s name.
For now you can hide all objects except the message “Great! This will be useful to us."
Stage 2. Setting up triggers
A trigger in PowerPoint is a tool that creates a “hotkey” to trigger animations, audio and video effects.
One click of the mouse - and the selected object (picture, figure, single word) begins to move on the slide: disappears, moves out to the right or left, changes color.
In our game, if you click on the bowl, the message “Great! This will be useful to us." This is how a trigger works.
Let's set up all the triggers in our game.
Setting up animation and triggers for the bowl
- First, create an animation for the “Great! This will be useful to us." Select this message on the slide, go to Animations → Add Animation → Entry → Fade . The message now fades out whenever you view the presentation.
- We need this message to appear when you click on the thicket. To do this you will have to add a trigger. To do this, highlight the “Excellent” message again. Go to section Animations → Trigger → On click and select a bowl.
After that, when you click on the bowl, the message “Great! This will be useful to us." To check this, move the transparent layer aside, press F5 and click on the bowl.
- Notice that when you click on the bowl, a message appears, but the background does not darken. Because of this, you may be able to click on other objects. Let's fix this by adding a transparent layer. It allows you to see the background with the kitchen, but prevents you from clicking on other objects, such as the cat.
- Drag "Transparent Background" onto the slide. Select it and go to Animations → Fade . The layer now has animation.
- Now we want a message to appear when you click on the bowl, and only then the background to darken. To do this, let's change the order of the animation. Click Animation area. In the panel that opens, select the transparent background animation and move it under the “Bowl” trigger.
- To make two animations work sequentially, select them in the tab Animation area, and then on the panel Start select With previous.
To see the result, clear the On click on the Transitions .
Now we click on the bowl and a message appears and the background darkens, blocking other objects. Hurray, you did it! But going back to the game is impossible. If you click anywhere on the slide, nothing will happen. Let's fix this.
- Select the message “Great! This will be useful to us” and a transparent layer to add another animation to them. To do this, click Add Animation → Exit → Fade .
- Select the two new animations in the Animation Area → click Trigger → On Click .
- In the window that appears, select the name of the button “Great! This will be useful to us." I named it "True" when I renamed all the objects.
- Select the two new animations and in the panel Start click With previous.
Now, to continue the game, just click on the message “Great! This will be useful to us."
Making the bowl disappear
Once you take the omelette bowl, it should disappear. This will give the impression that you have added it to your work inventory. The disappearing effect also needs to be adjusted. This is what we will do now.
- Select a bowl on the slide. To do this, you will again have to lower the transparent layer under the slide. Select Add Animation → Exit → Fade .
- The resulting effect on the panel Animation area drag "Bowl" to second place in the animation list.
- To make the bowl disappear after clicking on it, in the Home panel, select With Previous.
We can also make the bowl disappear before the message appears. To do this, move the exit animation to the top of the list and select After Previous for the remaining animations.
You should get something like this:
Congratulations, you have set up animations and triggers for the bowl. Now let's take care of the cat
Setting up animation and triggers for the cat
To animate the cat and the remaining message, we will have to go through the already familiar sequence of actions.
- Start by placing an “Interesting Idea” message on your slide. After that, right-click on it and select Bring to Front so that it appears on top of the “Excellent” message.
- Select a cat on the slide and add an animation to it: Animations → Add Animation → Exit → Fade .
- Add a trigger to the cat. Go to section Animations → Trigger → On click and select a cat. Now it will disappear if you click on it.
- Let's move on. You need to make sure that when you click on the cat, the background darkens and the message “Interesting idea, but let’s master the classic method first” appears. To do this, select the transparent layer and the message. Go to Add Animation → Entry → Fade .
- Drag the fade animation into the cat trigger. This is what it looks like:
- Select the moved fade animation again and in the panel Start click With previous. Now, if you click on the cat, it will disappear, the screen will become darker and the message “Interesting idea, but let's master the classic method first” will appear.
- Please note that you cannot return back to the game again. To do this, select the “Interesting Idea” message and the transparent layer to add another animation to it. To do this, click Add Animation → Exit → Fade .
- Select the two new animations in the Animation Area panel → click Trigger → On Click .
- In the window that appears, select the name of the button “Interesting idea”. I called it "Wrong" when I renamed all the objects.
- Select two new animations and in the panel Start click With previous.
Now, to continue the game, all you have to do is click on the “Interesting idea” message. You should get something like this:
Congratulations, you have set up animations and triggers for your mouse. Now let's set up the animation for the Forward button.
We create educational games ourselves: the best services to help teachers
Services for creating educational games
- eTreniki is a designer of educational simulators, included in the TOP 30 best projects of the Competition for Innovations in Education. Offers several task concepts: Kartofan (correlation of signatures with objects on the map), Kokla (dividing words into categories), Krypton (solving words with mixed up letters), Morfunks (parsing a word according to its composition), UFO (searching for extra objects in a group).
- Learningapps is a service already known to many with interactive learning modules. The tasks are aimed at choosing the correct answer, distribution, sequencing, filling. The developers offer a wide variety of interesting templates, for example: “Who wants to be a millionaire?”, “Guess”, “Horse racing”, “Hanging”, “Couples”. The service removes a significant part of the burden of constructing and checking tests from the teacher.
- Online Test Pad is another popular service. Types of constructors: test, survey, crossword, logic games. To combine several types of exercises, a complex task designer is provided.
- Quizlet is an online service for working with virtual cards, as well as audio and written prompts. Supports about 130 languages. Among other things, it can use the “Memorization Mode” with the creation of an adaptive curriculum and a reminder function via mobile devices.
- ClassTools is an online service for creating interactive Flash resources. There are interesting templates for “QR Game Generator”, “Arcade Game Generator”, “Countdown Timer” and many others. If we talk about flash technology, it is also worth taking a closer look at the sites Jigsaw planet (creating puzzles) and Flashcard machine (creating cards).
- Hot Potatoes is a program for creating tests and crossword puzzles (download link). There are paid and free versions. Slightly outdated design, but very user-friendly interface. Ready crosswords can be printed.
- Socrative is a service for creating online surveys that students answer via mobile devices. Aimed at implementing the new global concept of Bring Your Own Device (BYOD). The teacher can add an explanation to each question, providing instant feedback. It is also worth paying attention to another quiz service: Kahoot!.
- Canva is a graphic editor in which you can create diagrams and process photographs, and then use them in educational games. Large selection of colorful templates.
- PlayPosit is a service for creating interactive videos. With its help, any video can be turned into a didactic basis for a lesson. Materials from other services are easily integrated.
- Google Maps (custom layer) is a service that allows you to build educational games based on the principle of geocaching. Other sites for working with maps: StoryMap and TimeMapper. The latter allows you to present the material both geographically and chronologically.
What else should I read?
Teaching preschoolers to navigate in space: games and exercises
“Game activities” - games and exercises to develop the prerequisites for logical thinking
Classification of didactic games in the Russian language
Entertaining astronomy for schoolchildren: games with cards
How to make educational games as effective as possible
- Use mobile phones.
Many modern electronic educational services provide work via smartphones. The teacher can write a note to the school management asking for permission to use them in class. Lessons aside, educational mobile apps are also suitable for extracurricular activities and homework. - Pay attention to the design.
Most educational Internet services have the same content, the same set of templates and differ only in design capabilities. But design should not be considered a secondary element. We are dealing with children, and a bright picture is very important for them. - Teach by playing.
Many educational online games are essentially tests, simply presented in a beautiful “wrapper”. Use them to achieve substantive results. - Integrate.
To make the project versatile, integrate some services with others. Try inserting a link to an interactive map into a QR code or colorful videos into your timeline. If there are many services, they can be combined on one site (for example, Google Sites). - Provide instant response.
It is advisable to program in the service a quick response to a student’s question or answer. This function is available, for example, in the Hot Potatoes program and the Socrative service. Just like colorful design, increased interactivity helps keep students engaged.
Let's get to know the world. Educational games with cards for children 5-6 years old (set). Didactic materials
Double-sided cards of various thematic series and a playing field with six transparent plastic pockets are used in games that develop speech, perception, attention, memory, and intelligence of preschool children. The choice and number of cards depends on the goals and level of difficulty of each game activity. In the methodological manual, the authors talk about the characteristic features of the development of children of senior preschool age, and provide recommendations for organizing play activities. A description of games with cards is also given, on the basis of which new options can be created based on the individual characteristics and pace of development of the child.
Buy
What PISA teaches us
In 2020, Russia once again took part in the international program for assessing the educational achievements of students, PISA. The results will not be available until the end of 2020, so for now we can only consider the results of the 2012 and 2020 studies. These results are not reassuring:
| 2012 | 2015 | |
| Science literacy | 37th place | 32nd place |
| Mathematical literacy | 34th place | 23rd place |
| Reading literacy | 42nd place | 26th place |
Why does this happen?
The study tests how well students can apply school knowledge to real life, which requires critical thinking skills. We, however, often make knowledge “bounce off the teeth” without much analysis. This approach really turns out to be useful in preparing for many domestic and foreign tests, but we should not forget about the student’s general literacy. When creating online simulators, experts recommend introducing creative tasks that are close to life, involving observation, analysis and other interdisciplinary competencies. #ADVERTISING_INSERT#
Stage 3. Setting up animation for the lock and the “Forward” button
Now we need to add an animation for the lock on the bottom panel - it will disappear if the player selects the correct equipment for making an omelette.
- Select a castle on your slide and add a fade animation to it. To do this, we use the already familiar path Animation → Add Animation → Exit → Fade .
- Drag this animation to a location between the "Great" message and the transparent layer in the bowl animations list and panel Start set parameter With previous.
- The last step is to make the Forward button visible after the padlock disappears. Remember we have a dark rectangle that covers the Forward button? If you configure the animation correctly, the dark rectangle will disappear along with the lock - the “Forward” button will become visible.
- Select a dark rectangle on the slide and add a fade animation for it: Animations → Add Animation → Exit → Fade . Drag this animation onto the bowl trigger below the lock animation and in the Start panel, set the With Previous option.
Now, when the player clicks on the bowl, it will disappear, the castle will also disappear, and a “Forward” button will appear on the navigation panel.
Note. The dark rectangle on the navigation bar performs a restrictive function - it hides the “Forward” button. It only disappears when you select the correct object on the slide. In our case, a bowl.
In the full version of the game there are five correct objects on the slide: bowl, frying pan, knife, whisk, grater. This means there will be five dark rectangles on the “Forward” button. Once you select the correct object, such as the corolla, one rectangle will disappear. But the “Forward” button will appear only when you have collected all the equipment for making an omelet.
Stage 4. Set up a hyperlink for the “Forward” button
Now let's add a hyperlink to the Forward button. Right-click on it, click "Hyperlink" in the drop-down list and select the slide in the presentation you want it to link to.
Thanks to PowerPoint effects, players must select all of the omelette-making equipment before moving on to the next slide. As they play, they will make mistakes and read the tooltips, remembering important information.
The plot for the game can be anything. This is a good way to add variety to your e-course. The game will help your employees relax a little before the next theory block of the course and consolidate the information from the material covered in practice.
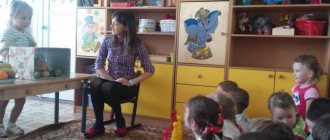
Children's presentation "Good Tales"
Marina Petrova
Children's presentation "Good Tales"
Game - presentation “ Good Tales ”
with sound designed for preschool children
Development program: Power Point
Purpose of the presentation : To clarify and enrich children's knowledge about fairy tales .
Tasks:
1. Develop the ability to recognize a fairy tale based on assignment .
2. Develop speech, imagination, fantasy, thinking.
3. Cultivate an interest in reading fairy tales , a love of oral folk art.
Recommendations for using the game - presentations .
Game - presentation “ Good Tales ”
made in Power Point with sound.
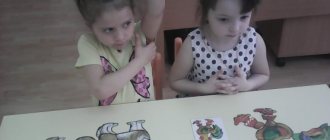
Includes fragments using animation, hyperlinks to images are located at the end of the presentation , colorful backgrounds and pictures based on fairy tales are selected in the presentation . Game - presentation consists of ten slides that change with a click. Each slide of the presentation has a task where children reinforce knowledge about fairy tales by choosing one of the answer options by clicking the right mouse button.
Accompanying the presentation game
1st slide: Title
Slide 2: You need to complete the task and answer the question:
“Find the object that the fox found from the Russian folk tale and name this fairy tale ?”
Four pictures are offered, you need to select the desired item and click on it. If the wrong answer is selected, the image swings with a knocking sound; if the correct answer is clicked, the object moves and the sound “Applause”
.
The transition to the next task is carried out by pressing the left mouse
Slide 3: You need to complete the task and answer the question:
“Find which of the fairy-tale characters the bear put in the box, and guess this fairy tale ?
Six fairy-tale heroes , you need to select one and click on it. If the wrong fairy-tale hero , then the image swings with a knocking sound, if you click on the correct answer, then the fairy-tale hero moves into the box and the sound of “Applause”
.
Slide 4: You need to complete the task and answer the question:
“Guess the fairy tale and what is mixed up in it?”
You need to select fairy-tale characters not from this fairy tale and click on them with the mouse.
.
If the correct fairy-tale hero , the image disappears and the sound “Applause”
.
Slide 5: You need to complete the task and answer the question:
“What object did the heroine of the fairy tale lose and what is the name of this fairy tale ?”
You need to select the desired accessory and click on it with the mouse.
.
If the wrong accessory is selected, the image disappears with a knocking sound; if the correct accessory is clicked, the item moves and the sound “Applause”
.
Slide 6: You need to complete the task and answer the question:
“What material is “Naf-naf”
built yourself a house?
Five types of building materials are offered; you need to select the correct one and click on it. If the wrong answer is selected, the image disappears with a knocking sound; if the correct answer is clicked, the object moves down and the sound of “Applause”
.
Slide 7: You need to complete the task and answer the question:
“Guess the animal that belongs to each of the fairy-tale characters and what fairy tale ?
Using the mouse, you need to first click on any fairy-tale hero , and then on the animal that belongs to this fairy-tale hero . If the correct answer is selected, the object moves and the sound “Applause”
.
Slide 8: You need to complete the task and answer the question:
“Guess what size the chair is, the girl broke it and name this fairy tale ”
Three chairs of different sizes are offered; you need to choose the correct one and click on it. If the wrong answer is selected, the image swings with a knocking sound, if the correct answer is clicked, the object moves up and the sound of “Applause”
.
Slide 9: You need to complete the task and answer the question:
“Which animal helped Khavroshechka carry out her stepmother’s orders?”
Four fabulous animals , you need to select one and click on it. If the wrong answer is selected, then the image disappears with sound; if you click on the correct answer, then the fairy-tale animal moves down and the sound “Applause”
.
Slide 10: You need to complete the task and answer the question:
“What did grandma cook “Koloboka”
There are seven items offered, you need to select one and click on it. If the wrong answer is selected, the image disappears with sound; if the correct answer is clicked, the object moves down and the sound “Applause”
.
11lide: Links to pictures