Materials
Oddly enough, in order to fold an origami goldfish, you only need a square cut out of paper. The color of the underwater inhabitant can be any, but it is advisable to take several colors or shades for variety.
If desired, you can complete the details using a felt-tip pen, colored pen or pencils, and also cut off excess pieces of paper with scissors.
Origami fish is very simple
This is probably one of the simplest origami models that children 5-6 years old can make. With this craft you can practice your paper design skills.
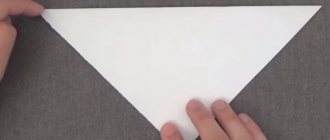
Take a square piece of paper and fold it diagonally. Unfold and fold the sheet again along the second diagonal. Now unfold the sheet.
Fold it in half.
Expand. There are a number of additional lines in front of you.
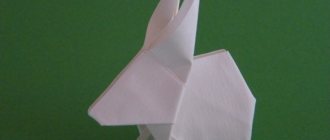
Take two opposite sides with your hands and pull them inward. The figure is folded. The end result is something like this.
Bend the top corner down and the bottom corner up. The end result should look like in the photo.
Turn the fish over and color it with markers.
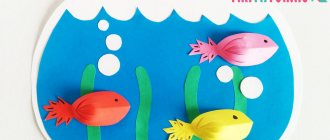
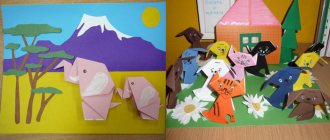
You can make an applique with such fish by gluing them onto a sheet of cardboard and adding algae, shells and other underwater objects.
Variations
There are a huge number of different possibilities for folding paper fish. For example, a simple fish, familiar to many since kindergarten, a fish with a large tail, or a moving figure.
We will give an origami diagram of the most interesting options.
Simple fish
First, you need to fold a paper square diagonally to form a shape resembling a scarf.
The second step is to fold the resulting triangle in half. For four-year-old children, this may be the final stage.
One has only to complete the figure by drawing in the eyes, fins and tail with a felt-tip pen or pencils of various colors. Older children can continue working.
The final phase of our work will be cutting out the tail. To do this, you should first outline the contours of the future tail, and after that you can pick up scissors and cut off the extra pieces of paper along the lines.
It is important to note that when working with cutting and piercing objects you must be extremely careful. If a child is engaged in this activity, then parents or one of the adults must monitor his actions.
Lesson. Topic: "Designing from paper "Fish""
Methodological development of an open lesson.
Design from paper “Fish”.
Target:
Development of technical skills of students using a ruler-square in children of primary school age.
Tasks:
1. To form in students universal learning actions with paper;
2 Learn to draw parallel lines using a ruler-square;
3. Make a paper fish craft;
4. Develop creativity, a sense of mutual assistance,
5. Bring joy to children.
Lesson form
: a classical form of training.
Materials, equipment: colored paper, pencil, scissors, square rulers, glue, brushes, napkins.
Progress of the lesson.
Org. Moment.
I would like to start our lesson with a fairy tale.
Theatrical production
: Once upon a time there lived a grandfather and a woman, and they had no children. Once they sit on a bench and cry. The stork flew in and said: “Grandfather catch a fish, choose the best one and give it to me. Then I’ll gain strength, fly overseas and bring you a baby.”
Guys, can we help our grandparents?
Children: yes.
Teacher: How can we help them?
Children: Make a fish
State the topic and purpose of the lesson.
Right. Today we will make fish, and grandfather will choose the best one for grandparents.
And we will construct it from paper. For work we will need the following tools: scissors, brushes, glue, rulers. Tell me what safety rules must be followed when working with these tools?
Children remember safety rules ( link to safety stand).
Teacher: Well done. Look what kind of fish I have. We can each make the one we like.
Show samples
.
Analysis of the manufacture of crafts, Explanation of the step-by-step execution of the work. Analysis of crafts.
Repetition and consolidation of the UUD on the basic techniques of working with paper.
Practical, independent work for children.
Finger gymnastics.
I hold the flag in my hands and wave to my friends. (We turn our palms away from ourselves, the thumb is pointing down and motionless. The remaining fingers are clenched into a fist and unclenched)
The boat floats along the river, behind it the waves are like rings. (palms cupped, wrist joint working)
The steamer floats along the river and it smokes like a stove (Palms in a boat, thumb up, wrist joint working).
We move our fingers and get a chain. (We connect each finger to the thumb in turn).
Stages of the sequence of making crafts:
Fold a sheet of paper;
Using a straight edge, draw parallel stripes;
Make cuts along the drawn lines;
Bend the cut strips and glue in the desired direction.
Physical education minute.
There is a hut in the dark forest (hands above your head like a house),
Fish with a big tail
In order to make an underwater beauty with a clearly defined tail, the first step is to do the same as in the previous work - fold a square of paper in half so that you get a triangle.
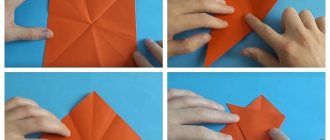
Then you need to bend the resulting figure in half, and then straighten it to form a bend. Next, we perform the same actions as when making an airplane - we fold two corners towards the center.
The fourth step will be to fold the lower corners upward. After this, we fold the same corners in half in the opposite direction.
In the sixth stage, it is worth folding the top layer of paper to the middle of the entire structure. In the resulting triangle, you need to bend the corner inward. We bend the bottom layer in a different direction. The entire figure must be bent inward.
Finally, we make cuts on both sides of the right triangle and straighten the tail.
NOTE!
Origami airplane: master class on making beautiful models with your own hands (125 photos and videos)- Origami vase - manufacturing technique and step-by-step instructions for assembling a modular paper vase (100 photos)
Origami boat - types, manufacturing methods and features of use in decoration (110 photos)
This version of the fish is much more difficult, and not every adult can cope with it. But with the proper skill and patience, everything should work out.
Exotic fish
This type of paper craft is not very complicated. You can use it to practice your skills in art, and later move on to more complex objects.
Here you will need a larger square. It should be bent in half, then straightened and folded in the other direction. Then we fold all 4 corners of the resulting quadrilateral towards the center.
In the third step, we turn the workpiece over and again fold three of the four corners into the center. After this, we bend the two corners in the opposite direction. It turned out to be a pocket. It needs to be revealed.
Now we bend the corners and get fins. The last step is to take a felt-tip pen and draw the missing details. Such as eyes, scales and various spots.
NOTE!
Origami bird - the best diagrams and recommendations on how to easily assemble beautiful origami with your own hands (90 photo ideas)- Origami flower - a review of the best patterns and models for a paper flower. 115 photos of the best flowers and features of how to assemble them yourself
Origami envelope - patterns for beginners and tips for choosing the best envelope models (100 photos and videos)
These were some of the most interesting variations. To fully immerse yourself in this topic, you can find photographs of origami fish, as well as watch master classes on making similar figures. Using this art, you can develop finger motor skills and improve your thinking.
Origami doesn't take much time. In just 10 minutes you can make an entertaining toy for your child or a gift for a friend.
With each object collected from paper, your skills increase. The main thing to remember when doing any serious business is not to be lazy.
Fish using modular origami technique
You will need: yellow, pink, orange and blue paper, ruler, scissors.
Master Class
- Cut colored paper into rectangles measuring 5.5x4cm and fold the module as shown in the photo instructions.
- Prepare 53 yellow modules, 48 orange modules, 2 pink modules and 1 blue module.
- Fold the head out of modules according to this pattern: 1st row – 2 pink modules; 2nd row – 3 yellow modules; 3rd row – 4 yellow modules; 4th row – 2 yellow, 1 blue and 2 yellow modules; 5th row – 6 yellow modules.
- Fold the body of the fish from the sixth row according to this pattern: 6th row – 7 orange modules; 7th row – 8 orange modules; 8th row – 9 yellow modules; 9th row – 10 yellow modules; 10th row – 11 orange modules; 11th row – 12 yellow modules.
- Mark the center by counting 5 modules on both sides of the body. Insert 2 orange modules between the 5th and 6th modules of the 11th row, and place the third orange module between them.
- Weave the tail from the 12th row according to the following pattern: 12th row – 3 orange modules; 13th row – 2 yellow modules; 14th row – 1 orange, 1 yellow and 1 orange module, 15th row – 2 yellow (in the center) and 2 orange modules (at the edges of the yellow); 16th row – 3 orange modules; 17th row – 2 orange modules.
- Make the fish's fins this way: string 5 orange modules on each side, as shown in the image.
We recommend: DIY paper fan, 5 master classes
The fish using modular origami technique is ready! I recommend watching this video!