An apron is a very common and practically unchanged piece of clothing from ancient times to the present day. There were aprons for men and women. Their roles were different - ceremonial, working, status, decorative. Nowadays, housewives do not often use an apron, finding a more modern alternative. But in vain! This is a very comfortable and cute piece of clothing. Moreover, even a schoolgirl can make an apron.
The technology of sewing an apron and its patterns is studied already in the 5th grade during labor lessons. This easy-to-make item is the perfect choice for learning sewing skills. In this article we will look at how to construct an apron drawing, as well as sewing several models.
Basic models of aprons
The school textbook “Technology Grade 5” includes sections on the technology of processing wood, metal, artificial materials, and child-friendly information about rational housekeeping technology. Many of these jobs require special clothing in the form of a children's apron. That is why the ability to sew an apron for a girl is very important.
All apron models are divided into two groups - an apron with a bib and an apron without a bib. Options for models with a bib, in turn, can be divided according to cutting technology into cut-off at the waist and one-piece.
The simplest types of aprons offered for making in labor lessons are shown in the following pictures. For each apron, the construction of the drawing is made on 1⁄2 of the full pattern. This was not done by accident. This is how you should mark out the details of the apron by applying half of the pattern to the fold of the fabric. This will ensure complete symmetry of the product.
If the girl has already sewn a simple apron model, then she can decorate the apron with various details. Several interesting options are shown in the following figure.
Based on simple basic patterns, you can simulate an apron pattern by flaring or changing the bottom cut line. The schematic construction of the drawing is shown in the figure below.
Each hand-sewn apron is sure to be interesting and unique. A novice craftswoman can select jewelry and choose a style at her own discretion.
Next, let's look at sewing an apron step by step.
Apron without bib
Previously, an apron with a cut-off bib would have been suitable for a technology lesson “How to sew an apron, grade 5. Federal State Educational Standard ". But the program has been changed, simplified, and this lesson will be more difficult to understand than provided for in the new program, although it includes elements of an apron for the fifth grade. You just need to take the lower part of the apron and the belt. The same applies to those who need an apron without a bib .
Today we completed a drawing of an apron , looked at two options for constructing patterns: a one-piece apron and with a cut-off bib, and learned about the advantages of cutting on fabric and using a pattern.
Which pattern option is more interesting for you, will you cut directly onto the fabric or will you create an apron pattern? Share your experience, your successes - everyone will be interested.
I look forward to your comments and questions. If the article was useful, share it with friends, like, subscribe to the news and receive the book “Sewing Machine for Home Use” as a gift.
With love, Olga Zlobina
Apron for work
The apron pattern for a technology lesson in 5th grade is very simple. How to build the main part is shown in the drawing below. The belt ties and straps need to be made according to your own measurements.
To sew an apron for a schoolchild you need to prepare:
- fabric 0.6 by 0.6 m;
- bias tape to match the color of the main fabric - 3 m;
- Velcro tape for the belt;
- threads, sewing tools.
Description of tailoring
Mark the details on the fabric. An example of the layout is shown in the following figure. In addition to the apron, it also shows details of arm ruffles and scarves.
We cut out all the details (except for the belt and straps) without seam allowances, since we will process the cuts with bias tape.
We process the sections of the main part with bias tape.
We cut out the blank for the belt with an allowance of 1 cm in width. Fold the strip in half with the wrong side inward, and sew along three sides. Turn it inside out and iron it. Fold the free edge allowances inward. The dimensions of the finished belt are 2.5 by 16 cm. We fix the belt on the main part with pins and attach it. Sew Velcro tape onto both parts of the belt.
On the pocket blank, turn the top cut 5 mm to the wrong side and stitch. Then we make another turn at 25 mm, stitch along the edge of the fold.
The remaining sections of the pocket should be finished with bias tape. Place the pocket on the main piece, baste or secure with pins. Machine stitch the pocket. Make triangular tacks at the corners. Sew a dividing seam in the center of the pocket.
Finally, remove the basting threads and iron the product.
A simple apron pattern for a child 5-7 years old
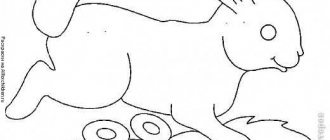
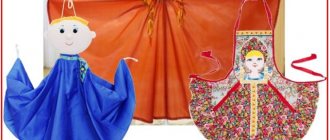
For a girl, the opportunity to cook in the kitchen with her mother is not just work, but a kind of status acquisition. She becomes a real adult hostess. And, of course, such work requires appropriate clothing. We invite you to sew a simple but cute apron for your little helper.
For sewing you will need:
- dense fabric of natural composition, linen, cotton are suitable - 0.4 by 0.43 m;
- oilcloth of the same size - optional;
- strip of lace (optional) – 19 cm;
- bias binding – 0.6 m; 0.75 m; 0.75 m; 0.16 m or strips of fabric of similar length, 3 cm wide;
- threads, sewing tools.
Description
The pattern must be constructed according to the proposed drawing.
If desired, you can make a second layer of oilcloth for the apron. In this case, we cut out the second part, put them together (oilcloth at the bottom) and stitch. Next we work as if we were working on one piece.
Using a basting stitch, sew bias tape along three sides of the apron. Attach and, if necessary, trim off excess trim.
If a strip of fabric is used instead of a finished binding, then we make two counter folds on it and iron it.
We also trim the top edge with bias tape or a strip of fabric. If desired, sew in a lace ribbon.
We process the cuts on the sides of the apron, deciding on the required length of the ties. First we fix the parts with pins, then stitch them.
Repeat for the second side.
We hem the open edges of the trims by hand or by machine, tucking them inward.
Iron the finished product.
Apron made from old jeans
If your son needs an apron for labor lessons, we suggest sewing it yourself from old jeans. This solution has several advantages. Firstly, denim fabric is quite durable, which is important given the purpose of the apron. Secondly, sewing such an apron is simple and quick, since there is absolutely no need to create a drawing. Thirdly, in the end you will receive a unique product, different from boring store-bought analogues. Fourthly, you will save your family budget.
Description
Let's look at making an apron step by step. First, let's cut off the belt from the front. We do this carefully, without damaging the straps.
Cut the legs to the desired length and width.
We cut along the central seam, ensuring that the legs lay evenly.
We fix this position with pins.
We sew the trouser legs, trim off the excess fabric on one of them. We sew the belt.
For the bib, we cut out a rectangular blank from the remains of the trouser leg. We make a fold along the top edge.
For the strap, you can use a seam cut from the same jeans.
We sew the bib with the apron. We make loops in the bib and insert the ends of the straps there.
It turns out to be a completely unglamorous, masculine version of the apron.
If you are using skinny jeans to make, then when you combine the legs, you will end up with an open area. We cut out the desired part and, placing it under the bottom, attach it.
We get a work apron.
Presentation “Constructing a drawing of an apron in M 1:4”, 5th grade
#5th grade #Labor #Technology #Teaching and methodological materials #Presentation #All teachers #Subject teacher #Additional education teacher #School education
Construction of a drawing of an apron in M 1:4 Developed by a teacher of the highest category Elena Valerievna Smirnova MBOU Secondary School No. 7, Sharya
What lines are called horizontal? Vertical? What lines are called horizontal? Vertical? How to construct a right angle? Remember why you drew a vertical line when you drew a vase, glass, jug? Drawing A drawing is a graphic representation of an object on paper in full size in a reduced or enlarged form.
Scale ruler (cutter's ruler); Scale ruler (cutter's ruler); Pencil TM and M; Square; Compass. indicates how many times the actual size of the object is smaller. The scale is written as a ratio of two numbers, the first of which relates to the drawing, and the second to the object. A scale of 1:4 means a reduction of 4 times. Drawing Tools Scale
Lines in the drawing Name of lines Drawing of lines Application Solid main Stroke of the contours of the main parts Solid thin Auxiliary construction lines, extension and dimension lines Solid wavy Interruption of the drawing Dashed Fold of fabric, location of the part on the pattern Dashed-dotted Axes of symmetry of a part or image
Signs used Designations in formulas Read Build (·) B We build a right angle in the right-left corner, we get point B we get = set aside ↓ OB = OT + Dst: 2 = Down from point O to point B set aside (for example, 24 cm) p/v Constant value
Techniques for working with a ruler and square
What measurements are needed to draw an apron drawing? What measurements are needed to draw an apron drawing? Can measurements be the same for everyone? Why? Why are St and Sat measurements recorded in half size? What tools are needed to create a drawing? At what scale will we build the drawing and why? Construction of an apron drawing in M 1:4
Required measurements: Required measurements: St = 30 cm; Sat = 34 cm; Dn = 18 cm; Dn = 32 cm. 1. Build ()B 2. VT = Dn = 18 cm; Construction of an apron drawing in M 1:4 V T
Required measurements: Required measurements: St = 30 cm; Sat = 34 cm; Dn = 18 cm; D low = 32 cm. 3. TT1 = Sat: 2 + 6 = 23 cm; 4. TN = Dnch = 32 cm; 5. Connect in (·) Н 1 Construction of an apron drawing in М 1:4 В Т Т 1 Н Н 1
Required measurements: Required measurements: St = 30 cm; Sat = 34 cm; Dn = 18 cm; Dnh = 32 cm. 6. BB1 = 7 cm; 7. TT2 = 9 cm; 8. () B1 and T2 – connect with a straight line; Construction of an apron drawing in M 1:4 T 1 N 1 V T N V1 T 2
Required measurements: Required measurements: St = 30 cm; Sat = 34 cm; Dn = 18 cm; Dnh = 32 cm. 9. TK = 7 cm; 10. KK1 = 7 cm; 11. from () K1 to 14 cm; 12. Connect in Construction of an apron drawing in M 1: 4 T 1 V T N B1 T 2 N 1 K K1
Construction of the belt Construction of the belt 13. We build () P; 14. P P1 = 5 cm; 15. P P2 = St + 25 = 16. Connect in Building the straps 17. Build () P; 14. B B1 = 5 cm; 15. B B2 = 50 cm; 16. Connect in Constructing a drawing of an apron in M 1:4 Independent work: constructing a belt and straps P P 1 P 2 P 3 B B 1 B 2 B 3
Draw up a drawing with solid main and dashed lines Draw up a drawing with solid main and dashed lines Construction of a drawing of an apron in M 1: 4 T 1 V T N V1 T 2 N 1 K1 K2 K3 K4 P P 1 P 2 P 3 B B 1 B 2 B 3
Construction of a drawing of an apron in M 1:4 T 1 V T N V1 T 2 N 1 K1 K2 K3 K4 P P 1 P 2 P 3 B B 1 B 2 B 3 M i d e n Bottom part Pocket Bib Belt Strap Sign the apron details
Name and show the parts of the apron that are rectangular in shape? Name and show the parts of the apron that are rectangular in shape? Which segment marks the middle of the apron? Side apron line? What measurement determines the width of the bottom? Explain why, when calculating a belt, a large increase (25 cm) is given to the St measurement. Name the paired parts of the apron. Construction of an apron drawing in M 1:4