Time and materials for the lesson on the application “Mushrooms”
The application, in which the central place is occupied by the image of mushrooms, is carried out at the beginning of the school year (September-October). At this time, many mushrooms ripen in forests and park areas; children can see them while walking, at the market. Children often help adults collect and even prepare these gifts of autumn. Impressions from what is happening in real life can become an impetus for artistic activity.
Since in the middle group children can already use scissors and are familiar with various, including non-traditional, types and techniques of appliqué, different materials and techniques can be combined in one work. The following materials are most often used in kindergarten:
- Plain colored paper, velvet, corrugated, with prints.
- Natural material (dried and ironed leaves), sprigs of dried flowers, dry grass, straw.
- Non-traditional for applique, that is, napkins, cotton wool, plasticine, cereals, sequins, magazine clippings, illustrations from children's books that have fallen into complete disrepair.
- For the background, you can use tinted thick paper and large scraps of wallpaper. Children themselves can tint and decorate the background; for example, collective autumn work can be pasted onto A3 paper with prints of autumn leaves in a yellow-red color scheme.
Children can tint the background themselves and apply a design on it with stamps
Auxiliary materials and tools:
- scissors;
- glue and brush;
- wipes for removing excess glue;
- oilcloth to protect the table surface.
It is better to stick mushrooms on a bright colored background so that their light stem is clearly visible
Planning a lesson
It is advisable to conduct a class on sculpting mushrooms in the autumn months, since this topic clearly correlates with this calendar period.
Degree of independence
Children 4–5 years old cannot yet choose their own options for tasks. At the same time, there is no point in suggesting that the whole group sculpt the same thing: someone can be asked to sculpt a fly agaric, and someone else can be asked to sculpt a boletus mushroom. The teacher gives recommendations on the color scheme for future work to students. On the other hand, variability in the work in terms of the techniques used is quite possible. Whether, for example, to use stacks for additional processing, children themselves can decide.
Collectively or individually?
Modeling is a type of creative activity that allows for options for both individual and collective work. Children can work together. Two or even three guys can, for example, prepare a composition from several items. This could be some kind of “magic boletus” from a fairy tale, under which forest animals are hiding from the rain, if there are some small toys the size of Kinder Surprise figurines (they can also be included in a similar composition). It could be the handsome fly agaric from the famous cartoon. Or mushrooms for a squirrel, various mushrooms in a clearing, a basket of mushrooms for the girl Masha from a fairy tale, a composition “mushrooms and berries” and so on.
In the course of such work, the results of any other preliminary classes can be used. This is how we can, in this situation, apply an individual approach to the implementation of the teacher’s ideas within the framework of this topic.
You can use a red plastic container lid as a stand for mushrooms.
Motivation of children
Before starting the lesson, children should get a clear idea of what exactly they should depict in sculpture. To do this, you should precede the actual modeling by showing pictures and a story-explanation on the topic: children should see the mushrooms that they will have to embody in sculpture.
You need to think in advance about how to distribute tasks if children work in pairs and triplets. Which of the children should be personally entrusted with making a specific mushroom or even several, and which should be entrusted with making small decorative details such as a skirt on a leg or spots on a cap. When working with a group - both when it is divided into microgroups and when children work individually - you should also adhere to a “fairytale mood”, turning modeling work into a kind of magical game, motivating children to achieve a significant result .
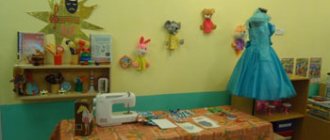
The result of the work is not only the small sculptures themselves, but also the relationship between them, which is indicated by the plot of the original fairy tale. All this can and should be beautifully presented - at least in the form of a small exhibition of works in the “art corner” of the group, to the delight of parents who will see the results of their children’s work.
Children's work can be organized into a mini-exhibition
Table: summary of a modeling lesson on the topic “Mushrooms” (middle group, author M. S. Mazur)
| Subject | "Mushrooms" |
| Tasks |
|
| Material |
|
| Progress of the lesson | Educator: Guys, today we are going on a trip to the forest, do you want to go there with me? Children: Yes! Educator: Hello, forest, wonderful forest, all of fairy-tale wonders! Who is hiding in the thicket? Who's snoring under the Christmas tree? (hedgehog), Look who's hiding under the tree? Children: Hedgehog! Educator: That's right, hedgehog. He is happy that we came to visit him! Do you think the hedgehog is living well? What does he do, where does he sleep, what does he eat? (Children answer). Educator: That's right! Preparing for winter, collecting mushrooms. Guys, the hedgehog asks you to help him stock up on more mushrooms. Shall we help? Children: Yes! Educator: Let's see together what mushrooms grow in the forest. Educator: What kind of mushroom is this? Let's guess the riddle: He stands in a red cap, with patches, On a white leg, does not walk anywhere, Only drives away flies (fly agaric) Do you think fly agaric can be eaten? Children: No, it's inedible. Educator: Let's look at the fly agaric together carefully, we need to remember it so that we know it and not confuse it with other mushrooms. How is it different from other mushrooms? Only the fly agaric has a red cap, as if strewn with small grains. Educator: We must remember! The fly agaric is poisonous! This mushroom cannot be used as food. We need to find edible mushrooms so that our hedgehog can survive the winter. Look, a mushroom is hiding under another tree. Now let’s guess what kind of fungus this is. Children guess. Educator: Tell me, tell me. Our mushroom picker knows this, The best mushroom in the world. Well, of course - (boletus) This mushroom is edible, it has a plump stem. And his hat is big and round. Do you think our hedgehog will be happy with such a mushroom? Well, enough of sitting in one place, we’re walking through a big forest. Get up, now we'll look for mushrooms. Physical education lesson: We'll go, let's go, let's go (steps in place) And we'll find mushrooms (claps hands) One - a mushroom (bending forward) Two - a mushroom (bending forward) Three - a mushroom (bending forward) We'll put them in a box (bending to the sides ) How is it, guys, we walked all over the forest, but didn’t collect enough mushrooms for the hedgehog. What should we do, how can we help the hedgehog? Children: You can make mushrooms for a hedgehog from plasticine. Educator: That's right! Sit down at the tables, let's see how we make a mushroom for a hedgehog? First we mold the leg. What color will it be? That's right, white. What shape is the mushroom's stem? Like a column. So, we take some of the white plasticine and roll it into a thick sausage. It must be strong to support the hat. What color will the hat be? Brown. Then we take some of the brown plasticine and roll it into a ball. Now we will flatten this ball in our palms. Have we got a hat? I think it turned out great. Now we can put this hat on the leg. We carefully connect everything. What great fellows you all are! Hedgehog is very grateful to you. |
Work order
How and from what we make the details of a specific application depends on the chosen technique and type of work. The order of gluing also depends on them.
Cut-out applique
Children prepare the pieces by cutting off two corners of red or brown rectangles adjacent to the long side. These will be mushroom caps. Then cut the legs to the required length from a strip of white or yellow paper.
Place the parts on the sheet, putting caps on the legs without gluing, to create a composition in the center of the sheet, to teach the kids to see the result of the work. After this, the legs are glued on, the caps are trimmed, and the ready-made images of mushrooms are supplemented with details that the teacher prepared and suggested. It can be leaves, paper grass, natural material.
This work successfully combines cut-out paper appliqué and decoration with natural materials.
Broken and mosaic applique
Pupils are given blanks: red or brown paper circles, white or yellow stripes. Children independently bend the circles in half and tear them along the fold line, getting two mushroom caps. The strips are also bent across and torn, these will be the legs. After laying out the composition, the legs and caps are glued onto the sheet, the work is decorated with “grass” from small pieces of green paper, and “foliage” from scraps of yellow and red.
Mosaic applique can also be used to depict mushrooms. Children are given templates with images of mushrooms; their task is to tear small pieces of paper from a sheet of the corresponding color, filling them with the silhouette of a mushroom, previously well coated with glue. This type of work is similar to cereal appliqué, in which it is also necessary to fill the outline with material, placing it on glue. For the cap, take buckwheat, for the leg - semolina, rice or millet. Mosaic application, both with paper and cereals, is difficult and requires painstaking work, so it is not performed in class, but in free artistic activity, together with an adult. In the older group, children will be able to do this same type of work themselves in pairs or threes.
Filling out the templates with mosaics or cereals starts from the top, otherwise the finished part of the work will disturb the child
Application made from natural material
Children themselves or with the help of a teacher make blanks for hats (from leaves close to round in shape, such as linden, apple, poplar), cutting the leaf along the main vein. The legs are made from long leaves, for example, willow, by cutting off the upper and lower parts. First they glue on the leg, then the hat, and decorate with straws, twigs, and grass.
If the teacher has planned a collective work “Mushrooms in a basket”, “A squirrel at his house with mushrooms”, then the basis, an image of a basket, a squirrel and its home, a tree trunk with a hollow, is prepared in advance, and for children in small subgroups (5-7 people) They suggest sticking images of mushrooms in the basket between the handle and the base or on twigs or strings located near the squirrel house.
Fly agaric applications turn out to be interesting and very beautiful. Children in the middle group will be able to cut out the fly agaric cap by cutting off the edges of the triangular red blank and cutting the stems of the mushrooms along the line. The “collar” of the fly agaric is made by the teacher, and the kids glue it on, since it is a small detail. But how much joy it will bring to decorate the fly agaric cap with white dots, especially since it can be done from napkins or cotton wool rolled into a ball, and from plasticine, and even by finger painting with white gouache.
White dots on the fly agaric cap can be done in different ways even in the same work
Both collective and individual works can be decorated with sequins, clippings from magazines and books, but if literature is used, it is necessary to tell children that these books and magazines are very old and unsuitable for reading, in order to instill in them a caring attitude towards books.
Fantastic mushrooms will be obtained if the caps are made from candy wrappers (cut out by the teacher), foil, and printed paper. The teacher will increase the children's interest in the activity by remembering the cartoon characters and fairy tales adored by the children: fairies, gnomes, wizards who could live on such unusual mushrooms. Having found images of children, forest inhabitants, bushes and trees among the scraps of magazines, you can create a collage telling about a trip to the forest to pick mushrooms.
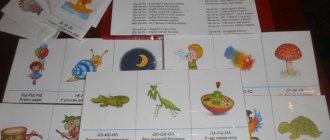
Photo gallery: samples of works and templates on the topic “Mushrooms”
An example of a combination of paper and cereal applique
A successful example of a combination of cut-out and cut-out applique
In this work, images of mushrooms are complemented by a figurine of a hedgehog, carved along the contour of a child’s palm.
Boletus and fly agaric can coexist in the same job
This work looks rich thanks to the rich decoration with autumn leaves.
Decorating an applique with paper straws looks interesting and original.
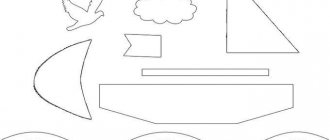
Instead of complex patterns, children in the middle group should be offered circles and strips that they can cut in half
This template is perfect for both paper mosaics and filling with cereals. You can invite children to trace this simple template with a pencil themselves, and then fill it in with small details
MAGAZINE Preschooler.RF
GCD for modeling in the middle group “Mushrooms”Tasks:
- Strengthen the ability to sculpt familiar objects, use familiar techniques: rolling plasticine with straight and circular movements, flattening with palms.
- Learn to sculpt with your fingers to refine the shape.
- Lead to a figurative assessment of work.
Material: Presentation “Mushrooms” , pictures and dummies of mushrooms, plasticine, modeling board, model of an autumn forest, ball, dry and wet napkins
Progress:
Educator: Guys, I suggest you guess the riddles (the teacher uses ICT with the presentation “Mushrooms” )
Educator:
He grew up in a birch forest. Wears a hat on his foot. The leaf stuck to it on top. Did you find out?
Children: It's a mushroom! Educator: In the soft grass at the edge of the forest there are red ears everywhere.
Golden sisters are called... Children: Chanterelles Teacher:
White dots on red - Poisonous mushroom, dangerous. There’s no point in talking here - Don’t disrupt...
Children: Fly agaric
Educator:
He will be born in an aspen forest, No matter how he hides in the grass, We will still find him: He is wearing a red hat.
Children: Boletus
Educator: That's right, these are mushrooms. Where do mushrooms grow?
Children: In the forest.
Educator: Children, can all mushrooms be picked in the forest?
Children: No
Educator: Let's remember which mushrooms are edible and inedible
Ball game "Edible, inedible"
Educator: Well done, you remembered everything.
Educator: Well done! Guys, take one mushroom at a time, look at them carefully and tell me how they are similar?
Children: Mushrooms have a stem and a cap.
Educator: That's right, children! How are they different?
Children: Mushrooms come in different sizes and different colors.
Educator: That's right, children! Today I suggest you make mushrooms from plasticine. First, I will tell you how to sculpt mushrooms. First, I will sculpt the stem of a mushroom, take a piece of plasticine and roll it between my palms with forward and backward movements. This is how the mushroom stem turned out. To make a mushroom cap, I take another piece of plasticine, put it on my palm, roll it out in a circular motion to make a ball, then put this ball between my palms and flatten it. Like this. Now I will connect the cap and the stem, I have such a beautiful mushroom. What is the name of this mushroom? (Boletus) Guys, do you understand everything? You can start sculpting. But first, I suggest you stretch our fingers. Watch and repeat after me.
Finger gymnastics “A crow walked across the field”
A crow walked across the field, carrying six mushrooms in the hem: Russula, boletus, boletus,
Milk mushroom, honey fungus, champignon, If you haven’t seen it, get out!
Independent activity of children, provide assistance if necessary.
Bottom line
Educator: Guys, look what beautiful mushrooms we got. Ilyusha, tell us how we used our palms to make mushrooms? (straight and circular) Roma will tell us what parts the mushroom consists of (leg and cap) And Sasha will show us what mushrooms we made (Boletus, boletus). Children design an exhibition of creative works “Mushrooms” .
| Next > |
Lesson on application on the theme “Mushrooms”
A lesson or direct educational activity (DED) in the middle group lasts about 20 minutes, and in the middle there is an active pause and a physical education session.
Table: approximate timing and summary of a lesson in the middle group of a preschool educational institution on the topic “Mushrooms”
| Target | Creating conditions for the development of creative abilities and independence. | |
| Tasks |
| |
| Materials | Paper blanks for mushroom stems and caps, dry leaves, glue, napkins, oilcloth, Squirrel toy, illustrations. | |
| GCD stage | Contents of the stage | Duration |
| Introductory part | The teacher makes the transition from the previous type of activity to a new one, organizes the children. You can use short poems about friendship, good mood, and a smile, which will evoke positive emotions in the students. | Up to 2 min. |
| Main part | Motivation for activity (options):
Looking at illustrations of mushrooms, which ones are best to collect? Which ones should you not touch? What is the difference between boletus and boletus? (Thickness of the stem, color of the cap). We need to make boletus and boletus mushrooms for the squirrel. Finger gymnastics, physical education. Showing the order in which the teacher performs the work. Repetition of rules for working with scissors. Making appliqués by children (cut out and glue on legs, hats, decorate with leaves and grass). | 15–17 min. |
| Final part | Teacher questions: What did we make today? For whom did they work? Do you think the squirrel will remember which mushrooms can be picked? Squirrel thanks the guys and promises to visit the group again and tell them how many and what kind of mushrooms they collected. | Up to 2 min. |
Summary of GCD on the topic “Mushrooms” middle group
Summary of GCD on the topic “Mushrooms” in the middle group
Target:
- introduction to mushrooms.
Objectives:
- expand children's knowledge about mushrooms (name, place of growth, structure);
- learn to distinguish between edible and inedible mushrooms; — develop children’s active vocabulary (names of mushrooms); - cultivate a caring attitude towards nature and friendliness. Materials and equipment:
- a basket with mushrooms, covered with a handkerchief;
— audio recording “Sounds of the Forest”; - pictures of mushrooms (white mushroom, boletus, boletus, chanterelles, fly agaric, toadstool) Preliminary work:
1. Reading V. Kataev “Mushrooms”, V. Suteev “Under the mushroom” 2. Examination of the album with illustrations “Mushrooms”
Progress:
Educator :
- Children, look what I have in my hands!
Want to know what's there? Children:
- Yes!
Educator:
- In the summer it grows in the forest, It doesn’t go into the basket on its own.
You need to bow to him, cut off the leg, don’t be lazy, then he will take off his hat, food from him is delicious. What grows under the hat, doesn’t go into the basket itself? Children:
- Mushroom.
The teacher removes the handkerchief and shows the children mushrooms. Educator:
- Children, where do you think these mushrooms come from?
Children's guesses. Educator:
- Where do mushrooms grow?
Children:
- In the forest.
Educator:
- I propose to go into the forest and find out how mushrooms grow.
The children agree. The teacher turns on the audio recording “Sounds of the Forest.” Teacher:
We are going to the forest today.
( Children walk in a circle)
That forest is full of miracles!
It rained in the forest yesterday - ( Shakes their brushes)
This is very good.
( Clap their hands)
We will look for mushrooms (
Place palm to forehead)
And collect them in a basket.
( They squat and pick mushrooms)
Here are the butterflies sitting (
Point to the right)
There is honey mushroom on the stump.
( Point to the left)
Well, you, fly agaric, (
They shake a finger)
Decorate the autumn forest.
Good forest, old forest. ( Children walk in a circle)
Full of fabulous wonders!
We are going for a walk now and inviting you with us! Educator:
- Here we are in the forest. Look how many mushrooms there are around. Let's take a closer look.
Picture White mushroom Educator:
— Near the hillock on the path there is a mushroom standing on a thick stalk.
A little damp from the rain, the porcini mushroom is large and important. Educator:
- This mushroom is called a porcini mushroom.
It has a stem and a cap. What color is the mushroom cap? Children:
- The hat is brown.
Educator:
- What color is the mushroom stem?
Children:
- The leg is white.
Educator:
- The porcini mushroom has a very thick and strong leg.
If you cut this mushroom, it will be white in the middle. Hence the name of this mushroom. The white mushroom is considered the king of mushrooms (the main one in the forest). Because it is the largest mushroom in the forest and valuable (delicious). Mushroom pickers love it very much. Who are mushroom pickers? Children: -
People who pick mushrooms.
Picture Boletus Educator:
- How good are the tough ones in red hats!
I'll collect them early in the morning under the aspen tree. This mushroom is called boletus. It grows under aspen, which is why it is called boletus. Educator:
- What does the boletus have?
Children:
- Leg and hat.
Educator:
- What color is the hat?
Children:
- The hat is red.
Educator:
- And the leg?
Children:
The leg is white with black ones.
Picture Boletus Educator:
- We have another mushroom in front of us.
This is a boletus. Why do you think it is called that? Children:
- Grows under a birch tree.
Educator:
- Under the birch tree in front - A boletus, look, on a tall slender leg... The leg is a little speckled!
How is it different from boletus? Children:
- With a hat.
The boletus has a brown cap. Picture of a Chanterelle Teacher:
- These are beautiful foxes.
Very friendly sisters. It is not easy for them to hide. It can be seen very far. Educator:
- Who can tell why these mushrooms are called that?
Children:
- They are red, like foxes.
Educator:
- Children, what mushrooms did we meet in the clearing?
Children:
- Chanterelles, boletus, boletus, porcini mushroom.
Educator:
- All these mushrooms can be eaten, you can cook different dishes from them (fry, dry, cook mushroom soup). Therefore, all of them can be called edible.
Outdoor game “Mushroom picker and mushrooms”
According to the counting, a mushroom picker is selected, the rest of the children are mushrooms
Teacher:
- Here is a forest clearing, There are edible mushrooms here. I invite everyone to the game, We play, you drive! Mushrooms grow in a clearing, at the teacher’s signal “The mushroom picker is coming,” the children run away and the mushroom picker catches. The game is played several times.
Educator:
- Now let's get acquainted with inedible mushrooms.
Picture of Amanita
Educator:
- This mushroom grows in the forest. Don’t put it in your mouth!
It's not sweet at all. Specks on the cap. Red like a tomato. Inedible fly agaric! Look what a fly agaric looks like. Children:
- White leg, red hat with white dots.
Educator:
- It is beautiful and bright, but very dangerous, because it is poisonous.
Under no circumstances should you touch it with your hands or even kick it. Picture of Pallid Grebe
Educator:
- Here is another mushroom that is poisonous to humans.
Pale-faced grebes wander in a flock through the clearing. I won't play with them. I'll go around and forget about it. Why should you avoid these mushrooms? Children:
- They are poisonous, inedible, and should not be touched.
Educator:
- Never eat unfamiliar berries... And you don’t need to put mushrooms in your mouth: your head will spin, your stomach will hurt, and the doctor won’t save you from poisoning.
Result: Educator:
- Where have we been?
(In the forest) Educator:
- What mushrooms did we meet?
(Edible and inedible)
We've played enough with mushrooms, and now it's time for us to go to mom.
Finding mushrooms is not difficult. You need to take them carefully. You need to know them well, so as not to collect toadstools.