Features of paper layouts
A DIY paper Kremlin helps parents develop their child’s imagination and fine motor skills, and teaches them how to work with cardboard, scissors and other tools. If you are just doing activities with children, it is enough to choose an easy-to-make craft in the form of a flashlight, flower or animal.
A do-it-yourself model of the Kremlin is made only in the following cases:
- The family collects handmade items. It can be not only paper products. Matches, Chinese sticks, cotton wool, fabrics, plastic, etc. are used.
- The family collects building crafts made from paper. Often these are landmarks of the World, so the Kremlin will always be added to the collection.
- It is required to make a model to form a stage for a mini-theater. Perhaps it will be a shadow theater, but the shape of the building in question has to be created for the surroundings.
Regardless of where the Kremlin model will be used in the future, it must be assembled from paper according to the instructions.
How to make the “Salute” applique
Any work performed using this technique involves gluing pre-made elements onto the base. A flat surface, for example, a sheet of cardboard, is often used as a blank for decoration. In addition, a postcard, packaging (box), as well as a decorative object in the form of a vase are suitable. The “Salute” applique can be made from paper, thread, plasticine, fabric, cereal, grains, beads, buttons. Paper is the simplest material that even small children can work with.
How to do
For production, you can use ready-made templates or make them yourself based on real photographs. Design of layouts occurs manually or through computer programs. The first is a simplified version, suitable for classes with children, and they themselves can draw a template for later cutting. The second option is complicated, but helps to obtain a design similar to the original.
Required materials and tools
To make an applique or voluminous paper kremlin, you need to prepare materials and tools for the work. Depending on the type of craft, you will need the following items:
- Paper and cardboard. Use colored paper for appliqués and white office paper for three-dimensional designs. It will also be useful in work where you need to print a ready-made template.
- Scissors and stationery knife. Only schoolchildren or adults should work with a stationery knife. Children should not handle a knife.
- Glue stick and PVA. For younger children, it is recommended to take a pencil, and for schoolchildren, PVA is suitable. In addition, PVA glue glues office paper and cardboard better.
- Pencil, pen, ruler and other stationery items, if you need to draw the model of the Kremlin yourself.
Manufacturing will also require additional elements used as decoration. You may need felt-tip pens with which children can color the paper blank.
Step-by-step assembly of a three-dimensional craft with step-by-step photos
Before you start making the Kremlin, you need to study the instructions for action, as well as prepare the paper and other materials needed for the work.
Model of the Nizhny Novgorod Kremlin
First of all, you can adopt the Nizhny Novgorod Kremlin made of paper. It is simplified in implementation, but you can go the hard way and do everything efficiently and fully. You can recognize the reliable diagram - the one located on the wall of the building in Nizhny Novgorod.
The model of the Nizhny Novgorod Kremlin is presented in a simplified version. There is only a wall and towers, but the entire complex structure can be safely restored by analogy.
The presented layout is enough to print. This can be done on a black and white or color printer. Black and white print will require coloring. If you want to make a craft from cardboard, the cut-out template should be glued to it and cut out. Next, glue the parts in accordance with the existing instructions.
If you want to make the Kremlin larger, you can print out several sheets of the template provided. The blanks are cut out and connected to each other. It turns out that it is not quite an example of Nizhny Novgorod construction, but the dimensions of the craft are larger.
Moscow Kremlin
Schemes for the manufacture of Moscow buildings are proposed. There are many of them, but you should choose according to your own capabilities or according to your own and your child’s wishes.
Layouts vary. Masters in the manufacture of paper structures can make complex crafts that fully convey all the buildings.
But novice paper designers should take on the easy option. For example, making only the wall and the Spasskaya Tower.
The Moscow Kremlin made of paper is assembled from several parts. To do this, you need to print several templates at once. In the future, they are assembled into a building, which will consist of several structures in the layout. Which ones - the designer will decide on his own.
The Spasskaya Tower is assembled separately. There is also a separate template for it, which is cut and joined according to the sample.
The production of Moscow buildings always attracts craftsmen who prefer to work with paper and create the beauty of buildings. They are often made from cardboard, but thin, which bends and sticks better.
Tula Kremlin
Most craftsmen, after the Moscow Kremlin, take on the production of other similar structures. Thus, the Tula Kremlin made of paper is attracting more and more attention. Here you can also make only a wall and a tower. But it is possible to restore a full structure.
If there is a need to make a simplified version, you can take on the production of only a few structures. It is recommended to use a schematic representation of the building in Tula.
The lack of ready-made templates for assembling one of the many towers can be made up for with any similar layout.
Zaraisky Kremlin
The model in the city of Zaraysk is also popular, so there are many ready-made templates for its production. Each master should use only those examples that are within his power. For inspiration, it is recommended to use ready-made works of experienced craftsmen. Thanks to them, a novice needleworker will be able to create designs that are unrealistic for themselves.
Before you start making a model of the Zaraisk Kremlin, you need to familiarize yourself with the diagram of its structures located in reality.
To begin with, it is enough to take into work only the walls and one of the towers. Gradually they begin to manufacture the cathedrals and the Spasskaya Tower.
Applications
It is impossible to make an origami Kremlin, but you can make an applique with three-dimensional elements. These are simple templates that are easy to make yourself. It is enough just to decide on the choice in buildings. As a rule, first of all they pay attention to Moscow construction.
The application with the Moscow building is formed in the following varieties:
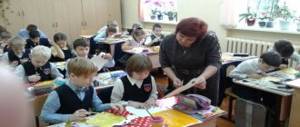
- A simple craft. The presented composition can be made with children of younger groups. To do this, just cut out blanks from colored paper and glue them onto white cardboard.
- You can make the work more difficult for older kindergarten or schoolchildren. The manufacturing principle is simple - you need to draw the format of the building on white paper or cardboard and paste it over with pre-torn or cut pieces of colored paper. You can make other types of crafts in a similar way. They improve fine motor skills.
- You can make an application with a three-dimensional structure. For it, a model is separately cut out on white paper with the shape of a tower, and then gaps are added to it. They are cut out along with the layout and folded back. Colored paper is glued onto the template, visually forming a tower. Next, you need to glue the gaps to the base and finish the craft.
It is recommended to complete the crafts in accordance with the children’s imagination and their own wishes. You should not refuse the child’s opinion if he wants to do something, but cannot or does not know how to do it. He should be helped.
We make fireworks from small circles and threads
This option is simple as it does not require the use of scissors.
To make parts you will need a hole punch. An ordinary stationery tool that makes two round holes will do. The work done using elements made using a figured stamp looks even more impressive. Such hole punches are used in scrapbooking and other types of decorative activities. The “Fireworks for May 9” applique can be made from many stars, and for a birthday or other holiday - from flowers or hearts. The decoration looks even more impressive if two hole punches were used, which make blanks of different sizes.
This decor is performed in the following sequence:
- Make a lot of blanks from multi-colored paper. If you use a regular hole punch, you will get something similar to confetti.
- Draw the approximate location of the parts on the base.
- Apply glue to the surface of a postcard, panel or other object. Create a composition by applying colored blanks. Add glue if necessary.
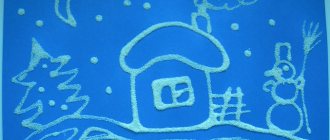
- After the fireworks “caps” are formed, cut threads of the corresponding colors and glue them in the form of bunches, diverging from bottom to top.
The composition will be spectacular. It can be supplemented with sparkles and painted details.
Manufacturing from round blanks
The Victory Salute applique can be made from large parts created according to one template from different colors of designer paper. This is one of the easiest ways.
To make such a decoration for a postcard, wall panel or other decor, follow these steps:
- Take several sheets of different shades, or better yet, surface textures. Metallized and pearlescent thick paper or cardboard will look great.
- Prepare a template (or several) from a regular sheet. Make a round blank of the required diameter. Choose any size. It can be from 2-3 cm for a postcard to 10 cm for a wall panel.
- Cut out several circles from prepared sheets of paper one template at a time. Make cuts on each one from the edge to the center; you can even decorate the outer circle in the form of a wave or teeth.
- Glue the cut out parts onto the base, preferably a dark color. Arrange the elements so that the small circles are at the bottom and the larger circles are at the top or to the sides. This will make a more realistic picture by creating the illusion of perspective.
As you can see, this kind of work is not difficult to do. The child can handle the task on his own if he already knows how to handle scissors.