Decoupage
Yulia Selyaninova
Decoupage
To develop creative imagination in children and creativity in general, it is necessary to diversify techniques, artistic materials, methods and approaches in visual activity.
One of the current trends today in decorative art is the technique of decoupage . I recommend this technique for children of preschool age and older.
Of course, in creating decorative works using this technique, the help of an adult is necessary. It is very good if this creativity is joint. Children will be happy to help you cut out the necessary elements for decoration from scrap materials - newspapers, magazines, napkins, or decoupage cards . And even if the work is not completed thoroughly, be sure to praise them! Believe me, such joint activities have great pedagogical meaning - the child gets to know the beautiful and sees the results of his work. For children, decoupage will be easier to do on a flat surface. For example, use it in the design of furniture, photo albums, diaries and other cute little things, especially those that make girls happy. Handmade plates and gifted to a loved one, grandmother, mother, father, will definitely not leave anyone indifferent! But if you use this technique on unusual objects (light bulb, Christmas ball, etc.)
then perhaps you will receive a designer toy or something made by yourself.
Let's define the basic concept of decoupage .
Decoupage is one of the types of decorative art.
Derived from (French dcouper - cut) - a technique for decorating various objects, based on attaching a drawing, picture or ornament (usually cut out)
to the object, and then coating the resulting composition with varnish for the sake of safety, durability and a special visual effect.
If you try to search for information about decoupage on the Internet , you will see what a huge number of sites and information there are about this technique.
I tried to highlight the main thing and adapt this technique for older preschool children.
To consolidate and master this technique, I recommend that parents and children engage in creativity in their free time. This is not only a fun activity, but also a productive activity that will bring joy not only to children, but also to their parents.
So, we need:
an object on which we will embody an artistic concept. To start, use something simpler - the lid of a box or casket, in our case it will be a plate;
picture - napkin, decoupage cards or whatever you decide to use for decoration;
PVA glue, which can be diluted a little with water;
scissors - can be of different sizes, from manicure ones for cutting through the smallest details, to ordinary stationery ones for cutting out, for example, ornamental strips;
tassels;
a small roller for better smoothing of pictures, but you can also use a regular cloth napkin or brush;
varnish for decoupage - in our case it is PVA (it is safe for children and water-based)
;
elements of additional decor if you decide to use them, for example, sparkles, paints;
wipes to remove excess glue (you can use a regular old cloth)
.
Step-by-step description of the decoupage technique for beginners
Prepare the surface - it should be dry and clean. If the surface is wooden, prime it; for this you can use acrylic varnish or PVA.
Carefully cut out the picture, making sure that the background is completely removed and only the picture itself remains. Place it on the surface and determine the place where we will stick it.
Now you need to lubricate the picture with PVA glue, then you need to lubricate the surface with the same glue. Slowly, pressing carefully, glue the picture. Use a napkin, roller, or just your fingers to smooth it out to remove any wrinkles or air bubbles.
Use a napkin to remove excess glue. Let the picture dry.
If you need to further decorate the picture, for example, with glitter or paint, or both, cover the picture with one layer of glue and after it dries, apply the desired decorative elements.
Now you need to cover the product with several layers of glue or varnish.
It is possible to coat it with a spray can of varnish for a quick result, so that the finished result looks like an absolutely smooth and even surface without protruding borders of your picture.
It’s interesting that in the old days it took up to forty layers of varnish to make a truly real work of art!
Isn't it true that a product designed using the decoupage is very similar to Chinese lacquer objects? Now you are the owner of a unique thing, made in an ancient, but at the same time, such a modern style! And what is very important, the work is done together with the child!
If you have tried to decorate something using the decoupage and were pleased with the result, I advise you not to stop and continue your creative endeavors! I wish you creative success!
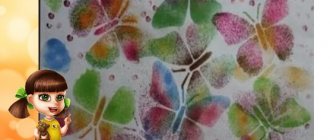
Calculation of the cost of a cotton panel using decoupage technique
How much does it cost? This type of needlework is quite inexpensive. The initial costs are low: you can get by with glue and napkins. You can get a taste for it, buy more paints, markers, varnishes, etc. A matter of taste, imagination and wallet.
The calculation of the cost of materials did not include oilcloth for the table, plywood, threads, cotton wool, or a piece of fabric because... These materials and objects were found at my home.
We also do not take into account energy costs, because work was carried out during the daytime.
| № | Material used | Price, rub.) | Consumption | Costs (RUB) |
| 1. | Painting printed on a color printer | 10 | 1 PC. | 10 |
| 2. | PVA glue | 85 rub. | 1 jar | 85 |
| 3. | Acrylic paints | 230 rub. (1 pack) | It took quite a bit | 20 |
| 4. | Acrylic varnish | 79 | 1 jar | 79 |
| TOTAL | 194 | |||
Environmental assessment of panels using decoupage technique
- Decoupage technology does not have a negative impact on the environment or human health. Environmentally friendly materials were used in the manufacture of the product.
- The decoupage technique is not particularly difficult to perform, but it requires care and precision.
- Decoupage is a fascinating, creative work that develops imagination and turns boring old things into new and beautiful products.
Self-esteem
Making the painting gave me great pleasure. She turned out very beautiful. I am sure that my mother will like the finished product.
The product meets the requirements: aesthetically designed; the material is optimally selected, environmentally friendly and hygienic; no flaws.
This work gives you the opportunity to express yourself and show your creative imagination. There are no serious difficulties experienced while working on the product.
The completed painting is original and pleasing to the eye.
Don’t waste your life with idleness - Do handicrafts! Sew, knit - don’t be discouraged, Or embroider with satin stitch. Here is a hook, needles, and a hoop for our nimble fingers. Fabrics, ribbons, borders - My head is spinning! The result is to the delight of us, our loved ones and friends.
Conclusion
Now the fashion for decoupage is spreading around the world like wildfire - quickly and uncontrollably. Millions of people enthusiastically cut paper and cover almost any object with it. Hundreds of companies produce napkins and decoupage cards, varnishes and adhesives for decoupage on various objects. Courses on teaching the art of decoupage are constantly attended by students.
The accessibility and simplicity of the method attract more and more new masters to the ranks of decoupage. Indeed, in order to do the simplest work, all you need is a drawing on thin paper, glue and varnish. After practicing on small objects, you can move on to larger works.
A wide variety of things await your inspiration: an old chest of drawers, a shelf, a closet, kitchen furniture... Sometimes completely unexpected objects are decorated with the help of decoupage, for example, a bicycle frame, a refrigerator or a computer mouse and keyboard. There are no limits to creativity. A couple of hours of work, and here in front of you, instead of a coffee jar, is a cute vase.
When I started the work, it seemed to me that it would take a lot of time and be very painstaking. But all the difficulties in manufacturing were immediately forgotten, seeing that everything worked out for me.
After analyzing the work done, I concluded that a thing made with my own hands is more expensive than something bought in a store, because my love and skills were invested in it.
Adviсe
To make the craft beautiful and neat, you need to avoid the most common mistakes. Here are some of the tips:
- Do not start varnishing the product until the paint has dried on it.
- Do not glue the napkin to the product without a white primed base.
- Do not varnish the product with light-colored napkins; the varnish may turn them yellow.
- Do not use gouache or oil paints for decoupage.
- All wooden workpieces must be cleaned with sandpaper.
- Before you start working with the blank for the box, unscrew all the fasteners and fasteners from it. They need to be painted separately.
- To prevent decoupage for preschool children from becoming a painful task, it is better to choose napkins with bright images from fairy tales and cartoons.
By following these tips and doing everything carefully, you can achieve excellent results.
Article “Decoupage for children”
Article “Decoupage for children”
Decoupage is a type of applied art that represents
technique using printing, followed by varnishing the resulting image.
Decoupage technique is modern in our time. Easy-to-use materials can be purchased at any craft store, office supply store, or go to a hardware store.
With decoupage you can decorate anything that your imagination suggests: flower pots, vases, plates, glasses, cutting boards, etc. You can sew a tablecloth and napkin from simple fabric and create an exclusive set.
You can make a sofa cushion to suit any interior. You never know what can be done...
The main thing is that all things turn out beautiful and useful in the household. Decoupage appeared recently in Russia and has become a very popular hobby. However, for children this is not just a hobby, but very useful fun.
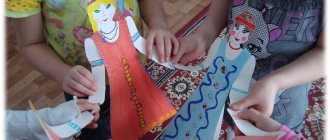
Decoupage will prepare a preschooler's hands for writing and work, teaching him to work with a brush, scissors, paper, patterns, developing logical thinking in the process of thinking through the sequence: choose a pattern, arrange a pattern or design, cut, paste, varnish. Develops fine motor skills of fingers and hands. With developed motor skills, preschool children are better prepared for school and learn to write more easily, since the writing technique requires coordinated work of the small muscles of the hand and the entire arm. It also develops visual perception and voluntary attention. Lack of preparation for writing and insufficient development of fine motor skills and visual perception may be the cause of a negative attitude towards learning.
During decoupage classes, the child learns to use scissors, hold a brush, and, accordingly, a pen. At what age can you start decoupage? At a very early age, because this technique has various types of complexity, from a person who does not know how to draw to an experienced professional.
The materials, used mainly in an aqueous solution, are odorless and non-toxic, which makes them possible to use when working with children. The child will be able to do decoupage, decorate blanks for boxes, boxes, trays, plastic objects and plastic decorations, glass plates, glasses, ceramic vases, flower pots, figurines - all this can be decorated with colorful motifs from napkins.
The beauty created by the hands of a child will be perfectly protected by varnish and will quite possibly become a source of family pride, which in turn will give the child confidence in his abilities.
Educator at MADO No. 10 in Salavat
Miroshnichenko Z.Kh.