Elena Abashina
Materials and tools.
2. Cardboard for the base
4. PVA glue
5. Items with a round base (Cup, saucer)
.
For such applications
you can choose any silhouette, for example a cat, a swan,
a snowman
, a bunny. Depending on the chosen plot, you can use additional details - pieces of colored paper, fabric, cereal.
a snowman on cardboard
.
Older children can do this on their own. A snowman can be drawn by
tracing objects that have a round base. Help your child do this.
Spread the surface inside the outline with PVA glue (not immediately, but in parts as you make the application
)
Show your child how to tear off small pieces of cotton wool
and place them on the area covered with glue. Let the child do this on his own.
Start with the snowman's
. While you are making the bottom circles, it will dry and you can draw the face.
When the snowman is ready
, ask your child to draw a face. You can glue a broom, a bucket, or snowflakes cut out of paper onto your head.
What to talk about with your child.
snow outside
, it's time to sculpt
snowmen
.
As a rule, these are three snow globes placed on top of each other. The snowman's
nose is usually a carrot.
Remember the fairy tale, how the Snow Maiden
.
Remember poems, New Year's tales or riddles about snowmen
.
For example, V. G. Suteev’s fairy tale “The Christmas Tree” about a snowman-postman
.
Come up with a name for your snowman
.
Make a riddle: The tablecloth is white, it covers the whole world. ( Snow
)
Publications on the topic:
Cotton wool is a widespread and very affordable material that can be found in any home. Crafts from cotton wool are made quickly and easily, Crafts.
Application on the theme “My friend the snowman” using semolina. Winter has come! True, the weather this year is not particularly pleasing to us.
Application “bear in a den”. Preparatory work: A conversation was held about how a bear sleeps in winter, how it prepares, how it hides a place.
Application “Snowman”, 2nd junior group (3–4 years) Branch Municipal preschool educational institution of a general developmental type kindergarten “Rainbow” - kindergarten “Snezhinka” Educator.
This work, despite its ease, is not so easy to perform; in children’s hands, cotton wool does not always want to obey, very often it tries.
Today is the first day of winter. The long-awaited snow has finally fallen. The guys and I decided to make a “Snowman” applique. For our work we will need:.
Calendar autumn is ending, and behind it will come a cold and white winter, which will dress everyone around in white soft fur coats. It won't be easy for the bunny.
We are all looking forward to the New Year. It is this holiday that gives adults and children real magic. When a forest beauty comes to our house, the whole family gets into a festive mood. Today it has become popular to bring back old traditions. In the old days, Christmas tree decorations were made by the whole family from cotton wool and paste, and today we will also try to repeat the same thing. A simple master class shows how you can make Christmas tree decorations with your own hands using improvised materials and without special skills.
Materials:
- - cotton wool,
- - PVA glue,
- - newspaper,
- - foil,
- - threads.
- - copper wire,
- - acrylic paints or watercolors,
- - hook,
- - jute thread,
- - decorative tape.
Let's make a snowman from cotton wool
Roll two balls of different sizes from newspaper sheets, and roll the smallest ball from a regular napkin.
Connect the balls together and tightly press them together with foil, forming the body of a snowman. Layer the cotton wool into thin layers and apply them to the workpiece to form the body of a snowman. While working, we fasten the cotton wool with threads, trying to press it down more tightly. We apply layers of cotton wool until the figure acquires the desired shape. In this work, red threads were used so that it would be better visible in the photo. For work, it is better to take white ones, so that they are easier to mask. After the volume has been increased, you can begin to cover the Christmas tree decoration with thin pieces of cotton wool. For work it is convenient to use PVA glue, but you can also work with paste. For better adhesion, the figure should be coated with glue. By applying cotton pieces to it, we begin to create the final shape of the snowman. While you are working with the material, you need to properly smooth the pieces with a flat brush or finger. While you are leveling the figure, try to expel all the air from the cotton wool. The snowman's arms can be made into balls by rolling two small balls from cotton wool, or sleeves can be fashioned from it. Roll a small cone out of cotton wool and stick it in place of the nose. The hat can be made from the same cotton wool, knitted or sewn. In order to decorate a snowman with a scarf, you need to separate a narrow layer from the cotton wool, grease it with glue and simply wrap it around your head. Now the snowman needs to be allowed to dry. Drying time depends on the amount of cotton wool and glue; it takes about a day. When the workpiece is completely dry, it will become very light, almost weightless. Now you can start coloring. For this it is better to use acrylic paints or watercolors. If you work with acrylic, then make a more liquid structure. To do this, mix water with PVA in equal quantities and add a little acrylic paint to the composition. Adjust the paint density as desired. We paint the hat and scarf blue, tint the carrot nose with orange, put black coal dots in place of the eyes, draw eyebrows and mouth. Let the paint dry for about half an hour. Using an awl, we make a hole for the rope and stretch it with a hook. We tie a knot and hide it under a bow. The Christmas tree toy “Snowman” is ready.
From early childhood you need to work with your child, this develops hand motor skills and creative abilities. For kids there are simple applications on a winter theme. The results of the work done will delight the baby. Crafts can be constructed from improvised materials that are always at hand. They will not cause much difficulty, and will evoke a sea of joyful emotions in children. After all, winter gives the greatest number of ideas.
Materials you will need: colored paper, scissors, thick cardboard, glue, cotton wool and cotton pads, as well as double-sided tape.
How to make a snowman from a sock?
Do you still have mismatched white socks? Don't worry, you can make beautiful snowmen out of them. For the craft you will need: white and colored socks, rice, glue gun, rubber bands, buttons, felt-tip pen, scissors, ribbon. Pour rice into the sock. It is more convenient to pour through a paper funnel.
We tie the sock with rice at the top with an elastic band. We tie the middle part of the sock with an elastic band, forming a head. Using a glue gun, glue the bright buttons.
Twist a spout from a small piece of fabric. Using a felt-tip pen, draw eyes and a mouth.
Cut off the top of the sock. Cut off a small piece of ribbon and wrap it around the snowman’s neck, securing it with glue. We will get an elegant scarf.
Cut off the top part of the blue sock and tie it with an elastic band. We will get a cap that we put on the snowman’s head.
A wonderful snowman made from a sock - ready!
We have a wonderful handmade winter souvenir! You can plant a snowman under the Christmas tree or decorate the kindergarten premises with it.
Look at the video for another way to make a snowman from a sock:
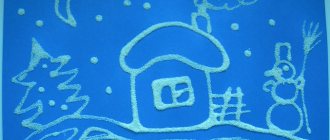
Winter house
A charming craft - a house under the snow. You can find and print any small house on the Internet for coloring. Cut the house out of white paper and paste it onto blue cardboard. You can draw smoke from the chimney in waves going into the sky. The snow is falling - small circles on the cardboard above the Christmas trees.
With colored pencils, let the child color the house: walls, door, windows. If there are Christmas trees or other trees nearby, color one tree with a light green pencil (felt-tip pen), the other with a dark green one. There is snow on the chimney of the house, the roof and around the house. It will be effectively replaced by glued cotton wool. The result is a voluminous and beautiful picture.
Summary of GCD for application in the junior group “Snowman”
Gupalova Natalya
Summary of GCD for application in the junior group “Snowman”
Summary of GCD for application in the junior group “Snowman”
Educational areas: artistic creativity, communication, cognition, socialization.
Goal: To strengthen the skills of gluing ready-made forms.
Program content:
Teach children to create an expressive image of a Snowman.
Strengthen the ability to sequentially arrange circles depending on size using a presentation on a projector.
Improve the ability to use glue and a napkin, complement an expressive image (eyes, nose, mouth, bucket, hands).
Develop orientation on a sheet of paper, visual attention, fine visual differentiation (large - smaller - smallest);
To instill accuracy in children when performing tasks;
Develop gross and fine motor skills.
Preliminary work:
Looking at paintings and illustrations from the album “Winter”, drawing a snowman, talking about the painting, observing and playing with snow while walking, listening to music from the album: “Seasons. Winter" P. I. Tchaikovsky.
Materials and equipment:
Sheets of blue paper, brushes, napkins, glue, oilcloth, circles of different sizes, white, carrots, PowerPoint presentation, computer, projector.
GCD move
Educator: Guys, listen to the riddle and guess who will come to visit us.
We made a snowball
They made a hat on him,
The nose was attached, and in an instant
Children: Snowman.
(Opens the door and brings in a snowman figurine.)
Educator: Of course, a snowman. Look how beautiful he is (show the snowman toy). What are snowmen made from outside?
Children: From the snow.
Educator : What shapes do snowballs roll?
Children: Round.
Presentation.
Slide 1. Children made three lumps of different sizes.
Slide 2. Dima rolled a ball and laid it down.
Sweet 3. Sasha rolled up a smaller lump and put it on top.
Slide 4. Tanya rolled up the smallest lump and put it on the very top.
Slide 5. Children together, put a bucket on their heads,
Slide 6. They put a nose - a carrot.
Slide 7. Made a mouth.
Slide 8. We made the Snowman's eyes out of pebbles.
Slide 9. Hands made of twigs.
Slide 10. The Snowman turned out good!
Educator: The snowman says that he is bored alone and asks you to make him friends. Shall we help him?
Children: Yes!
Educator: Now we will play a game and learn how to sculpt snowmen.
Game “We are making a snowman”
(Children repeat the movements after the teacher)
We are making a snowman (movements as if making snowballs)
Although the work is not easy. (wipe away sweat)
We skate together with a friend (tilts and forward arc movements of the arms from bottom to top)
Everything is growing like a snowball! (show big com)
Once - one lump is ready. (- as if they put a lump at the bottom)
Two - a lump - his friend. (- as if they were putting a com)
Three - another lump has appeared (- as if they are placing a lump at the top)
It turned out to be a snowman! (hands on belt)
The eyes are lollipops (put the thumb and index finger together and show circles)
His nose is like a carrot. (touch nose)
We did well today (claps)
We have a knack! (hands up and wave)
(poem by O. Kiseleva)
Educator: Well done, we've trained, and now to the march of the Snowmen, let's go to the tables.
Educator: Guys, now you and I will make friends for our Snowman.
Main part:
Children lay out a Snowman from ready-made parts on sheets.
Snowman, what shapes will it be made of? (from circles)
Right. The largest circle, where should we put it? (at the bottom)
Smaller circle, where should we put it? (On him)
Above, what circle? (the smallest)
The teacher reminds students of the rules for careful handling of glue. As the work progresses, he asks the children questions, performs the actions himself and makes comments.
Next, the teacher shows ways to create an expressive image of the Snowman: eyes, hands, mouth, bucket hat, carrot nose. And helps children complete the work with details.
Bottom line.
Educator: What beautiful snowmen did we get? Do you guys like them? What kind of Snowman did you make, Albert? What about you, Lera? You are such a great fellow, you have made so many happy friends for the Snowman! Look how happy he is and dances! Now let's have fun with these snowmen!
I'm for your kindness
I'll give you a gift.
What's in the box, inside,
Open it and look!
(Children help themselves to candy from the box).
A summary of the joint activity of a teacher with children on appliqué from cotton pads in the middle group “Snowman” of the GBDOU kindergarten No. 121 of a combined type, Vyborg district of St. Petersburg. A summary of the joint activity of a teacher with children.
Notes on the application in the middle group “Antoshka the Snowman” Purpose: to teach children to carefully assemble parts according to a model, to strengthen the ability to use glue and a napkin. Objectives: 1. learn to arrange parts.
Summary of the GCD for the application “Snowman” in the junior group of the kindergarten Summary of the GCD for the application on the theme “Snowman” in the junior group of the kindergarten Objectives: Educational: teach children to stick ready-made forms.
Abstract of GCD on artistic creativity in the second junior group. Application “Snowman” Notes on artistic creativity in the second junior group. Application “Snowman” Olga Panasyuk Abstract of GCD in art.
Snowman
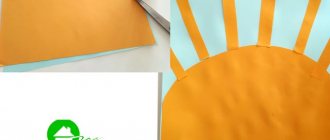
This is a beautiful three-dimensional craft. Application made of colored paper without glue, you will need 2-sided tape. The advantage of tape is that when children work there is a lot of garbage and dirt, but here it is clean and tidy.
Drifts are cut out of white paper in a semicircle, as in the picture. Attach snowdrifts and see how the overall picture will look.
Green Christmas trees are easy to cut out of colored paper. Fold a small piece of paper in half, draw half a Christmas tree, and cut it out. Glue a Christmas tree on top of the snowdrift using 2-sided tape, starting one at a time with the furthest trees on the side of the sheet. We glue the center of the second tree just below the first (closer) onto the snowdrift. The result is lush Christmas trees. There should be a large white snowdrift in a semicircle in the center.
For the snowman, cut out 3 white circles of different sizes. The largest is the base, the smallest is the snowman's head.
On the snowdrift, slightly retreating from the bottom edge of the sheet, glue the largest circle. The next one is located a third of the bottom circle. Glue 2 colored circles on the bottom and middle circles.
You can add a colored scarf for beauty. On the snowman's head there are black eyes, a carrot nose, and a mouth in a semicircle made of red paper. Glue a colored bucket hat onto your head. If desired + 2 thin strips or 2 matches will be handles.
You can cut out and glue 2-3 clouds from white (gray) paper. Snowball - small white circles between clouds and Christmas trees.
How to make a snowman from pieces of paper?
You can make a snowman applique from pieces of paper. Cut thin paper into small squares.
Cut out the silhouette of a snowman from cardboard.
Fixing a piece of paper on a pencil, dip it in glue.
Using a pencil, glue a piece of paper to the base.
Using the same technology, we glue the remaining pieces one after another, filling the entire base.
Glue on the snowman's nose and eyes.
Glue the buttons. Snowman - ready!
Mittens and hat
Cut out mittens or a daddy from pink (blue) cardboard. They can be decorated to your taste (small flowers, sparkles, birds, animals, etc.). For realism, you can add decorations - fluffy pompoms around the edge. Cotton wool or pieces of faux fur will do.
For mittens, you can use small pieces of polystyrene foam, foam cardboard, or glass balls. If you have leftover pieces of felt from an old hat, you can use that too.
Interesting ideas for winter applique in the photo in our gallery.
Photo of winter applique
Hello everyone, today we will make a variety of applications with snowmen. You will see many new snowman applique templates. You can make these crafts from cardboard, paper, sheets of formiam, and these templates are also suitable for felt snowman crafts. We will start by showing what technologies for making crafts can be used in general (tear applique, with cotton wool, paper with cereals and bulk materials). Each snowman template I enlarged to full A4 sheet size
. This way you can immediately send pictures for printing and be sure that they will print in a good large size. Let's see what beautiful templates and crafts in the form of snowmen I have prepared for you in this article.
Snowman applique
FROM COTTON DISKS.
Ideas and templates.
The fastest way to apply is to use ready-made round cotton pads. Slap and you're done.
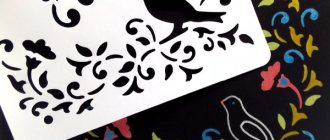
You can first draw a sketch of your future arrangement of disks on a sheet of paper... see what paper elements are laid out and how. For example, in the template below
a good idea for applique from ready-made round disks of cotton wool, a paper scarf, a spout and snowflakes cut out of paper.
You can make one of the disks a little smaller by cutting it in a circle with scissors. And then here is a template for a beautiful applique made from cotton pads. We cut out the accompanying applique elements from paper or cardboard or felt.
Snowman appliques
with WATTON LAYER.
You can lay layers of cotton wool on the silhouette of a snowman with glue. The result will be a delicate voluminous application, fluffy, as if alive. Bright pieces of cardboard or colored paper will be used for a hat with trim, stars, a bright scarf, a broom, a Christmas tree, a sleigh, and buttons.
The blank silhouette for such a fluffy snowman can be anything. The main thing is that he must have a sufficiently voluminous belly and face to fit the cotton neatly without getting over the edges.
This snowman template is suitable for placing cotton on the face and tummy.
You can cut out a silhouette from cardboard and cover it with cotton wool. Make a support from cardboard at the back so that the snowman stands upright. The support is made according to the same principle as for desktop photo frames. Just a folded tail of cardboard.
This snowman template is suitable for snow applique. Quite large areas of the head and many bright paper elements.
Application SNOWMAN
for kindergarten.
In kindergarten, children really love the snowman applique, whose belly is shaped like a paper snowflake. Beautiful bright applique. It is best to do it against a dark background so that the openwork of the snowflake is clearly visible.
Also in elementary school or kindergarten, children love to make cut-out appliqués
You can add plasticine elements to the applique with a snowman, as in the photo below.
PORTRAIT applique of a snowman.
Your craft can be a PORTRAIT - just a snowman's head, a hat and a colorful luxurious scarf.
Volumetric applique SNOWMAN. Ideas for kindergarten and school.
In kindergarten, the snowman applique can be supplemented with interesting elements - which will protrude forward above the surface of the sheet. For example, it could be a book, a pine cone, a three-dimensional Christmas tree.
You can also make all the elements of the snowman convex - from rolls of paper. We simply cut strips of paper, the child rolls it into a roll and fixes it with glue with a pencil. Three rolls are like three snowman balls. All that remains is to add the pens and the cap.
And a foam ball cut in half will also create a three-dimensional effect for your New Year's appliqué with a snowman.
You can make a fluffy three-dimensional Christmas tree from napkins or crepe paper and insert it into the snowman applique.
Appliques with a snowman Pear-shaped templates.
Beautiful applications with snowmen can be made simply from bright colored paper using interesting templates. As you already understood, the image of a snowman is not necessarily three round pieces of paper. The snowman's body shape could be more interesting.
For example, pear-shaped, as in the craft below.
Here are the PEAR shaped snowmen templates.
Snowmen with twigs in their hands. Templates for application.
Here are some beautiful templates where the snowman's hands are depicted in the form of tree branches. You can cut out branches from cardboard, twist them from wire, or use real pieces of branches, a natural material.
Snowmen with snowy hands.
Snowmen whose hands are NOT TRANCHES, but made of snow, look very beautiful. Plump snowy hands, as in the photo with the applique below.
Snowmen appliques
with hands not glued.
Appliques with snowmen look beautiful, where the arms are not glued to the body, but protrude from the background of the applique. As in the photo below.
In such folding handles you can insert an object, a Christmas tree, candy, a pine cone, or a sign with New Year's greetings.
Here are templates with ideas on how you can design such snowman hands on paper appliqué.
Subject applications with snowmen. Beautiful templates.
Beautiful bright applications with snowmen can have an interesting plot; other characters can be involved in the paintings - New Year's or just forest dwellers.
Here are some ideas for a beautiful applique with snowmen. You can choose any template - they are all A4 size. But you can reduce them if necessary. Just copy the picture with the mouse, paste it into a blank sheet of Word, and make the image smaller by dragging the corner of the picture with the mouse. And after that, send for printing the size that is convenient for your purposes. You can also copy a picture WITHOUT A PRINTER - simply by placing a sheet of paper on the glowing monitor screen, the picture will shine through onto the paper and you will trace the contours of the snowman with a pencil. Then with a black felt-tip pen to make it more visible.
In order to decorate your home for the New Year, you do not need any special financial expenses. You can beautifully decorate the rooms of your home in a New Year's style using the simplest materials that can be found in every apartment or house. For example, cotton wool, this is a wonderful material. from which you can make beautiful New Year's decorations. In this article you will learn how to make cute cotton wool appliques for the New Year 2020.
Snowman applique made from cotton pads
Even kids can make a snowman out of cotton pads. It is very easy to make. In order to make a “snowman” applique you will need cotton pads, thick blue paper for the background, white paper, glue, small pompoms and colored sequins.
On the blue background we glue a white layer of snowdrifts at the bottom of the sheet. We glue cotton pads one above the other - we should get snowmen. We glue factory-made eyes, a pom-pom nose and sequin buttons to the snowmen. The applique “snowmen made from cotton pads” is ready! You can place the craft in a frame and decorate your child’s room with it.
Application – “Snowman made of cotton wool”
You will get an unusual snowman if you make it with your own hands from ordinary cotton wool. As a result, there will be an aerial New Year's themed applique at home.
To do this you will need:
- Cotton wool;
- Glue;
- Cardboard;
- Scissors;
- Buttons;
- Colored paper.
Progress:
The application is best done on cardboard. On its surface you need to draw a snowman and cotton wool should be evenly glued onto this drawing. When everything is dry, you need to cut out eyes, a mouth and a hat from black paper. You should use a different color to make snowman hands. And the buttons are glued to the body. The result was a snowman made as if from snow.
Video master class on making a snowman from cotton wool
Application "Snowman" made of paper for the little ones
Using ready-made cut-out circles from white paper, a colored isosceles trapezoid and an orange triangle, even a child can make a plot picture. You just need to glue the details onto the blue background, and the applique is ready. The broom and scarf are added at discretion, and the buttons and face are drawn last.
The paper Snowman applique not only develops creative thinking, but also instills manual skills. During work, it is very important to convey to the consciousness of young children the difference in the concepts of “small” - “big”, “more” - “smaller”. After all, they need to glue the circles using the pyramid rule. That is, the largest part of the snow woman is attached at the bottom, then a medium-sized one, and the smallest one at the top.
You also need to draw the kids’ attention to the fact that all the circles must touch each other, otherwise the snowman will simply crumble!
It should also be explained to the children that the figure should be positioned vertically, not move to the left or right, and at the bottom you need to make a “floor” or “ground”.
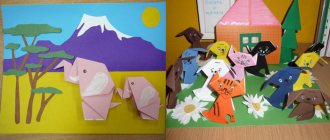
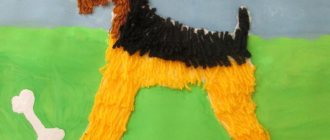
Application – “Cotton wool bunny”
The master class allows even small children to cope with the work. There is nothing complicated in the work, it is important to do it very carefully.
To do this you will need:
- Cotton wool;
- Cardboard;
- Scissors;
- Paints;
- Brush.
Progress:
On a colored sheet of cardboard you need to draw a bunny, sun and carrot. Then you need to glue cotton wool onto these drawings, distributing it evenly over the surface. When the application dries, the sun needs to be painted yellow, and the carrot orange. The bunny should have an eye glued on it. A beautiful painting will decorate the room.
How to make a snowman from a light bulb?
A very impressive Christmas tree decoration “snowman” can be made from an ordinary light bulb.
Wrap the top of the light bulb with white duct tape. Apply white spray paint to the light bulb. To make applying paint easier, you can use a clothespin.
After the paint has dried, paint the snowman's face - eyes and nose - onto the light bulbs.
Draw the snowman's mouth and buttons. You can remove the adhesive tape from the top of the light bulb. Glue thin stick handles to the snowman.
Decorate the snowman with a red ribbon bow. The snowman craft made from a light bulb is ready. All that remains is to attach a string to the top of the light bulb and you can hang the snowman on the Christmas tree!
Application "Lamb"
It will be very interesting for children to make a beautiful “Lamb” applique. You need to do the work slowly, and you will get a wonderful decor for a festive room.
To do this you will need:
- Cotton wool;
- Cardboard;
- Paints;
- Brush;
- Pencil.
photo of lamb made from cotton wool
Progress:
You need to draw a lamb on cardboard. You should stick cotton wool all over your body, distributing it in curls. You need to paint the legs and head. A wonderful applique for the New Year tree is ready.
Summary of GCD for children of the younger group. Snowman applique
Synopsis of the educational activity “Cheerful Snowman” for children of primary preschool age.
Author: Yulia Alekseevna Gorchakova, teacher at the Irdanovsky kindergarten “Kolosok”, Nikolsky district, Vologda region. Description of the material: This summary of direct educational activities is designed for children of primary preschool age, but with some complexity it can be used with children of middle and senior preschool age. The notes may be useful for kindergarten teachers in working on the topic “New Year’s holiday.” Goal: creating a festive mood, learning how to create a snowman from cotton pads. Objectives: - teach children to create a beautiful image of a snowman from different materials and use unconventional methods of applique in their work;
— promote the development of fine motor skills of the hands; enriching and activating children's vocabulary; — to cultivate in children a sense of empathy and a desire to help. Equipment:
magnetic board, large magnets, a picture of a snowman, cotton pads (three pieces for each child), PVA glue, ready-made forms from self-adhesive (carrots - nose, eyes, twigs - hands), cardboard.
Vocabulary work: snowman, carrot, circle, eyes, hands, nose, head, torso.
The course of direct educational activities:
Organizational moment. — Guys, we have a very funny guest today. We will find out who it is when we guess the riddle: We blinded him ourselves: Decorated him with coals, Made him a tummy, A smiling mouth, A nose like a carrot, eyes like pieces of ice... On a well-trodden path He emerged from the snowflakes Cute... (Snowman!)
- That's right, guys, it's a snowman.
Here he is, he came to our group today. The teacher puts a toy snowman on the table and reads the poem “Snowman from a children's fairy tale.”
The kids are flushed - Rolled three balls! They stacked them on top of each other, and piled a bucket. The nose is a carrot, the coal is eyes, the Snowman from a children's fairy tale! Hands are branches, mouth is candy. Let it stand now until summer! - Hello, Snowman, how good it is that you came to visit us! I came for help, I barely found you. It’s very boring to stand under a pine tree alone in winter...
- Guys, it turns out that the Snowman is sad, he has no friends.
How can we help him? (We can be his friends).
- Snowman, our kids want to be your friends!
Let's play with you! Repeat after us! Physical exercise “Making a snowman.” - One - hand, two - hand! (Children show first one hand, then the other.)
- We are making a snowman.
(Movements of hands imitating making snowballs.)
- We will roll a snowball -
(Draw a circle in the air with a hand.)
- Like this!
(They spread their arms wide to the sides.)
- And then a smaller one -
(Draw a smaller circle.)
- Like this!
(They spread their arms halfway to the sides.)
- And we’ll put a small lump on top.
(We join our hands in a ring.)
- So the Snowman came out - a snowman, a very cute fat man!
(Place your hands on your belt and turn from side to side.) Looking at a snowman. - Guys, please tell me, what is our Snowman like? (Small, beautiful, kind, funny).
- What figures does it consist of?
(From circles).
— How many circles does it take to make a snowman?
(A lot of).
- Let's try to make a snowman from large magnets.
(Children make a diagram of a snowman using magnets on a magnetic board).
- What great fellows you are!
And our Snowman became sad again.. - I’ll be returning to the forest soon... I played with you a lot of fun, but in the forest I have no one to play with! - How can we help the Snowman? (Children offer to make him friends).
- Look at your tables, what is there?
(Cotton pads).
- Try to make Snowmen out of them, just like with magnets.
( Children are experimenting with cotton pads, without glue for now). Showing and explaining the sequence of work. — Everyone managed to make a snowman. Now take the glue, drop a drop onto the disk and press it gently onto a sheet of cardboard. When your circle snowman is ready, you can decorate it with self-adhesive tape: glue on the nose, eyes, and handles. -What does a snowman have instead of a nose? (Carrot).
- And instead of eyes?
(Coals).
- What are the hands made of?
(From the branches).
We made a snowball... You will become a snowman!
We'll put two on top. The top one is the head. The nose is a carrot. This time! Two - glass instead of eyes. And with beets, when counting “three!”, we draw a mouth. Look! - What beautiful snowmen did we get? Do you guys like them? What kind of Snowman did you make, Nikita? What about you, Lera? You are such a great fellow, you have made so many happy friends for the Snowman! Look how happy he is and dances! Now let's have fun with these snowmen! I will give you a gift for your kindness. What's in the box, inside, open it and look! Children treat themselves to candy from a box.
We recommend watching:
Synopsis of a research and educational lesson in the 2nd junior group “Let's help a bear cub sew on a note of GCD using health-saving technologies “On a visit to the sun” for younger children Synopsis of a GCD in the 1st junior group on FEMP “Let's treat the Bunny with a carrot” Do-it-yourself application from cotton pads for kindergarten . Snowman
Similar articles:
Summary of GCD in the 1st junior group by February 23
Summary of GCD on FEMP in the junior group of kindergarten “Trip on a Train to the Forest”
Observations of the Christmas tree in kindergarten. Junior group
Bird watching in the kindergarten area. Junior group
Summary of a winter walk in the junior group of kindergarten on the topic: “Birds in winter”
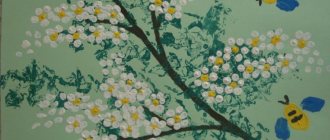
Application “Winter Landscape”
By doing the work step by step, you can get a beautiful cotton wool applique. Making such a decoration will take a little time, but the picture will always delight you.
To do this you will need:
- Cotton wool;
- Cardboard;
- Glue;
- Pencil.
Progress:
On cardboard you need to draw several village houses, fences, and Christmas trees. Since this is a winter landscape, everything needs to be covered with cotton wool. The outlines of the entire drawing should be clearly visible. The New Year's landscape is ready to decorate the room.
How to make a snowman applique from cotton balls?
A very simple and effective snowman applique is made from cotton balls. Cut out the outline of the snowman from paper. We apply glue to it.
Glue the cotton balls one by one.
Glue a scarf, eyes and nose to the snowman. We decorate it with buttons - pompoms.
Glue on the snowman a top hat and branches for arms. We place the craft on blue cardboard. The applique “snowman made from cotton balls” is ready!
Snowman applique made from cotton balls
A cotton wool snowman can be glued to a paper circle and decorated as a Christmas tree decoration.
Christmas tree decoration - snowman made of cotton wool
Application "Snowflake"
For the New Year 2020, you need to make different snowflakes in advance. You will get a very beautiful decoration if you use simple cotton wool.
To do this you will need:
- Cotton wool;
- Glue;
- Cardboard;
- Scissors.
Progress:
You should draw a snowflake on a sheet of cardboard, after which it should be covered with cotton wool. To decorate the surface, you can apply a little shiny varnish. Then the product must dry. You can leave the applique as is, or you can cut it out and hang it on the Christmas tree.
How to make a snowman from felt?
You will get a very beautiful snowman. Cut out two identical outlines of the snowman.
Glue a carrot nose, a scarf and buttons to one of the cut-out blanks.
Glue on the eyes.
We trim the snowman around the edges, leaving a small hole.
We trim it, leaving room for the snowman's handle. Apply glue to it and insert it into the hole.
Let's take cotton wool.
We stuff the snowman with it and sew up the hole.
The craft is ready!