Thread applique is a good way to keep your child busy with something useful. With its help, he will be able to develop creativity, fine motor skills and accuracy. You can practice this type of art from a very early age and try to improve as you grow older. To attract your children to this creativity, you need to study in detail the types of thread applications on cardboard and the templates for making them.
Selection of materials
Before you try to learn how to make appliqués from threads, you need to choose the right materials and tools. The attractive appearance of the finished craft will depend on their quality.
There are several nuances in this matter:
- It is best to use loose threads. This will help to better saturate them with glue and attach them more securely to the base.
- It is not recommended to use thick and silk threads.
- When choosing an adhesive, you should pay attention to its toxicity indicators. If they are tall, then giving such material to children is strictly prohibited. The best option would be to use PVA glue.
- If it is too thick, it can be diluted with a little water.
- You can replace PVA with office glue.
- While working, you will definitely need scissors. They should not be too sharp so that inexperienced kids do not cause themselves any harm.
- Don't forget about sewing supplies. In some cases it will be necessary to use them.
Materials required for work
To make a mouse out of woolen threads for the New Year with your own hands or any other holiday, needlewomen will need to prepare the following materials and accessories:
- Plastic blanks for making pompoms (they can be cut out of thick cardboard, 2 toruses for each pompom).
- Wool or acrylic threads in suitable colors.
- Ready-made eyes (you can make them yourself using blisters for tablets).
- Foil.
- Stencil.
- Wire.
- Black or pink varnish.
- Pieces of felt for the nose, ears, paws, tail.
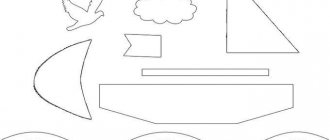
- A pattern that can be printed and put into practice as an example.
- Scissors, needle, PVA glue.
Craft options
Teachers have come up with a large number of options for applique from woolen threads in kindergarten. All of them are quite simple and do not require special skills from children, as well as skills in working with this material. During the creative process, a minimum number of items are used, which can be easily found in stores in any locality. Their cheapness allows even children from families with limited financial resources to engage in this type of art.
Fluffy cat
This version of cut thread applique is considered the simplest and easiest to understand. The image can be chosen arbitrarily based on the preferences of children and their teachers. This does not change the sequence of actions and the amount of material used. This app will be an ideal lesson for little ones. With its help, they will learn the basics of this type of creativity and understand some of its features.
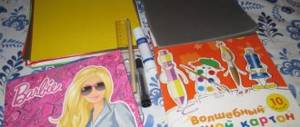
In order to make a craft, you need to find or buy the following items:
- a sheet of thick cardboard of any color;
- scissors;
- PVA glue and a brush for applying it;
- a sheet of white paper;
- a simple pencil;
- multi-colored woolen threads;
- decorative elements (ribbons, rhinestones, buttons, beads, etc.).
If it is not possible to obtain any material, then you can replace it with an available analogue. This will not change the quality and attractive appearance of the finished product.
DIY thread applique master class:
- An image of a cat is drawn on a sheet of white paper. If you have no talent in fine arts, then you can find a picture on the Internet and print it on a printer.
- The image is carefully cut along the contour.
- The resulting template is glued to a cardboard base and cut out.
- After the preparatory work, wool threads are taken and cut into small pieces about 1 centimeter long.
- The animal's eyes are glued onto a cardboard figure or drawn with a simple pencil.
- Then all the small details of the image are brought into focus.
- The entire surface of the workpiece is thoroughly coated with PVA.
- Finely chopped threads are placed on it and distributed evenly. For better gluing, you can lightly press the pieces with your hand or place the craft under a small press (book, wooden board).
- At the very end, the applique is decorated with decorative elements. It is recommended to glue the cat a mustache made of white threads, a nose made of beads and add a bow made of satin ribbon.
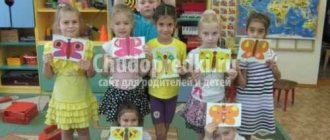
Master class for teachers “Appliqué from woolen threads”
Aliya Svishcheva
Master class for teachers “Appliqué from woolen threads”
Purpose of the master class : To promote teachers’ understanding of the importance of non-traditional types of appliqué in the development of creativity in preschool children.
Objectives: To introduce teachers to non-traditional types of application , to show the techniques and stages of application , to consolidate theoretical knowledge in practical activities. Encourage the use of non-traditional techniques to develop children's creativity.
woolen threads , cardboard, brushes, PVA glue, scissors.
Introduction
Applique (from Latin applicatio - applying) - creating artistic images by gluing, sewing onto fabric or paper multi-colored pieces of any material; image, pattern created in this way.
For applique, you can use a variety of materials: paper, fabric, threads, shells and pebbles, and even the most ordinary cereal.
Non-traditional types of applique in a preschool institution are one of the most rarely practiced types of visual activities, since they are not mandatory in preschool education programs. In this regard, there are no detailed methodological recommendations for conducting such classes with children. At the same time, non-traditional appliqué contain colossal educational reserves and enormous pedagogical opportunities, which influence the artistic, aesthetic and figurative-spatial perception of the world by preschool children, and the development of creativity in preschool children.
Any creative activity, in particular appliqué , is of great importance for the mental development of children; the stock of knowledge expands based on ideas about the various forms and spatial position of objects in the surrounding world, various sizes, and a variety of shades of colors.
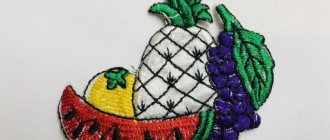
Thread applique.
An amazing material - threads! Whatever they do with them: sew, knit, weave: carpets, tapestries, panels; they embroider amazingly beautiful pictures. Products using the thread applique look original, the techniques for working with it are simple and provide endless opportunities for creative self-expression.
The technique thread applique Having mastered the basic techniques of working in this technique, based on the knowledge gained, you can create your own works. By demonstrating creativity in these works, the creative abilities of the individual are characterized by a readiness to generate fundamentally new unusual ideas that deviate from traditional or accepted ones.
To create an applique, you need to apply effort, carry out labor actions, master the skills of sculpting, cutting, drawing an object of one shape or another structure, as well as master the skills of handling scissors, a pencil and a brush, glue and plasticine. Proper use of these materials and tools requires a certain amount of physical effort and labor skills. The assimilation of skills and abilities is associated with the development of such volitional personality traits as attention, perseverance, and endurance. Children are taught the ability to work hard and achieve the desired result.
All of the above allows us to conclude that finger training affects the maturation of speech function. The better a child works with his fingers, the faster he develops, speaks and thinks better, and then studies at school. Folk nursery rhymes, finger exercises, as well as non-traditional techniques of drawing, sculpting and appliqué .
So let's get started!
1. First, let's take our blank. Glue the desired template onto a sheet of cardboard.
2. Next, apply PVA glue to the template.
3. We distribute our pre-finely chopped woolen threads .
4. Let the glue dry and shake off all excess threads.
applique with your children !
How to make a mouse from threads (wool yarn) with your own hands: step-by-step description
This craft can be done in half an hour.
According to the Eastern calendar, the symbol of 2020 is considered to be rodents - mice and rats. And of course, many needlewomen want to make gifts and home decorations with their own hands in the form of these animals. Therefore, many of them are wondering how to make a mouse from threads?
Note! A beginning craftswoman can use the following instructions as a basis for her own, more complex ideas, or use them in working with children, for example, this applies to kindergarten teachers.
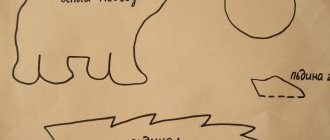
The craft is based on simple foil
You can make an ordinary mouse from wool threads and glue with your own hands according to the following scheme:
- Take food foil, from which a piece at least 20 cm wide is cut with scissors.
- The foil is compressed in the hands, gradually forming the shape of a mouse.
- Then it is done so that the surface of the figure is as smooth as possible. At the same time, you should not leave a void inside.
- Ears are made from loops. A woolen thread is taken, with the help of which a small ring is formed.
- Then the tail of the thread is threaded through the ring and tightened tightly.
- This procedure is repeated. A similar loop is formed. This way you get cute little ears.
- Quick-drying glue is carefully applied to the resulting loops.
- The toy's ears are attached to the nose. Then the mouse is wrapped with woolen thread (to do this, glue must also be applied to the sides of the foil figure). Excess threads are cut off.
You might be interested in this: Knitting a washcloth toy for a child - a selection of knitting patterns with descriptions
Mouse wrap
9. You will also have to wrap the nose of the toy.
10. The main part of the craft is almost done. You just need to wait a little for the glue to dry, and then secure the threads well.
11. Next you will have to attach a tail to the mouse. To do this, leave a long thread from the winding of the body in advance or take an additional one, which is glued to the back side of the figure.
You should leave a long thread behind the mouse, which will serve as a tail.
12. If the tail turns out to be too long, you can trim it a little.
Finally, you need to design the mouse’s face:
- Take black varnish, droplets of which are used to make the eyes, and pink varnish is used to make the mouse’s nose.
- After the first layer of varnish has dried, it is advisable to apply a second layer (also in droplets).
- In the same way, you can add a little volume to the eyes and nose.
Finishing touches
Please note! The glue must be applied to the surface of the product as carefully as possible so as not to stain the toy.
Graceful kitty
In the older group of kindergarten, an applique made of threads on cardboard “Cat” will be interesting. Let's present a master class on how to do the job.
Materials: cardboard, pencil, scissors, PVA glue with a brush, several colors of knitting thread. You can choose colors to your liking, but they must match the possible natural color of the cat.
Let's get started:
1. We fold the threads several times and cut them to a length of no more than 1 cm. Do this with each color. We take a ready-made cat silhouette template, draw it or print it. Now everything is ready to design the picture.
2. The next step is to transfer the drawing onto cardboard. To do this, simply outline it on cardboard. We draw lines that will differentiate the different colors of the cat. Draw eyes, nose and mouth. The photo shows an example with ready-made parts that can be bought at a craft store or cut from an unnecessary toy.
Related article: How to make a cardboard cone for a Christmas tree with your own hands: diagram with photos and videos
3. Let's start gluing the wool. For maximum neatness of the work, apply glue to all areas of the same color and apply threads. Then we move on to another color and so on. It is recommended to apply light threads at the beginning, and the darkest ones at the end.
4. The cat is almost ready. To prevent the work from becoming deformed, leave it under pressure for a day. For example, under a stack of books. Then all that was left was the decor. We glue mustaches from the remnants of woolen threads. If desired, you can make the cat more elegant by gluing a bow.
Twisted thread applique
Threads from a ball are rolled into any shape and fill the space of the craft. Creative work will captivate not only preschoolers, but also adults who are beginning to master the technique.
Such applications have different levels of complexity. Working with threads from one ball develops precision of movements, abstract and logical thinking, fosters perseverance and a love of manual labor. Regardless of complexity, all applications are created according to the same principle.
To work you will need:
- high-density cardboard (for example, from a box) or chipboard;
- rubber glue or PVA;
- woolen threads of different colors;
- acrylic paints, pencil or felt-tip pen;
- stencil;
- scissors.
It is recommended to use threads of the same thickness. However, if you plan to highlight individual parts of the application and create it in relief, you can use different thicknesses and densities.
Description of work:
- Using paint, a pencil or a felt-tip pen, we redraw the drawing onto a thick base.
- Apply glue along the contour of the image.
- We glue the threads, outlining the boundaries of the future application.
- Having greased the base area with glue and glued the tip of the yarn to the center, we twist various shapes (circles, droplets, ovals) or focus on the shape of the lines of the drawing.
- Repeating point 4, fill in the empty spaces.
If you initially take thin yarn of the “noodle” type, then making applique with it will be easier. The curls of yarn themselves lay down in a dense layer and fill the entire image. This material will make “fluffy” animals - foxes, owls, ducks.
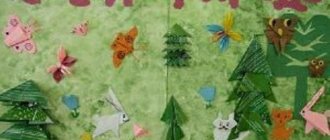
Original dandelion
Schoolchildren will be interested in a more complex manner of execution, which includes different types of appliqué, including thread applique. Let’s show it using the example of the painting “Dandelion”.
Materials for completing the work: glue, scissors, pencil, woolen threads for knitting in yellow and green colors, paints, toothbrush, green colored paper or a herbarium of dandelion leaves, a sheet of white cardboard.
Let's start the manufacturing process:
1. Prepare the background of the picture. To do this, take a toothbrush and use watercolor paints to make splashes of both yellow and green colors.
2. Next is the turn of dandelion leaves. If you have a previously prepared herbarium of dandelion leaves, that’s great. If there are no supplies, take a sheet of green colored paper, draw and cut out a few leaves.
3. Take a green woolen knitting thread. Fold several times and cut into small pieces no larger than one centimeter.
4. Glue the cut threads onto the previously prepared dandelion leaves.
5. Cut out the stems from green colored paper and glue them onto the prepared background.
6. Form a bush. We glue the leaves and bases of the buds (sepals) from previously cut green threads.
7. Take a piece of paper, fold it several times and wind a yellow woolen thread in one direction.
Related article: Knitted and crocheted jacket with description and diagram
8. Carefully remove the yellow thread and tie it tightly in the middle.
9. Cut the threads on both sides and fluff the bud.
10. Repeat points 7, 8 and 9. There should be as many buds as the number of petals that were glued to the picture.
11. The final point will be attaching the buds.
Another option may be a simpler and easier version of children's thread applique. It can also be used in preschool institutions. Print out the dandelion template. We take finely chopped yellow and green threads and glue. Generously coat the template with glue and glue the threads.
With the help of this article, you can make sure that thread applique is a very interesting and exciting activity for children of different ages. And combining different techniques and types of appliqué will allow you to create real masterpieces that will decorate the interior of your home or be a wonderful gift. Don’t be afraid of experiments, both the child and his parent will definitely like them, they will give new smiles, teach new skills and techniques.
Outline applique
Threads highlight the boundaries of the image or emphasize individual elements. Yarn in long pieces is glued only along the outer and inner lines of the pattern. To prevent the image from looking “empty,” the future composition is pre-colored with paint (pencils) or sealed with colored paper (a combination of paper and thread appliqué).
The principle of contour gluing is well suited for creating snowflakes that decorate postcards. The technology of execution requires accuracy and precision of movements, so children in the preparatory group and older can cope with such creative work.
Required materials and tools:
- snowflake diagram (or draw it yourself);
- tracing paper;
- scissors;
- thin threads;
- PVA glue and container for it;
- rug or mat for creativity;
- vegetable oil;
- pins.
Step-by-step instruction:
- Place tracing paper on the prepared image and secure with pins.
- Lubricate it with oil so that the finished snowflake moves well away from the work surface.
- Cut the threads 10–15 cm long and moisten them in glue (dilute with water if desired).
- Pass the thread from the edge of the snowflake to the center, while making loops and knots around the pins.
- Fasten all the rays in the middle, glue them to a ring of thread.
- Wait for the snowflake to dry, remove the pins and treat the knots and joints with glue.
- Leave to dry.
- Carefully remove the snowflake from the tracing paper and glue it onto the card.
And also with the help of long threads, individual parts of the applique are highlighted. For example, a hedgehog, whose “needles” in the form of loops are glued in rows on the back.