How to make an origami tulip from paper diagram for beginners
Many people like not only to receive, but also to give flowers. They decorate the room and exude a pleasant aroma. If you also want to give a flower, we suggest you learn how to make an origami tulip out of paper. Even paper flowers will be a pleasant surprise.
Let's start with a simple example and gradually complicate the task. Let's try to figure out how to make an origami tulip out of paper together with your child. We will use double-sided red and light green paper. Let's get started:
- Cut a square from a red sheet. Bend it diagonally. You should get a triangle. Iron the fold.
- After this, you need to bend the sharp edges of the triangle in the opposite direction. But so that the corners protrude from above. We do the work on one and the other side. Turn the workpiece over. The bud of the future tulip is ready.
- Let's take care of the stem. Cut a square from the light green material. Bend diagonally. We open the figurine.
- The sides need to be folded towards the center so that an angle is formed. Iron the folds.
- Fold the sheet in half. We bend the bottom corner upward so that it looks out from behind the main part of the figure.
The preparations are ready. It remains to connect the upper and lower parts of the flower. You can use a glue stick for this. Simple origami done.
We have collected simple origami patterns for children in another article
Flat tulip
Let's continue to look at examples. Children will be interested in this origami tulip flower. The next sample will be similar to the first, but the folding technique is different. Prepare double-sided colored paper, red and light green. Let's start making:
- First we'll make a flower. Cut out a square from red and fold it in half to make a triangle.
We open and repeat the actions with other corners. - Take the bottom corners and bend them up. The bottom half should form an angle, leaving the center part open.
- Turn the workpiece over to the back side. We bend the sides.
The flower is ready. - Let's move on to working with the second sheet. You also need to make a square out of it. Connecting the corners. We turn the workpiece over and lift the bottom corner up, but connect it so that the edges remain even.
- Take the right side and connect it to the left. We open the workpiece. We lift the lower part and turn it down. We lift the right side up.
- We position the product so that the wide angle is at the top.
We wrap the bottom part and fold it in half. We also fold the wide part.
Attach the flower to the resulting stem using glue and the origami paper tulip is ready!
Light voluminous flowers
We move from flat origami examples from megamaster.info to three-dimensional ones. Let's start with the simplest thing. You will need:
- red or pink square 9 by 9 centimeters;
- green paper;
- scissors;
- glue stick.
Ready? Then let's begin:
- Take the prepared square, bend it in half, with even edges facing each other. Repeat the action so that a small square is formed.
- We iron the folds and form a triangle from the resulting figure. We unfold the figure and once again bend the surface inward diagonally on one side and the other.
- Now we make cuts on each edge. Leave one and a half centimeters uncut to the center.
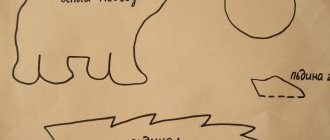
After this we proceed to gluing. Lubricate the corners of each cut part and attach it to the center of the adjacent part. - We will make the stem and leaves from green. Immediately cut out the leaves that will support the stem.
Cut a square and fold it into a triangle twice. We cut out two arcs on one of the sides, unfold the workpiece and make a hole inside. - We will make the stem itself from a small rectangle. We twist the material into a tube. We cut off the edges of this part so that they become even. We cut one of the ends into two or three parts.
- We thread the stem through the leaves with a hole, and straighten the cut edge. We treat the part with glue and attach it to the bud.
- Add leaves to the stem. We cut them out of a green leaf. Using scissors, slightly curl the leaf and glue it to the stem.
Ready. As you can see, to make such an origami tulip you don’t need a diagram. The result turned out beautiful and bright.
Options for experienced craftsmen
Those who have been seriously involved in origami for a long time can try to make a tulip according to the following step-by-step diagram. It is quite complex, but the flower turns out to be not just a beautiful craft, but a real work of paper art. In the future, these elements can be used to create a decorative kusudama ball.
There are several varieties of tulips using the modular origami technique. For this flower you will need 175 1/32 modules. Of them:
- 100 white;
- 75 pink.
Dimensions of the finished flower: 6x28.5 cm.
Realistic tulips
The following tulips will also be voluminous, but their appearance when folded correctly will be realistic. You can make a bouquet from these flowers and give it to a loved one. You will need:
- pink square 17 by 17 centimeters;
- double-sided green paper measuring 9 by 29 centimeters;
- scissors;
- toothpick;
- glue stick.
Let's look at how a three-dimensional origami tulip is made from colored paper:
- Take the prepared pink square. Fold it diagonally and iron the fold.
We unfold it and bend it diagonally again, but on the other side. - Return the paper to its original position, with the colored surface facing you. Now let's fold the material in half like a book. We repeat the action on the other side.
- We open the workpiece with the white surface facing us. We bend each corner to the center point. Once again we fold each side into a book. Then we take the bent lines and fold them, pushing the workpiece inward. You should get a figure like the one in the sample.
- Place the product with the open part up and bend the outer corners towards the center. There should be an inclined line inside, and the sides should be folded symmetrically. Turn the workpiece over and fold the corners towards the center again. Focus on the edges of the leaf so that the flower turns out even.
- The sides on which we folded need to be connected together and the corners hidden inside. The flat side should lie in front of you. We bend a small triangle at the bottom and symmetrically bend the second one from the opposite edge. There are already a lot of layers here, so iron the folds carefully. Turn the workpiece over and repeat the steps.
- An angle should form at the bottom. Here you need to make a hole. Cut off the tip with scissors. Opening the tulip. We stick our fingers through the top and gently push each side of the flower. The result was a voluminous bud. Twist the ends of the petals; you can use a pencil for this purpose. Origami paper tulip bud is ready.
- Making a stem. Take the green strip and twist it with a toothpick. To make the stem strong, you need to twist the material very tightly. Glue the tip. We cut off the oblique corners and make cuts on one of the sides, as we did in the previous instruction. We separate the cut parts.
- Lubricate the cut parts of the stem with glue. We insert the part into the bud, doing it from the inside. Press with your finger to ensure the parts stick.
- All that remains is to make a leaf. We will not fold it using the origami technique, but simply cut it out of paper. Lightly twist the bottom part and glue it to the stem.
This is such a wonderful flower we got!
Classic 3D model
This is exactly the kind of beautiful three-dimensional origami tulip that many people made in their childhood. Following the step-by-step instructions with photos, it will be quite easy to assemble it today. You will need two square sheets of paper 15x15 cm, one of any bright (tulip) shade, the other green.
Assembly algorithm:
Fold the square sheet in half lengthwise and transversely. We open the workpiece. Turn it over to the reverse side. Now we fold the square along two diagonals and open it again. We bend the workpiece from top to bottom, while we “hide” the side corners inward, bringing them towards the center. We get the “water bomb” figure.
Fold the right and left corners to the top point of the triangle. Turn the workpiece over to the reverse side. We repeat point 5. We see the result in the photo.
We “flip” the right side to the left, like a book. We turn the model over. Again we “close” it from right to left. We fold the right side of the top layer towards the center line and move it slightly beyond it.
We do the same with the left side. We insert one formed valve into the other. Repeat steps 12 – 14 on the reverse side. We bend the triangle at the bottom up and return it to its original position.
We turn the model over. We grab the “pockets” at the bottom and pull them in different directions, while simultaneously blowing air into the hole in the center of the model. The flower acquires volume and a characteristic shape. We bend the upper petals down and twist them a little. For example, using scissors. The tulgan is ready, now it needs to make a stem and leaves.
For greenery you will need another 15x15 cm square.
We place it with the wrong side up, with an angle towards us. And make a diagonal fold. Then we bend it towards the center of the sidewall, getting a “kite”. Its open part should “look” down. We bend the outer corners of the workpiece again towards the center line, as shown in the figure. Now we fold the left and right edges of the workpiece towards the middle. We combine the lower point with the upper one.
Fold the resulting workpiece in half “valley”. We push both parts apart, separating the leaf and stem. All that remains is to combine the greenery with the flower.
One flower is good, but the bouquet looks much more impressive. Step-by-step video instructions for assembling a composition from origami tulips: