Summary of an open lesson on arts and crafts. Artistic crafts of Russia
Arts and crafts class. A painted fairy tale, an introduction to the artistic crafts of Russia
teacher of additional education of Municipal Educational Establishment of Children and Youth Children's Education Center Chvanova Ekaterina Alekseevna
Topic: “Painted fairy tale”
Description of work: The lesson is intended for children of preschool and primary school age. The material will be useful to educators, primary school teachers and additional education teachers. The lesson in a fascinating form (fairy tale) will allow you to talk about 3 folk art crafts: Polkhov-Maidan, Gorodets and Khokhloma. Goal: To introduce children to three types of painting. Objectives: Educational
: To activate and interest children, to ensure the inclusion of everyone in the work
Educational:
Motivating children’s interest in national culture through the means of decorative and applied arts.
Cultivating hard work. Developmental
: Development of cognitive interests, creative activity and the ability to apply acquired knowledge in practice.
Class type:
combined.
Type of lesson:
theoretical and practical work.
Method:
information-receptive, reproductive.
Equipment and materials: gouache, brushes, water jars, paper, oilcloths for the table, napkins, templates and elements for decoration, markers. Visual aids:
tables with products, products.
Progress of the lesson: 1. Organizational moment. Hello guys! Today I will tell you about one of the types of folk art - painting, you will find out what types of painting are the most common and we will try to create a pattern with you based on Khokhloma painting. 2.Learning new material. I invite you to a fairy tale. An unusual fairy tale, created not with the help of words, but skillfully decorated with the hands of masters, brushes and paints - a painted fairy tale. What words do fairy tales begin with, guys? (children's answers)
In a certain kingdom, in a certain state, there lived masters. And they created painted miracles - objects of decorative and applied art. Guys, are you familiar with this art? Now I’ll explain it to you, and you will understand that, of course, it’s familiar. Look, we live surrounded by a variety of objects, we encounter them both at home and on the street. Among this diversity, there are objects that were skillfully decorated by the artist; they are elegant and unique in their own way.
These artistic objects belong to the decorative and applied arts. Artists, like wizards, transform and decorate our world or, in other words, decorate objects. The word "decor" means "to decorate, to give a beautiful appearance." DPI items include painted items. Painting originated a long time ago, when people made and decorated most objects with their own hands. Patterns for decoration were taken from the surrounding world. Each pattern had its own meaning. I have a chest! Want to know what's there? It opens only with the help of magic words. In any fairy tale, miracles are performed with the help of spells. What magic words do you guys know? (children’s answers) And here... beautiful objects. Have you forgotten that we are in a fairy-tale state? (children say magic words, the chest opens). We walked and walked and finally came to the first master, whose name is Polkhov-Maidan. Our master did his best when painting this item. He probably had some secret, what do you think? Yes, guys, there really is a secret.
The master took wildflowers with drops of morning dew, lacy leaves, and added a ray of sunshine. And, a miracle happened! The flowers turned out bright, like butterflies in a clearing. There are a wide variety of paint colors here. Guys, name the colors that you see on the product? (children's answers) Well done! This is such a wonderful painting - Polkhov-Maidan. Go ahead?! And again we have a magic chest in front of us! Who remembers the magic words? (children's answers. The chest opens). And here is the work of the next master. This master is Gorodets! The secret of this master is in a magic brush that brings animals, birds to life, and paints wondrous flowers, which are called roses and flowers. They are in the form of a circle and decorated with arcs and droplets of spring rain.
And the result was a painting - Gorodets. Go ahead?! And before us is the magic chest again. (children's answers. The chest opens) This is the work of the third master. This master is unlike anyone else, he has his own secrets.
The master's name is Khokhloma. He carves wooden dishes. One day he cooked wheat porridge for himself and served it to the birds. The Firebird flew to his doorstep. He treated her too. The Firebird touched the cup of porridge with its golden wing, and the porridge and the cup became golden. The secret of the Khokhloma master is the fabulous feather of the firebird, a bunch of ripe berries and a coal from the stove. Let's stay with him for a while... Craftsmen take patterns and shapes for their products from nature. Objects carved from wood undergo a series of amazing transformations to become the way we see them now.
This is an unusual ladle with small scoops. They call him brother. This word came to us from the Old Russian language and sounds a little unusual at first glance. This ladle was a decoration for the holiday table. Bratina can be in the form of different birds. And a swan, a strange bird, and even just a bowl, only with scoops.
What a beautiful ladle.
What needs to be done to turn him into a brother? That's right, add ladles (scoops).
Why do you think they are called so affectionately, scoopers? That's right because they are small. Let's try to turn the ladle into a brother and decorate the scoops. 3. Practical part: Task: perform a criul with a brush on a sheet; decorate the ladle with elements of Khokhloma painting. Guys, you have colored envelopes on your table. Let's see what's in them. A leaf with a curl, red scoops and patterns for decoration (a berry and a leaf for a berry). Now you need a sheet with a curl and a brush. Safety precautions. Guys, do you know how to work with paints? I'll tell you a little secret of real masters. When working with paints, guys, you need to be careful not to stain yourself, your clothes and your work. Please note that the brush is a sharp object. You cannot swing your brush while working, you cannot turn towards each other. Choose the color you like. We will draw curls - kriuli. Open the jars of gouache and dip the brush into the glass. And we take the paint, a little on the tip, and remove the excess on the edge of the paint jar. The magic brush is ready to use. See how to hold the brush correctly. Feel free to draw a line on the sheet... (children's work) Well done, guys. We wash the brushes and put them away, cover the paint. What is the name of the curl that you just circled is called a criule. This unusual name was given to the leading line or stem on which everything “grows” in the painting. Working with a brush is a complex process, as you have now seen. (Working with a template, blank, paints...) We will do part of what artists paint with a brush, and we will do it with a marker. We put the leaves with kriuls aside and take the scoops. You have ready-made leaves and berries. They need to be attached to the criul. Let's draw it. (Show on the board with a marker). It turns out? (check the children’s work). Now let’s attach a leaf, a strawberry and draw lines to them... To complete the work, the craftsmen add different blades of grass with a brush. Let's draw some curls too.
(Children’s work. Folk music.) 4. Summing up. Today you have become a bit of a master of Khokhloma craft. Let's see what wonderful work you have done. (Exhibition of children's works on the board, work with a magnet). Guys, let's remember what you learned today. What is decor? Arts and crafts? What is the name of this bucket? (brother's show) What is kriul? Well done! Now let's remember what paintings you met today. Gold and scarlet This cup blossomed. Sun, berries, summer Suddenly it is filled! Guess what kind of miracle it is? This is a miracle - ... Khokhloma A black horse gallops through the roses and groves, And with a silver harness He rings above the ground. Such bravery! This painting... Gorodets Can I become a screen star. My outfit is decorated with flowers, With shining petals And different berries, Ripe and red. Matryoshka from Maidan. We visited a fairy tale, it has one amazing feature - this fairy tale has no end. Because the masters have not died out, and they still create their bright sunny products that delight us. Did you guys like today's fairy tale?
We recommend watching:
Binary lesson in elementary school, 3rd grade Notes for a drawing lesson Khokhloma Notes for an art lesson. Khokhloma painting Application “Khokhloma” for children 5-7 years old. Master class with step-by-step photos
Similar articles:
Didactic games in fine arts in elementary school
Lesson summary for DPI “Butterflies”
- February 21, 2014
Competition “My Pedagogical Initiative - 2013”
Nomination “Teaching and educational process in primary school”
Lesson summary for DPI (1st year of study) on the topic “Butterflies”.
Goals and objectives of the lesson:
- teach children to cut droplets out of cardboard;
- teach how to create an image of a butterfly from cut out parts;
- develop the ability to work with plasticine, the ability to decorate butterfly wings;
- develop aesthetic taste, imagination, fine motor skills;
- consolidate knowledge of safety precautions when working with scissors;
- introduce students to the variety of butterfly species;
- cultivate a caring attitude towards nature.
Equipment and materials : multi-colored cardboard, pencil, scissors, multi-colored plasticine, multimedia projector and computer for demonstrating the presentation, music series: The melody “Butterfly Waltz” from the movie “Admiral”.
During the classes
1. Organizational moment.
The melody sounds: “Waltz of the Butterflies.”
Teacher
: Everyone probably loves summer. (slide 2) In summer it is very warm, the sun is shining brightly, and many different flowers grow in the meadows. But summer is also good because you can see different insects, especially... you know who? To understand, guess the riddle:
All four petals of the flower were moving. I wanted to pick it - She fluttered and flew away (butterfly).
2. Communicating the topic and objectives of the lesson
Teacher
: Today we will take a walk through the flower meadow. Many different butterflies live here. Let's imagine this clearing.
The Tiger Swallowtail butterfly lives here (slide 3). Here is the “Peacock Eye”, four bright spots on its wings - a protective coloring to scare away enemies (slide No. 4). Here, “Icarus Blueberry” is often found in the meadow (slide No. 5). And the Monarch butterfly has a magnificent ceremonial outfit (slide No. 6).
2.1. Conversation on the topic of the lesson.
Teacher
: Most butterflies feed on flower nectar. With their beautiful wings they attract other butterflies and scare away predatory insects and birds. Amazing transformations happen to them. At first they are caterpillars, and then the caterpillar turns into a pupa, and from the pupa into a butterfly (slide number 7).
Physical education minute:
The flower was sleeping (sit down, burying your head in your knees and clasping your knees with your hands) And suddenly woke up (raise your head, straighten your arms; then lower your arms along your body) Didn’t want to sleep anymore. Moved, stretched, soared up and flew (straighten your back, rise; sway slightly left and right; move your arms back - “wings grow”) The sun just wakes up in the morning - the butterfly circles and curls (“fly”, imitating the movements of a butterfly).
4. Practical part.
4.1. Work plan:
- Choosing the color of cardboard for the base.
- Rolling the plasticine into a flagellum for the body of the butterfly and attaching it to the base.
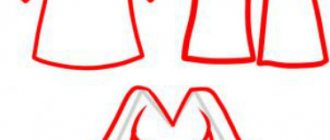
- Choosing cardboard color for butterfly wings. Drawing the outline of a butterfly wing with a pencil.
- Cutting wings with scissors.
- Decorating butterfly wings using plasticine.
- Arrangement of parts into a single image. Fasten the wings into the prepared plasticine flagellum.
Teacher
: Let's remember the rules for working with scissors:
- Place the scissors with the rings facing you.
- Do not leave scissors open.
- Do not wave the scissors, do not bring them to your face.
- Use scissors for cutting only.
Teacher
: Today we will make butterflies using cardboard and plasticine. The body of the butterfly will be made of plasticine, and the wings will be made of cardboard. Butterfly wings resemble the shape of a large droplet. The wings will be decorated with circles and flagella made of plasticine.
4.2. Independent work of students with teacher tips.
5. Lesson summary.
Teacher
: What beautiful butterflies you got today! You all worked hard today. Well done.
All the obstacles passed and we came to the clearing. The journey has been long, we all need to rest!
Each child takes a “butterfly”.
Teacher
: So the butterflies are flying, fluttering easily in the air. You, blow on them, Butterflies, dance!
6. Cleaning workplaces.
Presentation for the lesson
Author: Tukubekova Venera Mansurovna, art teacher, 3 years of work experience, KGKP “School of Arts No. 2”, Karaganda, Kazakhstan.
MAGAZINE Preschooler.RF
Summary of a lesson on arts and crafts for children aged 6-7 years (fredpoint technique) “Flowers of Victory”Prepared by Filimonova O.E. Teacher of MBDOU "Kindergarten No. 8 "Teremok"
Institutions of the preschool education system today, more than ever, are faced with the important task of developing the creative potential of children, taking into account their individual and age characteristics. Creativity is a constant companion of childhood. Arts and crafts classes are perhaps the most interesting type of creative activity for preschool children. “The origins of children’s abilities and talents are at their fingertips. From the fingers, figuratively speaking, come the finest threads - streams that feed the source of creative thought. In other words, the more skill in a child’s hand, the smarter the child,” said V. A. Sukhomlinsky. By being creative, a child develops himself both physically and mentally. The manifestation and development of creative abilities teaches a child not just to look, but to see, and helps him become an extraordinary, developed personality.
One of the non-traditional types of arts and crafts is Fredpoint.
Fredpoint – painting with wool. Author's technique of Lyubov Borisovna Khitkova, from English. "thread" yarn and "point" point. This technology is not yet so widespread, so it is most interesting. This is a special way of creating an artistic canvas without the use of brushes, paints and water. All you need is imagination and creativity. The works are similar to watercolors, but at the same time they will not crack from frost, they will not be afraid of heat, and they will not turn pale from the bright sun if they hang on a sunlit wall. In a word, such pictures will please the eye for a long time.” The pictures turn out to be warm, both literally and figuratively.
Creating paintings from wool is impossible without an emotional and sensory aspect; mastering the technology develops fine motor skills of the hands, a sense of shape and color, imagination, perseverance, which is so necessary to cultivate in children when preparing them for school. Wool is a very warm, soft material and interaction with wool helps strengthen the nervous system and brings a lot of pleasure to children. Also, painting with wool is an excellent color therapy, since in the process of work only bright colors are used, which children love so much. There is no doubt that it is the development of creative abilities in preschool children that will help “transform” every child into a competent person capable of adequately thinking, feeling and acting in a cultural society, and Fredpoint can become one of the most effective means at the present stage.
felting technique is quite difficult for children. But, nevertheless, with skillful guidance from the teacher, preschoolers can freely master this fascinating technique. Extensive experience in working in preschool institutions allowed us to select simple, adapted methods and techniques, thanks to which the process of learning felting became accessible to children of senior preschool age.
On the eve of the great holiday - the 75th anniversary of Victory Day, I propose to make gifts for Veterans with children using this technique.
Lesson topic: “Flowers of Victory”
Group, age of pupils: general - developmental orientation from 6 to 7 years, senior preschool age.
Prepared by: teacher Filimonova Olesya Evgenievna.
Type of lesson: integrated.
Educational field: artistic and aesthetic development.
Integration of educational areas: cognitive development, speech development, social and communicative development, artistic and aesthetic development, physical development.
Section: development of productive activity and children's creativity.
Goal: to educate children with moral and patriotic feelings.
Software tasks:
Educational:
- To give children ideas and knowledge about the Great Patriotic War and Victory Day.
- Initiate children's independence when creating an expressive image
Educational:
- Encourage students to take an active part in the conversation, develop dialogical speech, develop expressive speech, and answer questions.
- Perform actions based on the text.
- Develop an interest in participating in the creation of work.
Educational:
- Help children understand the meaning of this holiday - Victory Day, and pronounce the words clearly. • Foster a sense of respect for WWII veterans and a desire to care for them.
- To cultivate patriotic feelings, the desire to be like those soldiers who defended our Motherland.
- Cultivate friendliness. Preliminary work of the teacher: a selection of illustrations, photographs, documents, wartime items, corner design.
Preliminary work with children:
- Conversations with children about the Great Patriotic War using illustrative material.
- View presentations: “Victory Day!” , "Children of war"
- Reading works of fiction (stories, poems): M. Isakovsky “Remember forever!” , S. Baruzdin “A soldier walked down the street” , S. Mikhalkov “Victory Day” , L. Kasil “Monument to the Soviet soldier” .
- Learning war songs and poems.
- Listening to war songs.
Forms of organizing the activities of students taking into account the integration of educational areas: frontal, individual.
Methods, techniques and technologies used: verbal method (conversation, observation), visual method (illustrations, teacher demonstration), game method (physical minute), practical work.
Types of children's activities: play (audio recording), productive (application), social and communicative (conversation), motor (physical minute), fine art activities. Vocabulary work (consolidation of terms): war, feat, victory, heroism, defender, veteran.
Materials and equipment: presentations, photographs of veterans at the parade, illustrations and photographs of the war years, audio recordings of the Victory Day , colored wool, frames with glass, scissors, glue stick, reusable paper towel, colored paper St. George ribbons 10 long and 3 wide see, paper colored emblems of the 75th anniversary of the victory.
Handouts: colored wool, frames with glass, scissors, glue pencil, reusable paper towel, colored paper St. George ribbons 10 cm long and 3 cm wide, colored paper emblems of the 75th anniversary of the victory.
Didactic tools (demonstration material): illustrations of paintings, photographs, sample of finished work.
Equipment: ICT
Expected Result:
- To instill moral and patriotic feelings in children.
- Enrich knowledge about the great holiday - Victory Day.
- Make paintings from wool with your own hands.
Progress of direct educational activities.
Part I. Introductory part
Organizational moment Children enter the group to the music “Victory Day” . They take their places.
Part II. Motivation of children in activities.
Educator: Show a picture with fireworks. Guys, how many of you know why every year on May 9th in the evening fireworks stars scatter on the city streets?
Children's answers: Because May 9 is Victory Day.
Educator: Our whole country is preparing for this holiday. And in the new year 2020 there will be an anniversary date of 75 years of Victory. Victory Day is Victory in the Great Patriotic War. Many soldiers and civilians died in this war. But many returned home from the war as heroes. Now those who fought in that terrible war are still alive. They are called Veterans of the Great Patriotic War. (Show illustration of veterans at the parade)
Educator: On Victory Day, veterans put on orders, military awards and go to the parade to meet their front-line friends and remember how they fought.
Educator: Guys, do you have great-grandparents who fought?
Educator: In honor of the Great Victory, many monuments were erected in our country. In our city of Rasskazovo there are also monuments, people bring flowers with gratitude to honor the memory of the victims.
Part III Main
Educator: If you see a person with orders on May 9, then come up and congratulate him on the holiday, tell him “thank you” for defending our Motherland from enemies. It is also customary to present flowers and gifts to veterans on this holiday.
Educator: What gift can we give to veterans (children offer gift options).
Educator: Offers the children a sample of a painting with lilac flowers, with bouquets of which the winners were greeted in 1945 (show the children a photo of the meeting of front-line soldiers, whom relatives and friends met at the station). Consider a sample of the work - background color, color of flowers, placement of flowers on the work, placement of the St. George ribbon and emblem. Reminds safety rules when working with scissors.
Independent work of children under the guidance of a teacher. The teacher demonstrates the stages of work, monitors the results and helps as necessary.
The teacher first disassembles the frames; for safety reasons, only stretchers are placed on the children’s tables; glass is placed on the finished work only under the supervision of the teacher (you can use plexiglass or glass processed around the edges).
On the work tables for each child are prepared: a stretcher; a stretcher-sized reusable paper towel; glue stick; wool of yellow, green, lilac and purple colors; scissors; paper St. George ribbon 10cm long. and the emblem of the 75th anniversary of the Victory.
Educator. Guys, let's get started, take a glue stick and apply it to the stretcher along the edges and diagonally. Then carefully take the towel and place it on the stretcher, aligning the corners (the corners of the stretcher should coincide with the corners of the towel), and press with your hands.
Then take yellow wool and carefully pull out the strands from it, lay them on a towel, covering the entire area. The result is a yellow background. Be sure to press with your hands. The background is ready, now let's move on to the lilacs. We take green wool and disconnect thin long strands, we need three stems. We place them on the background from the lower left corner and distribute them beautifully: one higher, the other lower, the third between them.
The stems are ready, now we will make the leaves, we pull out two wide strands from the same yarn, twist them at the ends - we get leaves, we lay them next to the stems closer to the place where our stems are connected. We press everything with our hands. Now let's start with the flowers, take the wool of lilac and purple flowers, pull out small strands from them, connect them together and roll into balls, lay them on the stems nearby to form lush lilac inflorescences. We press with our hands.
Well, our lilac bouquets are ready, all that remains is to decorate our paintings with the St. George ribbon and emblem. Take the ribbon and place it in the upper right corner of the picture, with the emblem on top of it.
Next, the teacher helps the children place the glass on the finished work and carefully trim off the protruding ends of the wool (the wool scraps are not thrown away, but are collected in a box for use in other works). The pictures are also placed in frames with the help of the teacher.
The teacher invites the children to rest and do physical education.
Physical education lesson: “Victory!”
We celebrate Victory! They walk in place.
Firework! Firework! Firework! Raise your hands up, clench and unclench your fingers
There are spring flowers all around, hands on the belt, turns of the body,
Bloom, bloom, bloom! Extend your arms to the sides.
All the people are dancing, celebrating, Squats with their legs pointed forward.
Sing, sing, sing!
Let there be different countries in the world. Inhale, move your arms in a circular motion, depicting
Live, live, live! Earth.
Part IV. Final
Summary of the lesson. Educator: Look what wonderful gifts we got. Ask your parents to take you to the Victory Day parade. Take the paintings, take them to the monument to the Soldiers of the Great Patriotic War, and give them to veterans.
Educator: What did you like most about the lesson?
Educator: What did we talk about in class today?
Educator: When is Victory Day celebrated?
Educator: Where do children and adults lay flowers on May 9?
Educator: What did we do today?
Educator: Who did we make gifts for?
| Next > |