A scarlet flower (flower-shaped crafts in general) can be made from any materials: paper, beads, or yarn. The flower making techniques presented below are simple and understandable even for children. By following all the instructions, the child will be able to make a pleasant surprise for his mother. Below you can see photos with examples of work.
Handmade products will be a unique and beautiful gift for friends and relatives on any occasion, and bouquets of artificial flowers will be an original decoration for your apartment.
Working with beads
Beaded flowers are very beautiful. However, such crafts are a very painstaking and time-consuming process that requires patience, perseverance and perseverance. Even a beginner can figure it out step by step in the master class.
For a quality product, it is important to choose the right bead diameter and the right wire. It is important that the material matches the color scheme and is of equally good quality.
It is worth choosing Czech or Italian beads, these are the most durable. You should not take material made in China, it is of low quality. For beginning needlewomen, it’s worth starting to master small, simple crafts, rather than taking on complex work right away. In order to master the basics of needlework, ready-made bead kits are perfect. Those who know how to embroider can purchase an embroidery set with beads. With a little effort and imagination, you will get a stunning work of art.
Read this: DIY wedding bouquet: options for materials and their use
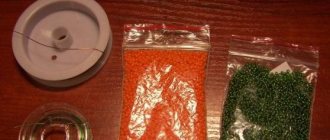
You can learn the principles of flower weaving using the example of chamomile. To work you will need:
- Wire;
- Beads for the base of white and green shades;
- Small beads;
- Stem tape.
Cut 40 centimeters of wire and string 25 beads, and then fold the loop. Thread the wire into the last bead. The ends of the product should come out of one bead.
Repeat the entire process three times.
Make a sepal from green beads in the same way. Twist the petals and sepals. Weave leaves according to the pattern.
The flower is ready!
Keychain “Scarlet Flower” (weaving from rubber bands)
New master class by Lyudmila Selezneva on weaving from rubber bands: scarlet flower :).
Sometimes you want something new and bright to lift your spirits, for example, a beautiful flower. This is exactly the keychain we will weave from rubber bands.
To weave a flower, we need:
- elastic bands of three colors - red, crimson, yellow; - two hooks.
Let's get to work.
We take two red elastic bands, this will be the top of our petal, and twist them in the form of a figure eight on two hooks.
Next we take two raspberry elastic bands, fasten them to the edge of the hook, and remove one side of the red elastic bands on them.
On the other side we also collect raspberry elastic bands and lower the red one onto them; on both sides we should have two raspberry elastic bands.
On the left side, we transfer the two top raspberry loops to the right side.
We take two more raspberry rubber bands and remove two loops on them on the right side (on the right side we already have three pairs of raspberry loops).
On the right side, remove the two top loops and transfer them to the left hook.
We collect two more raspberry elastic bands and remove all the loops on it on the right side, and then on the left side.
We turn the hooks over so that the right side becomes the left and the left becomes the right. Remove the top loop from the left side and throw it over the right side.
We take two more raspberry elastic bands and pull only the dropped loop through them.
Again, but only from the right side, we transfer the upper elastic bands to the left side.
Now we take two red elastic bands, fasten it to the edge of the hook and pull all the crimson loops onto it. We do the same on the left side.
Having dropped the crimson loops onto the red elastic bands, we transfer them to one hook and put the second one aside.
We collect two yellow rubber bands and throw all the red rubber bands on them. The first flower petal is ready! Using the same principle, we make 4 more such petals.
Having made all the petals for the flower, we fasten them and make a stamen. Take one yellow rubber band and remove all the petals from it. We tie it into a knot.
The “Scarlet Flower” rubber keychain is ready!
In order not to forget the page address and share with friends, add it to your social network:
More interesting:
See also:
Fishtail rubber band bracelet (master class)
Another master class from Tatyana is dedicated to the super-popular hobby of recent months - weaving and...
“Fashionable bracelets. Crochet part 2
For part one - basic instructions for crocheting bracelets, see here. Fallen leaves br...
How to make a name from beads
Recently I was puzzled by the idea of how to make a name out of beads to somehow mark my daughter’s backpack. Volumetric...
DIY gift for a friend
Today we have a wonderful article by Nina Aleksina about how to make a gift for a friend with your own hands...
Beaded tassel earrings
As many already know, a bright and at the same time classic accessory option for 2020 is earrings...
Caterpillar bracelet made of rubber bands
We continue the series of master classes on weaving from rubber bands. Next in line is the “caterpillar” bracelet, apparently...
DIY ribbon hairpin
Every mother wants her daughter to be irresistible. Is it really possible to wear the same hairpins...
Crocheted earrings (boho set)
The second master class of a boho style set is crocheted earrings. How to knit a bracelet for them, look...
Master Class. Geometric wood carving
An interesting master class in wood carving techniques was sent to us by Inna Aleksandrovna Kunitsyna, a student...
Beach leg decoration (crochet)
Summer is the time for vacations and relaxation on the beach! Today we will crochet a leg decoration that will allow...
Marine bracelet
Another work in the “Handicraft” category, sent by Ekaterina Solokha, is a master class on decoration...
Bows for girls “Belle” and “Sofia”
Master classes on how to make bows for a girl with your own hands, beautiful ones, and even with her beloved princes...
Tags: DIY jewelry
Discussion: there is 1 comment
- Anastasia:
August 15, 2020 at 9:18 amVery beautiful *THUMBS UP* I'll try to make one like this sometime))
Answer
Your comment Cancel reply
Paper bouquets
There are many ways to make paper flowers:
- Origami;
- Quilling;
- Cutting out.
Below we will look at how to make a bouquet of dahlias. To do this, you just need to draw 7 circles on a sheet of red paper. The diameter of each subsequent circle should be 1.5 centimeters smaller than the previous one. Cut out circles and make petals just like in the picture.
Read this: Toys made from fresh flowers: how to surprise with an unusual gift
At the last stage, you need to glue the parts of the flower, a large circle together with a small one.
Corrugated paper
To make flowers from corrugated paper with your own hands, you need to take into account the characteristics of the material. This paper itself gives the product additional volume, but to enhance it you will need some tricks. Let's conduct a master class on how to make a tulip from corrugated paper.
- Cut a small piece of corrugated paper into a rectangular shape to fit the flower and slightly round the edges.
- To make the petal acquire a convex shape, you can slightly wet it (just a little so that the paper does not spread) and place it on the back of the tea cup.
- Let the paper dry. Do the same with all the petals.
- Prepare the stem. It can be made from a stick or thick wire wrapped in green crepe paper. As a center and to secure the petals, you can use a special base in the form of a semicircular mesh, as in the photo.
- Secure the corrugated paper petals to the stem or base so that there are no gaps between them.
This is what the step-by-step master class and the finished flower look like in the photo
Volume roses
You need to take crepe paper and make a bouquet of roses. Cut the paper into 15 cm strips. One strip will produce one finished flower. Bend the corners first inward, then upward. Twist the strips into a tube. Straighten the petal and strengthen it with wire.
Methodological development of the master class “The Scarlet Flower”
METHODOLOGICAL DEVELOPMENT MASTER CLASS
"The Scarlet Flower"
Starikova Svetlana Anatolevna
additional education teacher
MKOU DO CDT "Rovesnik"
ANNOTATION
The methodological development “The Scarlet Flower” presents a master class for students aged 6-10 years old, held on the eve of Mother’s Day.
The methodological development can be used by additional education teachers, primary school teachers and kindergarten teachers.
Introduction
Despite the fact that in our country Mother's Day is a fairly young holiday, in other countries it has been celebrated for 4 centuries. Since 1998, it began to be celebrated with us. It was then that this holiday was officially established. It was decided to celebrate the date every last Sunday of November.
On this day it is customary to visit mothers. Give them symbolic gifts. In our country, the main symbol of the holiday is a teddy bear with a forget-me-not in its paw. How can you please the person closest to you and make sure that you really like the surprise? You need to make a gift with your own hands.
The master class will help you create a gift with your own hands and add love to your dearest person.
Subject:
"The Scarlet Flower"
Target:
making a gift for Mother's Day with your own hands.
Tasks:
- introduce students to the holiday Mother's Day and remind them of the fairy tale “The Scarlet Flower”
- develop creativity, imagination, fantasy
- cultivate neatness
- correct eye, fine motor skills
Lesson form
: Master Class
Type of lesson:
integrated
Teaching methods:
- Verbal
- Visual
- Practical work
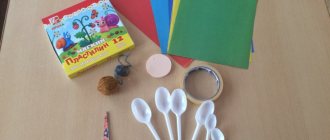
Materials and tools
: cardboard, colored paper, quilling paper (3 mm), ruler template with round holes, scissors, quilling tool, PVA glue.
Equipment and visibility:
sample crafts, drawings.
Progress of the master class
Theoretical stage
Soon we will celebrate the holiday of the most dear person to us, Who is this? Of course mom. On the last Sunday of November, namely November 24, we will celebrate Mothers' Day. Mother's Day is a fairly young holiday; in other countries it has been celebrated for 4 centuries. Since 1998, it began to be celebrated with us. On this day, we will try to show even more how we love our mothers and express our warmest feelings to them not only with words, but also give them a gift.
I keep walking, I keep thinking, I look: “What will I give my mother tomorrow? Maybe a doll? Maybe some sweets? No! Here's a little scarlet flower for you, dear, on your day!
Elena Blaginina
“The Scarlet Flower” is one of the most beloved fairy tales. Who knows who wrote this fairy tale. Sergei Timofeevich Aksakov (1791 – 1859) wrote it correctly.
There are many miracles and strange things in the fairy tale. The merchant brought wonderful gifts for his daughters because of the sea voyage. One of the gifts for the youngest, beloved daughter was a scarlet flower. So today we will make a scarlet flower with our own hands for the person we love most, for mommy
Organizational stage
To make our gift we will need.
Checking the availability of tools and materials
Preparatory stage
Safety instructions when working with scissors, toothpicks and PVA glue. (Annex 1)
Practical stage
Step 1.
We are preparing a substrate for our work; for this we use cardboard and colored paper.
Step 2.
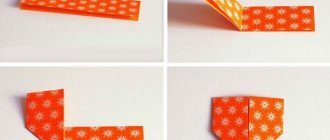
We prepare the necessary elements for the flower.
- Take four stripes of pink and four red
- Glue together the pink and red stripes. We get 4 stripes of mixed colors.
- I use a quilling tool and roll 4 rolls starting with pink.
- Using a ruler with round holes, measure two rolls measuring d-13mm and two rolls d-15mm
- Make a drop shape out of two d-13 mm rollers, and make a drop shape out of two d-15 mm rollers and bend the sharp ends as shown in the picture
Step 3.
We prepare the necessary elements for stems and leaves
- Take 4 strips of light green and 4 strips of green. Glue them together light green with green. The result is 4 stripes of mixed colors.
- I use a quilling tool and roll 4 rolls starting with a light green color.
- Using a ruler with round holes, measure two rolls measuring d-12mm and two rolls d-15mm
- Make an eye shape from two d-12 mm rollers, and make an eye shape from two d-15 mm rollers and bend the sharp ends as shown in the picture
- We take one green strip, cut it in half, bend them in half again, we get two blanks for the stems
- Using a quilling tool, roll the half rolls to the outside. Glue to a length of 2 cm.
- Take 2 green strips and use a quilling tool to twist two tight rolls.
Step 4.
Prepared details for the postcard.
PHYSMINUTE
Hands up, press them together, spread your fingers, slightly round them like a flower bud.
Spread your fingers as if a flower is blooming. Rhythmic movements of fingers together - apart.
Place your palms down and press their backs together, spread your fingers (flower roots)
Step 5.
We select a composition based on. Glue with PVA glue.
The final stage.
For congratulations, you can use signatures with congratulations
Using your imagination and your own design, you can make another option. I hope that the skills acquired in this master class will help you in making other works using the quilling technique.
Go for it.
Resources used
Quilling, paper rolling - master classes, lessons, training, postcards, crafts, diagrams Children's creativity, crafts, poems for children - Access code https://luntiki.ru/blog/kwilling
Annex 1
Safety precautions when working with scissors:
- Pass the scissors rings forward, holding the closed blades.
- Place the scissors on the right with the blades closed, pointing away from you.
Safety precautions when working with PVA glue:
- Work carefully, trying not to drip glue.
- Work with glue on a special substrate.
- Use a toothpick for glue.
- After work, rinse the substrate well with warm water.
- If glue gets into your eyes, rinse them well with water.