Simple machine
Playing with paper toys is no less interesting than with models made of plastic and metal. By playing with such products, you can organize races and make a garage for your toy. Each child will be able to decorate the craft themselves in any colors.
For the design process take:
- sheet A4;
- scissors;
- markers.
Having collected such a list, you can start making a simple machine. Now you will learn how to make a paper car.
Manufacturing process of a simple machine:
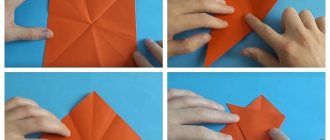
- take a sheet and cut a square out of it;
- fold the cut square in half;
- turn the edges in the opposite direction and bend them back towards the middle;
- bend the extreme sides in the reverse order and connect the figure in half;
- Now on the workpiece, you need to apply sketches that will resemble a car;
- for application, you need to wrap the upper corners and tuck them into the middle;
- in the end we get two corners, which in the same way, we fold one small one into the other large one;
- All that remains is to make the wheels;
- to do this, you need to bend the lower corners back;
- then we round them with scissors and get the front wheels;
- We do the rear wheels in the same way;
- All that remains is to bend the corners to get the headlights and decorate the product in any colors, and draw windows and doors.
After spending 10-15 minutes, you learned how to make a simple car out of paper and delighted your child with the craft.
DIY paper machine (diagrams, templates)
Every boy loves to play with cars; he will not soon assemble a metal structure on his own, but teaching a child to make paper models is very easy. Parents will need a little time, paper, glue and scissors. You can create such machines using the origami technique or 3D design; for each method there are the necessary materials, instructions and recommendations.
How to make a car from waste material?
You can create cars not only using ready-made diagrams, but also using available materials, for example, cardboard and matches, wooden sticks and colored paper. For example, take several cardboard cylinders left over from toilet paper and cover each one with colored paper. After the fake has dried, it is necessary to cut a rectangular hole on the surface of the cylinder, leaving a little space on one side so that it can be bent and thus make a seat for the driver.
The design can also be decorated inside using felt-tip pens or a marker; to create a steering wheel, you should cut a circle out of white paper and glue it opposite the seat. The machine can be additionally decorated with applications made of colored paper, choosing different shades. If the car is a racing car, you can put a number on it; if it is an ambulance or fire model, then you can also cut out the corresponding signs or draw them. To secure the wheels, use small bolts or plastic bottle caps.
Volumetric 3D paper cars
To complete the work, you need to prepare a printer, a sheet of paper, scissors, cardboard material, as well as glue, colored pencils, paints or felt-tip pens.
The instructions are very simple; you can assemble a paper machine without any special skills or knowledge. First, you need to print out a model of the machine you like on paper, then glue the sheet onto cardboard to make the structure durable. The image is cut out along the contour; this is another advantage of this technique of creating a paper machine.
These white ends must be glued together so that the structure does not fall apart, and if the cardboard is strong enough, then you can use super glue rather than stationery PVA. After that, the most interesting thing for the boy is to decorate the car at his discretion.
A simple way to create a paper car
Paper cars are just as fun to play with as metal or plastic ones, you can arrange real races, and you can also build a garage by decorating all the structures with felt-tip pens, and use a toothpick to make a flag.
To create a paper machine you will need a square piece of paper; it should be folded in half, then unfold the edges and bend them in the opposite direction towards the middle of the sheet. Then, fold the edges again in the opposite direction and fold the sheet of paper in half. Draw the outline of the car onto the material; to do this, fold the top corners, then tuck them inward; two corners will peek out from below. They are also folded inside, after which you need to make wheels for the car.
Bend the lower corners back, rounding them a little, thus creating wheels; in front, to make headlights, the corners must be laid inward. Do the same on the back side of the car; all the details of the vehicle can be drawn, for example, wheels, headlights, doors or the driver behind the wheel. 15 minutes of time and a beautiful paper car is ready.
Origami machine
This is a unique art that involves the creation of unusual paper figures, including cars. To work, you just need to stock up on colored paper and patience, it’s very easy, so you not only can, but also need to involve children, together you can create a whole fleet of cars. Or you can make a car out of a banknote and give it as a gift to a friend.
To create, for example, a sports car, you need to take a rectangular sheet, as a rule, the aspect ratio should be 1:7. The work begins by bending the upper right and left corners, thus creating all the necessary folds. The next step is to fold the top of the sheet, along with the folded corners on the left and right. Small triangles will remain sticking out, which should also be folded towards the middle of the sheet of paper.
Origami machine
The Japanese paper art technique (known as origami) makes it possible to create unique crafts from leaves, including cars.
Making a machine using the origami technique requires patience, colored paper, scissors and glue. You can involve your child in crafts of this type; he will only be delighted with your invitation and will learn how to make toys himself. Note that together with the baby, you can make a whole fleet of vehicles.
Making an origami machine, step-by-step instructions:
(Step 1)
- We take a rectangular sheet, monitor the ratio of the sides, they should be equal to 1 to 7;
- fold the lower and upper right corners;
(Step 2) - we bend the upper side of the sheet, while the corners should be bent on the left and right sides;
- there are small triangles left on the figure that protrude; they need to be bent towards the middle of the sheet;
(Step 3) - then, it is necessary to bend the sides from the sides and fold the remainder located at the bottom; when bending the lower part, the algorithm of actions that were performed while bending the upper part must be followed;
(Step 4) - At the end, we fold the craft in half, tuck the triangle into the middle and paint the product.
This option takes about 5 minutes to make. Now not only you will know how to make a toy out of paper, but also your child.
Sport Car
Previously, we told you how to make a simple car out of paper, now we will complicate the work and make a racing car. This toy is capable of moving, for which it is enough to place the craft on a slippery and flat surface and blow on it. To make such a model, you only need office paper.
Manufacturing process:
- take a sheet and fold it in half, but not across, but lengthwise;
- we apply the corners located at the top and bottom on the right and left in the middle;
- iron everything well;
- now we form the bend of the upper side with internal triangles according to class=”aligncenter” width=”1024″ height=”680″[/img] (Step 2)
- We bend the already formed triangles to the middle of the workpiece;
- then bend the side parts inward towards the center;
- fold the bottom side of the triangle onto the top of the workpiece and bend the product in half;
- We bend the remaining corners into the resulting pockets.
The car is basically ready, you can paint it if you wish.
Origami king penguin
You also need to fold it from a square sheet of paper, as in the template:
- The sheet is folded in half.
- Then the corners are about a quarter.
- Small folds are made in steps, as in the diagram.
- Fold the workpiece in half.
- Turn right 90 degrees.
- Then the corner is straightened with a cap - this will be the head.
- Bend a large corner.
- And fold it inward, as in the picture.
- Let's make paws.
- We perform the beak.
- The penguin is ready - it can stand on its own, without help.
- This model also has better beak and eye design.
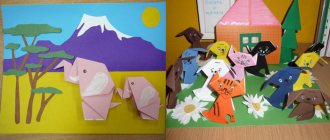
If you make several origami of different colors and sizes, as in the photo, you will get a real family of penguins - big and small!
Machine made from bushings
To make a model car for the little ones, use the remaining toilet paper roll. We will tell you below how to make a paper toy for a baby, but now we will list what materials and tools are needed:
- toilet paper;
- brush and paints;
- scissors, compasses and cardboard;
- glue;
- a pair of toothpicks.
The manufacturing process goes like this:
- Take a roll of toilet paper, clean the sleeve, paint it with any color of watercolor paint. After the paint has completely dried, we draw the emblems with a pen or draw an image of racing symbols.
- We take cardboard and, using a compass, draw 4 circles on it, which will then become wheels. After marking them, we cut them out and paint them in black.
- Now, you need to pierce holes for toothpicks on the base of the sleeve with a needle or awl. Then insert toothpicks into the holes and put wheels on them.
- We cut out a semicircle from the top of the sleeve and bend it towards the top. It will act as the windshield of the finished craft.
- If you wish, you can put a little man in the middle of the car. To do this, you need to cut out a silhouette from a sheet and fix it in the middle with tape.
Let's reveal a little secret, the wheels will spin, but to prevent them from falling off while driving, you need to drip some glue on the outside and wait until it dries. Now, you know how to make this type of machine out of paper.
DIY paper machine: ideas
Children love to make various crafts. They show particular interest in paper products, because this process turns out to be fascinating. We'll tell you how to make a paper car quickly and easily: even preschoolers can handle this activity .
A paper car is made in several ways. The simplest of them is cutting, but older children will find this process boring, so we will consider several options for a child of any age.
Let's tell you how to make a car out of paper:
Truck
Let us immediately note that a cardboard truck will look more interesting if it is made voluminous.
To make a truck, prepare:
- cardboard or thick paper;
- scissors and glue;
- wooden skewers for canapés;
- double-sided adhesive tape;
- plastic containers;
- compass and pin.
Having collected the entire list of materials and tools, we begin manufacturing:
- We take thick paper or cardboard, cut out 4 squares from it to construct the cabin, 3 identical rectangles and 2 squares to make the body. We put the cut out elements into 2 boxes and fasten them with tape.
- We take the squares that are intended for the cabin and cut out holes in them for the front and side glass. Now we cut out pieces from a plastic bottle and fix them with tape in the cut out areas.
- We glue the cabin and body into a single piece.
We've figured out how to make a car body out of paper, now let's start making wheels. To do this, you need to take black colored cardboard and use a compass to mark eight identical circles. We cut out the circles, and to make them more stable, glue them in pairs. In the middle of each wheel, you need to make holes using a pin.
Similar holes are made in the body and cabin. We insert wooden skewers and put wheels on them.
Upon completion of production, you can paint the craft. If it is necessary for the truck to be more stable, instead of 2 circles, glue 4. If you want your child to learn how to make a truck out of cardboard, you can involve him in the work during production. It’s interesting for you and exciting for your child to participate in the construction of his toy.
Military model
Paper makes excellent military vehicles.
(Step 1)
To manufacture one of the types of military equipment you will need:
- cardboard with a dark green tint, or matchboxes;
- wooden skewers, paper and plastic tubes;
- compass, ruler and simple pencil;
- glue, scissors, black paint and brush.
Let's get started:
- We take dark green cardboard and draw 4 squares for the cabin on it. On the next sheet of the same paper we draw 3 rectangles and 2 squares. You also need to draw 3 rectangles. We cut out all the parts and glue the cabin, body, and glue 3 rectangular elements into a triangle, this will be a mount for missiles.
- We draw windows and doors on the cabin. The windows can be cut out, or you can leave them like that, but it is advisable to stick strips of paper or tape on them, this will make the craft look more impressive.
- Glue a triangle for rockets onto the body. We combine these components into a complete car.
(Step 2) - Wheels are made in the same way as for a truck. Also, 8 identical circles are cut out of black cardboard and 2 circles are glued together. Holes are made for the skewers and the wheel blanks are installed. For strength, it is advisable to dip the edges of the skewers in glue. Next, let's make rockets.
- The production of rockets for our military vehicle is carried out from cocktail straws. Take the tube and cut it into several parts. The length of one element should be 3 cm. After cutting, paint the elements black and wait until they dry. Then we glue the segments to the triangle, which is placed on the body.
Having done this work, you will get a wonderful military vehicle with missiles, which, by the way, drives. For realism, military equipment can be painted with dark camouflage spots.
Assembling the craft
Modular origami (penguin) must be assembled as follows:
- Take two black modules and place them on the table with their wings facing up. Connect them together with a third piece, putting it on one wing of each (Illustration 1).
- Add another black module and slide the next one on top. After a few details, start using white. As a result, in the first row you should have five black modules and seven white ones. The second row consists of six black and six white (Figure 2).
- The third circle will consist of seven black and five white modules (Figure 3).
- The fourth row is represented by four white modules and 8 black ones (Figure 4).
- Fifth row - two white parts and ten black ones (Figure 5).
- Turn the figure over as in illustration 6.
- Make a row of three white modules and nine black ones (Figure 7).
- In the next tier, increase the number of white modules by one and decrease the number of black modules.
- In the next row there will be five white and seven black modules (Figure 8).
- Insert four white and eight black parts (Illustration 9).
- Place one white module on both sides of the black module (Figure 10).
- Then insert only black modules (Figure 11).
- The last row consists only of black modules (Figure 12).
- On both sides, insert the black modules with the reverse side (Figure 13).
- Use glue to attach the orange module (Figure 14).
- Make eyes from two white circles and a pair of smaller black circles.
The three-dimensional penguin figurine is ready! If you wish, you can make a crown for the animal, in the same way as the body was made, and glue it to the head.
Buy origami paper.
One sheet of paper measuring 15 x 15 cm (6 x 6 inches) will suffice. If you are going to make a larger penguin, you can use a 30 x 30 cm (12 x 12 inch) sheet, but in this case you will need to multiply all the dimensions below by 2. If you want your penguin to look as beautiful as possible, buy paper with one side white and the other black.
Fold a sheet of paper in half diagonally.
First, place a piece of origami paper on a flat, smooth surface (if you have black and white paper, place it with the white side facing up). Then fold the sheet diagonally, aligning the bottom left corner with the top right corner, and press the fold. After this, unfold the sheet and repeat the same for the other two corners; unfold the sheet of paper again.
Fold the bottom left corner toward the center of the sheet.
Having straightened the sheet with two folds along the diagonals, grab its lower left corner and bend it inward so that the top of the corner touches the center of the sheet. In other words, the top of the corner must coincide with the intersection point of two diagonal folds. Press the new fold down, then fold it back, straightening the paper.
Fold the top right corner into the new fold.
After the previous step, the paper has two large X folds and a smaller diagonal fold at the bottom left of the paper. Grasp the top right corner of the sheet and fold the top into the middle of this smaller fold. After this, unfold the paper again.
Turn the sheet over.
For subsequent bends, you need to turn the sheet over. If you have two-color paper, the black side will now be on top. Turn the sheet over and position it diagonally so that the former lower left corner is on top.
Bend the left corner towards the right.
When re-arranging the paper, grab the left corner and bend the sheet in half so that this corner coincides with the right. At the bend there is already a fold that you made earlier, but you need to bend the paper along this fold in the opposite direction after you have turned the sheet over.
Fold the bottom corner to the right.
After the previous step, the sheet has the shape of a triangle, the left side of which is vertical. Grab the bottom corner of this triangle and bend it at a 45° angle. In this case, the horizontal edge of the upper fragment should coincide with the fold made earlier, and with the lower one, and not the one that runs along the large diagonal. After smoothing the bend you just made, fold the bottom corner back, again creating a triangle with a vertical left side.
Make an inverted fold along the crease you just created.
This fold is more convex compared to the ones you created earlier. To make an inverted fold, fold the fold you just created in the opposite direction, tucking the corner under the edge of the paper.
- It is difficult to imagine an inverted fold from just a verbal description - the following video demonstrates how it is done: https://www.youtube.com/watch?v=iHQMzLUQMmg#t=80.
- Fold the top half of the sheet.
Leaving the inverted fold aside, take the right corner (the topmost one, not the one below) and fold it so that the top edge of the corner lines up with the vertical left edge of the sheet. Smooth out the crease without straightening the paper.
Turn the sheet over and fold it in the same way on the other side.
Turn the sheet over to the other side and bend it on that side in the same way as in the previous step. In other words, fold the second corner (at the bottom in the previous step) of the sheet so that its top edge also matches the same edge of the sheet.
- This step is especially important if you are using two-color paper, because once the white background has folded black areas on both sides, the outline of the penguin will begin to appear. These areas form the bird's wings.
For the next bend, you need to turn the paper over again. At the same time, position the sheet so that the narrow part is directed upward.
Bend the narrow section to the left.
With the long, narrow piece facing up, bend the sheet at a 45° angle so that the tip points to the left. You will end up with a protrusion that resembles a penguin's beak. After smoothing the fold, turn the folded section back up.
Make an inverted fold along this curve.
At this stage, you need to create an inverted outward fold along the fold made before. The inverted outer fold is slightly different from the simple inverted fold applied earlier. To do this, slightly bend the paper from the side of the black surface and insert your finger inside the fold made in the previous step. Turning the folds in the opposite direction, transform the fold so that both black surfaces of the paper again touch each other.
- As mentioned above, the inverted fold is not easy to describe in words, so this fold is demonstrated in the following video: https://www.youtube.com/watch?v=iHQMzLUQMmg#t=127.
Even though the wings are already formed, they are not complete. Grasp the wing on top and bend it so that the white surface is at the top. In this case, the angle previously directed downward to the left will move to the right. Pull it back so that the wing hangs over the small tail located at the bottom of the leaf
A paper penguin is easy. Origami technique allows you to fold a bird figurine in different ways - from easy to complex. Let's start in order.
This MK is designed specifically for beginners in the origami technique. It is made from a small square sheet of black paper (it is better to take glossy paper). Detailed step-by-step instructions with a visual description in the video.
Large cardboard machine
Using cardboard you can make a large car for a child. In this case, we will tell you how to make a fire truck out of paper.
This machine is made from:
- five cardboard sleeves;
- two peeled reels of adhesive tape;
- several cardboard boxes;
- tape (including masking tape);
- paint glue and paper napkins;
- four cocktail straws;
- newspapers and matches.
Having collected the entire list, we begin production. Manufacturing process of large cardboard machine:
Manufacturing (Step 1)
- Using cardboard, we fold two boxes of different sizes and glue them with tape into one solid part;
- cut the tape spool, a total of 4 elements are needed;
- using a sleeve, we make something like a container for water, for this we seal the ends with masking tape;
(Step 2) - We make something like wheels from toilet paper reels and fill the middle with newspapers, while sealing the ends with tape;
- to eliminate defects, seal the car with napkins;
- using tubes and matches we make a fire escape;
- We attach all the parts, put the wheels on skewers and finally paint the craft with paints.
Upon completion, you will see that a toy has been made that looks like a fire truck.
Progress.
1. Cut out templates from white paper
necessary for
making “
Penguin ”
(torso, beak, legs, crest)
.
2. The body will be white
, beak and paws - red, crest and eyes - black.
3. Starts with making the body
. Apply glue to the marked line.
4. Glue the crest to the body.
5. Then the legs.
6. Glue the beak.
7. And eyes.
Penguin is ready
. Of course, you can also add a tail and wings.
Penguin
is the only bird that can swim but cannot fly. In addition, it is the only bird that walks standing
Thank you for your attention!
Publications on the topic:
Probably many people would like to receive a bouquet of wonderful flowers as a gift. And we will be able to please our family and friends by making for.
I would like to present to you a master class on making a flower from colored paper, which you can do with your preparatory children.
Spring has come and nature comes to life around us, including insects: and the children and I decided to make caterpillars - beautiful, bright and unusual.
Autumn. Autumn holidays are held in kindergartens at this time. Autumn is a beautiful time: yellow, red, orange leaves are spinning in the air.
To make flowers we will need: - crepe paper of different colors; - plasticine (you can use leftovers); - toothpicks;
Master class on making bookmarks from colored paper “Pencil” How good are my pencils! Don't bother me, please: I'll draw it.
Construction from colored paper “RAINBOW” *** Riddle: “A multi-colored miracle bridge grew into the ground for a minute.” Dear colleagues, I want to join you.
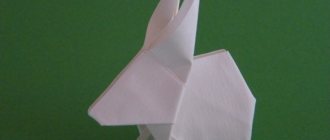
You can fold simple origami penguins from paper with children from five to six years old. The penguin is an unusual bird. Lives at the South Pole, in Antarctica. He can't fly, but he can swim perfectly! And the penguins are dressed like real gentlemen - in a black tailcoat and a white shirt. Therefore, we will need paper for origami that is black on one side and white on the other side. If you want, you can color the penguins’ noses with felt-tip pens or make a yellow “shirt front” on their chest. But this is completely optional. Origami penguins turn out very cute anyway. And, most importantly, absolutely recognizable! We present two models of origami penguins. Both are quite simple. Also look at the folding diagrams that are a little more complex. For all origami penguins you need to take a square of black single-sided paper.
Penguin No. 1 - simple paper origami for children 4-5 years old
This penguin folds very simply, perhaps this is the simplest origami penguin model. 1. Fold a square of paper in half diagonally. The black side should be inside the fold. 2. Bend one of the legs of the triangle towards the center, about halfway. 3. Open the central fold and place it on the table, black side up. Bend the bottom corner up. 4. Again we fold our origami penguin along the central previously outlined fold. 5. We bend the upper corner of the workpiece to the side - this is the future head of the origami penguin. 6. Along the intended fold, open the head of the origami penguin. For those who find it easier to navigate the diagram, we attach a diagram of an origami penguin made of paper for children 4-5 years old. The head in this diagram is made a little differently than in the previous description. A simple origami penguin is ready.
Penguin No. 2 - simple paper origami for children 5-6 years old.
In our opinion, this penguin is the most beautiful. It is made a little more complicated than the previous one, so we recommend it for children 5-6 years old. 1. Fold a square of paper in half diagonally, black side inward. Open the fold. 2. Raise the bottom corner up, approximately to the middle. 3. Fold the workpiece in half along the center line. 4. Bend the sides of the triangle towards the center, slightly short of the center line. 5. Mark a vertical fold by turning the protruding corner towards you. 6. Mark another fold. It should go from the same point where the previous fold ends and to the corner of the wing. Using the marked folds we make an origami penguin wing. 7. Open the piece along the center line and make two folds (back and forth) for the penguin’s beak. 8. Fold the piece along the center line again and turn the penguin’s head to the side. Unfold the penguin's head along the marked folds. For those who find it more convenient to navigate by diagrams, we are attaching a diagram of an origami Penguin made from paper. The origami penguin is ready.
Penguins have always been the favorite animals of many children and adults. They make cartoons about them and draw pictures. We suggest making your own origami penguin craft from paper.
Papercraft machines
Boys often have a desire to design cars using papercraft techniques. This is a technique in which blank parts are cut out according to a ready-made template. But it is not always possible to purchase a book from which car elements are cut out and glued together.
Don’t be upset because modern technologies, such as the Internet, make it possible to find options for cars, transfer the image to paper and make yourself a car. Many people are interested in how to make a toy out of paper using the papercraft technique without having special books with details? Yes, everything is simple here.
The first thing you need to do is find and print a drawing of the car. This could be a sports car, a racing car, special construction equipment and many other options.
The assembly diagram is carried out according to the layout, but in order for the design to turn out correctly, you have the task of cutting out all the parts evenly from the printed image. After printing, you should pay attention that the white elements are the junction points of the parts. Glue is applied to them and the parts are fixed together.
(2)
It is recommended to choose glue for this type of activity, one that does not leave marks, but holds the paper well.
For kids, such a hobby is very interesting; it can captivate him for many years, while he will collect more and more new car models. And who knows, maybe after growing up, childhood fun, he will be attracted to a similar type of activity in the field of mechanical engineering.