How to draw a passenger plane?
Let's start our first exercise with a passenger plane. We use a hard pencil, an eraser and thick paper.
Stage 1
Using geometric shapes we outline the complex shape of the aircraft.
Stage 2
After this, we draw auxiliary lines and windows and wings based on them.
Stage 3
We erase the construction lines and do shading.
Stage 4
We remove all dark areas and refine the shape.
Another version of the drawing of a passenger plane from a different angle.
Summary of a drawing lesson in the senior group on the topic: “Balloon”
Abstract of OOD on drawing in the senior group
Topic: “Air mode of transport - hot air balloon.”
Target:
Teach children to draw step by step with a graphite pencil, then paint over with watercolors.
Tasks:
—
Contribute to the activation of vocabulary on the topic (land, water, air, driver, driver, captain, cyclist, motorcyclist.)
— Learn drawing step by step with a graphite pencil.
— Strengthen the skills of careful painting with watercolors.
- Help relieve muscle tension and relaxation.
— Develop creative imagination.
PROGRESS OF THE CLASS
1. Organizational moment.
Educator:
Do you like to solve riddles? Then sit down, I'll tell you a riddle.
– Guess what kind of word this is, which begins with the sound [T] and denotes what people and goods are transported on ( The child answers: “transport
”).
How did you guess?
2. Conversation about transport.
– Where can a person use transport? ( on the water).
What type of transport is this?
( water)
Where else?
(on the ground - ground, in the air - aerial).
– I invite you on a journey, and you will find out what type of transport we will use if you look at the easel.
The surface of the easel is divided into nine sectors by four stripes: three at the top, three in the center, three at the bottom. In the central sector of the top row there is a card with a picture of blue rings.
(Child's answer: We will go on a trip by air, since this is the symbol of air).
Guys, what kind of air transport do you know? (plane, helicopter:).
- Why is transport called air transport? (because he flies through the air).
- Why is air transport needed? (To transport people and goods faster).
- Who flies the plane? (pilot).
- Where do planes land? (airport, airfield).
Guess the riddles
There are no wings, But this bird will fly and land on the moon. (Rocket)
Boldly floats in the sky, Overtaking the birds in flight. Man controls it. What's happened? - : (Airplane)
It is a grasshopper that is crackling, not a bird that is flying, and not a horse that is carrying. (Helicopter)
Well done! What transport are the riddles about? (about air)
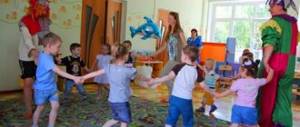
The game "Flies - does not fly."
(The teacher calls the vehicle if the airborne children show “wings”, and if not, stomp their feet)
Helicopter, subway, plane, rocket, tram, bus, trolleybus, satellite, parachute, boat.
3. Drawing.
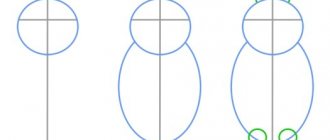
I suggest taking a trip in a hot air balloon.
Children, what do you think we will draw with? (First with graphite pencil, then with watercolors).
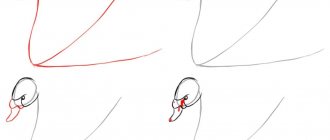
Guys, let's draw a balloon step by step. Then how to draw a balloon with a graphite pencil. We paint it with watercolors.
4.
(Children’s work. Help from the teacher (along the way, individual reminder, individual demonstration).
5. Physical minute: (standing)
“Higher your arms,
(raise your arms up)
Wider your shoulders. (hands to the side)
One, two, three (jumping in place, hands on the belt)
Breathe more smoothly (stop, inhale through your nose)
Exercise will make you stronger
You will become stronger and stronger!” (walking in place).
6.
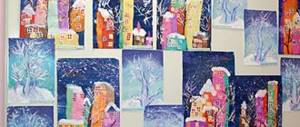
Result:
Go and look at the children’s work, do you like it?
(Yes, well done, guys!)
Children, I also liked your work. Everyone tried their best, you became real magical artists. Did you like working in the magic workshop? (Yes!).
Our travel time is ending and we need to return home. One, two, three - we returned to the garden again. Here we are at home. Today we worked hard, repeated everything we learned about transport.
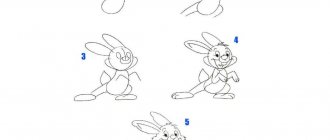
Toy airplane
Young artists can easily learn to draw an airplane. You need to start by creating a sketch with a simple pencil, and then start coloring.
Step-by-step instruction:
- Place a landscape sheet in front of you and draw two semicircles, curving down. They must be at a certain distance from each other. The left one should be twice as large as the right one. The rounding point should be narrower than the base. Bend the top line in both geometric shapes with an arc outward. These are airplane wings.
- Above the right wing, draw another semicircle, rounded upward - the rear right wing, which will peek out from behind the body.
- Draw a long elongated triangle - the body of the airplane. The narrow side should be on the side of the rear wings, make the opposite side as wide as possible.
- Above the front wing add a cockpit - a large semi-oval. Inside the cockpit is the smiling head of a pilot in a helmet, glasses and headphones.
- At the front of the plane, add a nose - a narrow semi-oval. Blades depicted in the form of petals should extend up and down from it.
- At the front of the plane, draw a vertical line and draw a row of rivets - bold dots.
- The wings are also divided by vertical lines - flaps.
The black and white sketch is ready. All that remains is to color the picture with felt-tip pens and finish drawing the clouds, sun and birds.
Lesson plan “Planes fly through the clouds” drawing in the middle group
Type of activity: drawing with wax crayons and a brush. Watercolor. Poking with a hard, semi-dry brush. Gouache.
Important! Gouache and watercolor paints, colored pencils, wax crayons can be used in traditional or non-traditional techniques.
Goals: to teach children to draw oval objects and objects consisting of several parts by representation. Paint over them with wax crayons. Learn to tint a sheet of paper with watercolors and convey the features of the depicted object using a poke with a hard, semi-dry brush. Develop imagination.
Approximate sample drawing
Course of the lesson corresponding to the Federal State Educational Standard
| Lesson stages | Content | Auxiliary material |
| Organizing time | Guys, today a new toy will come to visit us. But first, solve the riddle. If you answer correctly, you will find out what kind of toy it is. What clues in the riddle helped you solve it? How can you play with a toy airplane? Today we will learn a lot about airplanes and learn how to draw them. And after class you can play with him. In ancient times, people looked at birds and dreamed of flying like them. But a lot of time passed before this happened. First, people learned to rise into the air on... (Show picture). Do you know what this is? People learned to take to the air in a hot air balloon. The ball was filled with smoke from the fire, a gas that is lighter than the surrounding air. But the ball flies where the wind blows. And the man wanted to choose where to fly. Time passed and finally an airplane was invented, which was controlled by a pilot. (Show picture). It flies where the pilot directs it. But in order to get off the ground and into the air, the plane must first fly at high speed along the ground. This requires a lot of space and a specially built road - a runway. And sometimes you need to fly to a place where there is not a lot of space and such a runway. That's when people had to come up with a helicopter. (Show picture). The helicopter is also controlled by a pilot. But to take off and land, a helicopter does not need a lot of space or a runway. The pilot turns on the engine, these blades begin to rotate (shown in the picture), and the helicopter takes off straight from the spot. Guys, what does the plane have? (wings, landing gear, fuselage, cockpit) Let's draw a plane that flies through the clouds. Show the children a finished sample of the drawing. | Riddle: Not a bee, but buzzing, Not a bird, but flying, Not building nests, Carrying people and cargo. (Airplane). |
| Practical part | Invite the children to use wax crayons. First you need to draw the body, and then finish drawing the wings, windows, and cockpit. Color the plane with crayons in a solid color. Use watercolors and a lot of water to paint the sea around. While the watercolor is drying, play outdoor games. Guys, a cloud appeared on the way of the planes. Let's draw it using gouache. Give the children white or blue gouache. Show how to paint oval clouds using a semi-dry hard brush using the poking method. | Outdoor game: Let's fly, fly, (Stand your legs apart.) Spin your arms forward. (Rotate your arms in front of your chest.) Arms to the sides - take flight. Send the plane, (Spread your arms horizontally to the sides.) Right wing forward, (Turn your body to the right with your right arm moving forward.) Left wing forward. (Turn the body to the left with the left arm moving forward.) One, two, three, four - Our plane has flown. A wonderful pilot sent the plane on its way. (Running freely with your arms out to the sides.) |
| Conclusion | After creating a drawing, children are invited to play a game. At the end of the game, ask the children what new did you learn today and what did you learn during the lesson, what did you like most? Praise each child. Be sure to sign all the drawings and arrange a mini-exhibition for parents. | Outdoor game “Airplanes” Children run freely with airplanes in their hands. The teacher gives the commands: “Planes, land,” “Planes, take off,” “Planes, gain altitude,” “Planes, descend.” |
Drawing lessons in the senior group on the topic “Indoor plants”
Note! Depending on the skill level of the students, you can complicate or simplify the drawing.