The simplest diagrams of a basic aircraft model
Before moving on to complex models, let's brush up on the basics of aircraft construction. We bring to your attention the 2 easiest ways to fold an airplane.
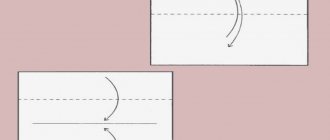
Using the first scheme, it is easy to get a universal airplane familiar from childhood. It does not have any special takeoff and landing characteristics, but folding it is not difficult even for a child. An adult can complete the assembly in just a minute.
Don't know how to read origami diagrams? No problem - these video tutorials will allow you to quickly figure out this activity. We invite you to see with your own eyes how to make a simple paper airplane.
If even the first scheme seemed too complicated to you, use the simplified method. It allows you to get the desired result as quickly as possible.
Similar “Arrow” video:
Unusual models
When simple models are conquered, you can proceed to more serious aircraft models.
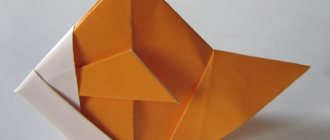
Glider
The model has excellent flight characteristics.
- Take a piece of paper and fold it in the middle. Then they unfold it and place it with the fold up.
- It is easy to make an even triangle along the marked line. The smoother you make it, the better the plane will turn out.
- Visually divide each side in half and bend the corners along the line. The sheet is not turned over! A sharp and long nose should form. It is bent so that it extends slightly (2-3 mm) beyond the edges of the bent corners.
- Fold in half so that the back side goes inward. To do this, use the old label from point 1.
- Bend the wings to the desired width.
Hawkeye
This is a complex model, but if the previous ones came out, then it will definitely come out.
- Use a thick sheet of paper. Place with the short side facing you.
- Fold in half to create a center line.
- Fold one of the top corners so that the top part matches the side. Do the same with the other angle.
- You should get something similar for the cross. The side parts are folded towards the middle and everything is folded well. The upper right corner is folded to form a single level with the top line. There should be about a centimeter between the middle and the fold. The same is done on the second side. The gaps left are required to accommodate the horns at the front of the aircraft.
- The resulting horns are bent in half. The excess is wrapped inside.
- The lower corner part is turned back (away from you in the opposite direction). The fold line should reach the point where the horn comes out.
- The blank is folded in half and wings are made. They should consist of two parts: the inner part is parallel to the floor, and the outer part is slightly directed upward.
The model is painted and launched. She has a rather sharp nose, which is not recommended for playing with small children.
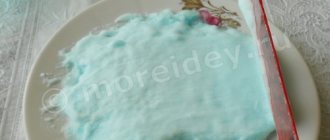
airplane boomerang
This aircraft will return back after each launch.
- Fold the sheet in four and press on the corner with your finger.
- Bend half of the cut towards the center, press the corner on the quarter.
- Fold inward a quarter to the corner at the top. You should get a triangle.
- Straighten the triangle. Lift it up and insert your fingers between the parts - the folds should be folded perfectly.
- Turn the workpiece over and bend the other side of the triangle inward. The wide end is bent in the opposite direction.
- Repeat on the reverse side.
- The formed “pocket” is lifted up and bent. The edge should lie evenly along the length. Place the corner in the “pocket” and bend the top one down.
- Do the same on the second side. The two parts must be symmetrical.
- The parts on the side of the “pocket” are folded upward on both sides.
- Open the workpiece and place the leading edge inside. Bend the protruding parts at the front, and also remove the rear fin-shaped parts.
- Turn the workpiece and bend the front part, bend everything in half and iron it.
- To decorate the fuselage - bend each side down along a line parallel to the central fold.
- Bend small pieces of two wings. Unbend the workpiece. There must be a base, flat wings.
- Run your fingers along the front.
For origami, only flat sheets are used. All lines are smoothed well with your fingers or a hard object.
Boom glider
- A4 sheet is laid horizontally.
- Make the necessary lines: bend in half along the vertical axis, along two diagonals. Visually, you should get an isosceles triangle with a lower base.
- Fold the bottom corner so that the side is on the edge (diagonal line). The same is done on the second side.
- Along a horizontal line below the middle, bend the workpiece inward and then unfold it. There should be 3 sectors on the sheet.
- The middle is bent inward, lowering the right and left parts down. Straighten and turn the long side down.
- Bend the upper corner and straighten it on both sides parallel to the lower base.
- Bend the lower part to the resulting line.
- Bend your nose 135 degrees.
- Everything is also done from the reverse side.
- The workpiece is turned to the left. Bend one part of the nose so that the line is perpendicular to the base, and bend the wing.
- Open the pocket and insert the nose part.
- They do everything from the other side.
- The workpiece is opened, fixing the motor with a piece of paper.
- Bend at the center and form wings.
Narrow and long models fly longer and further. It is better to shift the center of gravity to the nose. You can weigh it down with thicker paper.
Airplane for 100 meters
- Fold the sheet in half lengthwise.
- Unfold and bend the upper corners to the formed line.
- Fold the corners again.
- Bend the top triangle down in half.
- Fold the folded triangle 2/3 up.
- The workpiece is bent in half and wings are formed.
- It is good to smooth out all fold lines and corners.
The aircraft is ready to set new records for flight range.
For range, the aircraft must have a well-modeled tail. It is made from lightweight materials and is well balanced.
A paper airplane can be a complete and exciting toy. Paper can be used to make many different models that children can compete with. Origami helps to develop a child comprehensively, and will also become his new hobby.
DIY paper airplane
The simple design of a paper airplane is very popular. To make it you will need a rectangular sheet of A4 or A3 paper . It can be white or colored. Its density should be medium so that it can be easily folded without tearing.
How to fold a paper airplane:
- Place a sheet of paper on a flat surface. Bend it in half and then straighten it out. The fold line will serve as a guide.
- Fold the left and right edges of the sheet towards the middle.
- Fold the corners (left and right) towards the center line, and then bend the two halves of the airplane.
- Unscrew the resulting wings. The structure is ready to fly.
Using origami technique
Origami is a Japanese technique that allows you to fold various shapes from paper. This process does not use scissors or glue .
The first to invent this technique were monks. How to make a fighter plane with your own hands from paper using this technique:
- Take a sheet of paper of the desired size and shape. Fold it in half.
- Fold the top corners towards the middle, then straighten and secure.
- Bend the corners of the diamonds back.
- Fold the side corners there (back). You should get a triangle with equal sides.
- Unscrew the wings of the product, bend them and insert them perpendicularly.
- The winged car is ready!
If you were unable to make a similar design, then watch the detailed video of the master class:
A paper airplane that flies for a long time
Option one. The longest-flying aircraft is considered to be designed by Ken Blackburn back in 1983. And he built it according to the following scheme:
- Take a piece of paper. Bend the edges so that the corners meet in the center.
- Now bend a strip one centimeter wide.
- Continue folding these strips until you reach 2/3 of the sheet.
- Fold the leaf in the middle and form wings.
- Unscrew the flaps at the ends of the wings.
- The airplane is ready!
Option two. Step-by-step instruction:
- Take thin cardboard. Fold it in half with the short side.
- Fold the wings - turn the corners towards the center.
- It turns out to be a triangle. Bend his nose towards the very edge of the side.
- Fold this structure in half, you get two halves of the plane.
- Fold back the wings.
- Now form the flaps and you can launch your airplane into the sky.
Supersonic airliner Concorde
- Take a regular sheet of A4 size paper. Fold it diagonally. Cut off the excess strip with scissors.
- Unfold the square and bend two corners towards the middle.
- Fold each long side towards the middle.
- Fold the corner up.
- Fold the long sides towards the middle.
- Bend the corner so that you get a triangle, do not touch the wings.
- Turn the workpiece over to the reverse side.
- Divide the large triangle mentally in half. And up to this triangle we add long fold lines.
- Assemble the workpiece: turn the structure over, bend the nose of the plane slightly downward. Holding the tail with your fingers, bend the triangle upward.
- Supersonic Concorde is ready to fly.
In addition to these models, there are others, and there are a lot of them. Therefore, do not stop at designing certain aircraft, but experiment and move on. Over time, you will be able to make airplanes even with your eyes closed. DIY airplanes are a lot of fun!