Visualization, as you know, is the golden rule of learning. And the use of a game form is another plus in the lesson. By combining both of these elements, you can be sure that any lesson at school or in the preparatory group of a kindergarten will go off with a bang.
Among the works using the appliqué technique there is a whole class of crafts on the theme “My Body”. Children can make a paper man with their own hands in different states - how he sits, stands or even runs. Or you can make a figurine of a head, a hand - in a word, there are plenty of ideas. You can draw the details yourself or take a stencil from the Internet and print it. There are a lot of ideas, and you definitely won’t have any problems choosing.
Anatomy lesson for little ones “Men made from geometric shapes”
Here are instructions on how to make a “man” applique yourself step by step. For the little ones it will be interesting and easy to create a composition from geometric shapes. Tip! The rectangle, which serves as the basis of the body, can be trimmed with buttons or beads to style it as clothing.
For younger children, there are simpler options that do not require a step-by-step description.
But here are real masterpieces that can be made together with your baby.
In general, there is endless scope for imagination here - you can create a whole family from the applique and give such a postcard.
Or a cheerful clown - kids will certainly like this applique for its brightness and cheerfulness.
Denim applique
Fabric applique from jeans can be done not only for the purpose of repairing worn trousers or skirts. A painting, the elements of which are made from a piece of unnecessary denim, will decorate the interior in an original way.
A fairly rough material looks great against something as common as bare cork. To create additional elements of the denim pattern, you can take rope twines or simply add them with a marker.
Video master class on creating “denim” roses
We teach to lay out and identify sense organs
You can also make a model of a human head out of paper with your own hands. The design of a human head consists of several paper figures:
- the head itself;
- eye;
- lips;
- hairstyles
They are prepared in advance, and then step-by-step instructions are explained to the children in detail:
- First, the head itself is glued on, on which you need to mark the places for the eyes, lips, eyebrows and draw the nose.
- Then the eyes and eyebrows are glued on.
- After - lips.
- And the last step is for the hairstyle. By the way, it is better to trim the edges of the hair to create stripes - then the craft will take on a real live look, as shown in the photo.
For younger children, you can suggest arranging the senses like a puzzle and laying out a person’s face.
You can use a stencil, or you can draw parts of the face and cut them out yourself.
You can attach parts of the face using Velcro:
DIY fabric applique for kindergarten on the theme of Summer
Fabric painting “Summer”. Master class with step-by-step explanation
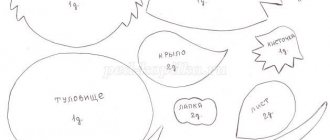
Author: Olga Borisovna Sergeeva Purpose: creating a painting from fabric. Objectives: To introduce different fabrics and fabric appliqué techniques; broaden children's horizons and enrich their aesthetic sense. Develop a sense of color, composition skills, creativity, and emotional responsiveness of children. Foster independence and accuracy. The master class is designed for children of preschool and primary school age, educators, and primary school teachers. Purpose: interior decoration. Necessary materials: white A3 sheet base for work fabric of yellow, brown, light brown, green, white and yellow paints scissors lighter glue “Moment” Crystal flowers, birds cut from fabric, cut from books
Step-by-step manufacturing process:
Step one: cover the base for work with a white A3 sheet
Step two: using paints we create a background for work
Step three: cut out a sun from yellow fabric and trim the edges with a lighter
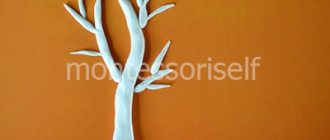
Step four: cut out a tree trunk from brown fabric and trim the edges with a lighter
Step five: cut out leaves for the tree and grass from green fabric, trim the edges with a lighter
Step six: make a fence from light brown fabric and strips of white paper
To do this, we make tubes from strips of white paper; we wind strips of light brown fabric onto the tubes
Step seven: cut out clouds from white fabric and draw the edges with a blue felt-tip pen
Step eight: we begin to design the painting itself. Glue the sun and clouds onto the sky with glue.
Step nine: glue the tree trunk and leaves, starting from the bottom, giving the tree volume
The tree is ready.
Step ten: glue the grass and fence
Step eleven: glue flowers cut from fabric onto the grass
Step twelve: glue the birds cut out from books.
The summer picture is ready.
We recommend watching:
Volumetric applique made of colored paper for older preschoolers. Flower meadow Applique Flowers made of colored paper for children 4-5 years old Volumetric applique made of shells with your own hands. Underwater kingdom Do-it-yourself summer crafts from waste material. Octopus
Similar articles:
Summer crafts with children in kindergarten
DIY butterfly made from candy wrappers
Butterfly made of beads. Master Class
Summer crafts with children 6 years old. Duckling
Movements of the human body in application
The task will be to lay out the movement of a person from pieces of paper strips.
And finally, you can make a person in motion - again, such applications are made from geometric shapes.
From such applications you can make a real panel and dedicate it to sports
USE OF NON-TRADITIONAL APPLICATION TECHNIQUES IN CORRECTIONAL PEDAGOGY
USE OF NON-TRADITIONAL APPLICATION TECHNIQUES IN CORRECTIONAL PEDAGOGY
MBU kindergarten No. 5 “Filippok”
Tolyatti
teacher of the highest category
Baranova I.V.
teacher of the highest category
Belyakova I.E.
We present to your attention the experience of teachers in using non-traditional appliqué techniques (tearing method, bead applique, trimming). The accumulation of material was facilitated by the experience of working with two graduates of children over 6 years.
“Desire is many possibilities, and unwillingness is 1000 reasons.”
These words are perfect for preschoolers. After all, if a child doesn’t like something, he is not able to assimilate information and learn to take action. It is not without reason that the leading activity in preschool age is play.
In our kindergarten, all children have musculoskeletal disorders and have various diagnoses: flat feet, postural disorders, cerebral palsy, hemi- and paraparesis. Along with motor disorders, children have problems with the development of fine motor skills of the hand, various speech disorders and emotional disturbances often occur.
Art therapy, as a correctional technology, allows you to achieve maximum results. British doctor Andrian Hill became the first in the UK to create an art therapy school for children with cerebral palsy. He proved that with the help of art therapy one can relieve emotions, get rid of anxiety, and proved that artistic activity mobilizes the whole person, and not his individual qualities or organs. And most importantly, turning art into a means, into a “drug” for the health of children, art therapy easily and cheerfully manifests a deeply humane position: a person is more important than art.
In my group, I tried to use one of the types of art therapy - non-traditional application techniques. They are attractive due to their unique artistic expressiveness, contain elements of novelty, activate children’s individual abilities, provide unlimited opportunities for improvising a combination of a wide variety of materials, and also teach how to plan the work process.
Working with new materials is useful, as it removes the fear of failure and develops the qualities necessary for creativity: self-confidence, self-affirmation, self-esteem. The multifaceted activities of children in such classes evoke positive emotions. Children are actively involved in creativity, creating interesting individual and collective works.
Since our children are of senior preschool age, we chose the trimming method.
What is trimming? This is one of the types of paper crafts. This technique can be attributed to both the applique method and the type of quilling. With the help of trimming you can create amazing three-dimensional paintings, mosaics, panels, decorative interior elements, postcards. This technique is quite popular; interest in it is explained by the unusual “fluffiness” effect and the easy way to perform it.
Studying anatomy with the help of an application
Children not only need to know their structure and what each organ is responsible for, but also know what internal organs a person has. If you are interested in presenting them with human anatomy. Using play forms can really interest the baby.
External body parts
You can start learning with your favorite cartoon character, and then move on to closer pictures of the person.
We study the structure of the face and body structure:
You can start with a simpler activity and learn the body parts using labeled signs. The child places the desired name on the arrow and identifies the part of the body.
If the baby already knows the names. You can offer to assemble the little man himself in parts.
Internal structure
First, the baby needs to learn the names of the internal organs, preferably clearly from a picture.
And then offer to lay out all the organs in the correct order. Pronouncing names.
The outline of the human body can be drawn with paint or pencil, or sculpted from plasticine. We suggest making templates for internal organs such as in the photo, and with the help of adults attach them in the right places. In this way, with a child in the form of a game, it will be possible to study the human structure. All these templates are very successfully made from plasticine.
You can cut out organs and a body from cardboard and decorate it. If you are planning an applique for long-term use, it is better to make fabric templates. This way it will not lose its shape and appearance for a long time.
For a visual study of human anatomy and for kids to better grasp knowledge of anatomy, we recommend making an “apron cape” to fit. The organs are attached to it using adhesive tape. The organs are labeled, but this is suitable for children who can already read.
For younger children it will be enough to understand:
- How are the organs located?
- Their names
- What function do they perform?
And you shouldn’t give too many names. Start with 2-3 organs.
Man made of geometric shapes
This model is ideal for children from the younger group of kindergarten.
Here we need only geometric shapes. To perform this technique, in addition to colored paper and glue, you will need to use a special template. Progress:
- Using a stencil, draw a circle on a beige or white sheet of paper. This will be the head.
- To create the body, draw a square (for a boy) or a triangle (for a girl). Any paper color can be chosen.
- To create the arms and legs, we draw triangles: wide for the legs, narrow for the arms.
- We create the eyes using stencil circles.
- The nose is a triangle shape.
- The boy's mouth is also made using a triangular shape, and for the girl we select a square.
- Cut out all the parts of the body and glue them onto a piece of paper as in the photo below: