History in simple words
Nowadays the Land of the Rising Sun is called the birthplace of origami, but the history of this art begins in China. The first paper was received here. Initially it was used only for writing, but later other uses were found. Based on them, the first simple origami patterns for children and adults were discovered.
Once paper production was established, origami became part of the culture in Japan. When creating the figurines, it was important not only to convey the exact shape of the craft, but also to convey the spirit of nature. Therefore, the production is based on a square sheet, because it was considered the embodiment of the world. The figure cannot be cut so that the integrity is not compromised.
Art was passed on from parents to children. Initially there were few figures, now paper origami patterns for children can be very different. They allow you to get an interesting craft and have fun spending your free time.
Modular origami bun and herringbone assembly diagram. Master class kolobok
Modular origami Kolobok is the beloved children's hero of Russian folk tales. A master class on assembling a bun and a Christmas tree was made by ARAMAT-55 on the website Country of Masters. Modular origami is great for assembling spherical models. A very beautiful bun made of triangular modules sits on a stump. A bun and a Christmas tree made of paper will become a real decoration for a child's room. To assemble a modular origami Kolobok, you will need 462 orange modules. Row 1-3 - 10 modules in a row. We increase the number of modules to 20 in a row. 4 row - 20 modules, put on each corner of the previous row. 5 row - 20 modules. 6 row - 40 modules. We increase the number of modules by 2 times. We put on a module for each corner. 7-12 row of 40 origami modules. 13 row - 27 modules, reduce the modules: for every 3 modules we put on 2.14 row - 27 modules. 15 row - 18 modules. For every 3 modules we put on 2 modules. Shape the bun into an oval shape with your hands. The origami bun is ready.
Mushrooms on a stump. Each mushroom consists of 4 rows of modules. Row 1-2 - 5 modules each. Row 3 - 10 modules. Row 4 - 20 modules. The stem of the fungus can be of different lengths. The modules fit on top of each other. Glue the stem of the mushroom to the cap.
Origami stump. The stump requires 480 modules: 410 snow-white, 30 dark, 40 greenish. We begin to collect the stump using this MK with 40 modules https://origamka.ru/modulnoe-origami/33-volshebnyy-tort.html and collect 11 rows. At our discretion, we add dark modules anywhere you like.
Row 12 - 40 green modules. The paper stump is ready.
Origami instructions for children
The first thing you need to do is select instructions that will help you master the technique of working with paper. It is advisable to choose simple examples that will allow you to gradually study the art of magic. Visual origami diagrams for children can have a beneficial effect on the general stages of their development, while it is important to follow several rules in the work:
- Prepare square sheets. It is desirable that the size starts at 15 by 15 centimeters. The more sheets are prepared, the better. The child will not be afraid to make a mistake and then start working again.
- The first schemes should be simple. They should not include more than ten steps. Such origami patterns are easier for children to understand. It is recommended to start with figures that can be easily recognized: a boat, an airplane or an animal.
- As you gain experience, you can suggest making crafts more difficult. These include jewelry, phone stands and even modular products.
- While making origami, children perform simple step-by-step actions and thereby provide the child with a calm environment. When working, you need to be relaxed in order to fully surrender to the process. If the child is already busy folding, you cannot switch his attention.
When is the best time to start folding figures? The answer to this question depends on the baby’s desires. You can try just folding paper from the age of four. After five years, you can complicate the task and start creating simple products, but with the help of an adult. Gradually developing crafts will become better and more accurate. What schemes should I start with?
Origami for children photo step by step
The collection of examples to start with is constantly growing. If making paper crafts has become a child’s favorite hobby, you can think about thematic collections. For example:
- vegetables;
- fruits;
- Pets;
- wild nature;
- flowers;
- transport.
By the way, it is often with transport that people begin to engage in paper art. This origami instruction for children is attractive because folding is simple, and the result is figures that you can play with.
One of the simplest options is a boat. You will want to fold it many times. And if made correctly, the craft will be able to float and not sink. Some are even suitable for racing on a pond.
The next example is an airplane. Start with simple patterns and move on to complex ones. By improving your skills, you can create aircraft that fly long distances.
In the future, step-by-step origami instructions will be suitable for children, according to which you can make moving toys or even inflatable ones. Movable ones include a jumping frog, and inflatable ones include a tulip.
Origami hare according to Dr. Stephen O'Hanlon
Photo By Rui.Roda
It is best to start introducing children to the wonderful world of origami with simple and understandable crafts. Moreover, for this you need to choose those models that depict things known to the child. For example, an excellent example of such a simple craft can be a cute origami bunny, the diagram of which was developed by Dr. Stephen O'Hanlon.
To make this hare you will need:
- a square sheet of paper measuring approximately 15cm by 15cm (you can take a little smaller);
- 7-8 minutes of free time (the baby may need a little more time).
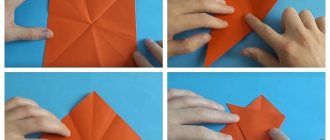
To begin, fold our square sheet of paper in half, then fold the edges towards the center. It turns out something like an envelope. Now the corners of the rectangle, which are on its smaller sides, are folded to the center line and then the folds are unfolded.
Next, the smaller sides of the rectangle are folded towards the center, unfolded and the previously made corners are bent inwards. It is best to follow the next steps after the master, who made a very detailed and understandable video tutorial on assembling such a bunny.
In addition to the video, we also have a hare assembly diagram. Maybe it will be easier for someone to explain it to a child or to fold it themselves according to the assembly diagram.
Diagram from here
We hope you liked this wonderful origami bunny, which is also very easy to fold. We are waiting for photos of your crafts, as always, in the comments. Good luck!
- Anastasia
Origami simple patterns for children
Why is it important to develop a passion for origami? It is from simple instructions that the child develops many positive qualities. We have selected ten advantages. By choosing simple paper origami patterns for children, you will receive the following positive qualities:
- The child will learn to control his behavior. This happens by repeating the same actions when folding. Concentration, attentiveness and perseverance appear. In addition, getting a positive result after work develops self-esteem.
- A correctly selected origami photo for children will step-by-step and clearly explain the process of making a figurine. Work can captivate even a whole company, so social skills develop. And this applies not only to kids, but also to adults. Age barriers are erased, and with experience, a child can teach even his parents something new. All in all, this allows you to correct behavior and develop communication skills.
- When receiving a figurine from a sheet, a person feels satisfaction. Children will be especially happy with the resulting craft, because a miracle can be made from one sheet. An origami diagram for children helps relieve stress. This happens due to monotonous actions that calm and remove negative thoughts.
- Not many people know that this art helps improve coordination. To fold the figure you need to use special care and coordination. All this improves the child’s three-dimensional perception, and he begins to better navigate in space.
- It is impossible not to mention that even simple origami for children, step by step, can activate the brain. This activity is compared to work, with a mosaic or sand; fine motor skills of the hands are involved here, which affects various areas of thinking.
- Scientists conducted a study and found that the origami examples used for children step by step with pictures allow them to develop mathematical skills. When working, you have to take into account the correctness of the geometric folds. As a result, at school age children already know information about shapes, height and width. Later, it is easier for them to remember various formulas and schemes.
- Making figurines not only helps to cope with stress. Anyone who is passionate about this art is aimed at getting a good result, which means he develops determination and becomes self-confident. The work must be done carefully, and the result and success depend on the correctness of the actions. Psychologists say that it is precisely such actions that help in life not to react so sharply to failures and the child learns to solve problems.
- By creating origami crafts for children there is an opportunity to discover multicultural development. Children can get acquainted with the traditions of other countries. My horizons are expanding.
- By making origami paper crafts with children step by step, you contribute to the development of visualization and imagination. Such a simple hobby will help open up your child’s world. This is important if you want to show potential. Later, it will be possible to approach assigned tasks with unconventional thinking.
- By choosing easy origami patterns for children, you give them the opportunity to relax and escape from difficult everyday life and stress. And this is good for physical and emotional health.
And to summarize, it should be said that this hobby can become a family hobby. You can spend your leisure time pleasantly with it. And the resulting figures, made according to the instructions for origami from paper for children, will become pleasant gifts for friends. Such a surprise will definitely lift your spirits and bring positive feelings. We invite you to read articles on the topic of origami patterns for children + origami for children step by step and choose your first craft.
Making a paper bunny
Let's start with a simple MK for beginners and try to assemble an origami hare craft on our own. The first photo shows what you should get after you follow all the steps step by step. Below is the origami hare diagram itself, which details the sequential steps of the master class.
We provide a diagram for folding paper crafts, which was developed by the Japanese origamist F. Shingu. Follow the instructions exactly, you will get an origami paper hare, just like in the picture. The work will not take much time, and its degree of complexity is designed for even the smallest craftsman. To learn how to fold without peeking, do the same steps several times.
Training video
The instructions for assembling an origami hare with your own hands may seem complicated, although in reality everything is much simpler, the main thing is to try. A video that will tell you about the secrets of folding the craft will help you verify the ease of execution.
Funny face
Perhaps the easiest origami hare model for children and beginners. The muzzle is good both for decorating a postcard and as an independent souvenir. The model is worth adopting for primary school teachers - it is so simple that it is suitable for independent work without the help of adults.
The muzzle should be as bright as possible to really lift the mood and look impressive. If you don’t have colorful “kami” paper on hand, you can color ordinary landscape sheets at your discretion or download the print you like.
Step-by-step instruction:
- We draw a hare's face in the upper half of the square, and on the strip in the central part - the pink part of the ears.
- If desired, color with a stamp, pastels, paints or pencils. If necessary, let the workpiece dry completely and cut it out.
- Fold from bottom to top diagonally.
- We tuck the workpiece along the line of the “ears”.
- We bend it “valley” along the central axis. The face pattern should be on the outside.
- We open the workpiece.
- Raise the right and left corners to the top of the triangle.
- Fold up the bottom.
We do the same with the top corner.
Origami hare faces are ready:
Realistic model
The following origami is not for beginners. To ensure that numerous folds lie neatly and do not fall apart, you need to take thin and soft but durable paper, for example, “kami”, pencil tracing paper or foil. The last option is suitable for gift figurines or Christmas tree decorations. You will need a square of 15x15 cm.
Step-by-step instruction:
- We start from the wrong side, if there is one. By bending, we divide the square diagonally, and then its lower half into 4 more parts.
- We fold the product along the lines indicated on the diagram by “mountain” and “valley”.
- We do the same with the upper half.
- Carefully following the markings, we make all the indicated folds to form one front paw. At the top of the workpiece we repeat the same thing, getting a second one.
- We make a zigzag in the center of the product.
- Open the cuffs on the left side.
- Fold the same part and press it down, pressing the edges.
- Bend the top back.
- Fold the top and bottom free flaps.
- We bend the model in half “valley”.
- We make a kind of “dart” by folding the model at an angle.
- We bend the right side along the indicated line “mountain”.
- Using a reverse fold, we “put” the right corner over the main workpiece. This is the head of a hare.
- Let's make another "tuck". It allows you to raise your head to a horizontal position.
- The next “dart” makes the hare’s “body” more compact and forms a characteristic silhouette.
- We raise the “head” using the technique from step 15.
- We fold the blank, highlighting the ear.
- On the left we form a ponytail using a zigzag.
- We press it, giving it a vertical position.
- A zigzag fold marks the belly.
- By making “mountain” and “valley” folds along the yellow lines, we give the figure realism.