Plasticine is a wonderful material for a variety of activities with your child. It can be used to keep young children engaged for a long time.
Activities with plasticine have great benefits - they perfectly develop fine motor skills. In addition to all kinds of crafts, you can use this material to create interesting applications and beautiful paintings. For children, such a pastime will be not only interesting, but also useful.
Ultimately, the craft will become a good gift or decoration for a nursery. This article will look at ways to create paintings from plasticine on paper and cardboard using various techniques.
DIY plasticine crafts
Plasticine is a fairly expensive material. This is especially felt when you need a lot of it. To save on purchase, it is better to make it yourself . In addition, homemade material will be much more pleasant to the touch, and the process of its preparation itself is entertaining for both children and adults.
To make homemade plasticine you will need:
- ¼ cup fine salt;
- ½ cup boiling water;
- 1 tablespoon of odorless vegetable oil;
- 1 cup flour.
First, you need to boil water in a saucepan, then add flour and salt to the boiling water and stir the resulting mass with a spoon. After this, place the resulting dense lump on the table, after sprinkling the countertop with flour. Make a small depression in the resulting mass and pour oil into it. Then knead the resulting dough thoroughly (until smooth).
After this, it can be colored using special dyes (food dyes can be used).
The resulting plasticine can be used immediately or saved. To eliminate the possibility of damage, it is necessary to pack it in ziplock bags. This way it will be stored for quite a long time.
Golden tree on cardboard
First you need to roll out thin sticks of different lengths from red, orange and yellow plasticine. Then they need to be twisted into special spirals - “snails”. From the resulting spirals, form a tree crown on cardboard. To secure the prepared parts, it must be pressed against the cardboard.
Next, roll out sticks from brown material, from which to form a trunk on cardboard. Trim the base of the trunk using a stacking tree.
After this, sticks of yellow, orange and red colors must be placed under the trunk in the shape of a wave, folding them tightly to each other. This will create fallen leaves. Next, roll out sticks from lilac and pink material to make a frame. After forming and fastening the corners of the frame, we can assume that the plasticine picture of autumn is ready.
DIY plasticine panel on the theme “Autumn” for children. Master class with step-by-step photos
Do-it-yourself plasticine panel “Rainbow Autumn” for children. Master class with step-by-step photos
Master class “Rainbow Autumn” made from plasticine with your own hands.
Author: Ilyina Alisa, 7 years old, studying at the “Children’s Art School named after A.A. Bolshakov”, Pskov region, Velikiye Luki. Teacher: Natalya Aleksandrovna Ermakova, Teacher, Municipal budgetary educational institution of additional education for children “Children’s Art School named after A.A. Bolshakov”, Pskov region, Velikiye Luki. Description: the work can be done with children of senior preschool and primary school age. The material may be useful to educators, teachers, children and their parents, and to anyone who is interested in creativity. Purpose: participation in autumn exhibitions, interior decoration, gift to family and friends. Goal: creating an autumn panel. Objectives: - to improve previously acquired skills in working with plasticine; -develop independence in choosing materials, means and methods of performing work; - to cultivate accuracy and interest in working with plasticine. Autumn colors splashed: Willow - red hair color, Poplar - golden gray hair Autumn day presented! With majestic beauty, with a riot of copper-gold, the Maple stands before me - I get drunk in front of it! It sprinkles gold around, swirls with leaves, forming a circle of stars, and lays down like a carpet! With a generous autumn pattern and a palette of colors, the feeling of a fairy tale crumbles before your eyes!
Materials and tools: - a sheet of white cardboard - plasticine - a simple pencil, a stack - a frame
Progress of the master class:
We start with a pencil sketch and place the tree trunks on a sheet of paper.
Then we make tree trunks in plasticine. We smear brown plasticine in small pieces over the drawn silhouettes.
Let's make the trunks more picturesque. Let's give them volume using gray color - apply it on top of brown.
Then we make a strip of earth (grass) with light green plasticine.
Apply green color in places to the light green layer of plasticine.
Next is the crown of the tree; we paint it in different shades of green (we apply plasticine to the paper in a thin layer).
We finish the work on the tree crown with red, yellow and orange colors. Using a stack, remove excess plasticine from the tree trunk and level the trunk.
Instead of the second tree, we decided to make an unusual forest beauty - spruce. We sculpt it from small multi-colored droplets flattened on the surface of the work.
Next is the background, we will do it by drawing with plasticine on paper. We draw as if it were not plasticine, but wax chalk.
Below the strip of land we will use blue and light blue plasticine to depict the waters of the pond. Let's make a duck and a swan from brown and white. On the shore we place several pebbles made of black plasticine and a mushroom.
We will decorate our background with small strokes of blue, purple and white plasticine, creating the illusion of clouds. The work is ready! Thank you for your attention!
We recommend watching:
Summary of a modeling lesson on the topic Autumn in the senior group Plasticineography for younger students (grades 1-2) Autumn. Step-by-step instructions with photos Plasticineography on the topic: Mushrooms in autumn for older children Do-it-yourself autumn landscape from plasticine for children. Master class with step-by-step photos
Similar articles:
Plasticineography on the theme of Autumn. Autumn bouquet. Master Class
Hedgehog with seed needles
For this craft you need to take plasticine, sunflower seeds and glass. First, you need to roll two balls of different sizes from a dark color, one for the body, the other for the head. Form a head from the smaller ball, sharpening it on one side. After smoothing out the shape of the muzzle, roll the larger ball into an even ball for the body. Then connect the two parts together. After this, attach the previously prepared eyes and nose to the muzzle and move on to the needles.
To attach the needles, you need to stick the seeds one by one into the hedgehog’s body with the sharp ends down. The seeds need to fill the entire surface of the hedgehog's body.
Next, you need to make mushrooms, apples and yellow and red leaves from the material. This will add an autumn mood to the picture and will correspond to the given theme.
To make leaves, you need to roll out the plasticine and select, for example, the shape of a maple, separating the excess material. To make the leaves in the picture look neat, draw veins on them in a stack. After this, move on to sculpting mushrooms or apples.
To form an apple, you need to roll a red even ball, sharpening it slightly at the bottom, and attach a small green plasticine leaf on top. To sculpt a fungus, you need to roll out a thick stick from white plasticine, which will serve as a leg.
For the cap, form an oval and flatten it on both sides. Then fasten the cap and stem, placing the resulting figures on the hedgehog’s needles. The craft is ready!
You can also make a hedgehog in the form of an applique . To do this, you need to cut out an animal template from cardboard and cut it out. Then cover the back of the future hedgehog with brown color and poke seeds into the plasticine, filling the surface.
Make a mouth, nose, eye and eyebrow from white and black colors, attach all the details to the muzzle. After which the craft can be decorated with various leaves, twigs and other details reminiscent of autumn.
Plasticine panel.
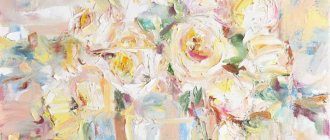
Plasticine paintings are distinguished by their realism and bright colors. This is not surprising, because three-dimensional parts can be created from a soft mass, and then, assembling them by color, they can be easily attached to any, especially glossy, surface. So, one of the types of plasticineography is modeling panels from plasticine. This is what we will do in today's modeling lesson. Naturally, it is better to start with the simplest and most understandable options, especially if you are working with young children. But it is children who most often push their parents to plasticine feats. Only by trying to make a picture from plasticine can you understand how exciting this process is. Here we demonstrate the technique of sculpting a panel depicting a bright blooming sakura branch, but this option is by no means the only one - the theme of the painting can be absolutely any.
1. To create a panel, you need plasticine of suitable shades, as well as a base to which the plasticine parts can be easily attached; ordinary cardboard will do.
№1
2. First, create sakura branches from brown plasticine. To do this, knead the block in your hands and pull the mass into thin threads.
№2
3. Stick small brown sections to form a branched pattern. Try to place the branch in the center of the panel and leave the edges unused.
№3
4. Using pink and yellow plasticine, create small parts for sculpting sakura flowers. The baby will be happy to do this work; he will like to pinch off the soft mass in miniature portions. If the set does not include delicate pink plasticine, pre-mix raspberry or red blocks with white.
№4
5. By connecting 5 petals around a circle, placing a yellow dot in the center, create a small flower.
№5
6. Stick on lots of delicate flowers.
№6
7. Attach the decoration to the branch in any order.
№7
8. The painting with the image of a flowering twig is ready. But in order to turn it into a panel, you should also choose an expressive frame. Make several long threads from plasticine of any color. For example, blue and green colors will do.
№8
9. Start making the edging from the first thread.
№9
10. Attach a second layer of a different color, placing them close to each other.
The final look of the craft.
As you can see, there is nothing complicated in such work, but the result will exceed all your expectations. Most likely, you will even want to frame the panel with a glass frame and decorate the wall in the room.