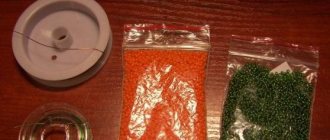
For work we take matchboxes, cardboard, tree branches. The tools are also the simplest - a knife, a hammer, small nails, sandpaper, any file or jigsaw, glue, paint. The proposed method of making wooden furniture does not in any way pretend to be professional carpentry work. But even a completely untrained person will be able to make a minimum set of furniture for the “Russian Izba” mini museum of folk life. All the furniture was made for the interior design of the “Russian Izba” mini museum with an area of 30x30 cm. We talk about how to make such a house out of cardboard in the article “ Mini-museum of folk dolls and folk life Russian Izba.” But the furniture can be used without a house, simply by placing it on a table or shelf.
Furniture for the Russian Izba mini museum is suitable not only for museum use, but also for children’s play activities both in kindergarten and at home.
Table and stool made of matchboxes. DIY furniture for the Russian Izba mini museum.
To make table legs we need four empty matchboxes. Pull out the boxes a little, coat two of them with glue. Places of lubrication with glue are shown by shading.
Let's connect both legs-corners. To do this, slightly crush one of the matchboxes.
The legs for our table are ready.
Let's paint the table legs and glue on the tabletop. We cut out the tabletop from cardboard. Size 13x7 cm
The table is almost ready, all that remains is to paint the tabletop. Now let's start making the stool. The technology is very similar to the table, but the stool should be lower. Therefore, we cut the matchboxes into two parts.
This is what the base for a matchbox stool looks like.
We glue the seat, paint it, and the stool is ready.
In this way you can make a Russian hut and benches for a mini museum of folk dolls and folk life. You can try this yourself. And now we will tell you how to make wooden benches with your own hands.
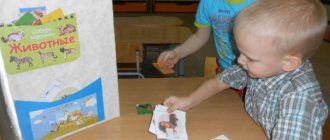
How to make a model of a Russian stove?
This is an integral part of the Russian hut. After all, in the old days they used a stove to heat the room and cook here. There are beds at the top, people slept on them. The stove is also mentioned in many Russian fairy tales. And, having made this item, children will understand what it looks like:
- To make a stove, you first need to measure what size it will be. Then cut out the necessary parts from cardboard and glue them together. There are two of them. The lower rectangle and the upper part where the pipe will be located.
- Make a combustion chamber. To do this, cut here with a breadboard knife and attach the missing parts. A smaller hole must be made in the upper part of the stove.
- Now take the salt dough, roll it out and start gluing it to a certain part. To make the object look like it is made of brick, take a paint brush and water. Using these simple devices, you will divide the dough fragments from the finished oven so that they begin to resemble bricks.
- When the dough is dry, paint the oven with white gouache. And use a small amount of black to mark the soot near the brewing compartment.
- All that remains is to make a ladder from skewers so that you can see how they climbed onto the stove.
Check out another master class and step-by-step photos that will demonstrate how to make this item. In this case, the stove is large. It will be interesting for children to play around this. They can place toy cookware in the cooking compartment and pretend to cook. You can also make a door at the bottom to put firewood here.
Now attach the small one to the top of the large box. Do this using double-sided and regular tape. Cut out a semi-circular cooking compartment using a utility knife.
Take light wallpaper and cover your work with it. When this layer dries, you need to glue the paper base a second time so that the drawings on the box do not show through.
You will also glue light or similar wallpaper, when the glue dries, then draw a flame using gouache. And dark paint will help create a firebox.
Draw a few bricks with a pencil on the surface of the product. Separately, draw bricks on cardboard with a red marker and stick them around the hob. You can draw a cat curled up near the stove, mushrooms that are drying here.
- Draw the pipe in red so that it is clear that these are bricks. The kids will be happy to play here. You can also put other household items from the old hut so that the children know how people lived in those days.
- Place a table with a wide white tablecloth here. You can have tea and pies with it. If you wish, make the stove in such a way that there is a passage here on the back side. To do this, take a large box, cut off the top and back wall.
- Attach a piece of cardboard at the top in front, which will become a pipe. Cover your work with white Whatman paper or wallpaper of the same color, then paint it.
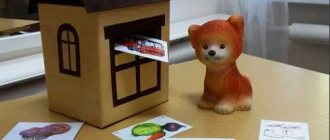
- The model of a Russian hut may include a chest, which is also easy to make with your own hands.
- Place the spinning wheel here, put the yarn. Place several cast iron pots on the bench next to the stove. Then the children will have an idea of what the model of a Russian hut looks like.
If you have an unsightly extension at your dacha, we suggest decorating it to create a stove. In the same way, you can hide the entrance to the basement of a brick or block house.
To do this, the surface of the walls needs to be whitened, and the bottom painted with brown or red paint to make bricks. Place two painted tires on top, which will become flower beds. Make a grandma and grandpa out of straw, burlap and fabric. Place a wooden spinning wheel here. Then such an ancient corner will be right next to you.
If you need to make a stove for a performance, in order to create a model of a Russian hut, then watch another master class.
- See also how to do
This is the finished product. First you will need to take 4 boxes of different sizes and glue them together to make 3 tiers of the stove and a tall pipe. After this, you need to cover them with white wallpaper. When the glue dries, paint with acrylic paints of the same color. When it is dry, glue colorful braid along the edges of each box. You need to glue wood-colored wallpaper down so that it imitates the floor.
If there is no wallpaper of this color, then simply paint the bottom of the stove brown.
Sew a small blanket to place here.
When you make the oven, on one side you need to glue the two middle boxes so that they are on a single plane. Then in the bottom you will cut a semicircular hole so that this will be the brewing compartment. The hole at the bottom is slightly smaller; place the sawn branches as if it were firewood.
You can place a decorative samovar here. Attach a damper to the top of the pipe, making it out of cardboard and covering it with self-adhesive black film. See in more detail how the combustion chamber is made.
Cover its sides with cardboard. You also need to make a partition. You will explain to the children that this department consisted of two parts. The front one has no open fire. Here cast iron pots and frying pans could stand, and the food they contained remained warm. Next there is a compartment where they put firewood and set it on fire for cooking. You can make cast iron pots from corrugated cardboard. Cut a strip from it, twist it into a spiral, then pull out the top and bottom. Glue the ends. The grip is also made from corrugated cardboard. But this is only the top part. Make the bottom one from a wooden skewer or pencil and glue a cardboard blank here.
And if you need to make a Ukrainian stove for a competition or for other purposes, then watch another master class. It may require an old stroller that is no longer needed.
This work was timed to coincide with the competition, when a stroller parade was held. The owners of this vehicle decided to dress up in national clothes and make a mobile stove. We had to find cardboard boxes. Now you need to measure your stroller so you know what size the oven will be. Prepare everything you need and get started. In this case, the whole box was not found, but only fragments of this material. Therefore, they need to be secured with tape.
Here's how to make a stove for the hut model below. The stove consists of two compartments. The photo below shows the details. Cut out the place where the damper will be located.
Now attach the pipe. This can be done using a stapler and double-sided tape. Cut out a flap from cardboard. Put it in its place.
Then you will need to cover the stove with whatman paper. Then you can put embroidered towels, amulets, wooden spoons, a board so that it is clear what the stove will look like.
But then it became clear that this product lacked drawings. Using a pencil and watercolor, apply them to the surface of the stove. Now you can put down decorative items again, install this product on the stroller and conveniently bring it to its place. After all, if you need to make a stove for a performance, it is made at home and taken to a children's institution in this way.
Bench. DIY furniture for the mini museum “Russian Izba”
To make a bench we need a straight tree branch with a diameter of 3-3.5 cm.
Let's saw off a piece 15-16 cm long from the branch. Using a knife and hammer, split it in half, and then split it again to make a board.
Use a knife and sandpaper to level the board.
Let's cut off 4 cm of round pieces from the same branch. Split it in half. We got two legs for our bench.
Let's nail the seat to the legs with small nails.
The bench for the mini museum “Russian Izba” is ready
This way you can make benches of any size for your mini museum. If you have the desire and opportunity, you can cover the benches with stain or paint.
Spinning wheel. DIY furniture for the mini museum “Russian Izba”
Let’s say right away that our spinning wheel is not an entirely accurate imitation. A proper spinning wheel should have a bottom, which is placed on a bench, and then the spinner sits on it and holds the spinning wheel in a stable position with the weight of her body. But making a spinning wheel with a bottom is more difficult and, moreover, it will not be stable. Therefore, we made a spinning wheel on a straight base with an emphasis on the floor. Which is wrong, but convenient.
Cut out a spinning wheel from wood, cardboard or plywood. Let's paint or tint the spinning wheel and apply patterned designs.
Spinning wheel template for the Russian Izba mini museum
Let's make a short bench for the spinning wheel, just like we made benches for the hut. Glue or nail the spinning wheel to the bench.
Let's make a spindle. To do this, take a toothpick and cut off a part of it. Wrap the toothpick with thread. Secure the end of the thread with any glue so that it does not unwind.
We tie the tow to the spinning wheel. We used flax, but if you don’t have it, you can take sanitary flax or woolen threads, after “fragling” them first. Mohair also works well.
We unwind the thread from the spinning wheel and wind it onto the spindle.
Do-it-yourself spinning wheel for the Russian Izba mini museum is ready.
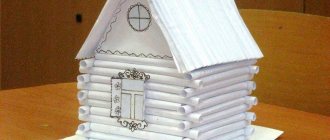
Russian hut paper applique
This is the kind of village house I made - the idea came when I saw a house made of paper and decided to make a detailed master class
We roll the paper into tubes
First on the sides - then in the center - and then the entire tube
You need a lot of these sticks - I didn’t count how many, I just made them as needed
We take cardboard as a base and glue the sticks like this - two are long as we made them - the other two are shorter, measure, cut off the ends to the required length and also glue
After 3 rows we outline a doorway - and after another 3 a window opening that is wider than the doorway
We close the window openings and the door opening equally - we glue the edges of the door on the sides - then we take thin tubes, which I twisted with a wooden skewer, which can be purchased at any sewing store - we cut the tubes to the height of the opening - we glue them together, we glue them to the doorway and so that they do not fall inside , taped inside with tape
We also glue the window opening - we cut off thin tubes and glue them into the opening like this - I used double-sided tape - but windows and curtains can be made as anyone wants - I did it like this and taped the inside too
We make the roof like this - we fix it inside with tubes so that they don’t bend for strength.
We decorate the window with self-adhesive tape
Making tiles - I made them from strips of cardboard
Tape the corners above the window
We make the steps of the porch - we glue the tubes and wrap them with self-adhesive tape - three steps
Olga Yavorskaya
Lesson on three-dimensional applique “Russian hut”
Application
Educational field "Creativity"
Theme " Russian hut "
Objectives: to deepen the understanding of the Russian hut as a monument of Russian wooden architecture; teach how to make a hut from logs (paper rolls)
;
consolidate the ability to cut out of paper folded like an accordion; develop hand coordination; cultivate love and interest in antiquity; introduce children to such concepts as “valance”
,
“platbands”
.