Stages of work:
1. Preparatory stage
Place and tape the paper sheet.
Combine 10 cotton swabs. You will get 3 “bunches”. One will remain for drawing finer details.
Pour paint onto the palette: white, blue and black.
2. Using a medium brush, draw the tree trunk, its roots and branches. See fig. 1-7
3. Take the first set of cotton swabs to mix some of the blue paint and a small amount of black on the palette. The result will be a dark blue color.
Using the resulting shade, draw the crown of the tree on the branches, simply creating imprints of a “bundle” of cotton swabs. See fig. 8-9
4. Dip cotton swabs into blue dye to lighten the color. Continue drawing the crown. Rice. 9-10.
5. Add more black to the dark blue shade on the palette. Use the resulting color to make prints of cotton swabs. Rice. 11-12
6. Now dilute the dark shade with the original blue to make the crown on the right lighter. Rice. 12
7. Take a bunch of clean cotton swabs and add leaves of the original blue color to the left, center and right of the crown. Draw fallen leaves on the ground. Rice. 13-16
8. Take the third “bundle” of cotton swabs and dip them in white paint mixed with a small amount of blue. It should turn out light blue.
Add light leaves to the crown. Draw blue fallen leaves on the ground. See the example in Fig. 17-20
9. Add more white paint to the light blue. Use the resulting pale blue to draw new leaves, sometimes on top of the ones already drawn.
This is how we create the appearance of sunlight. Fig.21-24
10. Take a medium or thin brush and paint the branches with black paint in some places. Rice. 23-24
11. Use the remaining cotton swab to draw single leaves that fall to the ground. Rice. 24-26
12. Using a brush, paint flying birds with black paint. Rice. 27
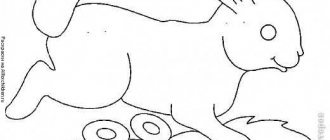
13. Draw the outlines of a person sitting near a tree. His image is very simplified, so you can easily cope with it. Draw the head and body, then the arm and legs. Finally, add a staff stick to him. See fig. 28-32
Your fairytale landscape is ready!
The lesson was created based on videos from the YouTube channel Jay Lee Painting
Making a group in a preschool educational institution with your own hands. Miracle tree from CDs
“Miracle Tree” from CDs.
Master class Master class on decorating a kindergarten group: “Miracle - a tree” Author – Tatyana Aleksandrovna Safronova, teacher at the Thumbelina MBDOU, Zainsk, Republic of Tatarstan Audience: kindergarten teachers. Purpose of the master class: designing a kindergarten group. Goal: To teach how to create interior wall decoration. Objectives: - mastering the technique of making interior solutions from waste material; - development of fantasy; - education of aesthetic taste. I was asked to paint a “Wonder Tree” on the wall in the reception area of the senior group and come up with a way to display the children’s creative work on it. I wanted to create something unusual, joyful and beautifully decorated. There was little space to work - between the lockers in the locker room and the wall. Just draw on the wall? How to reinforce children's work? The idea arose suddenly, having found a whole bunch of unnecessary CDs at home and I thought, why not? This is what ended up happening.
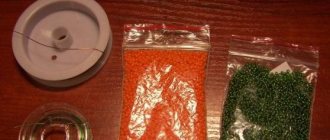
The work is not at all difficult and does not take much time. Parents can also be involved in collecting CDs. Working together is more fun. Let's try! For this we will need the following materials: - toilet paper 1 roll; - a simple pencil; — CD discs about 120 pcs; - multi-colored braid; — paper clips; - artificial grass; - glue "Titan"; - PVA glue; — glue moment “Crystal”; - scissors; - gouache; - brushes for painting; - ceiling tiles; - colorless varnish.
We start by drawing the outline of the desired tree with a pencil on the wall. And let's get to work. To do this, you need to tear toilet paper into random strips from 20 to 50 cm, the size is not so important. We crumple it arbitrarily, dip it in PVA glue (not diluted with water) and apply it to the wall, creating a tree trunk, simulating its bark, using the papier-mâché technique. Here we give free rein to our imagination.
Dries quite quickly. Let's start painting our trunk. This is where there is room for imagination in choosing shades! After the paint has completely dried, coat the barrel with colorless varnish. It was not possible to photograph the process of pasting and painting itself, because I did it all in a quiet hour alone, there was no one to capture the work. This is how it happened for me personally.
In advance, you need to glue the multi-colored tape to the back (not mirror) side of the CD with “Crystal” glue.
Let's begin the most exciting process - gluing CDs to create a tree crown. This needs to be done in a circle, alternating disks with ribbons and regular disks, using Titan glue according to the instructions.
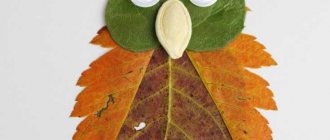
Of course, an owlet should live in the hollow. I found how to make it on the Internet, but I used household wet wipes, after drying them at room temperature for one day.
The basis of the owlet is the same CD disc. You can come up with your own image. Any miracles are possible on a miracle tree! You can use this diagram.
Now you need to make the grass. We take two cells like this with artificial lawn grass
and glue it with Titan glue to the cut-out shape of the ceiling tile.
We pre-paint the tiles green so that they do not show through. And after drying, we glue it to the place we need, adding, if necessary, additional herbs that we have on hand.
We attach paper clips to our ribbons and decorate the space around the tree with various butterflies, dragonflies, etc.
Our tree is ready. Agree – a fascinating process made from simple materials! And how much delight and joy this miracle - a tree - causes in children! You can touch the grass and admire the fabulous tints of shining discs. But the main thing is that now the children’s works are fabulously greeted by everyone in the group. Thank you for your cooperation! I wish you creative success and flights of fancy!
We recommend watching:
Craft - DIY birthday souvenir DIY Snow Queen Crown. Master class CD pendants. Master class with step-by-step photos DIY exhibition stand for children's work in kindergarten
Similar articles:
Summer crafts from CDs to decorate the preschool area
Do-it-yourself panels for decorating a corner of nature in a kindergarten
Aerodesign. Master Class
Do-it-yourself group decoration in kindergarten
DIY Autumn panel
DIY flower tree: flower topiary master class
13:55, March 18, 2020 17 0 4411
The “Awakening of Spring” flower tree combines several types of artificial flowers, hand-made or ready-made buds. Roses made from napkins and felt, fabric, foamiran and plastic flowers.
A topiary with a curved trunk is planted on a plaster cast - in a tall white flower pot with neat decoration. A charming foam bird nestled at the base, and a graceful green butterfly perched on the crown.
The composition is complemented by snail shells of various sizes scattered throughout the tree.
was used from old newspapers and knitting threads. A foam ball with a diameter of 15 cm will also work.
The total height of the money tree is 43 cm , the pot is 14 cm , the diameter of the crown with decoration is 18 cm . 3-5 hours to make a topiary of this size : you will need to make 40 roses from napkins in advance and roll sisal balls.
To make topiary from flowers you will need:
- Viscose napkins for cleaning 30x30 cm pink - 10 pcs.
- Light green felt sheet A4 - 4 pcs.
- Artificial fabric roses (small buds of different shades of pink) - 40 pcs.
- Pink sisal (for balls 20 pieces and in a pot) - a pack of 45 grams.
- Small flowers (white primroses) - 30 pcs.
- Smooth pink berry – 40 pcs.
- Snail shell - 20-25 pcs. (large shell in a pot - 1 pc.).
- Light green foamiran roses - 12 pcs.
- Small plastic grass - 3 types.
- Light green stamens - 1 bunch.
- Decorative bird made of foam - 1 pc.
- Butterfly - 2 pcs.
- Large green fabric sheets - 5 pcs.
- Medium plastic leaves - 10 pcs.
- Pink lace (width 2 cm) - 25 cm.
- Narrow light green satin ribbon (width 0.5 cm) - 25 cm.
- Rapeseed tape pale pink (width 3 cm) - 10 cm.
- Light green satin ribbon (width 3 cm) - 10 cm.
- White acrylic paint or gouache + PVA glue for painting the barrel.
- Branch - 35 cm.
- Plastic white pot - 400 ml.
- Plaster, water, pieces of foam.
- Sintepon (cotton wool) in a pot - to save sisal.
- A homemade ball from newspapers wrapped with knitting threads or a ready-made foam ball - d=15 cm.
- Silicone glue sticks for a hot-melt gun (diameter 7 mm, length 20 cm used) - 5 pcs.
using a hot-melt gun for gluing work . Unlike liquid polymer glue, this is convenient, economical and significantly reduces the time for making the “Awakening of Spring” flower topiary.
A convenient step-by-step master class in excellent FullHD 1080p quality on how to make a topiary from “Awakening of Spring” flowers with your own hands.
Did you like the format of the master class in 1 picture? See all the DIY topiaries from Alena Tikhonova!
To decorate the “Awakening of Spring” flower topiary, pink viscose napkins 3 flowers from light green felt (the principle is the same).
You can also use sheets of thin felt instead of napkins. The process of assembling roses is shown in detail in the video above, and is also discussed in the master class on blue topiary from “Heavenly Harmony” napkins.
In addition, at the preparatory stage you will need to twist pink sisal balls with a diameter of approximately 2.5-3 cm - to decorate the ball.
Stage II. Crown decor
Preparing the trunk and ball: for the flower tree we used a tree branch and a homemade base from scraps and newspapers with wrapping. We paint the trunk in 2 layers with white acrylic or a mixture of gouache and PVA glue. After drying, we fix it in a pre-calculated position with glue (you will need to first cut a hole in the ball - a slightly smaller diameter than the barrel).
The decor adheres perfectly to a winding of knitting threads or twine. You can also paint the ball if you use a ready-made base for a flower tree (so that the foam does not melt from the hot silicone).
We outline the compositional center of the topiary crown, in which we glue 3 light green flowers. Walking away from this island, in a chaotic manner we cover the entire surface of the ball with large decor:
- Pink roses from napkins (we will leave 1 flower for the decoration of the pot).
- Sisal balls.
- Fabric flowers (inflorescences of 3 buds).
- Foamiran roses.
Before gluing the flowers from napkins and felt, we cut them to get the same height of the bud.
We fill the gaps between the large decor with plastic leaves, inflorescences, smooth berries and stamens.
Stage III. Pot decor and plaster filling
We decorate the pot for the flower tree with pink lace and a bow made of wide rapeseed and satin ribbon; In the center we glue a pink rose from napkins.
Let's strengthen the trunk in the pot: mix a thick gypsum solution, about half the container. Learn more about how to fix topiary in a pot without damaging the wood and dishes.
In the flower pot, carefully seal the drainage hole (if there is one) with tape so that the plaster or alabaster solution does not leak out. Also add pieces of foam or sponges to the mixture to prevent the pour from splitting the plastic pot as it expands.
Lesson summary “Tree of Health”
TOPIC: HEALTH TREE
Goals
. To form in students an understanding of the value of life and human health, to show what place health occupies in the hierarchy of life values;
The ability to express your thoughts, your beliefs, your own attitude towards the actions and actions of others.
— Hello, today I will conduct a lesson with you, the topic of which you will learn later. How it goes will depend only on us, on our activity and desire to work.
- Now we will do a short warm-up, which will allow us to relieve emotional stress, if we have any.
- I will ask you all to stand up, take a pen or pencil and come out from behind your desks in a circle. Your task is to hold the pen between each other's index fingers and thus close the circle. And now, under my command, we perform the following movements without opening the circle.
- take a step left, step right
- two steps forward, one step back
- sat down, stood up
- jumped up
Well done! sat down in their places.
Today we will talk about values (pause),
about life values
— I have a magic box in my hands, it contains the most important value that a person has.
- Each of you will silently, without saying a word, look inside, think, and then say what this value is. (children's answers)
Yes, indeed, the most valuable thing is you, your life,
which is given to us 1 time.
Each of you has 5 cards on your tables. I suggest writing 1 value on each card, i.e. what you value most in your life.
You can refer to the slide for a hint.
Next, rank these values, i.e. arrange them in order of importance to you from more significant to less significant. And number them from 1 to 5
. (in 1st place it is more significant, in 5th place it is less significant).
Now imagine that a terrible event happened. And the value that is written on the fifth card has disappeared from your life (crumple it and put it aside).
- Think about how you will live without this value? Now question the value of #4. And try to imagine your life without her (pause).
Part with the third value... From the second... , and now even the last fifth. Imagine life without these values.....
- But a MIRACLE
, and you have the opportunity to return any of the valuables: you can choose one of the crumpled cards (choose any one, in your opinion the most valuable), smooth it out, but the miracle continues and you have a chance to save another valuable
(smooth it out).
And now the third….out of the remaining 2, choose the most important….
and the last one (smooth it out
).
- Now look to see if the numbering of values has been preserved. Has anything changed?
Discussion: Answer the question
- How did you feel after each loss of valuables?
- Which loss was more painful for you?
(Thank you)
Conclusion:
It is very important to build your own hierarchy of values
. And it often happens that we begin to appreciate what we once lost.
Parable "The Vessel of Life"
Once, one sage, standing in front of his students, did the following. He took a large glass vessel and filled it to the brim with large stones. Having done this, he asked his disciples if the vessel was full. Everyone confirmed that it was full.
Then the sage took the bag of peas, poured it into the vessel and gently shook it several times. Peas began to fill the space between the stones... The peas rolled into the free spaces and filled them. After which the sage again asked the disciples whether the vessel was full now. They again confirmed the obvious – it’s full.
And finally, the sage took a bag of sand and poured it into the vessel. After some time, there was no free space left in the jar; sand filled the remaining gaps in the vessel.
“Now the jar is full,” the sage addressed the students, “and I would like you to be able to recognize your life in this vessel...
— The vessel is your life, large stones represent the most important things in your life: your family, loved ones, your health — everything that is of great importance to you.
— Peas are those things that are not so significant to you, it could be your job, car, beautiful clothes, etc.
— Sand symbolizes the little things in life, the bustle of everyday life. These are the little problems that accompany us throughout your life.
- If you first fill your vessel with sand, then there will be no room left in it for larger stones and even for peas.
So it is in life
: If you spend all your energy on small things, then there will be nothing left for big achievements.
Therefore, pay attention, first of all, to the important things: find time for your family and friends, take care of your health. And you will still have enough time and energy for work, for home, for hobbies and everything else. Keep an eye on your big stones - they are the only ones that have a price. Everything else is just sand. Questions for discussion:
- What do you think this parable teaches?
“Teenagers today love luxury, have bad manners and no respect for authority, disrespect elders, loiter and gossip constantly. They argue with their parents all the time, they constantly interfere in conversations and attract attention to themselves, they are gluttonous and tyrannical with teachers ... "
One young man was walking along a muddy road and suddenly saw a gold coin in the mud. He bent down and picked it up. I went further in search of other coins. And, indeed, they sometimes came under his feet. This is how his life passed.
When he was dying, they asked him what life is. He replied: “Life is a dirt road where sometimes you come across gold coins.”
“Let’s try to ask the question: “What is life?”
Life is a blessing, it is a gift that is given to a person only once. And it depends on the person himself what content he will fill his life with.
Yes, a person has one life, but sometimes you look at a person (at how he wastes his life) and think as if he has not 1, but several lives, and he is so thoughtlessly shortening his life.
Tell me, what factors influence the quality and duration of our lives?
(children's answers)
Our life can be imagined as a tree whose roots go deep into the ground. Roots
- these are the values laid down in childhood by our parents, they give you the foundation in your life.
The trunk and branches
are what help us be healthy.
- Sports activities
- hardening
- no bad habits
- physical activity
- quality sleep
- favorite hobby
- proper nutrition
- love for people
- stress resistance
- positive emotions
And the leaves are the result of our labor
There are leaves on my table: yellow, green, red.
Each of you will now take 1 leaf and attach it to our tree.
If you get sick very rarely - green leaf
If you often have any chronic disease - yellow
If you are sick - red leaf
(Thanks a lot)
- I finish this lesson and wish you that there are only green leaves on your tree.
Exercise gift
Video tutorials: DIY autumn crafts for children
The autumn season is rich in fruits, and when harvesting, many do not even think about what wonderful crafts can be made using vegetables or fruits. For example, pumpkin crafts look unusual. For adults, this is an opportunity to “revive” their interior, and for children it’s a whole game - making something with their own hands. Creating crafts is very useful for preschool children; the process teaches them to be creative, work with new materials, develops imagination and opens up creative potential. With the help of the YouTube video presented by the service, you will learn how to make children's autumn crafts.
A very simple autumn craft “Cucumber Crocodile”
“Mushroom picker with a dog” made from natural materials
"Frog" made from vegetables and fruits
What can you make a health path from cheaply with your own hands?
How to make a health track for kindergarten. From available materials for the path, you need to choose the safest ones so as not to damage the child’s skin. It’s easy to make a strip using both purchased tools and natural materials. Therefore, you should not immediately throw away bottle caps or plastic containers with carved bottoms; they can also come in handy. Also, when going for a walk in the forest, you can collect cones, acorns, and wooden twigs that can be used.
In stores you can buy things that will also become massage products. These can be beads, decorative stones, twine, multi-colored buttons and other decorative elements.
Natural small stones
If a fixed multi-sectional structure is used, one of the boxes can be filled with small pebbles, on which the bare heels of preschoolers will tread. A cell made of sanded wooden blocks, reinforced on the sides, the bottom of which is covered with polyethylene, is filled with small pebbles. It is very pleasant to walk on this surface with bare feet.
The mobile variation involves leatherette, mat or other fabric base, onto which pebbles are glued with glue. The result is a fairly hard area that will awaken all the nerve endings. By the way, this design is not afraid of water and is easy to clean from dirt.
Sand
Children love to play in the sand, and boys and girls will also enjoy running around in it.
The section with sand is prepared as follows:
- the wooden frame base is strengthened so that the walls stand strictly vertical;
- the bottom is covered with thick fabric;
- sand is poured.
- The sand must first be sifted, in case there are sharp objects in it.
You cannot leave the health track open on the site; rain will wet the sand. Therefore, the path must be closed during bad weather.
If the boxes can be moved from place to place, then it is better to put the box with sand indoors.
Emotional development of a preschooler
Cones
One of the sections of the health path may consist of pine cones folded into a cell. As when filling with other materials, a dense fabric base is placed at the bottom of the box, and cones are poured onto it. Before pouring out the filler, you need to check the cones to see if there are any needles or sharp chips on them.
Another option is to compact the cones into dense sand, so that the cones are half immersed in the soil.
The third option is to use cement mortar, which is used to fill the mold, and then the cones are placed randomly on top, slightly immersing one edge into the cement paste. The result is an interesting pattern, and the slabs with cones themselves become an excellent exercise machine for the feet.
Wooden blocks
A section of wooden blocks is made as if a decorative path was being prepared using wood.
- The base is prepared - a shallow trench is dug, geotextile is laid on it.
- The sides of the section are formed using boards.
- Sand is poured onto the geofabric and compacted.
- Thin wooden sticks, sanded and smooth, are placed on the sand, one next to the other.
- The seams between the wooden elements are filled with sand, which compacts well.
- It is not advisable to leave cells with wooden elements and sand in the open air. It is better to close the path in bad weather.
Acorns, chestnuts
Natural materials can serve not only as a decorative material, but also as an effective natural trainer for the feet.
You can prepare health path cells with acorns and chestnuts using sidewalk path technology.
So, the base is prepared, as in other options. Sand is placed tightly on the geofabric, and a solution of cement and sand is poured on top. When the mixture begins to harden, the surface is lined with acorns and chestnuts, which are lightly pressed into the cement. The result is an interesting natural “scale” that you can walk on with bare feet.
To prepare a mobile walkway, you can take a cloth and, covering it with glue, scatter and smooth out acorns and chestnuts.
Physical exercises in kindergarten
Rugs
Rugs are one of the most convenient options for massage paths. They are easy to use and can be used in any weather, anywhere.
You can make rugs yourself without much effort. The basis is a rubber coating or other dense fabric. It can be leatherette, linoleum, hard cardboard, which then needs to be covered with material. Various massage elements are attached to the front side using glue: pebbles, pebbles, buttons, foam sponges, etc.
One of the sectional squares of the path will be rugs made of rope or cord, having a well-defined woven surface.
A coconut fiber mat and a prickly mat also have a good massage surface.
Plastic caps, bottles
There are several options for using plastic caps and bottles. The first is mobile, with covers glued to a rubber mat. The second is stationary, when the track cannot be moved to another place. In the second case, the lids are placed in tightly compacted sand with the cap facing down.
To make a track, you may also need plastic bottles, or rather, bottle bottoms. Carefully cut out cups 5-10 centimeters high and immerse them in the sand, bottom up.
Path paved with planks
To make a path from planks, you need to use the technology of laying sidewalks from planks.
For this:
- Prepare a base from a fixed frame, lining the bottom with dense material.
- Make drainage from crushed stone, which is placed on the fabric.
- Pour sand onto the crushed stone and compact it tightly.
- Build the sides, digging into the ground so that they protrude 5-10 centimeters above the surface.
- Make membranes from the boards, immersing them sideways in dense sand.
- Place planks on the holding boards.
- Fill the cracks with sand.
Outdoor games for preschool children