Needlework
07/20/2018 Anastasia Prozheva
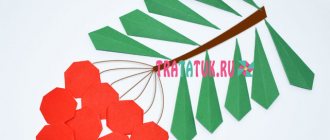
Needlewomen strive to capture the bright natural colors in their creative works. The symbol of autumn compositions is often the rowan tree. The intense combination of its green leaves and red-orange berries is used in products as decoration or as a whole composition. At the same time, a rowan branch is made with your own hands in absolutely different variations, depending on the purpose of the product.
A bright beaded topiary is perfect as an interior item. Colorful work will bring a fresh touch to a dull room. The work is quite labor-intensive, but you can master it by following the step-by-step instructions.
candy tree
Due to the light shine of the beads, the tree acquires the effect of a varnish coating. In this case, the reflection is associated with the natural phenomenon of wet foliage, which is observed on trees in rainy autumn.
The product consists of several rowan branches. Therefore, having dealt with one element of the tree, you can create a whole composition in a similar way.
Involved in weaving:
- Czech beads No. 10 green and orange;
- copper and green wire;
- brown ribbon;
- brown acrylic paint;
- gypsum.
Beads are strung on copper wire 10-12 cm long and twisted. You should start working by moving the bead to one end of the wire.
After 5 mm from the first bead, the second one is strung and twisted again.
The entire row of beads continues along the length of the wire in a similar manner. A rowan bunch requires about 15 beads.
The ends of the wire are twisted together to form an inflorescence.
In order to make a full-fledged bunch, you should prepare 5 such inflorescences.
The inflorescences are connected into a single piece by twisting the wire. When the rowan bunches are ready, work moves on to the leaves.
Beads of the corresponding color are strung on a green wire 10 cm long.
It is located in the center of the segment. One of the ends of the wire passes through the bead again and the wire is tightened. The next two beads are threaded in the same way, then three, then four.
Related article: DIY flower vase made from newspaper tubes with photos and videos
After this, the number of beads decreases one by one until there is only one bead left in the row. Then the ends of the wire are twisted.
Several leaves of beads are made, after which a single branch is formed. In this case, the rest are screwed perpendicularly to one leaf.
When the required number of branches from leaves and berry clusters has been prepared, the random formation of rowan branches begins. In this case, the clusters and leaves are twisted together in the desired order.
To create a tree, you should take part of the modeling mass and roll it into a column. You need to insert prepared rowan branches into it one by one.
After the mass has dried, the tree trunk is wrapped with brown tape, as in the photo.
The tree is inserted into a small flower pot and filled with plaster.
When the plaster dries, it should be painted brown.
Step-by-step photo lesson:
Prepare suitable colors for sculpting: green and brown (no need to explain that they are necessary for the crown and trunk), and also necessarily red, because you will have to sculpt rowan fruits - bright berries.
Roll a green ball (if you look at a rowan tree from a distance and carefully examine the drawing, it will become clear that its crown has the shape of a ball). Also make a brown thin trunk. The trunk can be bent.
Fasten the two parts. If you are afraid that there is too much green plasticine and the barrel will simply bend under its weight, then take measures to lighten this part. For example, you can initially disguise foil inside green plasticine; it is very light and will not only lighten the barrel, but also save plasticine.
Roll out a lot of very small beads (the size of seed beads if you are making a small tree figurine) of red color. These red beads will allow us to imitate rowan fruits.
In addition to red beads, also make blanks for leaves - very small oblong green pellets.
Collect rowan bunches and leaves. Connect several red beads into piles, and also fasten several leaves together.
Stick the resulting fruits with leaves onto the green part of the tree in random order.
The elegant winter rowan tree is ready. Although we depicted more of an autumn version, when the leaves had not yet turned yellow or fallen off.
Lesson on plasticineography in the middle group “Rowan Twig”
Teacher Gladneva Elena Nikolaevna
Program content:
- Teach children to make a circle from a ball by flattening it.
- Develop interest in nature and curiosity.
- Develop the ability to see the beauty of nature.
Equipment: rowan berries, pictures of rowan.
Handouts: plasticine, stacks, backing board, wet wipe, cardboard sheet - according to the number of children.
Vocabulary work: activate the dictionary: brush, bunch.
Guys, guess the riddle.
The berry is red, but not tasty. And the frost came and brought sugar.
(Children's answers)
This is a rowan.
Grows in forests, parks, gardens. Rowan is friends with everyone and tries to feed everyone. And if someone gets sick, they will treat it. Although rowan berries taste bitter, they are still good. Look - there are rowan berries in a plate on our table. How many berries are there on a branch? If there are many berries on one branch, what can it be called? (bunch, brush)
Take one berry in your hand.
What color is it? What does it feel like? What is the shape? Look for a dark colored mark on the berry. Look what's inside the berries? (pulp, juice, seeds)
Do you want to try the berries? What do they taste like?
Fizminutka
There is shade and a solar net on the path. A branch hung over the tyn, through the fence. I'll come running... I’ll gallop….. I’ll stand on my toes….. I’ll grab the branch by the braids and get the berries. I’ll sit by the fence and carefully string a rowan berry onto the silk. Put on some bitter beads, a twig, a branch. There is shade and a solar net on the path.
Well done, we had a rest. Oh, guys, today a magpie on its tail brought news. At night there was a strong wind in the forest, and it tore off all the berries. Now the birds will have to starve all winter. Is there anything we can do to help them? I suggest making your own rowan branches. Let's see what we have on our tables. (children's answers)
How can we make rowan branches?
(children's answers)
Show an illustration of a bunch of rowan berries. Look what berries she has? That's right, red, round, and they are also friendly, one grows next to the other. There are a lot of berries, they are collected in a bunch. Let's repeat everything together - a bunch. The clusters are directed downwards. What color plasticine will we need for the berries? First we will roll the balls. How many balls do you think we will need? (a lot of)
We will make a lot of small balls and flatten them.
Plasticine loves warm hands. Let's warm our hands together.
Finger gymnastics
Birds are coming (calling finger movements)
I'll give the lard to the titmouse. (4 times cutting movements with one palm on the other)
I'll make crumbs ( "crumb"
bread)
A little bread. These crumbs are for pigeons. (right hand forward)
These crumbs are for sparrows. (left hand forward with open palm)
Jackdaws and crows - eat pasta. (three palms against palms)
Our hands are warm, we are ready to start sculpting. Our parts are ready, let's take our cardboard and stick on a twig, berries and of course leaves.
Independent activity of children.
Look, guys, how many rowan branches we got!
Do you think we did a good job with you?
In autumn, nature is full of bright colors, which makes anyone incredibly happy. Every autumn there are several bright days, when the sun is still warm, the leaves are glowing with red-orange colors, and the mountain ash is waving its red tassels. Today we will talk about how to make a rowan branch quickly and easily with your own hands.
Plasticine berries
The rowan branch also inspires little creators. Often it acts as a craft for the autumn holiday. As a rule, plasticine is involved in such work.
To create a rowan branch from plasticine, you should stock up on material in the appropriate colors and a base in the form of a cardboard sheet.
Brown plasticine branches are formed and randomly attached to the base.
Small balls are rolled out of red-orange plasticine, each of which is equipped with a black or brown center characteristic of berries. The balls are arranged on the base in the form of a cluster.
Cuts are made on each core to give the berries a natural appearance.
Leaves are formed from green and orange plasticine. They are located along the prepared branches.
Alternately, natural veins are drawn on the leaves.
The craft is ready!
How to make a rowan from plasticine
Step 1. Cut the orange and red sausages into four parts.
We divide the resulting strips into small plates. Roll pieces of plasticine into balls.
To make a bunch of rowan berries have a beautiful three-dimensional shape, we create as many berry preparations as possible.
Step 2. Next, we form a realistic-shaped bunch of berries. Glue the red berries together first. It is better to glue orange berries to the bottom of the bunch, where unripe berries are formed.
Step 3. Place tiny brown cakes on each berry. Using a plastic spatula or skewer, draw thin veins on the bottom of the fruit.
Step 4. Now we cut the pieces of wire into short pieces 5-6 cm long. We process thin pieces of the frame with brown material.
We insert the branches into the berries and connect the ends together.
We form the upper part of the branch from a piece of plasticine. Roll out the branch in your palms to smooth out the joint. If necessary, draw the texture of the bark on the woody part of the craft.
Step 5. Create oval leaves from green sausages. Using a skewer, cut through the central and side veins. We stick the leaves to the top of the branch.
Print Thank you, great lesson +4
We notice the rowan in autumn and winter, when its elastic berries turn scarlet, when they glow beautifully against the background of snow, when winter species of migratory birds quickly fly into cities to feast on the fruits.
In this lesson we will tell you how to make a rowan tree from plasticine. And again we will replenish our small and useful store of knowledge. Sculpting trees is easy and fun, because there is no need to create any complex copies of cartoon characters or movie actors, everything is extremely clear and simple. The main thing is to depict the trunk, crown and characteristic fruits. For rowan, these will be small red clusters. Other lessons on trees:
Autumn in knitting
Rowan motifs can also be seen in knitted items. As a decoration for your headdress, you can create an original element in the form of a rowan branch crocheted.
For the leaves you should cast on a dozen air loops.
Related article: DIY tea and coffee jar
Knitting continues in the opposite direction.
Half-loops are created along the chain.
Then they close.
After yarn over, the hook is pulled through three loops at once. Then yarn over again and cast off the next three stitches.
And so on until one loop remains.
The work is turning around. Half-loops are formed along the entire row, after which they are closed three at a time.
The row ends with a connecting post and the thread is cut.
This is how all the leaves are done. The berries begin with four air loops closed into a ring.
Single crochets are made in a circle through the central ring.
The rows do not close during operation. You should get a dense berry.
The product is turned on the wrong side. The wrong side will be the front side of the work.
The blanks are fixed to the main product in parts or after preliminary assembly.
