There are teachers, children and parents who enjoy decorating school premises every year, selecting original ideas from all sources. Most often this is done in elementary school, since there is one main teacher and an assigned office, but children themselves in middle and high school awaken an interest in design, and the opportunity to decorate the classroom for the new year is the best chance to show creativity.
Themed classroom decoration
In many schools, the design theme is “brought down” from above. These are fairly general topics, so coming up with a concept isn't that hard. I collected themes that I remembered from past years: “Winter’s Tale”, “Winter Angel”, “Snow Ballet”, “New Year’s Clown”, “Toy Story”, “Nutcracker”, “Frost”, “Winter Patterns”, “New Year’s Clock” ", "Amazing Christmas tree", "The Mystery of Santa Claus", "The Snow Maiden's House", "Gingerbread House", "New Year's Calendar", "Comic Horoscope", etc.
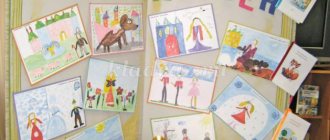
Sometimes each class is given its own topic, but it is more interesting if everyone presents their own vision of one topic. The imagination of children and parents simply knows no bounds; every time you wonder how such magic could be made from materials available to everyone.
Advice for children and parents
Every room design has its own rules. They are also available for decorating school classrooms.
- There should be no glass Christmas tree decorations in the classroom for primary school children, as there is a risk of injury from a broken product when playing. If you are planning a Christmas tree, then it is better to decorate it with candies in shiny wrappers, tangerines, fir cones or homemade snowflakes.
- Compliance with the measure is a necessary requirement. The decor must be beautiful and festive, but elaborate models of flashy colors may well become the reason for the sudden inattention of the children.
- The age of the students also matters. High school students will like unusual crafts, while kids will prefer cute, bright decorations.
- If the classroom area cannot afford a real Christmas tree, then it can be replaced by ikebana, which contains spruce branches.
- When there is no spruce or its branches, essential oils of coniferous trees will help to aromatize the class, but moderation is necessary here.
- A meeting dedicated to decorating the classroom will allow you to listen to the ideas of children, whose imagination may suggest an original and unexpected way to transform the school room.
- All New Year's decorations should only be attached in the presence of adults, especially those that will be located high up.
You don't need to be a genius yourself to figure out how to decorate your classroom for the New Year. Any sample seen on the vast expanses of the Internet can contribute to the birth of a new idea. And in this case, visual aids can provide invaluable help. For example, the video located here:
What can be decorated
With any amount of New Year's decor in the classroom, it should be comfortable to study: without elements covering the board, hanging on the children's heads, covering important areas of the classroom (washbasin, cabinets, teacher's desk, etc.).
In many schools it is forbidden to place even pots with indoor plants on the windowsills (these are fire safety rules), so we don’t put any Christmas tree arrangements there either.
The main areas remain: the window glass itself, the ceiling, the “New Year’s corner,” and the walls.
New Year's ideas for school windows
Stickers in the same style
Few people have the patience to cut out complex designs on their own with a sharp knife.
And there is no point in doing all this when the Chinese industry supplies such a variety of stickers. These pictures stick to windows without glue, come off without any consequences, you don’t even need to wipe them with a dry cloth. Each sticker sheet has a size listed, so it's pretty easy to get an idea of what size each individual figure is. Measure all windows in width and height, think over a plan for placing stickers and purchase the required quantity.
Vertical paper garlands on threads
These are ready-made and very beautiful garlands of different colors.
They don’t always have a New Year’s theme, but if you choose a combination of white, gold, silver or red-green garlands, it will turn out very elegant. Small and large circles resemble flakes of coarse snow. The stars look even more spectacular. The threads are easily secured with tape to window frames, and all these decorations are suitable for those cases where the glass itself is not allowed to be sealed. Often such paper garlands are attached over curtains to curtain rod hooks.
Here's more information about ready-made garlands on threads.
“Snow” spraying using synthetic snow spray
To apply patterns, stencils and a can of Frost Spray are used.
Try it on paper, then start decorating the windows. If you spray frost close, the temporary paint will adhere tightly (bright white flakes). If you spray from a distance, you will get translucent “clouds”. You can use different stencils. In some you fill the voids, the background remains transparent. You can glue a paper snowflake with water, smooth it slightly with an absorbent napkin, and spray it with spray. After the “frost” has dried, carefully remove the snowflake. You will get a white fragment of glass with a transparent snowflake. Synthetic snow can be removed very easily with a dry cloth.
Snow Queen style
The image of a cold, cruel and beautiful woman is as eternal as it is diverse. Various interpretations of Lady Macbeth, Marquise de Merteuil, Snow Queen, etc. have filled literature and the stage from the time of Greek tragedies to our decade of the triumph of serials. Genius and villainy may not be compatible (if you believe the poet), but beauty and villainy have long been considered a completely natural combination, exciting and intriguing the imagination of readers and spectators of both sexes. Coupled with a cold head and a cold heart, the image of the villain becomes especially provocative: a female shark, God forbid you get in her way, but if you watch from the outside, it’s simply impossible to tear yourself away. Either the demand for sexy icy beauties creates supply, or vice versa - one cannot help but admit that there is no shortage of such images on modern television. It is all the more remarkable how Claire Underwood
from the series
“House of Cards”.
The wife of the dangerous and unscrupulous politician Frank Underwood (an excellent role for Kevin Spacey), Claire is his full partner in ambitious plans and complex intrigues. Just like her husband, Claire has iron willpower, a clear mind and is able to go over her head to achieve her goal. “If heaven wanted to unite us, we would rule the world!” was said in a historical play. The duet of Frank and Claire is that very case of unity. And it seems that this chilling couple is quite up to the task of getting to power.
Returning to the screens after a long absence, actress Robin Wright (by the way, do you remember her in the terribly endless “Santa Barbara”?) became a sensation. It seems to me that this actress has only gotten prettier over time. And the impeccable style of her heroine, Claire Underwood, has been exciting the blood of fashionistas all over the planet for months now. Each image of the congressman's wife is an example of a perfectly thought-out outfit for a purposeful woman. It is clear that a lot of work was done on the images of this film and the result is amazing. If we agree with the statement that the king is played by his retinue, then we must admit that the snow queen, at least in part, is played by her wardrobe. When working on the series, famous costume designer Tom Brecker did not expect Claire to become a style icon, but from the very first episodes he understood how important her clothes were to unraveling her character. The heroine played by Robin Wright does not pretend that her wardrobe is second to none. She is not a fashion blogger pretending that a dress was pulled out of the closet in the dark, a careless scarf was tied in half a minute, and shoes were generally thrown on during a break on Instagram for a morning latte. In the circles in which Claire moves, clothes are chosen with undisguised care. Claire simply needs to command immediate respect and attention, even if it comes through fear and trepidation. Clothes are the first step to this. I propose to analyze the main elements of her wardrobe. 1. Lots of minimalist knee-length dresses.
2. White shirts and blouses.
3. Pencil skirts. 4. Trench coats and cashmere coats. 5. The color palette consists of white, gray, beige, dark blue and black. 6. Accessories: small (but very expensive) watches, a string of pearls, large bags and briefcases. I’m not surprised that American fashion magazines analyze her style in detail: Some of Claire’s costumes are made to order (in the workshop there is a mannequin whose proportions exactly replicate Robin Wright’s figure), and some belong to famous designers: Joseph Altuzarra, Ralph Lauren, Michael Kors , Proenza Schouler, Jason Wu and Derek Lam, Armani, Alexander McQueen and Burberry.
Tom Broecker worked on Claire's style in the first two seasons, and in the third he was replaced by Robin's personal stylist, Kemal Harris.
In the first two seasons, Claire “preferred” restrained colors: dark blue, gray, black. In the third and fourth seasons, Kemal Harris decided to add more femininity and vulnerability to the heroine Robin. This is how soft pastel shades and lighter materials appeared. In an interview with Women Wear Daily, Kemal Harris said: “Claire’s look is a symbiosis of Princess Diana and a little Jackie Kennedy.”
To create the style and image of Claire Underwood, stylists took inspiration from the images of Lauren Bacall, an American actress recognized by the American Film Institute as one of the greatest movie stars in Hollywood history.
And Carolyn Jeanne Bessette Kennedy - wife of John F. Kennedy Jr. Of course, many may not like the heroine Robin Wright. She sometimes seems dry, prim and cruel. But if you can doubt her actions, then you can never doubt her style.
- You are not only the first lady and the UN ambassador, but also my wife.
- In what order?
Ceiling decoration for the New Year
Large size finished paper decorations
On sale there are inexpensive and very large jewelry made from thin, thin paper in silence.
These are pom-poms, accordion balls, honeycomb balls, forfeits, etc. There are large figures (with a diameter of 15 to 40 cm), reminiscent of Christmas tree decorations and even Christmas trees. They are delivered folded, but in a couple of seconds the flat shape turns into a large three-dimensional figure. Hang them on ribbons from the suspended ceiling, it will seem like huge Christmas tree decorations are hanging down. It is safe. Even if a paper ball weighing 40-60 g falls on someone’s head, it’s okay. They are literally weightless.
A little more hassle with the pompoms (the white ones look like snow flakes). It is quite difficult and time consuming to separate the layers of paper from each other, so if you are short on time and have no assistants, do not bother.
Threads or ribbons with figures
I really like the wide bright ribbons with some symbols of the New Year attached to them.
You can just use bright, coated plastic balls. Even better are soft toys: snowmen, symbols of the year, Santa hats. It is easiest to attach such tapes to a suspended ceiling. To hang ribbons on a regular ceiling, you can use easily removable Command hooks, which do not leave marks after removal.
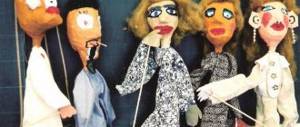
Carnival masks as classroom decoration
Yes, it looks very festive too.
And these same masks, glasses, ties, ears, noses can be distributed to children before the holidays. The result will not just be a classroom decoration, but also a gift with a good mood for every student. First we take selfies wearing masks, then we take them home with us to the home carnival. It is better to connect thin plastic and cardboard masks together in groups of 2 so that the decoration looks beautiful from any side, hanging from the ceiling.
This solution is best suited to the Carnival theme, but there are so many masks that you can come up with an interesting design for any other theme.
Solid decor - floor
Since the walls in any classroom are always occupied, there is only one suitable surface left - the floor. And in this case, if space allows, you can make a three-dimensional decoration - a snowman.
Snowman made from cups
The most interesting way is to use disposable cups. To make a figure consisting of 2 balls, you need:
- stapler and superglue;
- “mountains” of such plastic dishes - at least 300 pieces (200 ml each) will be required for a figure about a meter high;
- cap or cylinder, scarf (paper, cardboard, tinsel);
- cardboard red “carrot” for the nose;
- paper for eyes and mouth;
- Christmas balls - for buttons.
The cups are attached to each other with a stapler. First, they attach the elements around the first one, getting the first circle: for the body it consists of 25 glasses, for the head - of 18. Then they continue to work, attaching the next rows (top and bottom) in a checkerboard pattern until they get balls. They are not completely completed: the lower element (at the bottom) to give stability to the snowman, the upper one (also at the bottom) for the convenience of connecting it to the “body”.
They fasten the elements with superglue, any defect is forgivable: it will then hide under the scarf anyway. A cap is put on the head, the eyes and mouth are glued on, and the nose is fixed. From the inside, the almost-ball parts are connected with a strong thread, which is pulled tight. The purpose of this operation is to ensure the stability of the snowman. Another way is to attach the toy to a large sheet of cardboard.
Snow sculpture made of threads
If creating a popular character from plastic dishes takes a lot of time, then this method is simple and quite fast. To create a snowman you need to have:
- white threads (for example, floss);
- Vaseline, PVA glue;
- a couple of balloons.
Making such a snowman is not difficult. First, balloons of different sizes are inflated: smaller ones for the head, larger ones for the body. They are generously lubricated with Vaseline. The threads are soaked in glue and wound in random order, but so that there are no large voids left between them.
The finished products are left to dry for a day. Then the balloons are deflated or punctured. The resulting balls are glued together, again they wait for the allotted time, then they “draw” the snowman’s face using beads, beads, black buttons and a cardboard carrot.
Christmas tree with wishes and predictions
In the classroom, they often find a free corner or corner table for a Christmas tree. It is better to decorate the Christmas tree in the same style and color scheme that you have chosen for the windows and ceiling.
Children of any age love rolled up rolls of predictions for the year (you can simply hang them on the Christmas tree, securing them with ribbons or decorative clothespins). If you find a lot of transparent balls, place notes inside along with tinsel and confetti.
On the last day before the holidays, the notes can be removed and read aloud. If you are worried that children might write something not entirely positive and harmless, compose the text of your wishes and predictions yourself.
Notes can be personalized. A comic prediction made for a specific student is always more effective!
Replacing a traditional Christmas tree
From artificial Christmas trees that have lost their appearance (the top has broken, for example), you can make these charming snowmen. Styrofoam balls of all sizes are available at craft stores. Cheap plastic hats - found in party supply stores.
The Christmas tree can be replaced with a branch. You need to paint the branch with spray paint outside. White, silver or gold looks good. Select the balls in the same color scheme.
Happy holiday everyone! May the whole coming year be full of small and big surprises, interesting events and bright victories!
Irina Panasyan
Quick option
Advice! It is quite possible to make a crown faster if you do not cut out each tooth of the product separately, but use the continuous pattern technique.
To do this you should prepare:
- cardboard;
- fabric packaging for flowers;
- scissors;
- elastic band;
- silver braid;
- silver paper;
- threads;
- glue;
- sequins in the shape of snowflakes.
A crown template is drawn on cardboard. The workpiece is cut out. The pattern is placed on the fabric and traced taking into account the allowances.
The fabric part needs to be cut out, then placed on a cardboard mockup. The allowances are folded over to the reverse side and glued to the cardboard.
Glue is applied to the underside of the workpiece, after which the crown is glued onto silver paper. This hides unsightly allowances on the back of the product.
The crown is carefully cut out. The product is decorated with large sequins in the shape of snowflakes.
The outline of the crown is framed with silver braid. Depending on the quality of the braid, you can glue it with hot glue or sew it on yourself.
All that remains is to try on the crown and calculate the length of the elastic band on your head. The elastic is sewn along two edges of the product.
The crown is ready. If the holiday is just around the corner and you urgently need to acquire a “snow” crown, then you can try a simplified version – a product made from cardboard. To prevent the crown from looking like a “hurried craft,” it is advisable to replace the cardboard with a piece of light wallpaper with a pattern.
A model of the crown is drawn on it. The template needs to be cut out.
Then the workpiece is painted with silver spray paint. Since the aerosol tends to be sprayed in all directions, it is recommended to provide for this moment and carry out painting in the corridor, having previously covered the floor with newspaper or polyethylene.
Related article: DIY willow twig master class for children with video
First you should paint the back of the product. On the front side you need to carry out two stages of staining. After applying the first layer, you need to dry the product and repeat the coloring.
When the crown has completely dried, you can begin decorating it. The edges of the product are decorated with edging with rhinestones or any silver braid. The crown is decorated with additional elements corresponding to the theme of the carnival costume.
The final step is to sew a wide elastic band along the edges of the product. You need to measure the elastic so that the crown fits tightly around your head.
The carnival headdress is ready to delight its owner. Any proposed master class will allow you to create an accessory not only for a child, but also for an adult. This is especially true for kindergarten teachers and directors of theater clubs.