Quilling is a fairly popular modern hobby, the main essence of which comes down to creating compositions and figures from twisted strips of paper. This is an English word (in English “quilling”), which comes from the word “quill” - “bird feather”.
Where did this art come from? What are the types and methods of paper rolling? Why is quilling attractive and useful for children and adults?
Before starting to study quilling, the presentation will introduce you to the varieties of this art, provide an opportunity to learn interesting facts, as well as the useful and developmental properties of quilling.
Who and where or a little history
It may surprise many, but the history of quilling dates back to the end of the 14th century. It was then that European monks began to decorate books, icons and medallions with rolled paper.
At that time, quilling was known as paper filigree and paper mosaic. Openwork patterns, flowers and ornaments were rolled out of thin strips of paper and bird feathers were used for this. It is from this tool that the name of the quilling technique comes.
To make the craft beautiful and luxurious, trimmed gilded edges of book pages were used. The result was spirals that imitated gold jewelry (hence the comparison with filigree, a jewelry technique for decorating metal).
According to another version, the art of paper folding came to Europe from the New World. For twisting, a porcupine quill was used, which in English is also called “quill”.
However, for quilling, the history of origin begins in ancient times and leads to the ancient Chinese civilization and Ancient Egypt, when paper and papyrus were first invented. It is not known for certain who exactly – the Chinese or the Egyptians – came up with the idea of rolling paper. But, of course, this type of art migrated from East to West and from West back to the East.
Thus, in the 19th century, quilling flourished as a hobby for ladies from high society, and at the end of the 20th century it firmly took its position in South Korea. Koreans, with their characteristic oriental patience and accuracy, began to create truly works of art that are not inferior to jewelry, and even created schools for teaching the art of quilling.
In the XVIII-XIX centuries. paper, especially high-quality and durable paper, was quite expensive, so this hobby was accessible only to nobles and royalty. For durability and aesthetic appearance, the finished craft was coated with gold or silver.
It is worth noting that the art of paper rolling was the favorite pastime of the English Princess Elizabeth. Largely thanks to her, quilling gained its popularity. Many of the princess's works are preserved in the Victoria and Albert Museum in London.
Quilling was forgotten for almost the entire 20th century, but in the 21st century it regained its popularity. The availability of materials and tools, as well as the ease of making beautiful things, have made this type of creativity an everyday hobby for many needlewomen and craftsmen.
The emergence of quilling
The history of needlework began in the Middle Ages. The word “quill” itself is translated as “feather”. Many believe that this name refers to the use of feathers for curling. Considering the century of its origin, this assumption seems reasonable. At that time, European clergy made frames for icons by twisting thin sheets of gilding. This method was used to decorate book covers, mirrors and boxes. . This alternative to gold frames has begun to be used in churches on a tight budget. After some time, the technique gained popularity among aristocratic women who entertained themselves by twisting thin strips of paper. Elizabeth II was a lover of such leisure. One of the museums in London has an exhibition of her works using the quilling technique.
The origin of quilling is attributed to both Eastern and European culture. Oriental art is replete with lace details and intricate patterns. The European version is quite strict and laconic. It is used to decorate cards, frames, and create small paintings.
Ordinary people are not so interested in debates about quilling, the history of which excites researchers so much. What is more important is what opportunities for creativity this type of art opens up. Today it is available to everyone because it has become much easier to purchase materials. The feathers have been replaced with a toothpick, and ordinary colored sheets are used instead of gilded paper. The development of quilling in the 21st century has reached incredible proportions. It is present both on ordinary postcards and in interior decoration.
The presentation of handicrafts takes place in different galleries around the world.
What is quilling?
At first glance, the quilling technique is quite simple. Indeed, the basic principle is to twist strips of paper of equal width into tight or loose spirals, from which a painting or craft will later be assembled. However, quilling has its secrets and features.
Conventionally, all types of quilling techniques can be divided into two large groups - the European school and the Korean school.
European style is laconic. When creating quilling crafts in this style, a small number of parts are used that are assembled together like a mosaic. Compositions can be assembled from tight, dense spirals or basic quilling figures, which are formed from loose spirals. This style is most often used to decorate cards, frames, album covers and notebooks. Korean or Asian style is more subtle and elaborate. Koreans have developed the art of quilling to perfection. Works made in this style are difficult to distinguish from real filigree. Craftsmen work out every detail, use many elements and try to create monolithic works without any signs of paper seams or edges. The Korean school creates entire paintings made from strips of paper.
However, each school uses well-known techniques in its work, among which are:
- spiral quilling;
- bihive;
- contour quilling or hasking.
Compositions made from spirals are the simplest quilling technique that all beginners are familiar with. This technique is actively used by the European school. Using a special awl or other improvised device (sticks, toothpicks), spirals are rolled up and basic shapes are created, which are folded according to the intended pattern into a single composition. The larger and smaller the figures, the neater the work looks. Even children can easily master this technique.
Beehive literally means “honeycomb” or “beehive.” This technique creates details filled with spirals and curls that actually somewhat resemble a honeycomb. Most often, this technique is used to create petals, leaves, tree crowns and filled extensive geometric shapes. The details are delicate, delicate and neat.
Contour or graphic quilling or husking is somewhat more complicated and requires some skills, as well as artistic vision, perseverance and patience. Using this technique, one gets the impression of a picture drawn with pencils or strokes. The parts are filled with slightly curved, wavy or arched strips, which are glued to the paper edgewise.
For beginners, understanding and mastering this technique will be quite difficult at first. However, having acquired some skill, masters will be able to create full-fledged paintings, even without knowing how to draw. For contour quilling, templates and sketches with drawing small lines are used.
Also, types of quilling can vary in volume (flat or three-dimensional crafts) and theme (geometric, naturalistic, fantasy, portrait, etc.). Using quilling, you can create topiaries, decorative compositions (panels, postcards, paintings), figures and toys, household items (vases, boxes, baskets).
The art of quilling, as you can see, goes far beyond simple paper spirals.
Presentation "Quilling"
Technology teacher Ginter V.B.
Quilling, paper rolling, paper filigree is the art of twisting long and narrow strips of paper into spirals, modifying their shape and composing the resulting parts into three-dimensional or planar compositions.
One of the unusual techniques of paper art is the filigree art of paper rolling. In English, this type of needlework is called “quilling” - from the word “quill” or “bird feather”. Back in medieval Europe, nuns created elegant medallions by twisting paper with gilded edges onto the tip of a bird's feather. When viewed closely, these miniature paper masterpieces created the complete illusion that they were made of thin gold strips. Unfortunately, paper is a short-lived material and little has survived from medieval masterpieces. However, this ancient technique has survived to this day and is very popular in many countries around the world.
Nowadays, paper rolling is widely known and popular as a hobby in Western European countries, especially in England and Germany. But this art became most widespread when it “moved” to the East. The richest traditions of the finest graphics and plastic arts, papermaking and working with it have given the art of paper sculpture a new life. In South Korea, there is an entire Association of Paper Art Lovers, uniting followers of various areas of paper art. In the 15th century it was considered art. At 19 - ladies' entertainment. For most of the 20th century it was forgotten. And only at the end of the last century quilling began to turn into an art again.
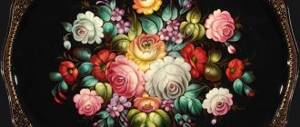
In England, Princess Elizabeth was seriously interested in the art of quilling, and many of her creations are kept in the Victoria and Albert Museum in London. We associate paper with the idea of fragility and fragility. But quilling refutes this statement - you can put, for example, a cup or a heavy book on a filigree volumetric stand, and not a single curl of paper lace will be harmed. You can assemble a candy vase from paper elements and safely use it for its intended purpose - it will not fall apart or break. In general, quilling is an opportunity to see the unusual possibilities of ordinary paper.
It should be noted that the Korean school of quilling (they call it paper rolling) is somewhat different from the European one. European works, as a rule, consist of a small number of parts; they are laconic, reminiscent of mosaics, and decorate postcards and frames. Europe is always in a hurry, so it loves fast technology. Eastern masters create works that resemble masterpieces of jewelry. The finest voluminous lace is woven from hundreds of small details.
Masters of the Eastern school prefer to perform twisting using a thin awl. A replacement can be made from a thick needle and cork. Also, children are good at winding on a toothpick. Paper. The paper must be colored on both sides. Ready-made cut strips of paper can be bought in specialty stores. If this is not possible, then you can cut the strips yourself. The width of the quilling strips is usually 3-7 mm.
We will need multi-colored strips for quilling. You can cut them yourself from double-sided colored paper or buy them in specialized stores already cut. The only thing is, pay attention to the density and thickness of the paper; it should not be dense, but at the same time it should not be thin, so that when curled it can hold its shape and not tear. The usual width of strips is from 3 mm to 1 cm, but strips of 3 and 5 mm are more often used. The length of the strips may vary
Why do quilling?
Quilling can not only please the eye, but also help in development, especially for children. This is a great way to develop fine motor skills, which are inextricably linked with brain activity. Assembling crafts from thin and tiny parts contributes to the development of intelligence, attention, speech and thinking centers.
A child who engages in paper rolling will easily learn the necessary self-care skills, be able to logically construct sentences and draw cause-and-effect relationships. As a rule, parents of preschool children pay attention to fine motor skills: well-developed hand motor skills indicate sufficient preparation for school.
In addition to developing thinking and memory, the art of paper rolling develops creative and artistic abilities, and cultivates an aesthetic perception of reality.
Both boys and girls can do quilling. The main thing is to select topics and techniques that will be interesting and understandable to children. For preschoolers, these can be simple compositions from basic figures, for older children - three-dimensional sculptures and semi-volumetric panels. For complex and large-scale work, it is recommended to organize joint work. This is how children learn to work in a team.
Quilling is an interesting activity that people of all ages enjoy doing, realizing their creative ideas and expressing themselves with the help of rolled paper.
history of quilling presentation on design, manual labor on the topic
Slide 1
Municipal Autonomous Preschool Educational Institution TsRR d/s No. 5 “Romashka” Quilling. Author: Yulia Anatolyevna Abramova, Teacher in Ivanteevka, 2014
Slide 2
History of quilling. The art of paper rolling originated in Europe in the late 14th and early 15th centuries. In medieval Europe, nuns created elegant medallions by twisting paper with gilded edges onto the tip of a bird's feather. When viewed closely, these miniature paper masterpieces created the complete illusion that they were made of thin gold strips. Unfortunately, paper is a short-lived material, and little has survived from medieval masterpieces. However, this ancient technique has survived to this day and is very popular in many countries around the world. Paper rolling quickly spread in Europe, but because paper, especially colored and high-quality paper, was a very expensive material, paper plastic art became an art for ladies from the upper classes. Quilling courses were held in the most elite schools.
Slide 3
Relevance of the problem. The development of fine motor skills of the hands is one of the current problems. This problem can be solved by modeling paper strips - quilling. This is a simple type of needlework that does not require large expenditures and is accessible to everyone. Having become acquainted with the simplest elements of quilling at our master class, you will be able to captivate your children with this, and I assure you that they will really like this activity.
Slide 4
The advantages of quilling as a direction of decorative and applied art: easy-to-learn techniques for working in this technique, developing fine motor skills; greater opportunity for students to express themselves and demonstrate their creative abilities; products using the quilling technique are highly artistic and harmoniously combined in a modern interior; easily made devices for performing elements using the quilling technique (based on a toothpick or plastic tube); relatively cheap and accessible materials (colored office paper and PVA glue).
Slide 5
Purpose of the work: comprehensive intellectual and aesthetic development of children in the process of mastering the elementary techniques of quilling technique, as an artistic method of designing from paper.
Slide 6
Materials and accessories for work: -Double-sided colored paper -Device for twisting paper tapes. This can be a wooden stick 10 cm long and a tapestry needle with a large eye. Insert the tip of the needle into the end of the stick and “bite off” the tip of the eye with pliers so that a gap remains. -PVA glue -Toothpicks (used to apply glue to the workpiece). -Scissors -Tweezers -Cardboard (to create the main background of the picture). -Ruler with round holes of various diameters (officer's). -A board or mat on which to cut, -Any suitable paper with a beautiful texture - for the base. -Metal ruler. -Stationery knife.
Slide 7
Paper The paper must be colored on both sides. You can buy cut paper at a specialty store or cut it yourself. The width of the strips should not usually exceed 3-7 mm. Standard strips are considered to be 27 cm long and 3 mm wide. If it is not possible to purchase specialized paper, then it can be replaced with white printer paper (not too thin) or colored origami paper. White makes excellent workpieces for snowflakes and other winter patterns. The color should be selected according to density and see if it is completely painted, i.e. is there a white stripe on the cut? You can cut with scissors along the markings or with a stationery knife along a metal ruler.
Slide 8
Basic shapes: spiral - wind a narrow strip of paper on a knitting needle, remove it by taking both ends, spread it apart - you get a spiral; tight spiral - twist the ribbon and glue the tip without removing the spiral from the needle so that the ribbon does not unwind; free spiral - twist the ribbon, remove the spiral from the needle and, before gluing the end, let it unwind; drop - make a loose spiral and squeeze it on one side so that it takes the shape of a drop; curved drop - make a drop and bend its corner; eye - make a free spiral and squeeze opposite sides, giving it the shape of an eye: leaf - make a free spiral and squeeze it in the shape of an eye and bend the corners in different directions; rhombus - make an eye and squeeze both corners to give the workpiece a diamond shape; triangle - make a loose spiral and squeeze it in three places to make a triangle. Using these techniques, you can create extraordinary compositions: from a simple flower to the most sophisticated projects.
Slide 9
Basic forms
Slide 10
Weaving technique Take the strip with two fingers. Pull the end of the strip with pressure with two fingers of your other hand, running your nail along it so that the end bends slightly. This is necessary to make the tip easier to wrap around an awl or toothpick. Twist several turns of paper tightly around the awl. When the diameter of the roller becomes 3-4 mm, it can already be removed from the awl and further turned by hand. Twist the thick disk with both hands, always intercepting it with your fingers so that the paper tape does not unravel. Roll up the entire strip of paper. When the paper is all folded, relax your fingers and let the paper spiral unravel a little. Glue the end of the strip with a PVA strip. If you squeeze the workpiece with two fingers, you will get a “drop” workpiece. Workpieces can be given a variety of shapes by performing compressions and indentations. There are 20 basic elements in total, but the principle remains the same: roll and pinch.
Slide 11
My works
Slide 12
Thank you for your attention!