Conducting a class on applique clothing and shoes
For a successful lesson, do not forget to use visual teaching aids, games and motivating techniques. At the end of the lesson, the children’s work should be presented in an exhibition and the results of the lesson should be discussed.
How to motivate guys?
Children are inquisitive by nature, and at the beginning of the lesson it is important to spur this quality, to interest the pupils in the upcoming topic of the lesson. We offer several ways to do this:
- thematic riddles about clothes and shoes: solving such riddles can be completed with the question of what all these items have in common, and lead the children to the topic of the lesson;
- reading a fairy tale about clothes or shoes. For example, “A Tale about how clothes got hurt” or “A Tale for children who don’t like to take care of their shoes” with a discussion of how clothes serve people and how they should be treated;
- viewing pictures of items of clothing and shoes that children need to name correctly.
Riddles for talking with children about wardrobe items:
- He’s not a tie, not a collar, but he’s used to hugging his neck. But not always, but only when it’s cold. (Scarf)
- They gave the brothers a warm house so that the five of them could live. The big brother did not agree and settled separately. (Mittens)
- More riddles for conversation here;
Gallery: pictures of clothing and shoes for conversation
Let the children think of what the mittens could tell the gloves or ask them
Ask the children why they wear a hat in winter (to keep warm)
Ask the children what elements a suit consists of (pants, jacket, shirt, tie)
Tell children about the differences between a jacket and a coat (a coat is made of wool, a jacket is made of fabric)
Invite the children to think of where a girl can go in such a dress (to a holiday, to a carnival)
Ask the children what kind of clothes they usually wear with shoes (dresses, skirts, formal trousers), and what kind of clothes they usually wear with sneakers (tracksuit)
Talk to children about the differences between a T-shirt and a shirt
Let the children answer what a hat protects the head from in the summer (from the sun)
Ask the children the difference between shorts and pants, which one is warmer Invite the children to count how many of them are wearing skirts in class (if there are up to 10 children in skirts in the group), or ask how a skirt differs from trousers and a dress
Table: fragment of the summary of the GCD in the senior group “Miracle Valenki” by N. V. Shumkova
| Target | To enhance children's knowledge about Russian folk winter footwear - felt boots, the history and stages of their production, decorative options. |
| Tasks | Enrich children's knowledge about types of shoes through the use of artistic words; introduce children to the history of traditional Russian shoes - felt boots, their manufacturing technology, and decoration options; consolidate the ability to create a decorative composition based on a model, promote the development of a sense of color |
| Preliminary work | Conversation about wintering birds, drawing tits and bullfinches, learning a poem (1 child). |
| Materials and equipment | Laptop, projector, presentation, snowdrift (white fabric stretched over a frame), paper trails, felt boots, cardboard tree, felt boots templates. On the tables for each child: oilcloth, napkin, felt-tip pen, glue stick, scissors, tray with applique elements (large black rectangle, smaller black rectangle, finished white wing, eye, beak). The teacher has: a basket with ready-made pompoms, wool, illustrations of birds, a ready-made applique on a felt boot template. Audio recording of the poem performed by the author K.I. Chukovsky “Miracle Tree”. For the game: an audio recording of the folk round dance song “Like Thin Ice,” a children’s folk costume for a boy, a horse. |
| Organizational stage (2 minutes) | The children greet the teacher, who invites them to go on a trip to a magical land. But then the teacher notices footprints on the floor and invites the children to follow where they lead. The trail ends at a snowdrift, in which the children find a felt boot. |
| Motivational stage (5–7 minutes) | Listening to K.I. Chukovsky’s poem “The Miracle Tree.” The teacher asks questions: why is the tree called wonderful in the poem? What shoes are worn at different times of the year (spring, summer, autumn, winter)? The teacher asks the children a riddle: Not shoes, not boots, But their feet wear them too, We run in them in the winter, In the morning - to kindergarten, in the afternoon - home! (Felt boots) Next, the pre-prepared child recites a poem about felt boots. |
| Teacher's explanation (5 minutes) | After this, the teacher asks the children what they know about felt boots, and then tells their story: showing a presentation about felt boots, their properties, stages of production, decor options. Valenki is a simple Russian word. From time immemorial they have been an integral part of Russian costume, Russian winter. The felt boots are rustic, but also durable, reliable, and will not let you down in difficult times! Valenki are comfortable and healing shoes. In felt boots we are not afraid of the most severe frosts. Felt boots are soft winter boots made of wool. Felting a felt boot means rolling the wool into a certain shape - the shape of a felt boot. But felt boots are produced only in Russia, and the tradition of this craft is passed on from generation to generation. Felt boots are the only shoes made entirely from natural materials: wool is simply sheared from sheep and processed - felted. And they felted like this: they treated the wool with boiling water, steam, smoke, knocked it into a total mass - felt - and rolled it - first on a table, and then on a block of the required size. Felt boots of different colors were rolled from sheep wool: black, gray and white. Now very often craftsmen decorate felt boots with various appliqués, embroidery, and paint felt boots in different colors. Look how different the felt boots are, how unusual they are... And in addition to the ordinary felt boots that you and I wear, craftsmen make decorative felt boots and souvenir ones. Educator: guys, let's decorate that felt boot that we found, I think the owner of this felt boot will not mind. |
| Surprise moment (2 minutes) | The children notice that the felt boot has disappeared, and in its place a tree has grown in the snowdrift. The teacher pulls the cape off the tree crown. Felt boots (paper templates made of multi-colored cardboard) hang on it. The teacher suggests taking these templates and decorating them with multi-colored applications in the form of birds: tits and bullfinches. |
| Performing the application (15 minutes) | Children go to their work places and sit down. The teacher shows a sample, distributes wool pompoms to the children and tells the sequence of work. Educator: to begin with, let’s draw a twig on our felt boots with a felt-tip pen on which the bird will sit. Will those with a yellow pompom do it? (titmouse), and those with red ones? (bullfinch). To make the base of our bird, we need a black rectangle, we must turn it into an oval, cutting off and rounding all the corners (the teacher shows the process of rounding the corners). Then we coat the resulting oval (base) with glue and glue it onto the felt boot template. From a small rectangle, cutting it diagonally, we get a tail and a wing. At the triangle-wing, we round off two corners to form a droplet. Glue all the missing parts (tail, wing, beak and eye). We glue the finished white piece of a smaller size onto the wing. Apply glue to the belly of the resulting bird and attach a pompom. (You can use cotton wool to stick a snowball on the branches). |
| Summing up (3 minutes) | Children hang the resulting felt boots on a tree and stand in a round dance to the song “Like on thin ice.” |
The resulting felt boots hung on a tree
Gallery: examples of finished works
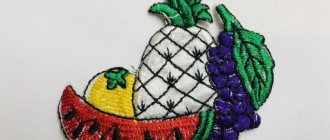
Felt is perfect for appliquéing fabric clothes.
To add volume to dresses, their contours can be filled with woolen threads
Using the symmetrical cutting technique, children can make outlines of dresses, which they can then color on their own using gouache, watercolors or colored pencils.
To introduce children to Russian folk costume, you can applique a kokoshnik
Performing a variety of appliques on shoes based on one pattern can be within the framework of the theme “Shoe Store” or “Shoe Factory”
Using the plasticineography technique, you can not only make decorations for clothes, but also lay out their contours on sheets of cardboard
An excellent decor for winter mittens would be a edging made of cotton wool or synthetic padding for soft toys.
From colored paper folded like an accordion, you can make not only a fluffy skirt, but also a whole dress with sleeves
The contours of the scarf and hat, cut out according to the template, can be filled with chopped woolen threads
Sequins, beads, buttons are best attached with PVA glue
Mittens and decor for them can be made from colored paper, and the cord connecting them from woolen threads
Dresses using the symmetrical cutting technique can be decorated with sequins or confetti
Certain decorative elements of clothing can be made using plasticineography technique
Diagrams and description of the order of application execution
“Holiday outfits” - symmetrical applique
Material: colored paper, braid, sequins, equipment and tools.
Instructions:
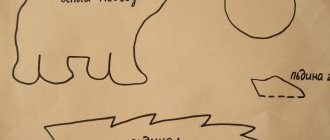
“Dancing Boots” - silhouette appliqué with elements of plastinography (based on a fairy tale by Vladimir Stepanov)
Materials: cardboard, boot template, plasticine, confetti, sequins, scissors, pencil.
Instructions:
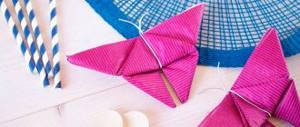
“Summer dress” - symmetrical applique made from napkins
Materials: dress template, colored paper, napkins, equipment and tools.
Instructions:
- Fold a sheet of colored paper in half, draw the silhouette of a dress and cut it out.
Trace the silhouette of the dress and cut it out in a symmetrical way - Fold the napkin like an accordion.
Fold a napkin like an accordion - Fold in half, straighten and glue to the dress. The skirt can be made fuller using the multi-layer method.
Attach the skirt to the dressUnfold the folded napkin
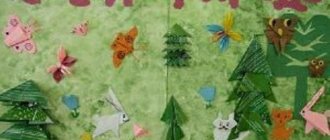
- These are the outfits the children got.
Exhibition of children's works
“Clothing collection” - collective application
Main stages of work:
- Together with their parents, children think through and create the image of a paper doll.
Prepare paper dolls - Creating a set of casual clothes for dolls.
Children come up with models on their own, draw, cut out the silhouette, then paint with pencils, felt-tip pens or paints of their choice. Casual clothing set - You can also suggest cutting out the silhouettes of outfits for dolls using a stencil using a symmetrical method, then decorating them yourself.
Silhouettes cut out according to a template and decorated with paper details - Children will be interested in the idea of organizing sports competitions in Paper Land and the proposal to develop a collection of sportswear for dolls.
Sportswear collection - For a social reception or gala ball, you will need evening dresses and suits.
To make decorative details, napkins or candy wrappers, pieces of fabric, etc. are useful. Evening dresses - A collection in ethnic style will be fashionable and modern.
Children cut out dress silhouettes using a template. Clothes in ethnic style - In the future, based on the created outfits, you can build various role-playing games, for example, “Model House”, “Clothing Store”, etc.
Role-playing game “Doll Fashion Salon”
“Mitten” - applique using quilling technique
Materials: mitten template, corrugated paper, toothbrush, quilling strips, tools and equipment.
Materials for application
Instructions:
- Trace the mitten template onto white paper and cut out the silhouette.
Cut out the silhouette of the mitten - Use the spray technique to tint the silhouette.
Put gouache on a toothbrush, point the bristles down, then use a thin rod (toothpick) to move it along the brush. Tint silhouette - You should get this effect of flying paint droplets.
Toned silhouette - Cut colored corrugated paper into squares (about 2x2 cm).
- Press the trim around the cotton swab.
Press the trim around the cotton swab - Glue the mittens to the silhouette.
Glue the trim to the silhouette of the mitten - Carefully fill the entire lapel area.
Decorate the edge with trims - Using a special quilling tool, twist the roll, loosen it a little and secure the edge.
This will be the main blank, deforming which we will get such shapes as “eye”, “drop” and “semicircle”. Prepare the rolls - A roll in the shape of an “eye” can be obtained by flattening the workpiece on both sides.
Give the main workpiece the shape of an “eye” - To create a drop shape, you only need to squeeze the circle on one side.
Prepare drop-shaped rolls - The shape of a semicircle can be obtained by pressing the workpiece inward with your finger, while sharpening the corners.
Make rolls in the shape of a semicircle - Lay out the basic snowflake shape.
Post a drawing of a snowflake - Add rolls in the shape of a semicircle.
Complete the snowflake with rolls in the shape of a semicircle - The completion of the decorative decoration will be rolls in the shape of drops.
Ready product
“Santa Claus costume” - applique with elements of palm technique
Instructions:
- Trace the silhouettes of children's hands and cut them out.
Up to 25 blanks will be needed, so each child cuts out the silhouette of his or her palm. Cut out blanks in the shape of palms - Laying your palms on top of each other, glue the parts and gradually lay out the fur coat.
Collect a fur coat from your palms - Cut out a circle for the head, glue on the eyes, mouth and nose.
Cut out a circle for the head. glue eyes, nose, mouth - Cut out the hat pieces and glue them together.
Make a beard and hair from the palms. Glue the hat and beard - Connect the head and fur coat.
Connect the head and fur coat - Cut out mittens, felt boots and glue them too.
Finished work
“Summer clothes” - applique made of fabric and paper
Materials: templates for T-shirts, shorts and sundresses, pieces of fabric, colored paper, tools and equipment.
Instructions:
Print pictures of a boy and a girl. Transfer the outlines of clothing templates onto paper and fabric, cut out and “dress” images of children on the printout. Color the girl and boy and the background with pencils.