This is not just a horse, it is a horse with moving parts, a twitching horse. You pull a thread, and it seems to run, raise its legs high and lift its fluffy tail. Making such a craft is included in the Perspective program, a technology notebook for grade 2. But not every second grade student will figure out without detailed instructions how to make such a craft, where to thread the threads so that the horse runs. Now we’ll figure it all out: what to cut from and how to cut it, how to fasten it, how to give the horse movement. At the end of the instructions there is a detailed video on how to correctly connect the moving parts of the figure.
How to make a horse out of cardboard
We cut out the template from a notebook using technology. If you are not making a horse for a lesson, you can print and cut out this template:
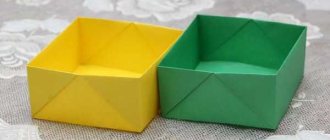
When the template details are cut out, we transfer them to colored cardboard. To make it more accurate, we will trace from the inside out. We make the body and legs of the horse from brown cardboard, and the tail from yellow cardboard.
We cut out the details along the contour. On colored paper we draw a separate template for the horse’s mane and hooves and cut it out too.
Glue the mane to the head and the hooves to the legs using glue.
Now you need to attach the moving parts - legs and tail - to the body. Please note that the template is marked with crosses and dots. We mark them on the reverse side of our parts. Use an awl or needle to make holes in the center of the crosses and dots. Crosses both on the body and on moving parts. We will need to connect them so that the crosses on the body and parts match, and we will do this as follows:
Take a needle and thread and tie a large knot at the end of the thread. We see a cross under the horse’s chest (the horse is turned to us with its colored side). We stick a needle and thread into it. We put the front legs on the same needle, also hitting the middle of the cross. Pull the thread until the knot touches the cross.
We turn the horse inside out towards us and stick the needle into a point on the leg. There is no need to insert a needle into the body in this place, the point is only on the parts of the legs. We thread the needle and thread all the way through this point, then remove the needle from the thread and leave the thread hanging. Don’t cut it, we need it, we will pull on it to make the horse move.
Similarly, we attach the second pair of legs and tail. We lower the threads down, connect them to each other and tie a knot at the bottom. From the inside out, a correctly fastened craft will look like this:
We pull the strings, and the horse seems to run, raising its legs high and lifting up its wonderful tail 
Paper bird of happiness
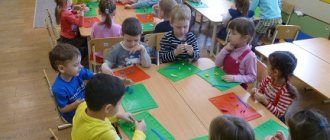
Children have a natural desire to learn new and unknown things, and you can start with your native culture. For example, try making a paper toy in the shape of a bird, which is so similar to a wooden carved figurine. For example, like in this video:
Another option was sent by Anastasia Batina.
And this bird is not an ordinary one, it will become the guardian of prosperity and bring happiness on its wings to your home! It will be a good gift for any spring holiday: Maslenitsa, March 8, Easter, and if you make a dove this way, then on May 9. Our master class will tell you in detail how to make this wonderful bird, are you ready?
Materials and tools
To create a figurine of the bird of happiness, prepare the tools and materials:
- thick double-sided paper in light shades (yellow, green, pink, beige);
- paper for decoration (patterned);
- multi-colored rhinestones or sparkles;
- thread, braid, ribbon or rope;
- a simple pencil;
- black marker;
- scissors and glue.
How to make a carved figurine of a bird of happiness from paper
Take thick paper or thin cardboard as a basis. To decorate, use decorative paper or print the pattern using a printer. Prepare other materials and tools for ease of work.
Fold the base paper in half. Draw the silhouette of the bird on the sheet so that the fold is captured and the figure has a connection point at the loop.
From half an A4 sheet, make an accordion lengthwise.
Draw a curly pattern on one side of the paper accordion.
Carefully cut out the pattern on one side of the accordion, fold it in half and duplicate the pattern on the other side. Cut out the pattern again and spread the resulting openwork wings.
On decorative paper, draw the head and tail of the bird, tracing the figure. Make curly cuts on the tail, and cut off the corners along the edge of the head.
Glue the decorative parts onto the main figure.
Make cutouts for the wings and for the future loop.
Glue circles of paper under the eyes, and stick rhinestones on top.
Using a black marker, draw a beak and a random pattern on the eyes, neck, tail and eyelet.
Insert the long openwork wings into the prepared slot.
Decorate the edges of the bird's wings and neck with rhinestones or sparkles. Thread a beautiful rope and make a loop for the figurine.
Move the sides of the figure apart so that the bird holds its shape. Spread your wings.
Fold the edges of the wings down, spreading them out like a fan.
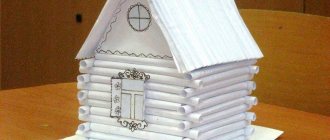
The wonderful carved bird of happiness is ready!
Our bird, although not wooden, is very similar to the work of masters from the past. The patterns and decorations for the figurine will be different in each case and each bird will be one of a kind. But the most important thing is that the bird was made by hand and therefore all the positive feelings and emotions, imagination and childish delight are put into it! This means that such an unusual figurine will be a wonderful gift or home decoration.
Another interesting option:
Video on how to make a twitch horse
If you wish, you can decorate the horse by gluing sparkles and stars on it. The twitch horse is ready. Let's go get an A!
Such a cute horse can be made not only for a technology lesson, but also just so that you can have an interesting and useful time and please your parents or younger brothers and sisters with your craft. And if you get creative, you can come up with a whole sea of different twitching animals, drawing instead of a horse’s head, for example, a dog or cat’s face and changing the tail.
Fabric bird
We have a Master Class on our website on how to make a bird out of fabric
Traditional folk birds were made to summon spring, and of course, from natural materials in bright colors. They were used to decorate the spring Joy Bird doll.
Nowadays, many beautiful synthetic materials have appeared, like organza, and crafts are also made from them:
Another master class for lovers of interior aromatic toys - coffee shop:
How and from what do you make a bird of happiness?
Send your photos and master classes, we will be happy to publish them! In order not to forget the page address and share with friends, add it to your social network:
More interesting:
See also:
Lamp from a can
My friend Oksana sent me a photo of another lamp made from a glass coffee can...
How to make a pincushion
Do-it-yourself embroidered pincushion I bring to your attention another master class by Oksana Dubrovskaya...
Super applications: paper flower bouquets. 4 master classes
New master classes on making panels (applique) - bouquets of colored paper for our bank...
Knitted case for flash drive “Owl”
If your flash drive body is worn out or the cap is lost, you can update it using a simple...
Elegant DIY throne pincushion
A new master class: a do-it-yourself pincushion continues the theme of these useful gizmos for needlewomen. On the …
Photo frame “Heart” with nylon dolls
Work for the competition "Handmade photo frame for Valentine's Day." Author: Boyarkina Lyudmila Yuryev...
Knitted bookmark “Dog”
One of the most effective “antidepressants” is undoubtedly reading. How nice it is after hard...
Panel “Golden Tree”
Work for the "Autumn Inspiration" competition. Author: Anna Fedorovna Timofeeva, additional education teacher…
How to make a candlestick from a glass with a paper lampshade
Candlesticks made from glasses Lamps have always brought some kind of romance and comfort to the house. Muffled light…
Maslenitsa doll
In 2020, Maslenitsa is from March 4 to 10, and it’s time to prepare for the national holiday. Maslen doll...
Decoupage cutting board
We continue to equip and decorate our kitchens using the decoupage technique. After a glass jar and with…
Glass jar piggy bank
In the kitchen, every housewife has a lot of different utensils, purchased independently or donated: dishes,…
Tags: March 8, Maslenitsa, Crafts for home
Discussion: 6 comments
- Antonina Ivanovna:
March 10, 2020 at 09:25 pmWhat beautiful birds! I really want spring already. You have to do it yourself so that the living ones arrive faster