Bright and nimble waterfowl attract all children, so they will definitely love the voluminous applique “Fish in the Aquarium”. But the fish themselves in this work are quite complex. Therefore, if children are small, it is better to make simple multi-colored fish in a flat form. You also don’t need to make a very small aquarium, since making small fish using this technique is quite problematic, especially for children.
How to make an aquarium out of paper?
Draw a round aquarium on a white piece of cardboard and cut it out. Don't make it very small, because small voluminous fish are very difficult to make.
Place the aquarium on the blue paper and circle it. And then draw a parallel inner line next to it, since the water should follow the contour of the aquarium, but be slightly smaller. Draw a wavy line at the top. Cut out the water.
Fill the aquarium with it, that is, glue the blue paper to the white cardboard blank.
What would an aquarium be without algae? Cut simple wavy stems from green paper. Also cut out circles of different sizes from white paper, which will be air bubbles.
Glue the parts, now the aquarium is completely ready to receive its inhabitants. At this stage, kids can cut out very simple fish, but older children can be advised to make voluminous fish.
Application using the “Goldfish” template (Master class)
Applique is a very useful activity for children. They learn to use glue and scissors, practice accuracy, imagine by combining colors in a picture, develop hand motor skills and abstract thinking. Working with bright colors and creating images from small details is also good fun for children over 4 years old.
To create an application you will need:
- cardboard;
- colored paper;
- scissors;
- glue.
Creating an application using a template includes several stages:
1. Take one of the simple fish stencils and outline the details, prepare cardboard templates for the child.
Fish pattern details
2. Find thick cardboard for the background and several sheets of colored paper. First, outline the body of the fish, cut it out and glue it to the cardboard. Make the tail and fins the same color, carefully glue them next to each other.
Glue the body and tail
3. Make the scales - this is the most interesting part of creating a goldfish. Trace the prepared template, and on it with a simple pencil, draw several scales, placing them evenly over the part.
Drawing scales for cutting
4. After cutting out the scales, bend them at a right angle. Apply glue to the part and glue it on top of the fish. The scale will add volume to the future craft and a touch of originality. Unusual crafts are a guarantee that your child will be interested in working with you.
Glue the fins and the part with the scales
5. Of course, a fish needs an eye. After cutting out a circle from white paper, place it proportionally on the heroine of the applique. Make a pupil out of black paper in the same way. Next is a matter of taste and flight of fancy.
Glue the eye
6. Decorate the background. You can also cut out seaweed or stones from colored paper.
Glue the details in the form of algae and stones
The goldfish is ready. This is how easy it is to make a little sea creature from colored paper. Your child will definitely enjoy working with bright sheets of paper, and the templates for the golden sea lady will simplify his work.
Related article: Stencil decorations for weddings: design, painting, etc..
DIY fish applications (2 videos)
Fish templates and ideas for applique (42 photos)
The best posts
- Wall decoupage technique: stages of implementation and application in different rooms
- DIY room decoration: 5 simple super decors!
- Beautiful ornament on the wall: tips for applying the image
- Decoupage technique on fabric using PVA glue (master class)
- Decoupage of interior items in shabby chic style: technique
- Bright design of bottles and glasses for a wedding
- How and with what to decorate the walls with your own hands: 7 decor options
- Give me a heart: souvenirs and gifts in the form of hearts
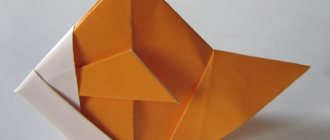
How to make a voluminous fish out of paper?
You will need a small square of paper. Its size depends on the size of the aquarium. Place your square in the created aquarium, does it look normal, does it not take up the entire area of the aquarium, will two more fish fit in there, or at least one more? If the answer is yes, we continue making fish.
Fold the square in half, corner to corner, to form a triangle.
And then cut first a semicircular and then a straight line, but not from the fold side. You can even make this shape even thinner, so the fish will be even better, with a longer tail and thinner.
Unfold the doubled paper.
Where there is a sharper angle, make cuts, not reaching the edge by about a third. You should get 6 thin strips.
Arm yourself with a glue stick and start stacking the strips one on top of the other, securing them with glue. First, connect two strips and glue them at the intersection, then two more, and the last two should meet on top. As you work, try not to lose sight of the tail; when crossed in the correct direction, it should be a fluffy bunch, and not just a layer.
At the last stage of creating a three-dimensional fish, draw one eye with a felt-tip pen and add strokes to the tail.
The green fish was an example, and for the aquarium I made three bright fish - pink, yellow and red.
It's time to place the fish in the aquarium by gluing them in the tail area. This is how a cute applique of a fish in an aquarium turned out.
If desired, you can glue a strip of white cardboard to the back so that the aquarium is, as it should be, in a vertical position.
Application “Aquarium with fish”
This application is as simple as possible, so it is suitable for classes in both senior and middle groups. Before making blanks, you should select all the necessary materials.
Here you will need:
- colored double-sided paper;
- glue;
- gouache yellow and blue;
- sponge;
- scissors;
- ready-made eyes (sold in craft stores).
First, prepare the background for your aquarium. For this application, the best option would be yellow sand and blue water. Using a sponge, apply gouache evenly onto a white sheet of paper. In the older group, this process can easily be entrusted to children. But the middle group will not do without the help of adults. Prepare elements for the future application. Of course, you can’t do without colorful fish. They can be printed and cut out using a ready-made template. To create a beautiful composition in the aquarium itself, also make corals from brown paper. An excellent addition to the picture will be algae and sea pebbles of different shades. All that remains is to distribute the finished parts throughout your aquarium. Glue the fish evenly around the entire perimeter to make the design bright. Thanks to this step-by-step tutorial, you can make such an unusual aquarium with your older group. Of course, children should like this sea-themed craft. These colorful fish can decorate a group at any time of the year. They will please the eye and create a creative atmosphere around.
Fabric goldfish
When talking about appliqués, ideas about various materials always come to mind. Various forms and techniques are used here. This is why older children love this type of needlework so much. They especially like crafts made from fabric. Although preparing for such an application can take a lot of time, it is worth it. Having ready-made stencils, you can get the job done quickly and efficiently.
If you decide to entrust a child of an older group to do this application himself, you need to give him step-by-step instructions and constantly monitor his actions. First you need to cut out the background that will serve as an aquarium for the fish. The deep blue “pocket” shape looks beautiful. Make a contour along the segment along which the child can cut out the aquarium.
Now you can start working on the fish itself. Since it is gold, it is better to make it from fabric in yellow and orange shades. Find a ready-made pattern or create your own stencil according to which your child will cut out the fish. You can also complement the work with sea pebbles of different colors. Glue all the elements to the aquarium.
This is the kind of bright appliqué with a goldfish made of fabric that the kids in the older group will get. It can be used as decoration and even sewn onto some item of clothing or bag, for example.
