Corrugated paper
Corrugated paper is more suitable for creating voluminous appliqués. It is initially a little convex, and if you use this quality correctly, you can do interesting things.
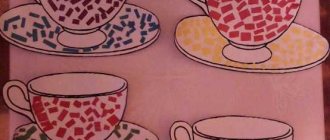
Cornflowers
- Prepare the base for the applique. This can be cardboard or thick colored paper that is not saturated with glue.
- We apply the outlines of the drawing to the base in advance.
- From blue corrugated paper (you can take paper of any shade), cut out small squares measuring 1 sq. cm.
- Place a pencil in the center of each square and roll it slightly so that the squares take on a three-dimensional appearance.
- Without removing the pencil, apply glue to the end of the square and glue it.
- Fill the entire drawing with such squares.
This technique of applique from corrugated paper is called “trimming”. The good thing about it is that the flaws are almost invisible. It is simple enough that even kids can do it.
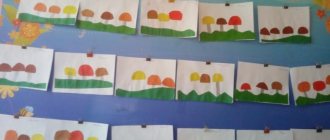
Hedgehogs
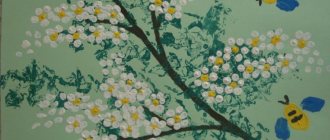
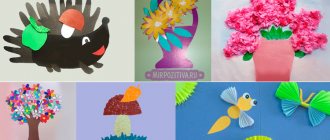
These voluminous appliqués made from colored corrugated paper are simple, but look simply wonderful.
- Prepare the base. It could be a candy box, colored paper, a postcard, etc.
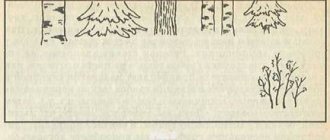
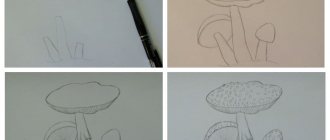
- Fold a sheet of corrugated paper 4 or 5 times.
- Draw 2 circles. To make them even, you can use a compass, cup or glass.
- Cut out the circles. One hedgehog requires 10-15 circles.
- Glue the circles together, applying glue only in the center. The edges should remain free.
- Make frequent cuts and fluff out the ends.
- Cut out a triangular hedgehog muzzle from cardboard and glue it to the body.
- Place the hedgehogs on the base.
- Eyes, mouth and nose can be drawn with a black felt-tip pen or cut out of black paper and glued.
- In the same way, you can make flowers and grass for a clearing from corrugated paper by folding the paper and making cuts on it.
Here's what kind of hedgehogs you can get.
How to make a 3D postcard from paper?
Applications from ordinary colored or corrugated paper can be made at home, in a kindergarten or an aesthetic center. They are extremely useful for kids, as they develop a sense of color shades, artistic taste, spatial thinking and a sense of composition. Cutting and gluing will have a beneficial effect on children's fine motor skills and speech development.
3D postcards always have a big advantage over regular ones. They look original and interesting. And if a child makes a voluminous card with flowers for his mother with his own hands, then both of them will be delighted. We have already done, which you can do for your household’s birthday and not only, as well. Let's add one more card to the postcard section, when you open it a beautiful vase of flowers pops up. The postcard is absolutely not complicated, it is easy and interesting to make.
Summary of a lesson on application in the senior group “Gift for Mom”
Educational: be able to cut out objects of symmetrical shapes folded in half from paper.
Improve children's skills in working with colored paper.
Developmental: develop a sense of shape and color, develop the ability to navigate on a sheet of paper;
Develop attention, imagination, memory, thinking; fine motor skills.
Educational: cultivate interest in the application, cultivate a desire to work and achieve the intended goal.
Cultivate aesthetic taste. Develop the ability to work in a team. Cultivate a love for nature. Cultivate compassion and kindness.
Summary of a lesson on appliqué in the senior group “Vase with flowers”
Irina Morozova
Summary of a lesson on appliqué in the senior group “Vase with flowers”
Summary of a lesson on appliqué in the senior group “ Vase with flowers ”
Type of lesson : subject application with drawing elements.
Type of lesson : by presentation.
Material: a sheet colored cardboard for each child, rectangles of colored paper folded in half with a drawn outline of half a vase size. 12x10 cm, squares of colored paper folded in half with a drawn outline of half a tulip flower size . 5x5 cm, green paper rectangles size . 2.5x8cm. Forms are given individually to everyone on a tray, brushes, green markers , oilcloth, glue in a socket, cloth napkins, scissors in a stand.
Equipment: easel, stereo, TV.
Demonstration material: slides with images of flowers in a vase .
Purpose of the lesson :
Be able to make an applique from colored paper “ Vase with flowers ”
.
Know how to use scissors correctly.
Be able to correctly draw glue onto a brush from a socket, and remove excess on the edge of the socket.
Be able to spread the mold from the middle to the edges on the white side of the paper.
Be able to turn the spread pan over, holding it on both sides with the fingers of both hands.
When removing excess glue, be able to press the napkin tightly, rather than stroking it.
Educational: be able to cut out objects of symmetrical shapes folded in half from paper.
Improve children's skills in working with colored paper .
Developmental: develop a sense of shape and color , develop the ability to navigate on a sheet of paper;
Develop attention, imagination, memory, thinking; fine motor skills.
Educational: cultivate interest in the application , cultivate the desire to work and achieve the intended goal.
Cultivate aesthetic taste. Develop the ability to work in a team. Cultivate a love for nature. Cultivate compassion and kindness.
Preliminary work: in the afternoon the day before, examining postcards, illustrations of flowers , vases, flowers in a vase . Conversation on the topic “Spring and flowering plants ”
.
Reading poems about flowers and spring . Selection of paper colors for applique .
Organization of the lesson :
Tables and chairs are positioned so that the light from the window falls from the left side.
The easel stands at a distance (1-2)
m from children's tables.
The teacher's desk is in front of the easel. On the table is a tray with larger shapes for displaying cutting, cardboard larger than for children, scissors in a stand.