Decoupage technique in kindergarten
The main classes in visual arts are aimed at developing the aesthetic taste and creative abilities of kindergarten students. In the process of learning, from early preschool age, children are engaged in modeling, drawing, design, and plasticineography. Involving new techniques in the visual activities of pupils serves to activate cognitive skills and imagination, improve fine motor skills of both hands, and confident use of tools (brushes, sponges, scissors).
Classes on creating crafts using the decoupage technique in kindergarten are conducted with students who confidently use brushes, are good at cutting out elements from paper, and are familiar with the main techniques of painting with paints (smears, pokes, spray). It is recommended to introduce the basics of decoupage to children 5–6 years old (senior group) and to expand the creative potential of children 6–7 years old (preparatory group). Making crafts using decoupage requires students to be very attentive and persevering; sometimes working with paper elements turns out to be tedious, so the teacher must choose images that the children will not have difficulty with. Since classes with preschoolers have a time limit (for older groups - 25–30 minutes), the teacher must think through the stages of work so that the children have time to complete what they started and receive positive emotions from the work done. It is allowed to prime the workpieces in advance (at the request of the students in the second half of the day outside of class), dry the paints and glued elements with a hairdryer (the teacher dries them!), and varnish the crafts by the teacher after class.
Types and techniques of decoupage
Students should begin mastering the decoupage technique by learning how to implant a paper picture onto the surface to be decorated.
Techniques required to study and use:
Primer - creating a light (usually white) background on the surface of an object. You can use a special acrylic primer; it is easy to apply and dries quickly. As a cheaper option, you can use white light gouache diluted in a 1:1 ratio with PVA glue. Apply the primer using a flat brush or sponge/sponge.
Cutting out or tearing out a picture is a technique that gave its name to the decoupage technique (from the French verb “decouper” - to cut). The plot chosen for application to the surface of the object, depending on the design, must be cut close or directly along the contour. For a more organic implantation of the image, pictures with uneven edges are used, carefully torn from a sheet of paper or napkin with your fingertips.
Gluing pictures should be done with preschoolers in two stages. First, the paper element is placed on a dry, primed surface and fixed with a brush and water. It is important to teach the correct movements - move a wet brush from the center of the picture to the edges, expelling, if necessary, air bubbles formed under the paper. When the picture has completely adhered to the surface, apply special decoupage glue on top (an economical option is PVA glue diluted with water 1:1). At this stage of decorating, students should pay attention to the significant difference between decoupage and appliqué: the paper element is glued by fixing it from above.
Implanting a paper element is painting or aligning the boundaries of a picture on the surface of an object. Since crafts using the decoupage technique are imitation of objects with an original image or pattern, the implantation process is key; the boundaries of the cut out element must be made as invisible as possible.
Varnishing the finished product is a mandatory stage of decoration. The finishing varnish prevents accidental peeling of the glued image and gives the work a completed and attractive look. We'll talk more about varnishes below.
There are two main types of decoupage - direct and reverse. Their difference lies in the place where the paper image is attached (on the outside or back of the object) and is based on the variability of the surfaces being decorated (wood, cardboard, transparent plastic, glass).
Direct decoupage
With direct decoupage, the cut-out picture is glued to the outside of the object. For example, according to the plan, the element will be placed on the lid of a box, on the cover of a notebook or a clay pot. Classes in the circle program begin with mastering direct decoupage; students learn basic techniques.
Examples of work (direct decoupage) - photo gallery
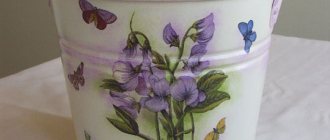
An example of implanting pictures using direct decoupage
Images of flowers are implanted by direct decoupage onto the surface of the object. The cover is decorated using a paper napkin.
Reverse decoupage
This type of decoupage is a little more difficult to master because you have to work on the back surface of the object. Students improve previously learned techniques and observe how the background is created around the implanted image, looking at it from the outside. For reverse decoupage, transparent objects are used: glass or transparent plastic plates, wide vases or cups.
Examples of work (reverse decoupage) - photo gallery
The reverse side of the items is decorated with cut-out elements and glitter paints
Simple reverse decoupage (without creating a background) on a glass surface
An example of creating reverse decoupage on plastic blanks
Aging
When students have sufficiently mastered the skills of priming and implanting an image, they can move on to mastering the most interesting method of decoupage - aging. Initially, products using the decoupage technique were created by craftsmen as imitations of expensive and antique interior items. To visually feel the touch of time, cracks and grout are created on the surface to be decorated using artistic techniques.
To create cracks , craquelure varnishes are used (from the French word “craquelure” - crack), which cannot be replaced with another product. Such varnishes are one-step and involve painting the surface in two stages: applying background paint, varnishing, and applying paint of a different color. As the top layer dries, cracks appear in the same color as the background. Two-step craquelure is applied to the background paint. When it is completely dry, a network of cracks is visible on the transparent surface; they need to be revealed: a small amount of oil paint is applied to a piece of soft cloth or sponge, which must be rubbed into the cracks that have formed.
To simulate grout, two layers of paint must be applied. The bottom layer, as a rule, is made dark (black, brown). Places of intended grouting are treated with a wax candle. Then you need soap foam: it is obtained by whipping a piece of laundry soap with a wet brush. The foam is placed on the wax. The surface is painted over with paint of a different color; when it dries, you need to go over the grout areas with sandpaper - the background color will become visible.
Patination is also used to age objects - darkening some areas of the surface. Bitumen paint is applied with a soft cloth.
Examples of work (aging) - photo gallery
An example of one-shell craquelure
The product is aged with two-step craquelure and complemented by patination on the edges
Dark grout is used on the edges of the product
This work combines two aging methods - grouting and patination.
Materials and tools for decoupage in kindergarten
At the moment, the shelves of craft stores are replete with materials and tools for working with the decoupage technique. We will talk about what is really necessary, what materials can be an interesting help in decorating, and what can be completely replaced with a cheap and accessible help for everyone.
- Pictures and patterns . The simplest option is three-layer paper napkins with a pattern, which you can buy at a hardware store. The top colored layer is used for decoration. However, it should be taken into account that preschoolers may have difficulties using this material: the napkin is very thin, it breaks easily during gluing, and many air bubbles form under it. Rice paper is more convenient to use for beginners ; it is durable, but at the same time absorbs water and glue well. Such paper is sold both with a pattern already applied, ready for cutting, and without a pattern, on which images can be printed using a printer according to your design. Decoupage cards are an expensive material, but they are more difficult to implant; you need to learn how to pre-thin the picture. And although you can make a decoupage card yourself (by covering an art card with several layers of varnish), the use of this material in classes with preschoolers is not recommended, since it requires sufficient experience in decoupage. Students should be given different images and scenes to choose from at each lesson. The theme of napkins and sheets of rice paper suits the tastes of both girls (flower arrangements, fairies and princesses, etc.) and boys (ships, cars, trains, planes, postage stamps).
Examples of paper pictures - photo gallery
Packages of such napkins are sold in hardware stores.
Thematic sets of three-layer napkins can be purchased at a craft store
Designed paper ready to cut and glue
White paper is intended for printing patterns and pictures on a printer.
A thematic set of cards can be used in a group lesson
- Brushes for decoupage must be purchased synthetic. Preferably flat, they apply paint quickly and evenly. Fan brushes are convenient at the stage of gluing a picture, but a beginner can learn to work without them. It is highly not recommended to use bristle brushes, as fallen hairs can stick unnoticed and subsequently spoil the appearance of the surface of the craft.
- Sponges are used to mask the edges of the picture; paint is applied with pokes. The layer turns out textured. Using a sponge, transitions from one shade to another are created. Special sponges can be replaced with pieces of a household sponge.
Examples of brushes and sponges for decoupage - photo gallery
A must-have tool in decoupage
Used to draw individual elements on the surface to be decorated
Helps easily fix the picture on the surface
Needed to create texture on a painted surface
Ideally replaces special sponges
- glue is used, diluted with water. There is no significant difference - they are applied and absorbed the same way. There are ready-made adhesives designed for decoupage on leather and fabric by experienced craftsmen.
- paints ; for beginners doing decoupage - without any effects. You can paint with gouache mixed with PVA, but such a mixture does not apply as smoothly as acrylic paint and takes longer to dry. As experience is gained, acrylic paints with additional effects are used: glossy, pearlescent, metallic.
Paints used in decoupage - photo gallery
The best option for decorating paints using decoupage technique
Acrylic paints with additional gloss effect, glass shine
Acrylic paints with an additional pearl effect
Acrylic paints with an additional metallic shine effect
This mixture can replace acrylic paint
- Finishing varnish is a mandatory material; the finished work must be covered with one or two layers. You can use acrylic varnishes - matte or glossy. They are easy to apply, practically odorless, dry quickly and are hypoallergenic. You can coat crafts with furniture varnish , but you should remember that it has a pungent odor (perhaps the teacher should coat the items with it after classes in a ventilated room) and a yellowish tint (this will be noticeable on an initially white surface). It is not allowed to use PVA glue instead of finishing varnish, since it is based on latex. The PVA coated product will be sticky.
Varnishes used in decoupage - photo gallery
As a rule, acrylic varnishes are used in decoupage - matte or glossy. Easy-to-use varnish option
Can be used for varnishing crafts
- Materials for creating additional effects include craquelure varnishes, patinas of various shades, oil paint for showing cracks, wax, soap and wax candle for grouting, contour paints to give emphasis to individual elements of the pattern, paints for marbling (imitation of a marble surface).
Additional materials in decoupage - photo gallery
Craquelure varnishes are necessary to create cracks. Such paints create an imitation of a marble pattern on the surface of an object. They are used to decorate a decorated surface.
Using bitumen patina, an aging effect is achieved
With the help of such a patina, you can create an imitation of a metal product, giving the item a bronze, gold or silver shine
Needed to create three-dimensional elements or simulate drops on a paper image
- Blanks for decoration using the decoupage technique are suitable from various materials: wood, glass, plastic, metal, thick cardboard, papier-mâché. Beginners are recommended to practice techniques on flat objects with a small area for decoration. Purchasing blanks from specialized stores is not necessary to organize the productive activities of a decoupage circle. Waste material , is of greater interest in the work and more actively encourages creativity : baby food jars and bottles, notepads with plastic or hard cardboard covers, disposable plates, food trays, plastic candy boxes, metal cans from -for tea or cookies, old photo frames and Christmas tree toys, etc.
Options for blanks for decoupage - photo gallery
Ready-made blanks for decoration
Unusual material
An example of using waste material as a blank for decoration
Ready-made plastic blanks for decoration (suitable for reverse decoupage) Burnt out light bulbs are found in every home
You can ask parents in advance to collect materials suitable for decoration
You can make a wonderful box out of a box
Decoupage for beginners from napkins: master class
The smooth ceramic surface of the plate is what beginner decoupage artists need. It is still not recommended to eat from such a plate, but as a decorative item it is incomparable. You will need to stock up:
1. Actually, with a plate 2. Alcohol napkin 3. Napkin for decoupage 4. Stationery file 5. Spray bottle with water 6. Glue 7. Acrylic varnish 8. Acrylic paints 9. Brush 10. Roller
Decorative plate made using decoupage method
Let's get started:
- First of all, take alcohol wipes - they will perfectly degrease the plate. After it has dried thoroughly, you need to apply PVA to the entire surface. And leave it to dry again
- Now it's time to start making decoupage napkins. You need to carefully separate the first layer with the pattern from it.
IMPORTANT: Many beginners mistakenly believe that the drawing should look up after applying the napkin to the surface. In fact, it is applied with the front part precisely to the surface.
- Place the layer on the file so that it does not tear. Then spray it all with water from a spray bottle.
- That's all - the file can be applied to the surface of the plate
- Next, the roller smoothes it in the direction from the center to the edges. This must be done, otherwise excess moisture and air will interfere with the normal attachment of the image. However, you can do without a roller - a flat brush will serve as a good alternative
- Now the file is removed, and the remaining moisture is removed with an ordinary napkin. You can coat it with varnish or paint, glue three-dimensional elements from colored napkins
Decoupage from napkins can be supplemented with lace glued to the edges
Decoupage from napkins can be complemented with golden paint
Decoupage plates in Victorian style
Topics for decoupage classes in kindergarten
An inexhaustible wealth of subjects and artistic motifs is presented on napkins and rice paper. Based on the tastes of the pupils (they love animals, walks, fairy tales), upcoming holidays on the calendar (New Year, March 8, February 23), current events in kindergarten (preparation for the Autumn Festival, Cosmonautics Week, farewell to Maslenitsa), the teacher selects thematic activities for mug. For example, in the lesson “Notebook Cover,” students can be asked to choose their favorite drawing from the available pictures: an image of an animal, a fairy-tale character, or a cartoon character. On the eve of the New Year, plastic balls are decorated. On the eve of Women’s Day, the guys are given a lesson “Vase for mom on March 8”, and before Defender of the Fatherland Day - “Diary/notebook for dad on February 23”. During Maslenitsa and Easter weeks, decoupage classes are aimed at decorating items that will decorate the festive table (at home or in a group for tea): “Dish for Easter eggs”, “Tray for Easter cake/Easter”, “Plate for pancakes”.
Lesson “Vase for Mom on March 8” - photo gallery
Preparation of materials and tools (rice paper, jar, scissors, PVA glue, paint, varnish, piece of sponge, string, water, brush)
Primer with white paint the area where the design will be glued
Painting the surface with a brush
Drying the background
Cutting the design close to the outline
Fixing the drawing with a wet brush
Gluing the pattern Drying the surface
Adding texture to the surface using a piece of sponge and paint
Varnishing
Decorating a product with a textile element
The gift for mom is ready
Lesson “Notebook for Dad for the New Year”
Organizing time
Priming the notebook cover
Cutting out a picture from rice paper
Fixation with a wet brush
Gluing
Painting the cover with a sponge with the first color
Coloring the cover with a second color
Spot application of glue
Gluing thin sequins to the cover
Varnishing with acrylic finishing spray
Notepad is ready
The topics of the circle's activities may be consonant with the topics that students are currently studying as part of the main programs for visual and cognitive activities. For example, at the beginning of the school year, the teacher had a conversation with the children about migratory birds and those remaining for the winter. The children studied their types and features and noticed them during walks. During creative classes, we sculpted bird figures from plasticine and drew pictures on this topic. To stimulate interaction between parents and children and support creative activity during extracurricular hours, the teacher could be given the task of making a feeder for birds wintering in the city. If you are given the task of making a feeder without applying paint to it, then in the future the children will be able to decorate it using the decoupage technique.
Lesson “Imitation of mosaic on a plate” (continuation of the theme of trends in art) - photo gallery
Materials and tools
Creating a Light Background
Drying a two-layer background
Eggshell breaks
Glue is evenly distributed in the middle of the plate
The shell is glued to the plate. Cutting out the picture from the paper. The plate is left to dry. The picture is applied to the dry surface.
The picture is fixed with a wet brush
Eggshells appear through the paper, creating a mosaic effect
Gluing the picture with PVA diluted in water
Use a piece of sponge to paint over the borders of the picture.
Drying the plate
A border is drawn with a piece of sponge
Matt varnish varnish
The plate is ready
The relationship between the classes of the main and additional programs is successfully created while studying the features of folk crafts: Dymkovo, Filimonov, Kargopol toys, Gzhel, Palekh, Zhostovo paintings. Folk painting patterns can be easily found on napkins and rice paper for decoupage. Children can decorate plates, cutting boards, doll furniture and dishes with these patterns. A lesson on the topic “Decorative Plate” may involve each student independently choosing an ornament. Depending on the style in which the chosen picture is made, the child must choose the colors of paint suitable for the design: Khokhloma - black, red, yellow or gold; Gzhel - white, blue, dark blue; Zhostovo style - green, pink, red, yellow, etc.
Lesson “Gzhel plate” (continuation of the theme of folk crafts) - photo gallery
Preparation of tools and materials (plastic plate, brush, scissors, PVA glue, napkins)
Cutting out the desired elements from paper napkins
Attaching pictures to the workpiece
Using a wet brush, the pictures are fixed on the surface of the workpiece. Gluing paper scenes.
Make sure there are no wrinkles or air bubbles remaining.
Gzhel style plate is ready
Exhibition of works based on folk crafts
For group project activities, topics designed for several classes are offered. The children are engaged in decorating one large object together, having previously distributed responsibilities among themselves, or the students are given some objects to decorate, which will later be compiled into a single composition. Classes on the topic “Table for our crafts” and “Doll closet” implement the first version of the project activity. Projects based on a composition include the themes “New Year’s toys and balls for our Christmas tree,” “Doll service,” “The Blue of Russia” (an exhibition of crafts based on Gzhel painting), and “Easter eggs.”
An example of collective activity in the lesson “Vase using decoupage technique” - photo gallery
Preparation of tools and materials (vase for decoration, brushes, PVA glue, water, napkins, paints, varnish)
Surface primer
Applying a second layer of primer
Drying the primed workpiece
Creating an ornament
Cutting out pictures from a napkin
Cutting can be carried out using the conveyor principle
Gluing pictures, varnishing
The vase is ready
Examples of children's work using decoupage technique - photo gallery
Exhibition of works for Mother's Day
Examples of decorating furniture and interior items in a group using decoupage technique
Examples of direct decoupage
Exhibition of New Year's crafts Making an old thing look attractive
Crafts from waste material
Direct decoupage on a CD Direct decoupage imitating folk painting Decorating a functional craft using decoupage
Exhibition of works by kindergarten students
Decorating plates with pictures of your favorite cartoon characters
Crafts decorate the Christmas tree
Option for Easter crafts Exhibition of works for the Easter holiday
Sample of direct decoupage using additional materials (numbers and arrows, eggshells)
An example of the design of finished works with shiny stickers
Master classes on decoupage for children
We invite you to watch video materials that explain the basic concepts of decoupage and show creative tasks for children.
Master class on decorating a cutting board - video
Master class on plate design - video
Making a candlestick using reverse decoupage - video
Master class “Box using craquelure and decoupage techniques” - video
Master class “Beautiful DIY wooden bracelet” - video
Send your photos
Do you also make beautiful crafts?
Send photos of your work. We will publish the best photos and send you a certificate of participation in the competition. See also:
Stained glass: how to make something exclusive out of an old door
I bring to your attention Yulia Nikolskaya’s story on how to decorate an old door with stained glass paints. "...
Fabric burning
Yulia Anatolyevna Brazevich is fond of fabric burning and will tell us about this interesting technique...
Colored salt in bottles for interior decoration
Another story by Liliya Grigorieva, this time about colored salt in bottles that can be used...
Patchwork pillow with padding polyester
Master class by Lyudmila Nazarova on how to sew a pillow from scraps. We sew a pillow from scraps...
DIY baseboard frame
Another option on how to make a cute frame for a photo (or painting) with your own hands, simply and...
Felt box “Daisies”
Surely every housewife has many little things that are necessary in the household, but often...
Decoupage bottle “Ukrainian house”
We bring to your attention a master class by Yulia Tarasenko on creating a “Ukrainian house” using…
How to make a dream catcher amulet
I don’t remember where I first saw this amulet, maybe at the Cowboy Festival, maybe in Ethnoworld. Vyg...
Birch bark box. Master Class
The author of the work on how to make a birch bark box with your own hands is Natalya Ivanovna Kolmogorova, teacher...
Three-dimensional painting “made of fabric Pot of flowers”
Name: Master class on handicrafts. Name. Three-dimensional painting “Pot of Flowers” Author: Fa...
Decoupage suitcase
Master class by Olga Sosnina. Almost every decoupage artist has decoupage in her collection of works...
Sign on the front door: “House guarded by dachshunds”
Work for the New Year's competition. Sign on the front door: “House guarded by dachshunds” Author: Alexandro...
Tags: Crafts for home, Handicraft techniques
Discussion: 2 comments
- Victoria:
April 1, 2020 at 10:32 pmI read the article about decoupage with great interest. When my son was little, he and I decorated a couple of candlesticks. No primer was applied, no varnish was applied. From the article I learned several steps that we simply skipped. Now the child is almost 7 years old and can try to work according to the rules. I liked the idea of decorating a pencil holder, I'll have to implement it.
Answer
- Alina:
February 17, 2020 at 5:46 am
Hello girls! Do you think products with decoupage can be washed?
Answer
Drawing up notes for a decoupage lesson
For each lesson, the teacher must set goals and objectives that correspond to the age characteristics of the children, as well as the level of their artistic skills.
Examples of goals that should be achieved in a decoupage lesson:
- Introducing children to the new decoupage technique, its history and terminology.
- Teach decoupage techniques (priming, implantation, aging, varnishing).
- Formation of the ability to decorate the flat/convex/embossed surface of an object.
Variants of tasks implemented during the lesson:
- Enriching the vocabulary of pupils, active use of new terms in oral speech (“decoupage”, “acrylic”, “primer”, “finish varnish”, “glitter”, “craquelure”, “grout”, “patina”, “sponge” and etc.).
- Expanding horizons, stimulating cognitive activity (children should not be afraid to ask questions).
- Improving fine motor skills.
- Development of artistic skills (handling of a brush, sponge).
- Development of aesthetic taste and personal artistic preferences.
- Formation of skills of collective activity, mutual assistance, and the ability to jointly achieve goals.
- Cultivating an interest in the art of decorating, a desire to give a second life to old and unnecessary things.
The summary should also indicate preliminary work on the topic of the lesson (if carried out): conversations with students, reading fairy tales and poems, looking at illustrations in albums, books, and postcards. A special place in the notes is occupied by the motivating beginning of the lesson: in what ways and materials the teacher activated the attention of the children, whether a game was played or a surprise moment was created. It is necessary to describe the elements of the lesson that are involved in changing the children’s activities: didactic, mobile or finger games, physical education minutes, choral performance of a song, gymnastic warm-up.
In accordance with hygienic standards, a lesson in visual arts in the senior group lasts no more than 25 minutes, in the preparatory group - no more than 30 and consists of the following stages:
- Organizational moment 1 minute.
- Motivating start 5-6 minutes.
- Discussion of the plan for completing the decorating work for 2–3 minutes.
- The practical part of the lesson is 10-11 minutes, for the preparatory group - 15-16 minutes.
- Display of finished works, discussion for 2–3 minutes.
- Summing up the lesson 1 minute.
Outline of a decoupage lesson (senior group) on the topic “When the clock strikes 12 (decorating a plate in the form of a clock)” - table
| Goals and objectives | Formation of the ability to create an artistic composition using the decoupage technique. Improving decoupage techniques - priming, cutting, gluing and implanting pictures, varnishing. Developing the ability to decorate finished work. Activation of fantasy. |
| Material | Poster with the image of the Kremlin chimes (the dial is painted over or closed). Musical accompaniment of the lesson - New Year's songs. Disposable paper plates, white primer, acrylic paints, PVA glue, acrylic varnish, scissors, brush, pieces of sponge, water, paper napkins or rice paper with New Year's themes. |
| Preliminary work | Reading fairy tales about watches together. Listening and learning the song “When the Clock Strikes Twelve” with the music director. |
| Progress of the lesson | Organizing time . The motivating beginning is the creation of a problem situation. When students enter the room and take their jobs, an audio recording of a song about New Year's hours is played. After the organizational moment (the children prepared the tools for decoupage and took materials from the teacher), the teacher takes a rolled-up poster with the image of the chimes. Children are asked questions: - What holiday is coming to us? (New Year) – At what point does the new year officially begin? (When the Kremlin chimes strike midnight.) – On which tower of the Moscow Kremlin is the main clock installed? (On Spasskaya) The teacher suggests remembering what the chimes look like, hangs up a poster, and the children notice that there is no clock. They come to the conclusion that someone stole the watch/it was taken for repairs/taken to an exhibition. The teacher offers to make everyone their own New Year's clock while the chimes are away. Discussion of the algorithm for performing actions. Practical part. Primer of paper plates. Cutting out pictures in a round shape. Implanting pictures using a sponge and paints. Decorating crafts with decorative materials (plastic or cardboard numbers, arrows, glitter, stickers). Varnishing. Show of works. The guys discuss each other’s work, voice aspects of the work that were difficult for them, and note what they especially liked during the task. The teacher returns the dial to the chimes, wishes the children a happy preparation for the upcoming holiday, sums up the lesson and thanks them for their interest and imagination. |
Creating a decoupage club in a preschool educational institution
You can diversify the forms of work with children in the direction of “Fine Arts” by organizing a decoupage club. Additional education classes help expand the range of topics in children's creativity; the teacher can take a deeper approach to introducing children to arts and crafts and touch on the basics of interior design.
For the circle to function, a room must be prepared. It is mandatory to arrange shelves with samples of products made using the decoupage technique. All materials and tools are available to students. In the work of the circle, the principle of choice is implemented: everyone can independently select or replace materials according to their taste and creative concept.
When drawing up a program for a decoupage club, the teacher is guided by the principle of continuity; knowledge is given from simple to complex. As students gain experience in decorating, classes can be based on a problem-situational method: children independently come to the conclusion of what techniques and tools to achieve the desired result. In decoupage classes, a synthesis of arts should be carried out: musical accompaniment, reading artistic texts are involved, in their works the children use previously learned drawing and appliqué techniques, and are inspired by fairy-tale plots and motifs of folk crafts.
The work of the circle should include projects (individual and group) dedicated to holidays or special events in the life of the kindergarten (Winter Ball, Ecology Week, Mother's Day, etc.). A certain period of time is allotted for the creation of a project. The completed project is presented to the audience (project presentation): it can be shown (to another group, in the hall of a kindergarten, in the assembly hall at a party). Children talk about their work to listeners who evaluate their creativity.
The result of the circle’s activities is the formation of aesthetic taste in students, the development of visual perception of objects and their properties, the development of the ability to work with various tools, which serves to prepare the brush for mastering writing.
It is recommended to develop a program for two academic years (senior and preparatory groups). Classes are held once a week.