Definition of the concept
Blotography is a drawing technique for children using blots, spots, drops and stains. The essence of such drawing is to discern some image in a blurry image and complement it with details. Thus, to get results, the child only needs to turn on his imagination.
Blotography in kindergarten can be carried out using different techniques, and this drawing method can also be combined with other techniques (for example, with appliqué or plasticineography).
Amazing drawing technique “Blotography” drawing article
Amazing drawing technique “Blotography”
Little children love to leave blots on paper. Parents, underestimating the “masterpieces” of their own children, get rid of incomprehensible drawings. But it turns out that you can create a unique drawing from the leftover blots. This unique drawing technique is called “Blotography”.
In recent years, blotography has been gaining unprecedented popularity. And this moment is not at all connected with the latest fashion trends. It turns out that thanks to this drawing technique, the child’s creative imagination is intensively developed.
It would seem that what useful thing can a baby learn from an ordinary blot? In fact, a spot made by accident with paint has a unique, non-repeating shape and size. And if you apply a little imagination, you can give an ordinary blot the outline of an object or create the image of an animal. By the way, adults are often fond of this unconventional drawing technique.
To create a unique drawing, you need to prepare the following material:
— An artistic brush. It is advisable to use hard brushes. Sometimes children resort to using a toothbrush to create a large blot.
- Paints. In this art form, only liquid watercolor is used. If you don’t have suitable paints on hand, you can simply dilute your existing watercolors with water. By the way, multi-colored ink has the consistency necessary for drawing. It can also be used when drawing.
— Cardboard or a sheet of white paper.
— Water container.
- Cotton buds.
- A damp cloth. Used to remove dirt from hands.
Stages of the creative process
So, blotography.
Where to begin?
If you are new to this area, then you should first decide on the topic of the future drawing.
Here it is extremely important to direct mental activity in the right direction, in other words, to set a direction. After making a blot on a piece of paper, turn on your imagination and try to see in it the outlines of an object or living creature. Maybe there is an amazing planet or a picturesque underwater world in front of you.
There are several ways to create a drawing using inkblotography.
Drip method.
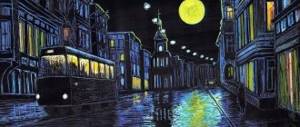
Here you will need a wide, voluminous brush. It should be thoroughly saturated with paint, and then, placing it over a piece of paper, begin to spray watercolor. If you want the drops to cover a small area, tap the brush on your finger or hand. When the brush is simply shaken, the spray area increases. For spot application of paint, use a pipette. By the way, you can use it to create a large blot, depicting, for example, the sun. Most often, landscapes are created using this method of blotography.
Spreading method.
To do this, apply a large blot to the corner of the sheet using a brush. Important: the paint must be very liquid. Then, using a drinking straw, they begin to blow the paint over the surface of the paper. It is advisable to direct the watercolor in different directions. Now take a closer look at the resulting drawing. What does it remind you of? Maybe a rowan bush?
If yes, then you should complete the drawing by drawing red fruits on the branch. To do this, use a cotton swab. Just soak the “tool” in paint of the desired color and draw rowan leaves and berries. The resulting drawing can be decorated with an original frame if desired.
During the first few lessons, your child may need adult help. Most often, children cannot immediately discern familiar outlines in a blot.
Basic rules for organizing blotography classes
Organizing and conducting a class on blotting is quite simple: you only need some materials and imagination.
You will need the following materials:
- drawing paper;
- tassels;
- watercolor.
Additionally you may need:
- plasticine;
- cotton buds;
- plastic bag;
- colored paper;
- threads;
- plastic tubes.
It is necessary to organize a comfortable workplace for the child. Be sure to cover the table with oilcloth and prepare napkins - the blots will remain not only on a sheet of paper.
In order for a child to be interested in an activity from the very beginning, you need to arouse his interest. To do this, you can have a small conversation on a relevant topic, tell a fairy tale or poem. Bright pictures or cartoons with a plot would also work well. While drawing, you can also listen to audio recordings of fairy tales or music.
Such preparation and atmosphere will help the child become completely captivated by the drawing process.
Unconventional drawing technique
Blotography of non-traditional drawing techniques
Blotography refers to silhouette art, but the history of figurative painting dates back to Ancient Greece. But this type of art became most popular in the 18th and 19th centuries.
Blotography is the process of drawing an arbitrary blot on paper into a recognizable artistic image.
Drawings made using the blotography technique are a unique way to interest children in drawing, make them want to learn this type of fine art and remember their childhood. The method is absolutely not complicated, but very exciting, developing not only drawing skills and abilities, but also imagination, ingenuity, and perseverance. Blotography is perhaps one of the most unusual methods in drawing. Moreover, it is considered to be an unconventional technique, as are many others, where a material unusual for this purpose is used.
To work with preschoolers (from 2-3 years old) and primary schoolchildren, you will need thinly diluted gouache or watercolor,
The technique of applying blots can be done in a variety of ways.
- thick brush (No. 5-10).
- pick up paint on the brush and quickly wave it over the sheet several times
- apply liberally - “splash” liquid paint directly onto the sheet with a brush
- plastic spoon: scoop up the paint with a spoon and pour it onto the paper
- pipette.
- sponge or foam rubber.
- gauze:
- spray using an old toothbrush and comb
- washable paint for children's creativity in cans
Blotography techniques
1. regular blotography 2 methods based on it - monotype (print)
2. blotography with a tube ( spreading method.)
3. blotography with a string.
4. blotography with stains (apply liquid paint to a sheet, and then carefully tilt it in different directions so that the drops spread, mix, and flow into each other - you will get very interesting stains.
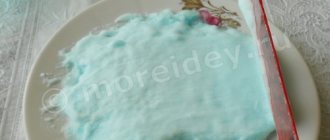
5. wet blotography (slightly moisten a sheet of paper with your hand or a wrung-out sponge. Shaking from a brush or dripping from a pipette, apply drops of paint in random order)
6. blotography on a smooth surface (apply drops of paint to a modeling board.
7. bubble blotography (mix gouache with a small amount of shampoo. Place the straw in a container with paint and blow until bubbles appear above the edge. Place a sheet of paper on the bubbles, press lightly and lift up. (only for older preschoolers)
8. blotography with small drops (drop small drops of paint on a sheet of paper. Find some images in the resulting chaotic arrangement of small blots and complete them by connecting the drops with a pencil, felt-tip pen or pen.) like a big bear in the sky
9. combined blotography ( in one drawing using
There are two or more blotography techniques).
Blotography will help children experiment with colors and have fun. In the process of drawing a picture using the blotography technique, children:
- eye and hand coordination develops
- fantasy, creative vision and imagination develops,
- skills of working with paints, brushes,
- children learn to render silhouettes of people, plants and animals,
- diligence, attentiveness, and accuracy develop.
Regular blotography
Blotography with a tube
Blotography with a string
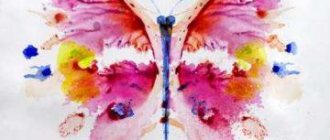
Blotography with stains
Wet blotography
Blotography techniques
Drawing using the blotography technique is carried out in two stages:
- the child creates a blot of any shape and imagines a certain plot or image based on the resulting blot;
- the blots are drawn into a suitable image with various details (the form is filled with content).
You can use different techniques to complete the details - this will make children even more interested in the drawing process. So, for example, in kindergarten it is best to use blotography with a thread and a tube.
With spreading
This art therapy technique is carried out on thick white paper or cardboard. Watercolor paint diluted with water is dripped onto the surface in a random order. The sheet is then tilted in different directions, allowing the paint stains to spread in unusual shapes. If desired, the procedure can be repeated several times.
When the drawing is dry, you can decorate it with details using paints, felt-tip pens, colored pencils or appliqué.
This painting technique can be transformed if paint stains are not simply dripped, but applied using bubble wrap, foil or cellophane. Such a pattern will be even more whimsical and will evoke new images in the imagination of children.
Table: examples of lesson notes on blotography (fragments)
| Author and title of the lesson | Progress of the lesson |
| Maltseva I. “Flowers for a Butterfly”, second junior group | A toy butterfly appears in the group and cries because all the flowers in its clearing were picked by the girls to weave wreaths for themselves. <…> The teacher invites the children to help the butterfly - to draw flowers for it in an unusual way - using blots. The teacher explains the technique of drawing with blots: you need to moisten a sheet with water and put a spot of any color on it - these are flowers that have bloomed in the clearing. Then dry gouache is added to the middle of each. When the paint dries, the leaves and stamens are drawn in with felt-tip pens. Physical school is being held.
Q: What do you think flowers need to grow beautiful? (Rain).
Independent activity of preschoolers. Exhibition of works - all the drawings are placed on a sheet of whatman paper - it turns out to be a large flower meadow. The butterfly thanks the kids and flies away. |
| Quote from: https://vospitatel.com.ua/zaniatia/izo/cvety-dlya-babochki.html | |
| Khairova V.K. “Happy Droplets”, middle group | The lesson begins with listening to an audio recording of the sound of rain. Children guess what kind of sound it is, and then they are offered riddles about water and rain.
The teacher reads the poem “Meeting” to preschoolers.
Conversation on the content of the poem: why the clouds had a fight, and how their quarrel ended. A slide show about where rain actually comes from. At the same time, preschoolers listen to audio recordings of the sounds of rain and thunder. Outdoor game “Droplets go around in circles.” The teacher is a cloud, and the children are droplets. They run away and dance to the music. Then the droplets flow in streams (two of them take hands), become one river (children follow each other together), and then fall into a huge ocean (forming a large round dance). The sun begins to warm up, and the drops evaporate (preschoolers stand on their toes and raise their hands). Finger gymnastics based on a poem by A. Bosev (guys perform movements according to the test).
The teacher invites the kids to draw rain using tubes and air. A cloud is depicted with a wax pencil, and rain is depicted using the blotography method: you need to dip a straw in a cup of paint, drop a speck on a piece of paper, and then blow on it. Independent activity of preschoolers. Exhibition of works. |
| Quote from: mdou125irk.ucoz.ru/interesno/pedagogi/risovanie_vozdukhom.doc | |
| Ivanova I. M. “Magic Trees”, senior group | <…> The teacher invites the children to turn into wizards (waves a “magic wand”, the children spin around). The teacher says that on the way to kindergarten she saw swaying trees. Children show the movements of trees in strong and weak winds. <…> The children are invited to depict magical trees using a magic straw wand. Drawing a silhouette in the air. Explanation of working methods. First, you need to dilute brown gouache with water on the palette. Using a spoon, place a blot in the place where the tree trunk begins. The spot swells with a tube, forming a trunk. You can rotate the sheet of paper to create branches. Independent activity of preschoolers. <…> Analysis of finished works. The teacher notes the most interesting drawings. The wizards turn back into children and return to the kindergarten. |
| Quote from: https://kladraz.ru/blogs/irina-mihailovna-ivanova/netradicionaja-tehnika-risovanija-kljaksografija-volshebnye-derevja.html | |
| Belgubaeva A. “Autumn Forest”, preparatory group | A conversation about late autumn, its signs (gray sky, almost no leaves on the trees, snow is already falling). The teacher reads A. Pleshcheev’s poem “Autumn.” <…> Then the teacher invites the children on a journey through the autumn forest. Imitation of putting on warm clothes. Children ride on an imaginary train. An audio recording of bird voices sounds - children are greeted by wintering birds. A toy hedgehog appears, in its paws there is a card with a riddle about a Christmas tree.
A conversation about the structure of a Christmas tree: trunk, branches, roots, needles. The teacher draws attention to the fact that the trunk at the bottom is wider, and the branches at the top are shorter, and at the bottom they are longer, and they grow downward. Other trees that stand almost bare in late fall are also affected. Physical education
A crying toy bunny appears in front of the children: there are few trees on the edge of the forest, and he has nowhere to hide from the wolf and fox. The children must help him draw a forest landscape. Folding Christmas trees from counting sticks. Finger game “Collecting leaves”.
The teacher explains techniques for drawing trees and bushes using the blotography technique. Fallen leaves can be painted with a brush using the dipping method, and snow can be painted with cotton swabs. Independent activity of preschoolers to the music of P. Tchaikovsky “The Seasons”. <…> Discussion of drawings. The bunny thanks the children for their help and, together with the hedgehog, returns back to the forest. |
| Quote from: https://www.maam.ru/detskijsad/konspekt-zanjatija-po-risovaniyu-netradicionoi-tehnikoi-tema-osenii-les-podgotovitelnaja-grupa.html |
My experience of teaching blotography classes
In my practice, I use blotography quite often. I believe that this is an excellent therapeutic method that relieves children’s stiffness and reduces their accumulated aggression.
It is also convenient that the blotography technique does not require much preparation, but at the same time gives excellent results. Children like to fantasize and create their own images, as well as monitor the results of other children.
To set students in the right mood and create the appropriate mood, I prefer to use music. These can be either theme songs or classical music. While we are discussing a topic together and setting a task, music usually plays in the background throughout the entire lesson.