Drawing workshops
| Participant #1 Master Class. Unconventional drawing. Nitography “Summer Fantasy” Author: Guselnikova Svetlana Leonidovna, art teacher |
| Participant #2 Painting a decorative cutting board “Golden Khokhloma” Author : Isaeva Svetlana Yuryevna, technology teacher, additional teacher. education |
| Participant #3 Master Class. African Tingatinga drawing style Author : Taranina Zhanna Nikolaevna, primary school teacher |
| Participant #4 Monotype. The use of monotype in working with preschool children Author : Lyashko Galina Vasilievna, teacher |
| Participant #5 Master class “Sweet Dream” using combined stained glass technique (pouring paints and beads) Author : Shushkanova Irina Yuryevna, educational psychologist |
| Participant #6 Master Class. Unconventional drawing. Printing Author : Shestakova Olga Fedorovna, teacher |
| Participant #7 Master Class. Drawing technique "Passepartout" Author: Sukhanova Natalya Ivanovna, teacher |
| Participant #8 Master class on drawing “Starry sky” Author : Randina Olga Nikolaevna, teacher |
| Participant #9 Master Class. Painting Gzhel plates Author: Belashova Tatyana Anatolyevna, teacher |
| Participant #10 Master Class. Drawing with cotton swabs “Daisies” Author: Sukhanova Natalya Ivanovna, teacher |
| Participant No. 11 Master Class. Unconventional technique of painting with beet leaves Author: Belashova Tatyana Anatolyevna, teacher |
| Participant No. 12 Master Class. Drawing technique "Scratch" Author: Mineeva Valentina Mikhailovna, teacher |
| Participant No. 13 Master Class. Drawing technique "Scratch" Author : Sukhanova Natalya Ivanovna, teacher |
| Participant No. 14 Master Class. Stained glass technique - glue drawings Author: Belashova Tatyana Anatolyevna, teacher |
| Participant No. 15 Master Class. Landscape monotype Author: Khairulina Ilyuzya Vakilevna, teacher |
| Participant #16 Master Class. Painting a glass jug for olive oil Author: Aksenova Marina Albertovna, art teacher |
| Participant No. 17 Master Class. Encaustic painting for beginners. Painting "Mountains" Author: Lykova Inga Yurievna, art teacher |
| Participant #18 Non-traditional drawing techniques for preschoolers. Master class “Miracles from semolina” Author : Maria Nikolaevna Chukmareva, teacher |
| Participant #19 Master Class. Mosaic drawing. Ornament in a circle “Bird of Happiness” Author: Rudakova Irina Aleksandrovna, primary school teacher |
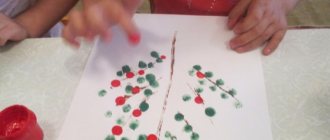
| Participant #20 Master class on introducing children 6-7 years old to pointillism “Goldfish” Author: Grebenik Zoryana Mikhailovna, teacher |
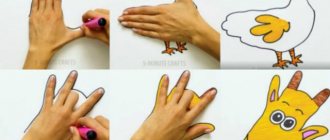
| Participant No. 21 Master Class. Drawing with fingers and palms Author : Yulia Aleksandrovna Afonina, teacher |
| Participant No. 22 Master Class. Autumn leaf image Author: Svetlana Vladimirovna Mertsalova, art teacher |
| Participant No. 23 Master Class. Drawing lesson “Daisies” Author: Yulia Nikolaevna Polushina, additional teacher. education |
| Participant No. 24 (continuation of work No. 20) Master class on introducing children of senior preschool age (6-7 years old) to pointillism “Golden Autumn” Author : Grebenik Zoryana Mikhailovna, teacher |
| Participant No. 25 Master class “Drawing a bee” Author: Bulygina Anna Aleksandrovna, additional teacher. education |
| Participant #26 Master class on drawing with string “Dandelions” Author : Olga Aleksandrovna Ilmukova, teacher |
| Participant #27 Master Class. Painting using the spray technique “Flowers in the meadow” Author: Tsarenko Galina Evgenievna, primary school teacher |
| Participant #28 Unconventional drawing technique “Imprint”. Master class “Autumn Bouquet” Author: Oksana Nikolaevna Sholkova, teacher |
| Participant #29 Master class on drawing “I want to draw - let them teach me” Author : Drozdova Margarita Vladimirovna, senior teacher |
| Participant #30 Master Class. Non-traditional drawing techniques in kindergarten Author : Klimova Irina Anatolyevna, teacher |
| Participant #31 Master Class. Gorodets painting Author : Belashova Tatyana Anatolyevna, teacher |
| Participant #32 Master class “Miracle flowers of unprecedented beauty” Author: Belashova Tatyana Anatolyevna, teacher |
| Participant #33 Master Class. Drawing Santa Claus with preschoolers Author : Zyurkalova Natalya Gennadievna, teacher |
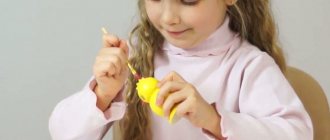
| Participant #34 Master class “Magic transformation” Author: Timoshkina Olga Anatolyevna, additional teacher. education |
| Participant #35 Master Class. Unconventional drawing technique - blotography “Magic Paints” Author : Maria Nikolaevna Chukmareva, teacher |
| Participant #36 Master class “Primary and additional colors” for 2nd grade students Author : Dariush Henrietta Vladimirovna, art teacher |
| Participant #37 Master Class. Applique print. Still life "Fruit" Author: Barieva Liliya Sergeevna, additional teacher. education |
| Participant #38 Master class “Ural birches” Author: Victoria Aleksandrovna Ostanina, teacher |
| Participant #39 Master Class. Unconventional technique of painting with semolina. Landscape “Birch tree by the river” Author: Olga Viktorovna Kandalova, additional teacher. education |
| Participant #40 Master class on drawing “Rainbow-arc” Author: Victoria Aleksandrovna Ostanina, teacher |
| Participant #41 Master Class. Unconventional drawing technique: imprint with leaves Author: Galyutina Tatyana Gennadievna, teacher |
Drawing for adults
Adults can try to draw more complex objects, which will be difficult for children due to their perception of the world according to a more simplified scheme.
Here are some master classes on drawing with a simple pencil for parents:
Draw a piece of fabric, gathered into folds and illuminated from one side using a table lamp.
The play of chiaroscuro is conveyed using shading. It can be done in both straight lines and curved ones. This is not a simple exercise, but it is this practice that will help in the future to reproduce the shape of the object.
Master class on jewelry - ideas for beginners and tips on choosing designs for jewelry (95 photos and videos)- Master class on knitting - beautiful ideas and useful tips for decorating and designing knitted crafts (85 photos)
Master class on snowmen - basic methods and step-by-step description of how to make a snowman figurine with your own hands (105 photos)
An even more complex option is to depict any object using the laws of perspective.
Perspective is the construction of an image taking into account its length. This is easy to explain using the example of railway tracks.
The two sleepers next to the observer are at a distance. But if you look at them in the distance, they will, moving away from the observer, gradually converge to a point. This is what perspective is. Its laws and principles of construction can be easily found on the Internet.
Master class for teachers “Secrets of non-traditional art techniques”
Master class “Secrets of creative activity”
(speech at the Moscow Region on December 6, 2017)
Prepared by: teacher Golyakova V.I.
Today I want to present to you my developments in the field of non-traditional arts and crafts techniques, and share the secrets of preparing material for free activities with children.
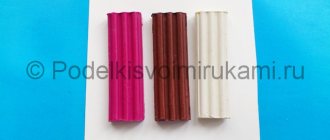
PLASTILINE FLAGELLA
Having seen paintings made from plasticine flagella on the Internet, I decided to make these for the children in my group and use them in free activities and in joint activities with the children. They have a lot of ways to use:
- you can make voluminous crafts,
- flatten the flagella,
- twist.
Children themselves can suggest options for use.
To make plasticine flagella we will need:
- 10 ml syringe,
- napkin,
- plasticine,
- hot water,
- kettle,
- mug,
- blank sheets of paper.
I have prepared for you syringes with a cut off tip (it can be easily cut with a regular or stationery knife. Scissors are not suitable for this).
We take the piston out of the syringe, place a piece of plasticine there, and insert the piston. Place a blank sheet of paper in front of you. We pour boiling water from a kettle into a mug, place a syringe there and wait for a while (I periodically check how the plasticine is squeezed out, if it’s difficult, then you need to wait some more. If you overdo it, you’ll end up with a too melted mass. My plasticine is ready and I squeeze it onto a clean piece of paper , most often it is squeezed out into a long sausage, which after cooling is very plastic.Flagella can be made either from halves of pieces of plasticine or from the remains of plasticine, it is also possible to mix colors.
When the plasticine begins to cool, it is difficult to squeeze out, then we place the syringe in hot water again and repeat the steps.
I store the flagella in skeins like these, like regular plasticine. You can use the technique of plasticine flagella with children of the second youngest group, starting from laying out plasticine on simple forms and progressing to more complex details for the preparatory group. Children show great interest in this unusual use of plasticine. It is also possible to lightly press and attach beads, sequins, sparkles, and various cereals to the flagella.
I have prepared small pictures for you, and you can make a small New Year’s craft from the flagella. Let's try.
(While the teachers are busy with crafts, I remove water and everything unnecessary from the tables).
The next find was a MAGIC TABLET
Starting to work with children on art activities in the second junior group, I noticed that children are still not good at using a brush or pencil, and they often get upset if they suddenly cannot draw simple shapes (circle, oval). Then I decided to introduce a “Magic Tablet” into the art activity center, which allows children to draw with their finger without getting it dirty. They wondered for a long time what was inside, they thought it was plasticine or paint, and when I said it was dough, their interest in the tablet became even greater.
Today I want to share with you the secrets of making the “Magic Tablet”.
We will need: Water, salt, flour, plastic cups, spoon or mixing stick, file, tape, gouache, napkins.
To make a tablet, we will need a file taped with tape at the perforations, this is done so that the dough does not leak out through the holes. I have already prepared such files for you. Look at them... and put them aside.
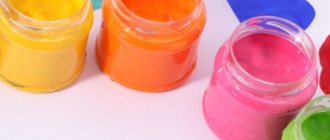
Now we will start preparing the dough. To do this, add water to the flour little by little, stirring constantly. Add salt, mix well so that there are no lumps. Then add paint to the dough. Each of you will make the dough of the same color, for this I diluted gouache in jars. Drop a few drops of gouache into a glass and stir. The dough for the tablet is ready.
Now take the file, open it and pour in the dough little by little, trying not to touch the edges. Place the file on the table carefully and smooth out the dough in it, not forgetting the corners. We need there to be not too much dough, but not too little. We bring it to the edge of the tablet, retreating a centimeter. And carefully seal it with tape. We try to leave as little air as possible inside the file. Our tablet is ready! There should be so much dough in the tablet that when a child runs his finger over it, he leaves behind a transparent trail that slowly disappears.
You can also pour several colors into the file alternately and there will be a multi-color tablet, you can show an example of the formation of a new color, for example, by mixing yellow and red, blue and yellow, children really like to watch how two colors mix to form a new color. Or you can add some small glitter.
For ease of use, I glue the tablet (edges) directly to the table so that the children can draw comfortably.
Magic does not last forever, and neither does our magic tablet; over time, the dough separates, the flour settles to the bottom, and then the tablet simply needs to be replaced. These tablets can keep children happy for several days.
Next, I want to introduce you to an interesting task - DRAWING ON FABRIC
Having seen the interest of the children of the preparatory group in non-traditional artistic techniques (painting with salt, drawing with yarn, blotography), I decided to try unusual drawing with the children - painting on fabric. To begin with, we painted motifs from Gorodets painting; the girls even took the painted fabric home so that they could make dresses for the dolls with their mothers. Then I decided to try another way of drawing on fabric as a free activity. And the children were delighted.
We will need: Fabric 20*20 centimeters, white cotton, gouache, water, thick brush, strong thread, oilcloth, jar of water.
Place a piece of fabric on the table. We take the middle with our right hand and lift it up. With your left hand we move along the fabric from top to bottom. We put it on the table and tie it together, making a tight rope out of fabric. In the junior, middle and senior groups, this preparation is carried out by the teacher; in the preparatory group, children can be involved in this in the evening.
Now we take the fabric in our left hand and begin to paint from top to bottom. Let's start from the very top, thoroughly soaking the paint from the fabric (a lot of paint is lost), then rinse the brush and pick up a different color of paint, again paint a section of the fabric in a circle, and so on until the very end. You can place the fabric on a napkin for ease of dyeing the fabric at the last stage. Children can’t wait to see what happened there, they can unwrap it right away and look, or they can first dry it on the radiator and then unwrap it. Children love the fact that this fabric can be used to make clothes for dolls or iron and frame it like a picture.
These secrets of creative activity helped to interest me and my children, I think that something will be useful to you in working with children. I wish you creative success!!!
If anyone wants to share their findings, we will be glad to hear from you.