In this article we will talk about such a drawing technique as grattage - what is it and how to use it correctly?
Drawing techniques today are very diverse. One of the most interesting is grattage, which is interesting for its unusual effect and simplicity. Even inexperienced people can learn the technique. Another name for the technique is waxography, and it is popular with both children and adults. Works made in grattage are distinguished by the fact that black and white contrast with each other and the effect is excellent.
What is grattage?
What is grattage?
Scratching is an old technique where an image is made by scratching. The modern technique involves scratching on paper or a board, which is first covered with wax. This allows you to make strokes clear and beautiful.
Drawings in this style have gained popularity not so long ago, and with this technique, expressive, fascinating drawings are obtained. Various objects with a sharp end are usually used for scratching. As a rule, these are goose feathers, wooden sticks and fountain pens.
The technique is very simple and its principle is as follows: a wax layer is applied on cardboard or thick paper, onto which black ink is then applied. When the scratching begins, you will end up with a white pattern on a black background. Alternatively, the base can be covered with watercolors to create an image of different colors. As a result, you will get a colored scratch paper.
It is no coincidence that grattage began to gain popularity at the beginning of the 20th century. It was then that simplicity and originality began to be valued. Back then it was possible to create drawings simply with contours. Even today, the technique is considered unique and is actively used in teaching preschoolers. This is a very simple way of drawing that allows children to develop very useful skills and qualities.
A way to depict a drawing for any age
Any child can learn to draw, which depends little on his natural capabilities and abilities. First of all, you need to approach the learning process correctly. This is the task of adults: to develop the child’s creative potential. If you want to interest a novice artist, introduce him to unconventional drawing techniques.
One of these methods is grattage. This drawing technique can be introduced to children of any age, as it is convenient and interesting to perform. For younger children, the basis for drawing is done by adults; older children can do it independently.
The whole process is divided into three main stages. Each of them will be interesting for children. Such activities develop children’s imagination, attention, perseverance, and the ability to finish what they start.
Working on drawings allows children to learn about the world around them and expand their horizons; the child accelerates the development of fine motor skills and attentiveness several times. Scratching is a good way for older children to express themselves and develop intellectual capabilities.
What material should I prepare for drawing using the grattage technique?
Tools for the scratch technique
Throughout the history of the technique, many tools have been created. The main drawing tools are:
Basic Tools
How to apply wax for the grattage technique: instructions
How to apply wax?
After preparing the base for work, you need to apply wax to it. This can be done in different ways:
- You can simply rub the candle over paper or dissolve it in a water bath and then apply it to cardboard with a brush
- Light a candle and use a brush to draw wax from it.
- Instead of wax, you can use wax crayons. If you think that you have applied them unevenly, you can use turpentine to level them
By the way, professionals often use egg yolks, chalk or special clay instead of wax.
Presentation “Master class “Grattage”
Tatiana Okhotnikova
Presentation “Master class “Grattage”
(1 slide)
One of the key tasks of modern preschool education is the development of the creative side of the individual.
Visual activities, especially non-traditional drawing techniques, have great potential for this. Such activities immerse children in the wonderful world of art and give them the opportunity to feel like real wizards. The teacher must introduce the children to the scratching .
(2 slide)
Scratchboard as an unconventional way of drawing.
Scratching is a method of making a drawing by scratching a paper base covered with a dark background with a sharp tool. The result is original contrasting compositions.
The name of this technique comes from the French word gratter, which means “scrape, scratch”
. It has another name - waxography.
If we look at the history of fine art, the peak of popularity of grattage was the beginning of the 20th century. In Russia, this technique was called grattography , it was very suitable for the embodiment of fantastic and expressive ideas. A form was needed that would simultaneously express simplicity and originality. This method of drawing made it possible to create the effect of halftones due to contours.
For the first time grattography was used by M. Dobuzhinsky when designing a publication
F. Dostoevsky “White Nights”
(1922)
.
“One Hundred Folk Ballads”
in a similar way .
(3 slide)
Specifics of organizing waxography classes in preschool educational institutions.
In kindergarten, the wonderful and unusual scratch will certainly be of interest to children of any age. But it is still worth practicing it from the middle group, since such drawing requires certain efforts and the development of fine motor skills of the hands.
Creating compositions using the scratching method is a small miracle every time when a beautiful image gradually appears from the darkness before a child’s eyes.
(4 slide)
Drawing using the waxography technique promotes:
1. Development of fine motor skills and hand-eye coordination.
2. Removing children's fears.
3. Development of imagination and flights of fancy.
4. Development of self-confidence.
5. The ability to express your idea.
6. Development of creative and creative thinking.
The creative process in this way raises the child’s self-esteem. If he doesn’t do some object or object very well with traditional drawing, then the composition using the waxography technique will in any case turn out beautiful and original. The preschooler begins to believe in his abilities.
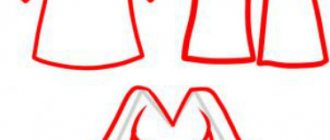
As for the age differences between kindergarten students, when conducting classes in the middle group, it is better to first offer stencil and template drawings. The fact is that when scratching, it is quite difficult to correct the mistake made (an extra line, etc.)
. Therefore, by tracing an image using a stencil or template, children will practice so that they can later create their own images. In addition, the stencil base can be supplemented with your own unique elements. For example, a child draws a fish using a stencil and completes the image with seaweed, pebbles, etc.
When preparing materials for a lesson (and this is an important part of drawing using the waxography technique)
in the middle preschool level this is entirely done by the teacher. Pupils of the senior and preparatory groups can already actively participate in this exciting process.
All stages of preparing a paper base for work instill in a preschooler attention, perseverance and a sense of consistency.
When working at any age, it is very important to constantly remind children about safety precautions. After all, the drawing is done with sharp objects (a toothpick, a glass, etc.), and the children themselves must work carefully and not touch the children sitting next to them.
Drawing using the grattage is a rather laborious task that requires some effort. Therefore, during the creative process, it is necessary to carry out physical education and finger gymnastics.
(5 slide)
Materials for work:
1. The base is thick enough paper (so that the tool does not cut through it)
. You can take cardboard, including colored cardboard.
2.To cover the base: wax candles, wax crayons, gouache or ink (usually black, but you can also use other dark colors - blue, purple, brown).
3. Liquid soap, PVA glue or detergent (to add to gouache)
.
4. Sponge or wide brush for painting the base with gouache.
5. A sharp tool for scratching the image: a toothpick, a glass, a used ballpoint pen, a pointed wooden stick, a plastic fork, etc.
6. A dry cloth to carefully remove any remaining wax after drawing.
If possible, preschoolers should be offered easels: the paint removed from the base with a stick will fall down onto the stand and not remain on the drawing.
(6 slide)
Ways to design the base:
The basis using the grattage can be designed in different ways.
1. Rubbing with a wax candle.
The simplest option is to rub a sheet of paper with a wax candle (there should be no gaps left)
.This can be done in the following ways:
Just rub it into the base (draw with a candle on paper as if with a pencil)
.
Grate the candle and heat the resulting pieces in a water bath. Once the wax is melted, apply it to the cardboard with a small brush.
Light a tea candle (it has the shape of a tablet, pick up wax on a wide brush directly from the candle and apply it to the base.
By the way, professional artists use chalk, special clay, and egg yolk instead of wax. Of course, the use of such materials in kindergarten is inappropriate.
(7 slide)
After waxing, a thick layer of gouache is applied to the paper. You need to use a wide brush and leave no gaps. It’s good to add a little liquid soap, shampoo, detergent or PVA glue to the paint. Due to this, your hands will not get dirty when scratching.
(8 slide)
2. Background with colored gouache.
The background can be decorated with colored gouache. These can be fragments of different colors. After the first layer has dried, it can be additionally coated with wax.
After the colored paint has dried, the base is covered with black gouache. Drawing occurs in a similar way using scratching.
(9 slide)
3. Background with wax crayons.
An interesting option for decorating the base is to paint it over with wax pencils. These can be colored spots, stripes, etc. The colors are again chosen according to the “mood”
future drawing. Unlike working with gouache, the process here is much faster, and preschoolers can easily cope with the task. The main thing is to leave less spaces. After coloring with crayons, a sheet of paper is also covered with black gouache.
(10 slide)
Scratching the image.
(11-17 slides)
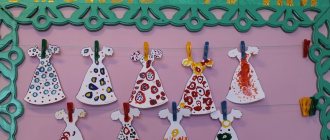
Art Gallery.
(18 slide)
Suitable topics for classes using the
scratchtage :
For drawing using the scratchtage , the teacher can offer children a wide variety of topics, but some of them are the most advantageous:
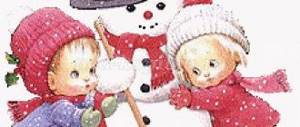
1. Landscapes, especially winter and autumn: “Winter Forest”
,
“Snowflakes outside the window”
,
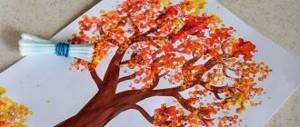
“Autumn leaf fall”
,
“Autumn forest”
.
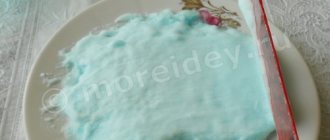
In the first case, it is better to leave the background color under dark paint white (just rub a sheet of paper with a wax candle)
. The snowflakes will turn out wonderful. When depicting autumn, it is better to make the base yellow or combine fragments of yellow and orange.
2. "Northern lights"
.
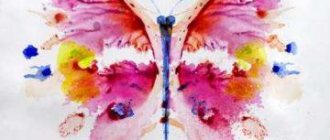
3. Image of all kinds of bright, colorful and contrasting objects of living nature: “Butterfly”
(
“Butterflies in the meadow”
,
“Parrot”
,
“Peacock”
,
“Bee”
, etc.
4. "Fireworks in the sky"
,
“Fireworks over the city” (depicting a city landscape)
.
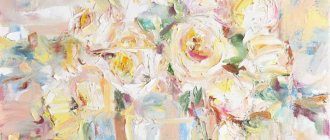
5.Floral motifs: “Bouquet for Mom”
,
“Flowers in a vase”
,
“Indoor flower”
.
6. Still life “Fruit in a vase”
.
7. "Undersea world"
.
8. "Space"
.
9. Fantasy themes: “Fairytale Bird”
,
“Magic Flower”
,
“Landscape on a Distant Planet”
.
(19 slide)
Good luck in job!
How to paint over wax for the grattage technique?
To paint over the wax, you can use ink, gouache or acrylic paints. To prevent the first two paints from rolling off, it is better to mix them with a soap solution or shampoo.
- Remember that paint tends to pill as you work, so it's best to apply it in several layers. You can add color with a sponge or swab.
- There is also a way to paint using gouache. Paint is applied in spots. However, the life of such a drawing will be short-lived.
- The last method is to use acrylic paints. But there is also one peculiarity in working with them - the paint hardens in the form of a film, and therefore scratching may be a little uneven.
Preview:
Master class for teachers “Unconventional drawing technique “scratch”
Goal: training master class participants in non-traditional drawing techniques - scratching, development of creative abilities. Objectives: 1. Introducing teachers to one of the types of non-traditional drawing techniques - grattage. (Making a drawing by scratching) 2. Creating a creative atmosphere. 3. Creating conditions for fruitful communication between master class participants in order to develop creative thinking and teachers’ imagination. Design materials: - presentation on the topic of the master class; Tools for work: - a blank for drawing using this technique, - a stylus - stick, Demonstration material: - presentation “An unconventional technique of drawing scratch paper”, - finished paintings made in this technique. Structure of the master class: 1. Introductory part: Announcement of the topic and purpose of the master class. Contents of the master class as a whole and its individual components. 2. Theoretically - demonstration part. Explanation of the main stages of performing work using the scratch technique. 3. Practical part. Mastering techniques for performing non-traditional grattage drawing techniques. 4. Reflection of the master class participants. Summarizing.
(sl 1) Progress of the master class. Even the ancient Greek scientist and philosopher Aristotle said: “Drawing contributes to the diversified development of the child.” Drawing in kindergarten, just like the activity of an artist, includes a certain technique that a child needs to master in order for him to be able to use it freely and to most fully express his impressions in a drawing.
(sl. 2) The use of non-traditional drawing techniques makes the learning process interesting and entertaining, creates a cheerful working mood in children, and makes it easier to overcome difficulties in mastering program material. Various non-traditional techniques are now known (finger painting, hand printing, signet painting, tamponing, plasticine painting, batik and many others). Each of these techniques is a small game.
(sl. 3) At our master class we will talk about a technique called “grattage”, which has been used for a very long time, but it is not for nothing that they say “The new is the long-forgotten old”
(sl. 4) The word “Scratching” comes from the French word - scrape, scratch, therefore another name for the technique is the scratching technique. Another name for this technique is waxography.
A scratch is a graphic design made by scratching wax with a sharp instrument.
There is some mystery and volume in the works made using this technique, each one turns out to be unique. Various means of expression are used here - line, stroke, spot, contrast.
(str. 5) The use of this technique solves a number of problems: this is an acquaintance with new possibilities in drawing; development of creative abilities; nurturing a sense of beauty, love of creativity
(ml 6) Drawing using the scratch technique brings a lot of benefits to preschoolers:
- Fine motor skills and hand-eye coordination develop.
- Helps relieve children's fears.
- Fantasy is actively developing. The child feels bolder, more relaxed, and has greater freedom for self-expression. In any case, a composition using the waxography technique will turn out beautiful and original. The preschooler begins to believe in his abilities.
(str. 7) The wonderful, unusual technique “Scratching” will be interesting to children of any age. It is recommended to use this technique with middle-aged children. In our kindergarten we gradually introduce this technique from a young age, introducing them to the candle and its properties and gouache. Here you can suggest drawing with a candle on a sheet of paper, and then tinting this sheet with paints, as well as using stencil and template designs. The fact is that when scratching, it is quite difficult to correct the mistake made (an extra line, etc.). Therefore, by tracing an image using a stencil or template, children will practice so that they can later create their own images. In addition, the stencil base can be supplemented with your own unique elements. For example, a child draws a fish using a stencil and completes the image with seaweed, pebbles, etc.
(sl. For drawing using the scratch technique you will need:
- The base is thick enough paper (so that the tool does not cut through it). You can take cardboard, including colored cardboard.
- To cover the base: wax candles, wax crayons, gouache or ink (usually black, but you can also use other dark colors - blue, purple, brown).
- Liquid soap, PVA glue or detergent (to add to gouache).
- A sponge or wide brush for painting the base with gouache.
- A sharp tool for scratching an image: a toothpick, a glass, a used ballpoint pen, a pointed wooden stick, a plastic fork, etc.
- A dry cloth to carefully remove any remaining wax after painting.
How to make a drawing using the grattage technique: instructions
Drawing using scratch paper technique
Before making the actual picture, the sheet must be secured with tape on a flat surface. After this, follow the instructions:
- First, dry the surface well with a napkin or clean sheet of paper.
- Paint the surface with pastels of any desired colors
- To ensure a smooth flow of shades, rub the transition areas with a piece of paper.
- Now apply black ink or gouache to the entire surface.
- Mark the main contours with a white pencil or chalk
- Remember that you only need to do the basic outlines and very carefully, because it will be extremely difficult to erase the pencil
- Further along the contours, begin to scratch the surface
- Do not press too hard, just remove the black layer
- After completing the basic outlines, add the remaining details for the drawing and finish it
It is also important to say that grattage turns out to be negative or positive. For the first case, the substrate is black, and for the second, dark. When the surface is covered with wax, it will turn out semi-matte, and you need to be careful with it, because it does not tolerate water and hands. If you leave your fingerprints, you won’t be able to remove them later.
Methods for preparing sheets for scratch paper drawing
You can buy ready-made sets of albums or notebooks for Scratchboard drawings. But there are also technologies for making engravings with your own hands. The most important thing for a new painting is to prepare a base sheet for scratching the drawings. The sheet must be made smooth and sliding, and a dark thick layer of paint or ink must be applied to the sliding surface, which will be scratched. In our master classes with photos you will find step-by-step instructions for these simple processes.
Scratch 1: using a candle and black ink
This is the simplest type of grattage, which produces a white design on a black background. For it you will need white cardboard, a wax or paraffin candle, black ink, laundry soap, a soft brush and a scratching tool. First, the sheet is rubbed with a candle and then covered with black ink. Soap is necessary to lather the brush before dipping it into mascara. This is necessary for better fixation of the mascara. When it dries, you can scratch the picture.
Scratchboard 2: with oil pastels
This picture will already be more colorful, because instead of a candle, a sheet of paper is rubbed with colored crayons made from oil pastels. You can use a combination of many colors and apply them on the sheet in any order: chaotic spots, stripes or squares. All other steps are exactly the same as in the version with a candle. When the drawing is scratched, a bright multi-colored layer will appear under the black background, which will give the picture an unusual effect.
Scratch 3: using a candle and gouache
This method uses a paraffin candle to create a sliding layer. But before treating the sheet with it, it is decorated with rainbow stripes of multi-colored gouache. On top, gouache is again applied to the paraffin layer, only this time it is black. When the black layer is dry, you can scratch your masterpiece. It will also be created with colorful multi-colored lines on a black background.
Scratchboard 4: With multi-colored wax crayons and gouache
A white sheet of cardboard is filled with spots or squares using multi-colored wax crayons. The result is a bright panel of “patches”. There is one rule for applying color with crayons: the main thing is that there are no gaps. Then the sheet is covered with black or dark blue gouache. And when the background dries, you can scratch your miracle drawing.
Scratchboard 5: With markers, tape and acrylic background
To make such a drawing using the scratching technique, you will need dark acrylic paint, tape, scissors, multi-colored bright markers or felt-tip pens, a soft brush, any dishwashing detergent and, of course, a sharp object - a tool for drawing.
First, a sheet of paper is filled with colored spots, stripes or squares using markers. After this, the surface of the sheet is laminated with tape (evenly, without creases or bubbles). When the multi-colored smooth surface is ready, it is covered with a background. To do this, mix detergent with dark acrylic in a 1 to 1 ratio. You can also use a hairdryer to speed up the drying process. Now you can start scratching the design.
Grattage technique - how to do it: expert advice
Tips for work
- If you don’t dry the cardboard well, your paintings will turn out uneven, or rather, the edges will cling
- The surface of the work must be flat so that the drawing does not sag. For immobility, you can fix it with tape
- You can use the materials for drawing that you like best, it all depends on your desire and preferences
- If your base is metal or wood, then gouache is not necessary. All you have to do is apply wax on it and make an image.
- The paint is applied with a soft and flat brush so that the layer is even. A hard brush will damage the wax.
- It is enough to apply the brush only once so that the paper or cardboard does not swell.
- Intermediate layers are made with wax, crayons or yolk, and the top one is covered with gouache or ink
- To avoid getting your hands dirty while scratching, it is recommended to pour a little PVA glue into the paint.
- When you apply the final coat, to prevent the paint from pilling, apply chalk on top
LiveInternetLiveInternet
Quote from Elnik14
Read in full In your quotation book or community!
Grattage technique
Author: Moyra
This technique is also called “graffito”, and the highlight of the work is that the design is scratched onto the sheet. Classic scratching is done like this: a sheet of paper is covered with wax and painted over with black ink, and then scratched. I was taught a simpler and more accessible way. I'm sharing :)
We will need:
- Thick cardboard - try different options, I use glossy, but regular white cardboard is also suitable for children's creativity)
- Oil pastels
- Black gouache
- Soap (hand or even laundry soap)
- Toothpick or skewer (you can even use a cocktail umbrella)
The cardboard is densely shaded with pastel. If you have some kind of idea right away, you can highlight future details of the drawing with color spots; if not, just paint over small areas (try to make color transitions).
(There will be several drawings here. At least three:) The blue tool is the same gravel, next to it is a former cocktail umbrella)
Black gouache is mixed with a small amount of soap. If you don’t mind sacrificing a piece of soap, you can simply dilute the paint directly on it, like on a palette :) We need to paint over our pastel sketch with gouache. Paint it tightly so that the paint does not show through. You can let it dry and go over it a second time (be careful, the paint sometimes slips, it is better to use fresh gouache).
When your radical black color reaches the desired condition (that is, a) it will not show through and b) it has dried completely), you can draw the contours - with a pencil (carefully, do not scratch the paint ahead of time) or transfer it using carbon paper (don’t be alarmed, against the background of black gouache you will get a very visible gray color). Take a toothpick/cocktail umbrella/sticker (the latter can be found in art kits codenamed “Engraving”) and scratch the outlines.
You understand, it is better to choose a drawing with a lot of small details, then it will be beautiful. All. For complete happiness, you can go over the edges with the same black gouache. By the way, all minor flaws can be easily corrected with it.
What to draw?
Scratchboarding is an ideal technique for drawing New Year's Eve (or any other night landscape), a flying witch against the backdrop of the Moon (for Halloween), deep space... However, butterflies, flowers, and even portraits turn out no worse.
Scratchboard - examples of drawings: photos
Photo 1
Photo 2
Photo 3
Photo 4