Watercolor autumn landscape
We're sure you've never worked with watercolors like this before! Discover a new signature technique from the master of the landscape genre, with which you can achieve the perfect airiness of watercolor. The technique involves painting wet in several stages with preliminary soaking of the sheet at each new session.
About the master class:
- find out what materials will be useful to you for painting a landscape using the raw technique
- prepare your drawing in such a way that while working with watercolors you can only think about painting
- learn to control the drying process of the sheet
- learn to saturate your work with color gradually
- learn how to avoid rough paint runs
The master class will be of interest to all watercolor lovers . Beginners will be able to try themselves in the landscape genre. And those who have been working with watercolors for a long time will get acquainted with a new technique that will help diversify creativity and bring into it that airiness that is so clearly visible in the author’s works.
about the author
Evgeny Dubitsky is a master of the landscape genre. His works are distinguished by incredible lightness and airiness, with the help of which he conveys light, air, space, mood and the inner state of nature.
The landscapes are filled with kindness and love for Russian nature. Its remote corners, rural views and cityscapes equally attract the artist. With special love he paints the environs of St. Petersburg, Pavlovsk, and old Russian cities.
Program
- LECTURE 1 . Getting to know the author and his technique in the raw. Materials. Pencils and formoplast. Paints and brushes. Palette. Paper. Bath and wet sea sponge. Tablet. What tool to use to regulate the flow of water?
LECTURE 2 . Pencil drawing for watercolor. What to pay special attention to to facilitate the painting process.- LECTURE 3. The first stage of painting. Soaking the leaf in a bath of water. Gum arabic solution and why it is needed. Filling the main planes with a unifying tone. We form the main color spots.
- LECTURE 4 . Second stage of painting. Soaking the sheet. We correct places that were numb during the first session. Studying the shape of trees. Color saturation. Glare in the reflection of water.
- LECTURE 5. The third stage of painting. We continue to work on the reflection of water. We saturate the greens with color.
- LECTURE 6. The fourth stage of painting. We clean the work after soaking. Adding more volume. We regulate the speed of water drainage and the drying time of the work.
- LECTURE 7. The fifth stage of painting. Working out the details and completing the work.
OTHER WORKS OF THE AUTHOR
- List of Neva Palette paint colors: cadmium lemon, yellow ocher, golden ocher, cadmium red light, kraplak red light, violet, indigo, cobalt blue, blue, emerald green, yellow-green, umber, mars brown, burnt umber, sepia, natural sienna, neutral black.
- List of brushes: squirrel No. 17, synthetic “Gamma” No. 12, No. 8, No. 7, No. 3, kolinsky brushes No. 12, No. 10, No. 8, No. 7, No. 3, flat bristles No. 5, No. 3.
- Paper: Saunders Waterford 190 and 300 gm.
Source: https://lectoroom.ru/courses/waternature
Watercolor painting “wet”
This sketch, done in the open air, conveys the evening state of the landscape. If the sketch is painted using the technique of watercolor painting “in the raw” and in a short period of time, in order to have time to capture the rapidly changing state of nature, then it is necessary to abandon the precise preparatory drawing, since it is impossible to accurately predict how the colors will blur.
Therefore, it was best to just outline the horizon line and the main contours (stacks, a tree in the distance and approximately the contours of the clouds) with a thin line without pressure.
This sketch should convey only an instant impression, a feeling of a moment. Too much detail in the clouds, or too precise in the shapes of the wood and staves would have changed the character of the study considerably.
Would it be possible to predict the contours of the trees in the background? Watercolor and wet paper did it for us. Pay attention to how the horizon line is located in the sketch. It divides the plane of the sketch into two unequal parts, which is compositionally correct. The task was to show exactly the beautiful sky at sunset.
Sequence of work on the sketch
After you have outlined the horizon line with a pencil, which is located approximately at the level of the lower third of the sheet of paper and the main contours, you need to moisten the watercolor paper with water generously or not very much (taking into account the humidity of the air, the complexity of the landscape and the time of working on the sketch). This is determined subconsciously depending on the experience of the watercolorist.
A landscape sketch is usually painted from the sky. Therefore, first, the lightest general (local) tone of the sky is applied with a wide brush. In this case it is light purple. The right side of the sketch is denser, and the left is lighter. The lower part of the sketch is also filled with this tone. Firstly, to create the overall color of the picture, and secondly, to create later light areas on the stacks and the ground. Here it is appropriate to quote the words of V. Vysotsky: “The sky is reflected in the forest as in water and the trees are blue.”
Next, you should wait a while and let the sky dry slightly, or, as they say, “shake” until it reaches the so-called watercolor moisture. This means that there are no more puddles of paint on the paper backing, the paint has been absorbed into the paper, but the paper still has good moisture content.
Drawing "wet"
Once upon a time, when I was in college, we studied various drawing techniques. But over the years, I conveniently forgot about everything. And so, when I visited Masha once again on the blog Colorful Thoughts, I read an article about how she and Vladik created the background for a picture using a toothbrush. This is what made me begin to remember what we were taught in my student years. And today I present to your attention a drawing made by Ruslan using the “wet” technique. This was done, of course, after my mother’s show. But Ruslan quickly understood how to work.
When painting on a wet sheet, the paint combines with the wet sheet, causing the contours of the drawing to blur.
Use brushes of different sizes, a sponge, a thick sheet (preferably whatman paper or sheets for watercolors that need to be fixed), watercolor, and a palette.
There are at least two ways of drawing in this technique: 1. drawing on a specific topic: landscape, walk, animals, flowers, etc., when the drawing is created on a wet sheet, 2. drawing a background for the future drawing, when the colors spread, connecting and shimmering with each other, they create a pattern that determines the theme of further drawing “dry”
Look. Let your imagination run wild. Rotate the sheet 90 and 180 degrees. What does your imagination draw?
In this technique, it is important to wet the sheet correctly. If there is not enough moisture, the paint will not spread as we need. If you wet the sheet too much with water, the drawing may not work out. Therefore, it is better for children to use a sponge to moisten the sheet: moisten it in water, squeeze it out and run it over the sheet.
You can not wet the entire sheet, but only part of it, or draw some shape with water. Then, when you add paint, you will find that it will only spread within these limits.
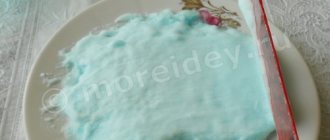
Ruslan and I used two methods at once. Of course, I myself determined the theme of the future drawing - “Winter” - but I led the child to this through a conversation. We talked about the seasons, what time of year it is now. What colors does winter have (white, blue, blue, purple). Since this winter did not particularly please us with snow (it was only at the very beginning), we remembered the properties of snow. You can use pictures depicting a snowy winter, where the child can also identify winter colors.
After moistening the sheet, applying and spreading the paint, we sprinkled the sheet with salt (coarse salt is good), which absorbs the paint around it, and after drying, small stars form (unfortunately, this is hard to see in the photo).
After the sheet had dried, I asked Ruslan what he saw in the drawing, what it looked like.
- I see a Christmas tree, right here. Forest and snow.
I suggested drawing a snowman. For this we used white gouache and a pre-cut foam circle. The gouache was applied to the palette, the foam rubber was moistened in water and dipped into the gouache, and then onto our sheet with a winter forest background.
We completed the elements of the snowman using a brush and watercolors: bucket, hands, nose. The mouth, eyes and buttons were painted with the back of the brush. This is what we got as a snowman in the forest.
Ruslan really enjoyed painting using the wet-on-wet technique. After the snowman, he drew (without my control) the sky. But I think what attracted him more to all this creativity was the sprinkling of salt on the drawing.
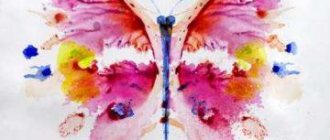
But I found these drawings in my large folder. These are drawings by my students. They are made according to the themes “Female image”, “Male image” and... what do you think it is?
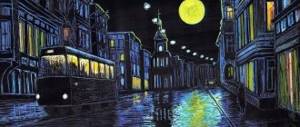
By the way, an excellent example of this technique is the magnificent drawings of Victoria Kirdiy.
I wish you creative inspiration!
Author Seytnefesova Svetlana
How to Improve Your Wet Watercolor Technique
I am passionate about watercolor painting using a raw technique. I really like to paint quickly, and each new painting challenges me: wet paint is laid on wet or damp paper, the colors flow and merge into each other in beautiful, unexpected ways, creating a diffusion effect. This is the method I am most comfortable using to embody my own view of objects.
Before I start painting, I quickly and easily draw basic outlines to place the focal point of my painting. I like to avoid a lot of sketching and leave a lot of space on the paper because I prefer to create some shapes intuitively.
I use 300gsm 100% cotton watercolor paper and stretch it so that I have a perfect flat surface to work on.
I only paint with clear watercolors (most good watercolor brands will indicate whether a particular color is clear, translucent or opaque).
I avoid painting with opaque colors as I prefer the light in my watercolors to come from the white paper rather than the paint itself. As a result, I paint from light to dark, although sometimes I restore some white areas by brushing the paint off the paper.
Try to draw quickly using the raw technique. These sunflowers only took me 30 minutes to make. Or rather, I should say that it was time to accomplish; spontaneity and intuition take up most of the time in most cases.
Selection of materials
Here you can see the full range of my materials. I work in watercolor from tubes and pans, presented in a portable folding plastic palette. I prefer to paint with tube pigments because the consistency of these watercolors is easier to work with.
However, I do use pans for some colors, so before I start painting, I pre-wet them with a spray bottle to get the same creamy consistency as the tubes. I use round and flat pointed brushes made from synthetic fibers and one or two extra fine brushes for final accents.
Applying a bright fill
After applying a generous amount of water to the stretched watercolor paper, I begin working on the background with a light, cool mixture of Cobalt Blue, Ultramarine Blue and Quinacridone Gold. Using a one inch flat brush I did this very carefully as it is important to keep the colors clean and bright for the first wash. A background that is too dark at this stage can affect the entire composition.
We begin to introduce flowers
I started painting sunflower petals with a mixture of Quinacridone Gold, Cadmium Yellow Light and Cadmium Orange. For the center of the flowers I used a mixture of Burnt Sienna, Sepia and Sangue di Drago. It is important to start painting the flowers while the first background fill is still wet. If you want to soften the edges of the composition, you need to tie the flowers into the background in this way.
Maintaining balance
After first filling in the background and flowers, I'll start drawing two or three new random flowers on top. I'll soften the edges of these colors and let them overlap to enhance the background.
Balance and unity are very important in a composition such as this, so if I feel like I can add darker, looser or washed out areas to the composition to achieve this, now is the best stage to do so.
We erase the excess
Notice that when I added a darker flower against a background closer to the bright one, the contrast between the two added colors refreshed and awakened the painting.
I achieved this by first removing excess paint with a wide brush and then applying a darker mixture of Quinacridone Gold, Raw Umber and a touch of Burnt Sienna to the petals. Using this technique, you can create interesting highlights that are smoothed around the edges.
We continue to edit
I used a round brush to enhance the center of the sunflowers with a mixture of Sepia and Burnt Sienna. If you keep the paper damp at this stage, you can still freely edit, leave or add anything you want throughout the composition.
At this stage of my work I felt that I needed to add strong contrasts because wet paper tends to make any shades you put on it appear paler. Dark colors lighten significantly as the paint dries, and this is where we can highlight contrasts.
Working out the contours
Now I start working on the petals with a pointed round brush, smoothly drawing the outlines of the petals from the center of the flower to the tip.
I used a mixture of Quinacridone Gold and Burnt Sienna to make these lines. You don't need to draw outlines for each petal, just make a few lines to give the viewer something to visualize and the multiple petals will just visually blend together.
Emphasizing contrasts
I work with the background again, adding dark touches to lighter shapes or white spaces because I want the center of the painting to have more obvious contrasts for the most interest.
At this point I mixed several blues and yellows, including Cobalt Blue, Prussian Blue, Quinacridone Gold and Raw Sienna, to create a rich green for the multiple leaves. on the background.
Painting with wet watercolors
The terms "wet on dry" and "wet on wet" mean that strokes of wet paint are applied to a dry layer or wet area. These two methods of working with watercolor provide a layer of color over previously applied wet or dry watercolor, and produce very different effects:
- in paintings made using the “wet on dry” technique, you can see sharp edges and clear shapes;
- In works using the wet watercolor technique, colors dissolve into each other, creating soft edges and blending.
Advantages
The biggest advantage of using the wet-on-wet method is that sometimes it is impossible to know exactly what effect you will achieve.
Adding another layer of paint to wet watercolor on paper creates a soft, diffused halftone effect. The degree of mixing depends on the moisture content of the first layer. The result is the effect of blurred shapes or a widely spreading free pattern.
With practice comes the ability to get a specific result from this method. The raw technique reproduces spectacular, vibrant paintings, flowers, landscapes and makes it possible to experiment.
This is especially interesting in painting with diffusing forms, without unnecessary details - light landscapes, simple still lifes, flowers, abstraction. Methods of working with watercolors produce transparent, airy shades with soft or clear transitions.
Features of the technology
The wet-on-wet method of watercolor painting involves applying paint or water to any area of the painting. The main goal is to wet the entire sheet of paper until the surface no longer absorbs water, but allows the liquid to create a thin layer on the surface. Touching a wet sheet with a large brush, saturated with paint, produces an amazing result in painting.
The hydrophilic, closely spaced, cellulose fibers of watercolor paper provide adhesion and capillary action—water and wet paint migrate from wet to dry surfaces of the painting.
The pigment spreads along the edge of the wet area, leaving a lighter tone in the center. The dark pigment creates irregular, wavy stripes. Subtle or pronounced bleeding occurs depending on the consistency of the paint in different areas and moisture imbalance.
Effects
The wet-on-wet technique involves various specific painting effects, each produced using different procedures.
Diffusion of osmotic imbalance
Concentrated paint is applied to dampened paper and diffuses or expands onto the clean area, especially if the paint is prepared using a dispersant. This creates a characteristic pattern similar to bird feathers. You can enhance the effect in landscapes by tilting the surface of the paper before drying.
Fill color
Artists pour a large amount of slightly thinned paint over the entire surface or individual areas of the design and, using a brush, spray with water, or judicious tilt, create wet painted areas.
The color is applied in a few minutes in random, delicate variations, which are completed with a damp brush or adding paint to the desired shape - this helps to paint flowers.
Popular combinations of red, yellow and blue are used in selected areas - once mixed and dried, they provide striking shades. The reserved white areas are first covered with film, masking tape or liquid latex.
A full fill of one color is done with a wide brush to obtain a uniform shade without streaks. Fragmentarily wetted sheets in specific places make it possible to obtain elongated strokes that capture dry and wet areas and acquire unique shapes, continuity, clear outlines in dry areas and spreading in moist areas.
For a gradient, the area of color is first precisely defined using diluted paint or pure water, then the more concentrated paint is touched to the wet areas with a brush. The added paint creates shapes by tilting or shading. Concentrated color is loosened by spreading the paint using a damp brush.
Source: https://artrecept.com/zhivopis/tehnika/akvarel-po-syromu
Working on wet paper surface
A more capricious and whimsical manner of painting in wet was born in England, probably because in a country located on an island surrounded by water, in this “foggy Albion,” the increased humidity of the air itself dictated the nature of painting to be light and soft. Painting with watercolors on wet paper is called “English watercolor”. This technique gives the watercolor depth and creates a sense of sunlight and aerial perspective. French watercolorists call the method of working on a damp sheet of paper: “travailler dans l`eau” (working in water). To maintain stable sheet moisture, in order to have a long-term opportunity to work with a complex pictorial form, easily fusing and mixing paints on a wet sheet, artists resorted to numerous tricks. To do this, different methods were used to moisten the paper from below.
It was in England in the 19th century that a special type of eraser was invented for small landscapes in the open air - a device for stretching wet paper without glue. The simple design consisted of two wooden frames that fit into each other quite freely. The first frame played the role of a board: paper was placed on it, which was then clamped at the edges by the second frame; the paper secured in this way took the form of a canvas stretched on a stretcher. If necessary, the paper was moistened from below with hot steam.
Another type of eraser made it possible to use a different method of moistening the sheet. It was a frame and a board or tablet included in it. A moistened sheet of paper was placed on the board, its edges were folded over the edges of the board, and the board with the sheet of paper was inserted into the frame. Once dry, the paper in the eraser was evenly stretched. When working with wet watercolors, cloth or flannel soaked in water was placed under a damp sheet of paper, which nourished the paper with moisture for a long time as it dried on the outside.
All of the methods described made it easy to maintain moisture in the paper while working, which eliminated the need to use any other means to prevent watercolor paints from drying out quickly. The literature also describes chemical methods for retaining moisture on the leaf. For example, a little glycerin and honey were added to the water for diluting paints, or a solution of calcium chloride or gumdragant was used. Some ancient miniaturists used snail saliva or fig milk for this purpose. These products were effective, but not safe, since the slowdown in drying was due to their hygroscopicity, and this ability to absorb and retain moisture later also manifested itself in watercolors. In addition, such means made the paint more viscous and thick, which directly changed the nature of the painting, and it lost its valuable qualities.
The method of working in the wet is especially successfully used in landscape painting, when it is necessary to convey the state of a foggy morning, cloudy day, clouds, etc. The sky is one of the most difficult components of a landscape, determining its color and tonal state. In painting, the variability of the color of the sky and clouds is difficult to convey even in oil, where it is possible to make corrections and rewrite failed places. When applying watercolor paints on wet paper, the artist often depends on the vagaries of the brushstroke spreading across the wet paper. This method of work requires constant self-control and fluent use of the brush from the painter. He must have a clear idea of what he wants and how he should solve the problem.
Before starting work, the front surface of the paper is moistened with water, and then the desired shades of color are applied to the still moistened surface. The moisture content of the paper softens the boundaries between individual tones. You should start writing on wet paper after the paper has been “shaken” evenly, as artists say, and there is no excess water on its surface. The degree of humidity of the paper and the different inclination of the tablet allow you to regulate and limit the spreading of paint to the required limits, obtain the desired color combinations, and achieve their purity and transparency.
It is more convenient to start work from the top, having previously determined the basic relationships in tone and color. While the applied color is still wet, another color is applied next to it, sometimes partially covering the neighboring one. If any adjustments need to be made to the specified color, they are added to the wet paint layer. The desired shades of color can first be selected on a palette or directly on paper. As the paper dries, especially on a hot sunny day, the paper is moistened again by placing a wet rag under it, this allows you to work for a longer time. Paints applied wet usually blur and go beyond the boundaries of the drawing of the objects. While the watercolor has not had time to dry, excess swollen places and unwanted layers of paint can be carefully washed off or selected with a slightly wrung out clean brush.
See also:
8 Ways to Watercolor Paint
by Kate Fenwick
“Watercolor painting course. Landscape in minutes"
Watercolor painting opens up a new world that amazes the imagination: something incredible happens, colors are mixed and wonderful coloristic and light-air effects are obtained.
Many people think that they can't draw. This is wrong. I don't believe that drawing is a gift. Anyone can be taught to draw. However, we must work on what we want to bring to life, the same applies to drawing. Even if you never achieve mastery, drawing will change your life - ask any artist. Yes, you will make mistakes; we all do them. The secret is to understand what exactly we did wrong and learn from our mistakes.
My task is to free you from twenty years of study. I'll teach you techniques, give you tips, and demonstrate useful skills that I've perfected through years of painting and experimentation. I will help you learn to depict nature, including the main elements of the landscape: sky, mountains, lakes, trees, rocks, running water, buildings, bridges. I'll also show you how to add mood and atmosphere to your landscape. I'm not going to force a certain style on you.
Over time, with practice, you will develop your own, easily recognizable style. Painting with watercolors is easier than you think. I'm glad to have the opportunity to show you how it's done.
Good luck! Kate Fenwick