Summary of GCD for modeling in the younger group
Summary of educational activities for modeling in the junior group on the topic “Carrot for a bunny.”
Author: Chernikova Dina Nikolaevna, teacher at MBDOU kindergarten No. 1 in the village of Staroye Melkovo, Tver region, Konakovsky district. Description of the material: I offer you a summary of direct educational activities for children of the younger group (2-3 years old) on modeling on the topic “Carrots for the Bunny.” This material will be useful to teachers of the younger group. This is a summary of an educational lesson aimed at developing children’s interest in working with plasticine, coordinating the movements of both hands, and developing fine motor skills.
Summary of direct educational activities on modeling in the junior group on the topic “Carrot for the Bunny”
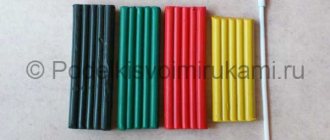
Integration of educational areas: “Cognition”, “Reading fiction”, “Artistic creativity”, “Communication”, “Socialization”. Goal: to teach children to recognize vegetables in their natural form by naming them; learn to roll out sausages from plasticine, connect plasticine parts by pressing, develop an interest in working with plasticine, coordinate the movements of both hands, and develop fine motor skills. Modeling techniques: rolling, pinching, joining parts. Material: orange plasticine, divided into medium-sized pieces; green plasticine in bars; natural vegetables; bunny toy; bunny basket; basket. Methodological techniques: game situation, examination of objects, conversation-dialogue, productive activity of children, analysis, summing up. Preliminary work: looking at illustrations, guessing riddles, the didactic game “Treat the Bunny,” the outdoor game “The Little White Bunny Is Sitting,” the finger game “Bunny.”
Progress of GCD
Several gymnastic mats-"beds" are laid out on the floor; natural vegetables lie on them.
The teacher has a basket in his hands. 1. Outdoor game “We’ll go to the garden”
We'll go to the garden and collect the harvest.
We will dig up potatoes, we will grow carrots, we will cut a head of cabbage. Round, round, very tasty. Let's pick a little sorrel and go back along the path. (children perform movements according to the text of the poem, help collect vegetables in the basket)
2. Examination of vegetables.
The teacher takes each vegetable out of the basket one by one and describes it. Educator: What is this? Children: Potatoes. Educator: This is a potato, it grew in the garden. It is hard, round and brown. The teacher passes it to each child in turn, giving them the opportunity to touch and hold it in their hands. Educator: What kind of vegetable is this, orange and with a green tail? Children: Carrot. Educator: Guess what vegetable the riddle is about. A round side, a yellow side, a bun sits in the garden bed, firmly rooted in the ground. What is this? Children: Turnip. Educator: Correct. Here is the turnip. Children look at a turnip.
The teacher takes cabbage, cucumber and tomato from the basket for inspection. 3.Game motivation.
Educator: Guys, look who is hiding here and trembling? Children: Bunny (children find a bunny). Educator: Stroke the bunny, guys, so that he is not afraid of you (children are stroking a toy). Where did the bunny come from? Children: From the forest. Educator: Do you feel sorry for the bunny? Children: It's a shame. Educator: What does the bunny like to eat? Children: He loves carrots. Educator: Let's treat our bunny with a carrot that we pulled out in the garden (children treat the bunny with carrots).
One carrot is not enough for a bunny. Let's, guys, make some more carrots for his family who remained in the forest. 4.Order of work.
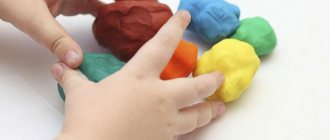
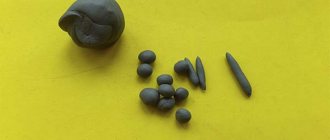
a) The teacher demonstrates how to sculpt carrots: rolls out a sausage from a piece of orange plasticine (length 5-6 cm, diameter 2 cm); then pinch off a small piece from a block of green plasticine and makes a sausage (length 2-2.5 cm, diameter 5 mm), rolling it out with your finger - this is the tail, presses it onto the carrot. b) Children making their own carrots. The teacher helps with advice, guiding questions, and individual demonstrations of sculpting methods.
5.Result.
Review of finished works (they are given only a positive assessment).
Children treat the bunny. The little hare thanks the children and says that he really enjoyed visiting the guys, but he needs to return home. Children put their carrots in a basket for the bunny and accompany him to the forest.
We recommend watching:
Synopsis of a research and educational lesson in the 2nd junior group “Let's help the bear cub sew on a note of the educational activity using health-saving technologies “On a visit to the sun” for younger children Synopsis of the educational activity in the 1st junior group on FEMP “Let's treat the Bunny with a carrot”
Summary of educational activities in the 2nd junior group “The first step on the path to health”
Similar articles:
Summary of GCD for modeling in the 1st junior group of kindergarten
Summary of GCD in the 1st junior group by February 23
Summary of GCD on FEMP in the junior group of kindergarten “Trip on a Train to the Forest”
How to make carrots
In order for your child to understand how to make a carrot out of paper, you should first analyze all the work step by step and watch the video.
Required materials and tools
For a fruitful creative process, you should prepare in advance all the necessary materials and tools:
- colored paper or cardboard;
- scissors;
- a simple pencil for tracing;
- glue;
- markers, paints or colored pencils.
Ribbons, ribbons or frames, stands may be required when decorating the finished work - for hanging or installation (stationary).
Step-by-step assembly of a voluminous carrot
When making a craft with your own hands, you should assemble it strictly in stages to avoid mistakes, then the voluminous paper carrot will turn out neat and “natural.” The work is carried out step by step:
- For voluminous carrots, 194 orange, 73 green modules and 1.5 pieces are prepared from origami modules. toothpicks.
- Rows 1 and 2 – 16 green and orange elements each. The latter are attached to the former.
- 3rd row in the same number of orange modules (short side).
- Turn the workpiece inside out.
- Then collect 10 more rows of the same color, 16 pieces each. – inserting with the long side.
- The next row of 11 modules - each with 3 corners.
- The 15th row is from the same number of pieces, and the 16th is from 8 pieces. (one for three corners).
- The last row is 4 modules.
- From 19 green modules, collect tops - 3 pieces, insert ½ toothpicks into them.
- The parts are connected.
A very beautiful craft is ready.
Bulk carrots can be made in another way:
- a sheet of orange paper is rolled into a bag - the excess is cut off;
- They create a semblance of tops from corrugated green paper, glue it to the inside of a bag, which is also fixed with glue.
You can use felt-tip pens to apply additional elements for maximum similarity.
This option is suitable for packing surprises inside if the foliage is tied.
Video master class
To make a carrot out of paper on the first try, you should definitely familiarize yourself with the video material on this topic. Usually after this there are no incomprehensible moments left, the children get to work with enthusiasm.
Modular origami fruits and vegetables. No. 3 Carrot
How to make a paper carrot sweets – EP – simplekidscrafts – simplekidscrafts
Origami with a simple diagram
Origami carrots with a simple assembly diagram are recommended for children of any age. To work you will need orange (15x15 cm) and two green (7.5x7.5 cm) squares of colored paper. Assembly in stages:
- the orange square is folded diagonally and in half, the folds are ironed;
- straighten the workpiece into a large triangle, bend the sides towards the center;
- each side is folded again towards the middle from the bottom;
- an equilateral rhombus with a pocket is obtained;
- the green square is folded diagonally, unfolded, and both sides are folded toward the center;
- turn the workpiece over, fold narrow folds towards the middle;
- do the same with the second green square, but without turning it over;
- green blanks are inserted into the pocket of the orange blank.
The origami craft is ready.
Origami carrot
Applications for children
The original carrot applique can be made in different ways, for example, a voluminous craft is assembled like this:
- Draw part templates with a pencil on colored paper and cut them out.
- The strips of the orange workpiece are cut off, leaving the bases intact for fixing.
- They do the same with green stock.
- The prepared elements of the carrot are fixed with glue, and the tops are glued.
The finished vegetable/vegetables are placed on cardboard, creating a composition, and glued - the spectacular picture is ready.
Crafts made in the younger group
An easy craft scheme for the younger group could be as follows:
- the child traces his palm with a pencil on green colored paper - the blank is cut off;
- cut out the shape of a carrot from orange paper;
- two parts are glued together.
The application is ready, it can be used in games, or hung on a string, or glued to a sheet of white paper.
Craft ideas for middle school
The middle group can handle more complex crafts. Paper carrots are collected step by step:
- table paper napkins are rolled into a roll;
- wrap a roll of napkin with corrugated orange paper, giving it the shape of a carrot - a cone (thin bottom and wider top);
- tops are cut from green paper, giving natural curves with scissors;
- connect the parts with glue.
A simple way to origami carrots - in seven steps:
What senior and preparatory students can do
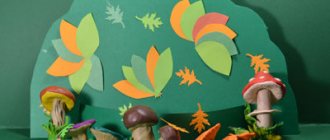
Children of the senior and preparatory groups can already independently make not only carrots, but also a simple composition, for example, an applique of a hare with a carrot. The work can be done both in the form of an applique and in the form of origami, where the carrot for the bunny will be a three-dimensional diamond-shaped, cylindrical shape.
Carrot for the bunny. Craft for children 2-3 years old.