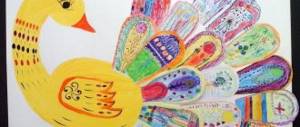
A colorful paper peacock will decorate the interior of your home, an exhibition of children's works, or can become an original gift for friends or family.
In the process of working, the child learns to interact with cardboard and paper, to fold it in a certain way.
Such experience helps develop imagination and reveal creativity. The child gains communication skills while working with other participants in the master class.
Basic manufacturing options
Depending on the age of the child and the aesthetic preferences of the participants in the creative process, you can make the craft in various versions: in the form of a cardboard base with an accordion tail, using the origami or quilling technique, make an applique.
Folded like an accordion
School students can independently create a paper craft in the form of a peacock with an accordion-folded tail. Young children will cope with this task together with their parents or teacher.
Teachers of fine arts and other subjects of an artistic and aesthetic nature can also adopt this idea.
1. Take a template of a peacock’s body with cooking and a characteristic crest. It can be made by drawing the silhouette of a bird on cardboard or using a ready-made blank, then carefully cutting it out along the contours.
2. Place the template on a sheet of colored paper, trace it with a simple pencil, and cut it out. We cut in two places to insert the tail. The length of the oblong slot is about 1 cm. We draw eyes on both sides using a felt-tip pen or glue ready-made ones.
3. Let's start working on the most spectacular element of the craft - the bird's bright tail. Using a glue stick, we connect three strips of different colors together. We apply and glue them horizontally. We make two such multi-colored blanks. We take the resulting striped sheet of paper and begin to fold it in the form of an accordion. We also make bends of 1 cm.
4. We place the finished corrugated workpiece horizontally in front of us on the table and fold it in half. We insert the accordions one by one into the slots and glue them at several points to combine them into one fluffy tail.
5. Draw ovals of different sizes (1, 1.5 and 2 cm) and colors on paper, cut them out, glue medium and small ones onto large ones. These are the “eyes” for the tail. We paste them in random order.
Origami technique
The art of origami allows you to create incredible shapes by folding paper according to patterns. Let's make a figurine of a peacock using this technique.
- We take a square of paper and bend it, connecting the opposite vertices, we get a diagonal. We bend the corners to the diagonal line.
- We turn over and bend the corners in different directions from ourselves, then bend the small corners to the front side of the workpiece.
- We bend the top of the figure down and the corner up. Fold the workpiece in half. We lift the neck of the future peacock up.
- Let's start working on the tail: draw patterns on it with felt-tip pens. We make the bird's eyes and beak, and paint the wings. The plumage on the head can be made from thin strips of colored paper. We create curls from them and paste them on the head.
You can make several figures of different shades and sizes to hone your skills.
Using quilling technique
Quilling or paper rolling is an art form of creating paper works by folding strips into spirals. Compositions can be flat or three-dimensional. Spirals can be given different shapes. Such blanks are called modules.
The king of birds, the peacock, made using the quilling technique, will look impressive and colorful.
Materials and tools:
- cardboard for the base;
- scissors;
- tweezers;
- double-sided colored paper;
- PVA glue;
- yellow paper
- pencil.
Let's look at a simple master class on creating a peacock using paper rolling.
1. Draw a bird on a sheet of cardboard or trace a prepared template. We draw patterns on the tail, crest, wings and beak.
2. Cut the paper of the desired colors into long strips. Apply a thin layer of glue to the contours of the body, head and beak, and glue strips of paper edgewise. We twist the strip into a tight spiral using a toothpick. This will be the eye. Fix the inner hole with glue.
3. Glue strips along the contour of the crest. We twist and fix the spirals on the wings.
4. We will make the ornament on the tail using a more complex paper rolling method: we make a tight blue curl, add blue around it and then yellow. We complete the blank with a yellow layer in the shape of a drop, paste it on yellow paper and cut it out.
5. Create a lot of these drops to decorate the tail. We add several strips of emerald and blue colors to each blank. We fix each folded element with glue. We distributed it along the tail. The peacock using the quilling technique is ready.
Application
You can make an applique in the shape of a peacock together with a preschool child. Older children will cope with the task independently under the guidance of a teacher or parent.
1. Create a template of the peacock’s body from cardboard and cut it out.
2. We cut thin strips of 0.5 cm from colored paper of several shades. We make loops from paper pieces and glue them onto a sheet of cardboard in a semicircle in the form of a tail in several layers.
3. Glue a cardboard template of the body on top; We cut out and glue the paws also from cardboard or paper. Draw/glue on the finished eyes and beak.
Simple drawing with pencils
This option is suitable for learning to make pictures or crafts for school together with your child. Various materials are suitable for the image, such as pencils, watercolors or felt-tip pens.
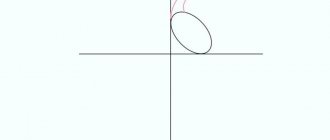
- The first step is a clear pencil sketch. Draw a small circle (it will later become the head), and under the circle - an oval. Divide the circle visually into two parts, in a ratio of 1:2, and connect it to the oval with a line perpendicular to the one that divides the circle.
- Use curved lines to connect the circle to the oval. An oval is a slightly rotated body. Decide which side the wing will be on and draw it with two lines, the movement should be similar to what an artist does when drawing a leaf.
- Depending on the side you choose, draw a bird in the circle of the eyes, with eyelashes on it. On top you can depict a crown of feathers. Three or four will be enough. Don't forget about the sharply curved beak.
- The paws can be drawn with simple sticks, or you can do something more complicated and make them voluminous. To do this, you need to draw down three strips of approximately the same length, and then connect them using four semicircles. You will get paws with two fingers.
- Decide on the scale of the tail and draw two lines from the body, running diagonally in different directions. Using semicircles, connect the right and left stripes. Divide the ponytail along the lines. They should start at the point where the semicircles meet and end just below the middle of the tail. Decorate the stripes with an original pattern of circles and ovals.
To color the peacock, use blue, green, yellow, orange and black colors. Remember that the main thing in a drawing is brightness and beauty.
Peacock breeding
Peacocks are polygamous birds. One peacock immediately lives with a whole group of females, which can include up to 5 individuals. In order to attract a female, the male peacock spreads his tail and walks in front of the female. When the female pays attention to the male, he turns away and shows his indifference. Then he spreads his tail again and so on until the couple comes together. The breeding season for peacocks is from April to September. In one clutch, females lay up to 10 eggs. Females incubate eggs for 28 days.
Chicks react quite sharply to cold and moisture. The female peacock protects and stays close to her offspring for quite a long time.
Until 1.5 years old, the male peacock does not have elongated feathers above his tail and is not particularly different from the female. The male lets go of his legendary tail at about three years of age. The lifespan of peacocks reaches 20 years on average.
Anatomy of peacocks
The body length of a peacock is on average 100-125 cm, while the length of the tail is usually about 50 cm, but the length of the upper tail feathers is 120-150 cm. A noteworthy fact is that the peacock’s tail itself is gray and rather short. But it is the feathers of the peacock’s tail that are the famous decoration of the bird. Such feathers are decorated at the ends with “eyes” and can reach a length of up to 1.5 meters. The male weighs approximately 4 kg and a little more. Unlike males, the female peacock is smaller, less brightly colored and does not have elongated feathers above her tail.
The peacock's tail also plays a protective role. As soon as the peacock notices danger, it spreads its tail. A huge number of multi-colored eyes can throw a predator off target. The tail also helps the male attract his female during mating games. It’s only in September that the peacock’s tail begins to lose its plumage in order to appear again in all its glory in the spring.
Peacocks' voices are not as attractive as their appearance. It doesn't sound like chirping at all, more like a sharp scream or squeak. Most often, peacocks scream before it rains. And during the mating dance, males, on the contrary, remain silent.
Scientists believe that peacocks are capable of emitting an infrasonic signal with their elongated tail feathers, which the human ear cannot discern.
Drawing with paints
An original solution when depicting a peacock with paints is to use the entire album sheet, like a peacock’s tail. In this case you will need:
- Draw with a pencil the elongated neck, head and chest of the peacock to the left or right relative to the center of the face.
- Draw the details - beak, eyes on the head. This can be done in white or light beige.
- Behind the neck, draw the base of the tail - the technique of drawing it is similar to the scales of a fish. Draw diagonal straight lines in different directions from the base of the tail.
When coloring, make the base of the tail in green or yellowish tones, the tail itself blue-green, and the body deep blue or dark blue.
DIY paper peacock for children
Made from brightly colored paper, this figurine really does look like a peacock. But if you make it out of brown paper, then you will see a capercaillie on a lek! Such is the metamorphosis. It is better to make a peacock from glossy paper, which does not tear as much as regular thin paper. Because at the end of the work, when you need to fold the craft in half, the thin paper will burst on the fold, and your efforts to make the bird will be in vain.
How to make a paper peacock with your own hands
Take a square sheet of colored paper, preferably with only one colored side - as a result, the craft will look more impressive.
Fold it diagonally with the white side inward.
Bend the triangle in half.
Unfold the top double leaf as shown in the photo. The top fold and the bottom should be on the same line.
Press the new folds.
Do the same with the right side of the workpiece. You will get a folded piece of paper like this.
Open the sheet on the left. Press it with your hand and iron it strictly in the center.
Lift the left side of the upper diamond, its edges will move apart, and you will press it to the craft, connecting its fold and the folds of the lower part of the workpiece.
Like this.
Fold the right side of the resulting triangle to the left.
Do the same with the right side of the diamond.
Bend the left side of the resulting triangle to the right. The result was something like this.
Grasp the corner of the large square on the right side and lift the movable part of the sheet with it.
It will open at the fold. Press it against the craft and again perform the same actions as in photo 9-15.
Turn the folded sheet over to the other side.
Fold the bottom sides of the square towards the middle.
Bend the top corner down.
Open all three sides.
Open the top of the folded sheet to the horizontal fold. Inside you will see four folds.
Tuck the edges of the sheet inward along these folds. Smooth them out.
Turn your workpiece over to the other side and lay it horizontally.
On the left there will be several folded pieces of paper. Unfold them so that the top is solid.
Fold the workpiece in half from right to left.
Fold in half again, but from top to bottom.
Release it and you will see such a “fan”. This is the tail of a peacock.
Bend the sharp part of the workpiece as in the photo. This is the beak of a bird.
Your peacock is ready.
By the way, if you make such a peacock from white paper, then you can paint it with multi-colored paints, and then it will be very beautiful!
Peacock on paper
If you don’t have colored pencils or markers on hand, you can use a regular black pencil, a soft pencil, and hard craft paper. In this case, you can use the method of shading or rubbing to create shadows and highlights. You don’t even have to show your child a photo from the Internet to draw a peacock step by step.
To get started, just draw two circles, one inside the other - with or without a compass. Draw a vertical line between them, dividing the circles into two equal parts. Draw two more small circles, centered at the intersection of the vertical line and the inner circle. The upper circle will become the bird's head, and the lower circle will become the body. Remember that the edges of the circles should not extend beyond the outer circle.
The next step is to start adding details to the peacock. Trace the bottom circle with two lines, making a motion similar to drawing a leaf or a drop. The pointed part of the figure is the bird's chest. From there, draw your paws in any order. Make sure that they are not too long or too short and that they are the same in proportions.
Draw the peacock's head, adding two eyes and a beak. Making two "{" brackets at the top and bottom is the easiest way to represent a beak. Divide the head in half with a vertical line, and on top, at the central point, add three or four feathers for the “crown.” After you complete the details of the body, you can draw the tail. Here you will have to use all your imagination.
Moving from left to right, draw oblong ovals, slightly pointed upward - these are the tail feathers. The back row should be drawn with larger ovals, so that later you can add smaller ovals on top, a second row of feathers. If you don't want rounded tail feathers, you can transform the semicircles into triangles, then the shape of the feathers will look like a sword or the edge of a jewel.
Once all the basic outlines and details have been drawn, take a black pen or marker and carefully trace all the lines. Wait until the pen is dry and start coloring the picture. To make the image bright and realistic, stick to a certain color scheme.
You can paint the peacock's body, its wings and head blue or aqua. In this case, the tail feathers should be painted over with a similar shade, but a little lighter. Don't forget about the original tail ornament. As a rule, these are circles of different sizes, but for a drawing with a child, you can come up with other shapes and their location.
What does a peacock look like?
Surely, each of us has encountered this wonderful bird at least once in our lives, if not in nature, then certainly in the zoo.
The length of the peacock reaches 125 centimeters, and its wonderful tail is, on average, 120 - 150 centimeters. At the same time, peacocks weigh about 4.5 kilograms.
Elements of peacock plumage
Of course, the most attractive thing about these birds is their plumage. The body pattern of male peacocks is especially varied: the head and neck are painted in a rich blue tint, the dorsal part is golden with a greenish tint, and the wing plumage is bright orange. Well, just a real rainbow! Females have more sparse feather color, often dark brown.
Ocellated tail feathers
The bird has an elegant crest on its head; from the outside it looks as if someone had put a crown with bells on the bird. The tail part of the animal's body is divided into tail feathers and the so-called uppertail. It is on them that the gaze of others stops, because they give a chic, truly royal, look to this bird. Each “fan” is decorated with an “eye” that has a beautiful multi-colored pattern. How beautiful peacocks are!
Peacocks often perch on the lower branches of trees.