Drawing on the theme “Beautiful Bird” in the middle group of kindergarten
Birds are representatives of wildlife that are familiar to children from an early age through fairy tales and personal observations. These animals differ in plumage, size, and habits, so every boy or girl will be able to find their favorite breed among them, which they want to portray.
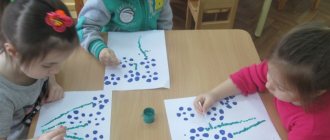
One of the simplest and most interesting drawings"
The purpose of drawing on the theme “Beautiful Bird” in a preschool educational institution
The main goal of this event is to develop children's creative abilities and gain skills in individual and group work.
Example of lesson notes
- Introducing children to the topic of the lesson;
- Distribution of additional materials;
- Reviewing with students diagrams, templates, illustrations of what they need to draw;
- Step by step drawing;
- Discussion of the work done and summing up the results.
How to draw a bird with a pencil
It is not so easy to draw a bird using only a pencil and an eraser in your arsenal.
Draw a line at an angle: you will later have to rely on it when depicting the silhouette of a bird. The line needs to be divided into 2 segments: the smaller one is for the head (here we draw a circle), the larger one is given to the body (here we draw an oval with a narrowed end).
From the lower part of the future abdomen, 2 lines are drawn - the “foundation” for the tail. There, in the lower abdomen, a sketch is drawn for future legs. One foot will require 2 lines connected into a triangle.
For a crest you will need a triangle, from which a segment is drawn connecting the body and head. On the left, draw a beak in the form of a triangle, draw an oval from it towards the crest. From the beak, in turn, it is necessary to draw a line. On the right, connect the stomach and head. Then draw the eye.
The next stage is the wings. They should be in the form of a semicircle. They need to be drawn from the center of the body, while the wing should be pointed downwards.
Let's move on to the paws. They are drawn in the form of oval fingers. To give it a more natural look, it is recommended to draw a branch on which the bird will sit.
Draw the contours of the beak and make a cut in its center.
A few strokes in the center of the wing are useful for obtaining plumage, and at the lower end of the body - for the tail. You will need 5 of these feathers.
Actually, the coloring of the bird. The lower part of the crest, closer to the head, should be darker in color.
When coloring the eye, leave a few white dots for highlights. Paint the muzzle with a dark color (beak area), and the breast with a lighter color.
Depending on the plumage, the wings can be given different shades of gray.
Then color the paws and tail. The latter should be painted in one shade of gray.
Materials and equipment needed for the lesson
Before starting the lesson, you need to prepare all the materials that will be needed during the lesson. They can be divided into 2 categories:
- Demonstration. Illustrate what children need to do. Since the goal of the lesson in the middle group is to draw a beautiful bird, it is necessary to show this animal. This can be done using a computer and a projector connected to it or illustrations from books.
Note! Children should see not only the familiar birds that live in Russia (sparrow, waxwing, woodpecker, owl), but also exotic ones (kiwi, peacock, flamingo). This will help the children realize how diverse the world around them is.
You can give children coloring books as practice."
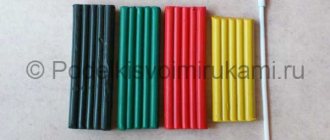
- Handouts. Necessary for drawing. These include A4 drawing paper, pencils or paints, brushes and sharpeners, and water in special glasses. If desired, you can distribute templates, but it is better for children to learn to draw on their own.
Important! Give each child a cloth with which they can dry their brush. The fabric will also come in handy if someone gets dirty with paint, which often happens even among adult artists. If the purpose of the lesson is to draw with pencils, then you need to distribute an additional piece of paper that can be used to shade hard lines. Paper is also needed to prevent the material from imprinting on their hands, which children can place directly on the drawing.
Plan of educational work according to the Federal State Educational Standard
Development of notes for a drawing lesson in the middle group
The drawing lesson includes three stages of working on the topic:
- introductory - up to 3 minutes - the teacher motivates the children to work, that is, updates their knowledge on the topic;
- main - up to 12 minutes - the teacher describes the procedure for completing the task, the children draw, to relieve muscle tension in the middle of the creative process, finger exercises and/or physical education are performed;
- final - up to 3 minutes - the teacher organizes a spontaneous exhibition of works, praises the kids for their drawings, children evaluate their works according to the “like/dislike” criterion and try to say why.
Table: Antonova M.V. Summary of a drawing lesson on the topic “Kitten” in the middle group
| Stage | Content |
| Introductory | Educator: - Guys, a guest came to us today, he asked not to name him. He wants to play the game “Recognize by Voice” with you. Let's try to recognize our guest? I turn on a recording of the cat's voice. A cat appears. Educator: (on behalf of the cat) - Hello, guys! Let's introduce ourselves, my name is Dymok. (Children say their names.) Teacher: (on behalf of the cat) - I came to you today for a reason. I want to ask you for help. My cat friends have a birthday soon. I wanted to please them, to draw them holiday cards with my friends on them. But I have many friends, but little time. Maybe you guys can help me? Educator: - What, guys, should we help Dymka? (Yes, we will help.) Educator: (on behalf of the cat) - Thank you very much for not refusing my request. Educator: - Smokey, but we don’t know what your friends look like. Educator: (on behalf of the cat) - I have photographs of them. Look! I place pictures of cats with different colored fur on the easel. Children look at the “photos”. |
| Basic | Educator: - Guys, go to the tables and choose pictures with pictures of kittens. Children sit at tables and choose coloring pictures. |
| Educator: - Guys, so that the fur of our kittens is fluffy, we will paint with a glue brush. Touch it, what does it feel like? (Hard, solid, rough) Educator: - Guys, look at how we will draw the kittens’ fur. We hold the brush correctly, the handle of the brush should be directed upward, the movements should be jerky. First, we use a poke to draw the shape of the cat along the contour, then, using a poke, we paint over the entire body of the cat. We put a little paint on the brush. When the cat is painted with a soft brush, you can complete the postcard as you wish. It could be: the sun, grass, flowers, sky, butterfly. Do you guys all understand how to draw? Then start drawing. Children draw, the teacher controls the drawing process, helps children in need. | |
| Final | Educator: - Guys, Dymka liked all your cards. And as a farewell, he wants to play the game “Cat and Mice” with you: Children stand in a circle, holding hands. The teacher sits on a chair in the center of the circle with a cat toy. Children walk in a circle and say words. The mice are dancing in a circle, The cat is dozing on the bed - Quiet the mouse, don’t make noise, Don’t wake Vaska the cat! When Vaska the cat wakes up, he will break up the whole round dance! The cat catches up with the children, the children run away to the chairs. |
| Quote from: https://ped-kopilka.ru/blogs/marija-vasilevna-antonova/konspekt-nod-po-risovaniyu-v-srednei-grupe-kotenok.html | |
Video: open lesson on drawing with a poke on the theme “Bear” in the middle group
Preliminary work with children, discussion of the topic
Before moving on to the main part of the task, you should make sure that the children have a complete understanding of birds. To do this, you need to show them these animals live. If it is spring or summer at the time of the lesson, then you can go outside, because birds are especially active during this period. If it’s winter, when many birds go south, you have to be content with pictures or stuffed animals. You should also tell children about different types of birds, among which are:
- Migratory;
- wintering;
- domestic.
It is also necessary to talk about the diet of birds: mosquitoes and other insects, seeds and fruits. To captivate children even more, you can tell children fairy tales about these animals, ask them to guess riddles about birds, and also talk about interesting expressions like “small bird.”
Physical education minute
To prevent children from getting bored, physical education sessions must be held once an hour. If the room is large and spacious enough, then you can perform several dance moves to funny short songs.
Note! You can find songs about birds and invite children to perform flapping movements to the music, similar to flapping their wings. If the class is not very large, then you can do eye exercises.
Physical education for birds"
Drawing domestic and migratory birds: lesson notes
| Author's full name | Title of the abstract |
| Volokhova O. | "Brave Cockerel" Educational objectives: learn to draw a cockerel with watercolors, conveying its characteristic features and creating an expressive image. Developmental tasks: develop color perception, sense of proportions, improve brush painting technique. Educational tasks: cultivate love and caring attitude towards poultry. Integration of educational areas: “Artistic creativity”, “Cognition”, “Communication”, “Socialization”, “Health”. Demo material: a picture of a rooster, an audio recording of a rooster crowing. Handout: sheets of white paper according to the number of children, watercolors, sippy cups, brushes, coasters, napkins. Progress of the lesson: Teacher's story about a rooster. It turns out that this bird was not always domestic. The ancestors of the rooster from India and China lived in the forest in trees and built nests on the ground. Loud singing was their protection from other birds. Domestic roosters have not lost this habit either. Villagers tell the time by the crow of a rooster. “The first roosters” sound at one o’clock in the morning, an hour later the second roosters sound, and at four o’clock the rooster’s voice is heard throughout the village, announcing that dawn will soon come. The guys look at the image of a rooster and a hen with a chicken, find out how they differ. The rooster is larger, it has a crest on its head, “spurs” on its legs (sharp claws for protection), and bright plumage, especially the tail. The teacher reads a poem about a cockerel.
A conversation about the character of the rooster in this work (brave, courageous, courageous, capable of protecting hens and chicks). He is like this in almost all fairy tales. The teacher asks the children in which fairy tales the cockerel appears. The teacher reports that since ancient times, people believed that the crow of a cock protects the house and embroidered the image of a rooster on towels, tablecloths, and painted it on dishes and furniture. Preschoolers are also asked to pretend to be a rooster. The game “Fighting Roosters” is played: two participants hide their hands behind their backs and, standing on one leg, try to push the opponent out of the circle (with their shoulder or torso). Independent work - drawing a cockerel. Exhibition of children's works. The teacher sums up the lesson and says that the cockerels will protect the children from adversity. |
| Geleverina Yu. | "Wintering Birds" The lesson begins with a game with a ball: children, standing in a circle, take turns naming the bird. Conversation about birds: · Where we meet them (in the city, in the forest, on reservoirs). · how they differ from each other (size, color, singing, habitat) · Where they find food in winter (in feeders, berries on trees). · What can be put in the feeder (bread, grains, seeds, lard). · How birds keep themselves warm in winter (they tuck their legs under them and hide them in the fluff). The didactic game “Cut Pictures” is played: children in pairs pick out images of birds. Physical school is carried out:
Didactic game “Finish the sentence (for example, a magpie is a wild bird, and a chicken...). The teacher reads the poem “Feeder”
Children are invited to draw a wintering bird of their choice. |
| Borodacheva O.V. | "Owl" The lesson begins with a riddle about an owl:
The teacher recalls with the children the fairy tale “The Owl” by V. Bianchi, and knowledge about the significance of this bird in nature is consolidated. Looking at pictures of an owl. Highlighting its distinctive features: large head and eyes, almost no neck, thick plumage. Rounded wings and a short tail help this bird fly silently. The owl's eyes, although large, see practically nothing. Since this bird is a predator, it has a powerful curved beak and sharp claws. The didactic game “Who Says What” is played (children reproduce the voices of various birds). Physical exercise "Owl"
The teacher explains the principle of drawing an owl, and then the children begin the practical part of the lesson (the owl is drawn sitting on a tree branch). Analysis of children's drawings: the teacher asks to highlight the largest owl, the smallest, as well as the sad and cheerful one. The outdoor game “Day and Night” is played. |
| Fomina I.A. | "Swan" At the beginning of the lesson, the teacher tells the children that an artist she knows gave her black and white pictures. We need to figure out together what is depicted on them - the children are shown slides depicting silhouettes of different birds. Preschoolers name them, highlighting characteristic features for each (for example, a swallow has a forked tail, a stork has a long neck, legs and beak). The conclusion is that all these birds are migratory. The didactic game “Finish the sentences” is played (all phrases are related to the swan). Demonstration of a sample image of a swan (swimming in the lake). Discussion on how to complete the drawing. Before working independently, children warm up their fingers by rolling a pencil between them. Independent activity of children. Exhibition of works. The teacher appoints one of the children as a tour guide, and he talks about the children’s works. |
Practical part of the lesson, drawing
Before starting the lesson, the teacher needs to decide on the drawing technique and materials. There are several types that young children can quickly master:
- Drawing with pencils: using thick and thin lines, mixing colors, shading.
- Watercolor: painting in one or more layers, mixing colors, using brushes of different thicknesses, adjusting the transparency of layers.
- Gouache: Layering different colors on top of each other.
Note! When using gouache, you can paint without brushes. To do this, you can ask the children to cover their hand with paint and apply it to a blank sheet, and then give free rein to their imagination. Such a drawing is not only faster, but also more interesting, because children will have to improvise and figure out how to make a bird out of their hand. For example, the bent thumb can be the head of a bird, and the other four can be wings or a tail.
Drawing with a handprint"
Musical accompaniment
To prevent children from getting bored, you can play music in the background. Since the topic of the lesson is “beautiful bird drawing in the middle group,” then choose the singing of birds. In this case, you can put different votes, asking you to guess who it belongs to.
A copybook for mathematics classes in preschool age
Step by step drawing process
Before you begin the creative process, you need to show the children a sample of the drawing that they have to complete. It is better if the teacher makes it with his own hands, so that the children can see the finished drawing and what it should look like.
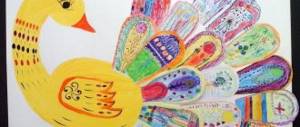
The bright bullfinch is familiar to every child."
A short summary of drawing with children:
- Schematically depict simple shapes that will be the head and body of the bird. These will be a circle and an oval, respectively.
- Connect the head and body using curved lines representing the neck. Draw legs and wings to the body.
- Go to the head: draw the beak, eyes, crest (optional). Children should be given freedom at this stage, let them choose for themselves what type of bird their bird will look like, be it a penguin or even a rooster.
- Trace the contours with the necessary materials, and then untwist everything else.
- Draw plumage and other decorations on the bird.
Important! You can offer to draw clothes or other elements typical of people on the bird. This will not only complement the drawing, but will also help the child develop thinking, because he does not just give the animal human traits, he wants to highlight something in its character, i.e. thinking about creating a complete image. For example, if a child draws luxurious decorations for a bird, then he wants to emphasize that this bird is beautiful, and if he gives it a book in its paws, then this means that it has remarkable intelligence.
Specifics of drawing birds in the senior group of preschool educational institutions
Children 5–6 years old are able to create beautiful, expressive drawings and convey the shape of objects and their components well. Children's horizons broaden significantly: new knowledge is acquired in the process of observing the world around them and reading fiction. The guys can already depict objects that they have never seen (as for birds, this is, for example, a penguin).
The color spectrum with which children work is expanding. The drawing is based on beautiful color combinations.
If in elementary and middle preschool age children depicted birds in the form of checkmarks, then in the older group the teacher’s task is to teach them to draw them correctly. The teacher must form in children an idea of the external appearance of birds, an understanding that they all have a similar structure, although they differ in color, size and shape of body parts. The children learn that all birds have an elongated body and the same head position. When moving, the position of the head and tail changes, and the wings open.
Drawing birds should ideally be preceded by modeling on a similar topic.
In order for preschoolers to realistically depict birds, preliminary work must be carried out before such classes: observing birds on walks, looking at numerous illustrations.
There are some difficulties in drawing birds. Children must learn the basics of depicting them. The drawing begins with an outline - an elongated body in the shape of a large drop (pointed towards the end) and an oval head. After this, wings, a tail, paws and an eye near the beak are added. The accuracy and quality of the entire drawing depends on the correct contour.
The teacher explains to preschoolers how the bird's body parts are located during flight and when moving on the ground (the tail is straightened or folded). In addition, you can draw birds pecking at food or sitting on a tree branch.
Of course, it is better to start depicting birds in the older group with those individuals that children can observe in everyday life: this is a sparrow, titmouse, bullfinch, pigeon, etc. We must teach the children to notice the difference between birds themselves, compare them, highlight key features, then drawing will be easier. For example, an owl is round and fat. The stork is thin-legged with a long graceful beak. The swan has a long neck, is very beautiful, with large, sweeping wings. The penguin seems to be dressed in a tailcoat, clumsy, with short wings, and has a funny crest on its head. The rooster has a powerful chest, strong legs, a beard, a beautiful comb, and most importantly, a multi-colored tail. The bullfinch is distinguished by its red breast.
When preschoolers learn to draw realistic images well, the teacher can invite them to depict a bird in a fairy tale interpretation - “Firebird”, “Bird of Happiness”, “Magic Bird”. Note that this topic is creative, and the teacher offers children several diverse samples for familiarization. In addition, children choose their own colors.
Materials used and base
Birds in the older group are depicted on a sheet of paper of the usual size. When painting with gouache or watercolors, the base is tinted in advance by the teacher. If children have to draw birds soaring in the sky, then it should be a blue background.
For collective work, the teacher offers the children a sheet of whatman paper, where, depending on the nature of the composition, they first draw a tree with many branches, a large feeder, or a village poultry yard.
Preschoolers of this age draw birds with both paints and colored pencils. It is better to paint white birds, for example, a swan, a stork or a goose, with gouache so that they are more visible against a colored background. The same applies to black and white - penguin and swallow. A titmouse, a bullfinch, an owl, a chicken, a sparrow, and a dove can be drawn with colored pencils or even wax crayons. In some cases, felt-tip pens are also suitable, for example, when depicting a bright cockerel.
Drawing with felt-tip pens
To preliminary draw the outline, use a simple pencil.
Techniques and techniques that should be used when drawing in the senior group
When drawing in the older group, the teacher should practice with the children the techniques of correctly painting a silhouette with a brush. Small parts of the body - beak, eyes, paws, tail - are carefully painted on with the tip of the brush. In this case, the instrument should be held in your hand almost vertically. The larger oblong body of the bird and its wings are painted over with all the pile, while the brush is tilted towards the paper. When the paint dries, you can additionally use the tip of the brush to indicate the direction of the feathers - the image will become more realistic.
Hatching with a pencil should be done in one direction, in addition, there should be no white spots inside the outline.
Depending on the size of the part to be painted, preschoolers should adjust the range of their hand movements.
Additional types of visual activities used, the relevance of an individual approach
The image will become more original, and the productive activity itself will be more exciting for children, if you diversify the composition with applicative or plasticine elements. For example, a bird can peck at a worm or caterpillar molded from plasticine (in the form of a flagellum or sequentially stuck balls). Small black eyes of birds can be sculpted from plasticine. If a bird soars in the sky, you can depict the sun using plasticineography. A bullfinch can sit on a rowan branch with sculpted red berries.
Applique details will be especially appropriate when drawing fairy-tale birds. This can be colored foil, shiny sequins or candy wrappers. You can decorate an elegant cockerel in a similar way.
Questions for children based on their drawings
You should not finish the lesson immediately after drawing. Children should be encouraged to talk about what and why they drew. You can give the guys a little time to create a full-fledged history of their bird, give it a name, come up with a breed if one does not exist.
You can also ask the children whose bird is the most beautiful and why. But with this task you need to be very careful, because you cannot single out anyone, and you should not deprive them of attention. Some can be praised for their drawing technique and accuracy, some for their unusual story, and some for their successful combination of colors and realism.
This lesson will introduce children not only to a whole section of wildlife, but will also help develop their creative and social skills. For these reasons, art lessons should be taught as early as possible so that children from an early age are introduced to the broad concept of “beauty” and learn to work in a team.
How to draw a dove
Draw a small circle and a large oval for the head and torso, respectively. The top of the oval should intersect with the circle, and the oval itself should be inclined.
At the bottom of the oval you need to draw two lines forming a branch. Then draw an elongated rectangle as a tail.
Let's move on to the wings. If one wing can be drawn on top of the body, then the second will have to be placed in the background.
Next, an eye is drawn in the upper part of the head and a pupil to it, then a triangular beak, feathers in the form of dots and wavy stripes and paws (3 stripes per 1 paw). All that remains is to outline the drawing with a felt-tip pen and color the beak and branch brown, the rest gray.