- February 18, 2020
- Holidays
- Tatyana Ivanova
There is a holiday in October that our pensioners especially love. It's Older Person's Day. In Russia it has been celebrated for about 30 years. On October 1, we congratulate parents, grandparents and all older people.
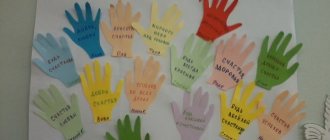
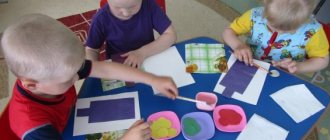
On this day, we can give our loved ones small homemade souvenirs and cards. It is advisable to involve children in creativity. This is a simple and enjoyable activity that does not require much time or special skills. Such a gift will be especially precious because it was created with love. Here are some recommendations on how to make your own cards for the Day of the Elderly.
What you need for creativity
The choice of material depends on the design of the gift. To make any postcard you need to purchase:
- colored cardboard;
- standard size colored and white paper;
- stationery knife, scissors;
- glue;
- needle, thread (you may also need these);
- felt-tip pens, pencils, paints.
You will also need decorative elements that will make the card unique. These can be ribbons, memorable photos, dry leaves and flowers, lace, beads and so on.
Postcard with paper flowers
It's very easy to do it yourself. Cards for the Day of the Elderly can be decorated with a variety of paper flowers. There are dozens of techniques that allow you to make carnations, roses, daisies, tulips and so on.
First you need to decide on the size and color of the postcard, and select the appropriate text. Try writing a short poem yourself. A loved one will be especially pleased to receive such a congratulation.
Decorate your card with homemade flowers. There are a lot of options. You can make an original postcard shape in the form of a heart, a cup or some beautiful shape. An excellent gift would be a three-dimensional craft with flowers inside. When such a postcard is opened, a whole flowerbed appears. You can place just one flower in the middle, but with voluminous petals. In order for it to “come to life” when the postcard is opened, it must be folded correctly.
But you can make a simpler craft. Let's look at how to make your own postcard for the Day of the Elderly, decorated with homemade flowers in a pot. To work you will need:
- colored paper (thin and cardboard);
- scissors;
- glue;
- ruler;
- pencil.
We will make, for example, a blue card with red flowers in a yellow pot. You need to do the following:
- Bend a sheet of blue cardboard (A4 format) in half and press the fold firmly.
- Cut several strips from green paper with a width of 5 to 10 mm. Their length can be from 10 to 15 cm.
- Also cut out several leaves from green paper. Make their shape arbitrary.
- Cut out as many flowers from red paper as you made stripes. The shape of the buds can also be arbitrary. In the photo they have 5-6 petals. But you can simply cut out circles with a diameter of about 5 cm, and make a fringe along the edge.
- Fold a sheet of yellow paper in half. Using a ruler, draw a shape in the shape of a flower pot (trapezoid). It should be about 3 times smaller in size than a postcard.
- Cut out this shape. You should get 2 identical parts.
- Stepping back about 5-6 cm from the bottom edge, glue one yellow figure onto the postcard, as shown in our photo.
- Glue flowers to the green stripes. Try to do this carefully.
- Glue green stripes with flowers onto the yellow trapezoid. The glue only needs to be applied to a small area. The rest of the strips should remain free. Attach paper leaves.
- Glue the second yellow trapezoid on top. It must be placed on the first one so that the edges completely coincide. The upper part of the second trapezoid does not need to be glued so that it can be bent as in the photo. You have a paper pot of flowers. You can decorate it with a red paper heart.
- Cut out a small strip. Its dimensions can be arbitrary.
- Glue it to the bottom of the card under the pot.
- Write “To Grandma” or “Beloved Grandfather” on it.
Postcards for the Day of the Elderly for grades 1-2
If this is grade 1-2, the teacher can invite students to make a card decorated with a large bright flower and a touching poem. To work, you will need a sheet of cardboard, preferably a light color, sheets of colored paper, a printed poem and templates, as well as scissors and glue.
First, you need to distribute a poem prepared for children, printed on a sheet of light-colored paper, and templates for making a flower, namely a template for the petals and core. The sheet with the poem must be glued to a base, which can be used as a sheet of cardboard folded in half. Then you can draw a frame. Then, according to the template, you need to cut out the petals and the core, then the cut out parts should be glued to the base and the card is ready.
With window
With such an interesting detail, a postcard made by children for the elderly looks very original. To make it, you need to prepare colored cardboard, paper, scissors, glue, a piece of transparent fabric, a pencil and a ruler. We perform the following actions:
- Fold a sheet of colored cardboard in half.
- Draw a small square or rectangle on it using a ruler and cut it out with scissors.
- On the back side we glue two pieces of transparent fabric. They will imitate curtains. We drape them and secure the edges at the bottom.
- Inside the postcard we place a picture or photograph of grandparents so that it can be seen through the “window”.
- We decorate the perimeter and doors with colored paper. You can draw a pot of flowers, make appliqués of butterflies and birds.
- Inside the card, in the free space, we write a congratulation.
Flower bouquet
Give your dear people a bouquet of autumn flowers, which will also be made by your own hands and in the form of a postcard. The technique is quite simple, so if your child helps you, then 3-4th graders will be able to cope.
To do this, you will need to stock up on the necessary materials: cardboard, colored paper, scissors, glue, pencil and ruler.
Now you can get to work. We cut nine circles of different diameters from colored paper. We cut the edges into fifteen to sixteen pieces. Now, using scissors, we give the scraps the shape of petals.
Article on the topic: Automotive fabrics for covers and interiors: jacquard, velor and others
Now use your fingers to bend the petals with the edges inward and place three circles on top of each other from the largest in diameter to the smallest. How to do it, see the link below.
We cut out leaves from green paper and shape them with our fingers in the same way as petals.
The decoration for our card is ready. Now all that remains is to put everything together. Attach flowers and leaves to the front side of the craft using glue. You can decorate with a twisted ribbon of colored paper. Look at the photo below:
All that remains is to sign the card and write a congratulatory message. This is what will happen in the end.
With satin ribbon flowers
For the base, take colored cardboard and fold it into a book. On the front side we will glue a slightly smaller rectangle of beautiful light fabric to form the basis for our composition.
Now let's make flowers from satin ribbon in red, pink, yellow or any other color. We cut it into strips about 10 cm long, collect it on one side with a needle and thread, forming a bud. We secure the thread with a knot. We straighten the flower and glue it to the fabric. We decorate the middle with a bead. You can make more magnificent flowers from ribbon, consisting of two blanks. We form petals from green satin ribbon and glue them near the flowers.
Another simple master class
To work, you will need a sheet of cardboard, preferably a light color, sheets of colored paper, pieces of fabric, as well as scissors and glue.
First of all, you need to bend a sheet of cardboard in half, then mark the window and use scissors to cut out the window sashes. Then you need to design the spread of the card, to do this, draw or glue a thematic picture, and on the inside of the window you need to attach pieces of fabric to make curtains, the lower edges of the curtains should be glued, secured with a strip of paper. Next, you need to write a congratulation and decorate the window using strips of colored paper. In order to decorate the title page, you need to cut out flowers, twigs, leaves from sheets of colored paper and glue them to the base, after which the work can be considered complete.
Due to our busy schedules, we often do not have enough time to devote to our mothers, fathers, grandmothers, and grandfathers. But there is a day in the year when all attention should belong to them. And do-it-yourself postcards for the Day of the Elderly will come in very handy, because older people love to receive gifts made by the hands of their beloved grandchildren and children.
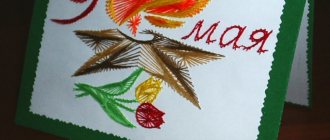
Homemade Older Person's Day card with autumn leaves
Since the holiday is celebrated in autumn, dried leaves and dried flowers can be used to create cards. This material must be prepared in advance. Glue the elements of the composition onto a base of colored cardboard and come up with a congratulatory text. Despite the simplicity of execution, this craft looks very elegant. You can complement it with a handmade drawing for the Day of the Elderly.
Congratulating people of the older generation, we try to find the warmest and most heartfelt words. We thank them for their love, care, and invaluable experience that they pass on to us. Handmade cards for the Day of the Elderly will help you better express your feelings, show sincere attention and respect to our loved ones.
DIY crafts for grandparents for the elderly holiday
To make a postcard for Older People's Day, you should prepare cardboard, scissors, pencils, colored paper and glue. To begin, fold a sheet of cardboard in half and mark a window. Next, using sharp scissors or a special knife, we cut out our sashes.
Having closed the postcard, we outline where the picture will be located and draw it. At the same time, glue the curtains to the inside of the window. Don't rush to cut them - it's better to do this after you've glued them completely.
We cut out the future design of the window opening from colored paper using a curly pattern and use PVA glue to secure the stripes. We enter congratulations.
Let's move on to the design of the title page
We cut out leaves, twigs and maybe flowers from paper. Since our holiday is celebrated in the fall, we will use autumn-colored leaves and imitation of the first snow for decoration. We place our decor one piece at a time.
In order to add volume, you can twist the leaves and twigs using scissors.
Next, apply PVA glue to the desired location and sprinkle the surface with semolina or salt. After this, you need to shake off the leaf and the excess “snow” will fall. In this way, you can decorate the edge of the window sill, twigs and leaves that have fallen from the trees.
On October 1, a wonderful holiday is celebrated all over the world, dedicated to the kindest and most caring people on the entire planet, our grandparents. It has been celebrated since 1991. As a rule, people who have reached retirement age are called elderly. They are so pleased to receive gifts from their children and grandchildren on such a significant day, especially if they are made with their own hands. In our master class we will tell you how to make cards for the Day dedicated to every elderly person, step by step and with high quality, with your own hands. And we will start, perhaps, with one not at all complicated postcard with a step-by-step explanation of the actions, as well as an attached photo.
Of course, this postcard is not at all like the masterpieces that are produced in printing companies and created on expensive machines, but it is the most beautiful and expensive, because it will be made by the hands of children for their beloved grandparents.