Beautiful and simple Mushroom applique. Templates can be obtained for free. Details in my post here.
We already have articles about autumn crafts. But every year I try to update the collection of works so that you always have fresh ideas at hand. So, autumn: leaves, cones, chestnuts... hands themselves ask you to collect more of this goodness and bring it home. But what to do with it then? What interesting works can you come up with and how will plasticine help us in design? Let's answer these questions.
And yet, this collection of ideas is more aimed at children of different ages. But I tried to make it interesting for kids with different interests. Adults can actively help the little ones, they can add a touch of play to this “serious” activity and arrange a mini-competition. Or they can use the ideas from the assembly themselves to decorate their home.
Autumn bouquet of leaves and cones
This bouquet is easy to make. You can take any leaves, just pay attention to their color. After all, the beauty of the bouquet will depend on how variegated the leaves are.
- A stick is fixed to the wide part of the cone using green plasticine.
- The lump is colored. And sprinkled with glitter.
- The stick turns green.
- The bouquet is collected in a vase. Or, it can be tied with ribbon.
As options, I’ll show you 2 more ways to make “flowers” from a pine cone.
- Colorful flowers.
- Bouquet in beige tones.
These flowers can and should be combined with tree leaves to get a beautiful bouquet. Learn how to paint pine cones here.
And here you will find various wreaths and topiaries made from leaves and cones.
Master classes on making crafts
Today, there are several dozen interesting DIY crafts made from pine cones, which can be used in various fields:
- Children's toys and crafts from pine cones for kindergarten.
- Souvenir products for interior decoration.
- A variety of holiday decorations: wreaths for door facades, Christmas tree decorations and garlands.
- Decor for the summer terrace in the form of original candlesticks.
The most interesting hand-made crafts from pine cones can be presented in various magazines of practical creativity (beautiful boxes, vases, picture frames).
The work requires imagination and a certain amount of ingenuity from the master, because any individual or original project can easily be brought to life.
Quick and beautiful DIY crafts from pine cones and acorns for kindergarten
Simple crafts that can be prepared quickly are also included in this collection. Such products may be of interest to little ones.
Birdie.
- A small foam ball is glued to the bump.
- Pieces of paper cut into a triangle in the shape of wings are glued to the sides.
- At the back there is a paper tail.
- Branches are glued to the bottom of the cone. The twigs must first be collected in the shape of bird legs.
- The craft is painted.
Dinosaur.
- In fact, everything is very simple. You will need to connect a certain number of acorn caps. You need 6 such blanks: a neck with a head, 4 legs, a tail.
- All this is attached to the cone: the head - to the wide part, respectively, the tail - to the narrow part. And the paws are below.
Mammoth.
This craft is done exactly the same as the previous one. The only difference is that it is not the neck and head that is attached to the wide part, but the trunk.
Autumn fantasy craft made from pine cones
I have already said that from pine cones you can make not just one craft, but a whole picture or composition. Here are these compositions on the theme of fantasy about autumn.
Bears on a walk.
- Bears are a connected cone and the cut off wide part of the cone.
- The bears are located in a clearing covered with grass.
- The composition includes a Mouse and an Owl.
- In a clearing there is a house that can be easily assembled and built from thick branches.
Autumn came.
- Yellow autumn leaves are glued to the cardboard.
- There are cones on the leaves. They are like trees that have shed their leaves.
- In addition to cones, the composition contains dried twigs and flowers.
- And you can make mushrooms from plasticine.
Each composition may contain those elements that you yourself invent and make.
Advantages of material selection
The practical advantages of working with cones include the following points:
- Ease of working with the material.
- In creative activities, you can use both whole cones and a scattering of individual elements.
- Making crafts from cones for children is very useful: rapid development of visual memory, logic, plot and abstract thinking. Fine motor skills of the fingers when working on crafts from pine cones contribute to the timely development of speech and motor skills.
For independent work, no special tools, skills or abilities are required. It is enough to have a certain amount of ingenuity, skill and sleight of hand.
All new crafts made from cones and chestnuts
Separately, you can make many interesting crafts from chestnuts without cones. For example, a spider or a ladybug. Simply paint the chestnut in the desired color and attach legs and antennae from wire or a toothpick. But there are also more complex works, consisting of several chestnuts, twigs, leaves, etc.
But this work, in which there is both a chestnut and a cone.
But what gorgeous deer.
Snail (pictured on the right).
- You need to connect 3 and separately 4 chestnuts with toothpicks.
- Connect these two blanks at right angles.
- On top of the workpiece, which consists of 4 parts, you need to attach a cone.
- All that remains is to attach the eyes to the snail. They are located on chenille wire.
In addition to the snail, you can do:
- Goblin
- Fairy
- little man
Chestnuts are a very good material that can be easily combined with other natural materials. So, thanks to a little manipulation you can make a number of interesting crafts.
And here are funny animals made of plasticine and chestnuts.
Owls made from acorns and chestnuts.
And here are caterpillars and snails made from cones, chestnuts and plasticine.
Original vase on the table
For fans of the eco-style that is very popular today, such an accessory will be a real find. The fragrant smell of pine needles will be optimally combined with a beautiful vase for small items, personal hygiene items, and tubes of decorative cosmetics.
Note!
Quilling crafts: features of the working technique, step-by-step instructions and clear diagrams for beginners + ideas for creative crafts (150 photos)Crafts made from corrugated paper: 100 photos of creative solutions for crafts + step-by-step diagrams and instructions for making your own
Crafts from foamiran: ideas for creating crafts and interesting patterns for making flowers
To work, you will need a set of consumables, metal wire, glue, old plastic disks for forming a platform, several willow twigs (optional).
Instructions for creating an original craft from pine cones with your own hands:
- Plastic discs are cleaned of protective film.
- Place the discs in a stack, gluing each layer.
- You can wrap willow twigs over the resulting pedestal (if you have experience and weaving skills). Such a base looks very stylish in any interior.
- A wire frame is woven over the base, following a similar principle to the previous craft.
- After cleaning and decorative finishing, the cones are attached on top of the metal frame.
For this accessory it is not necessary to glue the walls with glue. Sealing is not necessary at all, because the vase is intended for storing large objects. Natural air circulation, on the contrary, will prevent the development of dampness and fungus in such a decorative basket (or vase).
Crafts from pine cones and plasticine for children 4-5 years old in kindergarten
What can a toddler be able to do at 4 years old? A lot if we help him! Here are simple ideas for kindergarten:
Chicken.
- The cone is pre-painted. And on it there is a small decoration of small dots.
- The following are molded from plasticine: neck and head, scallop, beak and paws.
Squirrel (pictured left).
- The cones consist of three parts: tail, head and body.
- Ears, paws, muzzle, eyes and nose are molded from plasticine
Red squirrel.
- But there is another simple option to make a craft from a pine cone and plasticine. In this version, you only need one bump - the tail.
- And the body, head, front legs, eyes and nose are made of plasticine.
- But there is one more material in this design - acorns. The hind legs are made from them.
The crafts are very simple. But don’t forget that little ones need to be explained and helped a lot in order for them to cope with the task.
Candlestick
It's no secret that candlesticks can be made from a wide variety of materials, and we've talked about this more than once. But you definitely haven’t seen such a candlestick anywhere.
Find a huge pine cone in the forest, if you are lucky you can collect several large cones.
Buy miniature candles in tin cups at the store. You can buy multi-colored ones, or you can make candles yourself.
We recommend reading:
Crafts from natural materials - a step-by-step master class on creating original crafts for children and adults (100 photos)Wood crafts - the best craft options, instructions for beginners and ideas for making wooden crafts (85 photos)
- Fabric crafts - the best ideas and the most practical crafts and toys made from various types of fabrics
Paint the cones in bright colors. Place a candle on the top of each pine cone. For this you will need glue.
Crafts from cones and leaves on the theme of autumn, grades 1-2
Now I'll make you happy! I found this simple craft that is easy to make but looks amazingly cool!
Owl
- We load a regular plastic bag with dry leaves, cones, and acorns.
- We tie the edges of the bag on both sides so that the leaf stalks peek out.
- Glue the “eyes”, “paws” and “beak” of the bird onto the bag.
Now I’ll show you some work where there are both leaves and cones.
Fairies made of pine cones and nuts.
The nut is glued to the wide part of the cone. The nut is the head. Therefore, we immediately draw up all the necessary details of the head: eyes, nose and mouth.
We tie the “neck” (the junction of the cone with the nut) with a ribbon.
Glue the branches-handles. We make “hairstyles” from threads or moss.
We glue wing leaves to the back. There are twigs on the sides of the handle.
Author MK
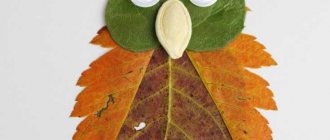
Owl.
- On the wide part of the cone we place the huge eyes of the owl, cut out of cardboard paper or from the caps of acorns.
- Between the eyes is a beak (can be made of felt, paper or tree bark).
- We make ears from the leaves on top.
- You can decorate your owl with a hairstyle made from thuja branches.
- The same branches are located around the owl.
- Don't forget to glue the owl's paws.
The work looks as if it is very difficult to do. But, in fact, they are very light.
Tools and materials for work
Depending on the chosen technique for making crafts, the set of tools may also be changed. According to established tradition, craftsmen prepare the following materials:
- A well-organized work desk with sufficient lighting.
- Glue.
- Decorating compositions (acrylic varnish, paints with pearlescent particles). Crafts made from fir cones are usually coated with a layer of paint and varnish for additional decoration.
- Brushes or spray.
- Cotton wool.
- Plasticine for making children's crafts.
- Wicker baskets can be useful for creating gift bouquets or New Year's sets.
- Epoxy resin and molds for pouring.
- Metal wire to create an original Christmas wreath.
Don’t forget about personal protective equipment: a mask or respirator, gloves and goggles. Working with many decorating compounds and epoxy resin requires respiratory and eye protection.
Hedgehog made of natural material and cones
What should we use as a base to which we will glue the cones? You can cut a large “droplet” from dark fabric. Sew it and stuff it with padding polyester, cotton wool or something else, for example, baby socks from which the baby has outgrown. The main thing is that the base has a flat surface and does not bulge from different sides. Or you can take foam plastic and paint it black. Or maybe even a bottle.
- Stages of work:
- The narrow side of the “droplet” is the nose and muzzle. We attach a nose, antennae and eyes to it.
- We cover the entire wide side with cones.
- We fix berries, mushrooms, leaves and fruits on top of the cones.
It should turn out to be a real cutie!
How to make an owl from pine cones
The “Owl” craft is very popular. And it’s so easy to make it from a pine cone!
First option.
Cut out 2 circles from cardboard.
Cut jute, hemp or wax rope into small pieces.
We glue the circles with this rope using PVA so that the threads of the rope diverge from the middle to the edge, like rays of the sun. Moreover, you need to leave a hole in the center, into which we will then insert an eye - a button.
Trim the edges of the ropes to make an even circle. Align the two circles, placing one next to the other.
In the circle, we insert ready-made plastic eyes into the hole in the middle.
We cut dry twigs into small shelves. These are eyelashes.
Glue the eyelashes to the back of the eye using hot glue.
These are the real owl eyes we got.
If the pine cone does not have a branch protruding, which was used to attach it to the tree, then you need to glue the beak in the middle of the wide part of the pine cone.
We place the eyes around the beak.
We wrap a thick twig on both sides with thick wire. It should look like an owl's toes.
We pass a thin wire between a thick one.
With this wire we will tie a twig with “paws” to the “body” (bump) of the owl.
Such an owl can be hung by attaching a loop of rope to the back of the bird.
Author
The second version of the winter owl.
We push the cotton wool into the spaces between the scales of the cone. The cotton wool should stick out a little!
Glue ready-made plastic eyes (can be made from plasticine or felt) to the wide part of the cone. Glue both the wings and the nose.
It's so simple that even a child can do it!
Did you like the collection? Then come visit us for new ideas for creative inspiration. To do this, subscribe to new articles on the site!
More on the topic of autumn crafts that we did last year:
The best plasticine crafts on the theme AUTUMN
Have a fun weekend with fall crafts.
How to make crafts from autumn leaves that won't spoil
13 unusual crafts with children on the theme of autumn
Owl
This toy is also easy to use. Prepare the following materials:
- Bump;
- Glue;
- Felt in brown, blue and yellow;
- Scissors;
- Ready-made eyes;
- Colored paper.
Progress:
- We take a small cone and wash it thoroughly under running water to remove all the bugs and worms;
- From brown felt we cut out the wings and the first layer of eyes. They should be together with the eyebrows;
- Cut out two medium-sized round pieces from blue felt. We cut these circles around the entire perimeter;
- Cut out small circles from yellow felt;
- Cut out a small triangle from orange colored paper - this is the nose. If you have orange felt on hand, make a spout out of it;
- Now let's start collecting the eyes. On the brown base, first glue a blue circle, then an orange one, and then the finished eyes;
- We take the cone and assemble the toy. Using glue, glue on the eyes, beak and wings.