We are looking forward to the end of winter to see the thaw and hear the birds singing, bask in the spring sun and soak in the spring energy. But the beginning of spring is wonderful not only with wonderful changes in nature, but also with an excellent holiday dedicated to all women and girls.
Children especially show their imagination and diligence on the eve of March 8th to make a gift or a handmade card for their mother or grandmother.
Every child will be puzzled by how to make a craft for March 8 with their own hands. Here he can show his flight of imagination and creative skills. Simple crafts for March 8th can be made with your own hands from scrap materials or colored paper.
If you already have pocket money, then you can make crafts from sweets with your own hands by March 8th. Maybe the child will want to give such a gift to his favorite teacher. Consider crafts for mom for March 8 that you can make with your own hands.
Crafts from colored paper for March 8
How is it customary to give flowers? In the form of a bouquet, or in a vase, or in a beautiful basket. If you learn how to make a basket, you can design your gift in an original way.
For this we need the bare minimum of materials – colored paper, glue and scissors.
Cut strips of colored paper 1.5*29 cm and 9*1.5 cm. For the bottom of the basket, cut out a circle with a diameter of 9 cm from thick cardboard.
Along the diameter of this circle we glue colored strips 9cm long. Lift them up and start weaving, laying out long strips horizontally. Periodically fix the weaving areas with glue.
When the short strips run out, the last 1 cm should be folded inward and glued.
We will need a long strip to make handles.
You can also do
Crafts made from corrugated paper for March 8
Corrugated paper makes beautiful flowers that look more like real ones.
If you don’t know what flowers are best to make as a gift for a loved one, then make a rose. This is a classic option and almost everyone likes roses. This flower can become a home decoration.
Materials:
- Corrugated paper
- Wire
- Hot glue
- Scissors
- Wooden sticks
- Pencil
It is best to make 15-20 petals to get a lush bud. To do this, cut out a rectangle from pink paper.
Having folded it, we cut the edges in a semicircle.
Stretch the edge of the paper to make it wavy. Wrap the candy in paper and tie it with thread.
Insert the wire into the bud. From a larger rectangle than the previous one, we make 4 petals. Twist the petals on top with a pencil, turning them outward. Attach the petals beautifully to the bud.
Repeat creating the petals again, but using lighter colored paper.
Green paper is useful for creating petals and winding the stem
You will get a beautifully decorated bud.
You can also make a small bud and attach it to the main one.
Leaves can be made from paper or bought ready-made
Corrugated paper can be used to create a three-dimensional applique using the trimming method
First, the basis is drawn - the shape of the picture. And then it is filled with crumpled pieces of corrugated paper.
Applique of autumn flowers
Flowers delight us with their bright colors not only in spring, but also in early autumn. Therefore, now we will tell you how to make an autumn composition with phlox and asters. In the previous lesson we learned how to make spring flowers in a vase, and in this lesson we will talk about how to make an autumn bouquet in a basket:
- First of all, you need to make a basket. It will consist of two-color stripes. Children in the preparatory group will be able to cope with this task independently. For kids, we recommend that they print out a suitable picture of a basket in advance.
- Then you need to form the flowers.
- At the end of the lesson, the finished parts will need to be beautifully placed inside the basket and secured with PVA.
Crafts for March 8th to school for a DIY competition
You received a DIY craft for March 8th as homework, or you want to spend quality time with your child. Then consider interesting ideas on how to make chic crafts from paper and other available materials.
Bouquet of sweets: a sweet gift for your beloved mother
Paint the wooden skewers green. We cut out flowers from multi-colored paper according to the shape or template. Glue candy onto the petals of the flowers and another candy into the center of the flower. Attach the flowers themselves to the stem.
To make flowers stand steadily in a jar-vase, you can make it heavier by placing polystyrene foam or floral foam inside
A colorful and no less bright bouquet will be created using felt.
Flowers can be made in different shapes, cut with curly scissors to create original edges. Glue each flower onto a wooden skewer and cover the joint at the back with a piece of felt.
The more colors of felt you use, the brighter the bouquet will turn out.
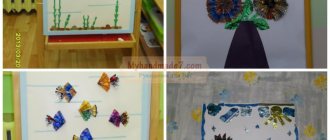
Summary of a lesson on application in the middle group of kindergarten. Flowers
Summary of direct educational activities in the middle group on artistic creativity on the topic: “Flowers.”
Author: Novozhilova Irina Gennadievna, teacher of GBDOU kindergarten No. 104, St. Petersburg. Description of the material: synopsis of GCD for children of the middle group on the topic: “Flowers.” This is a summary of a lesson on applique with non-traditional drawing methods, aimed at the artistic and aesthetic development of children. It will be of interest to teachers of middle and senior groups, as well as teachers of additional education. Purpose: making crafts with your own hands. Program content: Teach children to create a three-dimensional applique on a sheet of fabric paper, decorating it with unconventional drawing methods. Teach children to beautifully build a composition on a sheet of paper, develop imagination, fantasy and fine motor skills. Objectives: To develop independence in creating a composition. Evoke in children a positive emotional response to the beauty of nature. Develop the ability to work in a team, coordinate your actions with each other. Material for clarity: Pictures of flowers. Finished work.
Required material: Beautiful pieces of fabric, cut along the contour of the flower; white paper in the shape of an oval; plate, gouache. A bag with colorful shreds. Glue brushes. Rags and oilcloth. Specially made “pokes” according to the number of children: a cap from a felt-tip pen with foam rubber inserted inside. Preliminary work: Reading poems and conversations about spring and spring flowers.
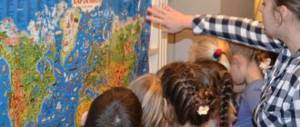
Examination of flowering plants, illustrations, photographs. Drawing flowers in free time. GCD progress:
Educator: Hello guys. Let's hold hands and stand in a circle. Now close your eyes, I’ll say: “One, two, three” and you and I will imagine that we have turned into beautiful flowers. Educator: One, two, three, we didn’t just stand in a circle, we were a big beautiful meadow. Open your eyes. Oh, how many beautiful flowers there are! Anya, what kind of flower are you? Styopa, what about you? (Asks each child) Children answer : mother - and - stepmother, chamomile, snowdrop, etc. Educator: Great. Let's make one big, beautiful meadow of flowers right on our carpet. He takes out a bag of colorful shreds and offers them to the children. Children : make up a collective composition from multi-colored scraps. Educator : what a beautiful clearing you have created! I just want to walk along it, smell the scent of flowers. What flowers grow in your meadow? What colors are there more? The children answer. Educator : Well done, guys, now let's make the same clearing, only smaller and give it to mom. Go to the table. Look what I prepared for this. Children sit at tables on which there are scraps of fabric, glue, glue brushes, pokes with foam rubber, green paint, and white oval paper. Educator: take and place on your sheet as many scraps as there are flowers in your meadow. Now you need to glue each piece. You need to work carefully, use a small amount of glue so that the work is not dirty. Children do the work, independently arranging the scraps according to their ideas. The teacher helps, if necessary, individually. Phys. just a minute. The children leave the table. “On the lawn in the morning we started a game. I am a snowdrop, you are a bindweed. Stand in our wreath. One, two, three, four Move the circle wider. And now we are streams, Let's run in a race. We hurry straight to the lake, The lake will become big. Stand in a circle again, Let's play sunshine. We are cheerful rays, we are frisky and hot.” (Children perform movements in accordance with the text) Educator : Well done, guys. Take your seats. Look what is missing in our clearing? Children : offer their options. Educator : And I suggest you make our clearing even more beautiful so that the white paper is not visible. We will make green grass on it. To do this, we will take these special pokes, put them in a plate with green paint and apply them to our work. Like this (shows). Now you and I have a real clearing with spring flowers.
Educator : Well done, guys. Now let's put your works on one common table so that each work can be seen by everyone, and together we have a whole flower field.
Lesson reflection : the teacher discusses with the children what they did during the lesson; what happened; what was the most interesting; what was difficult and what was easy and simple.
We recommend watching:
Summary of GCD in the middle group “Visiting the Traffic Light” Summary of GCD in the middle group on the theme “New Year” Summary of GCD for children in the middle group. History of children's toys Summary of GCD for FEMP in the middle group
Similar articles:
Summary of continuous direct educational activities in the middle group
Summary of GCD in the senior group on the topic “So that your teeth don’t hurt”
Summary of GCD in the middle group on the topic “Journey to the autumn forest”
Summary of GCD in the middle group on the topic: “So summer is over”
Beautiful DIY crafts for March 8th
On such a long-awaited day, every girl dreams of receiving a memorable gift. If you want it to be remembered and preserved for a long time, then make a gift with your own hands.
Memory is stored in photographs, and beauty can be presented in the form of a photo frame. The volumetric frame is made of thick cardboard.
Materials:
- Thick cardboard
- Scissors
- Glue
- Decor
- Ruler
To make a neat and even frame, print the template on a printer. Transfer it to thick cardboard, which will be the main material for creating a photo frame.
We will need two of these workers.
Using a ruler, make folds
We assemble the frame along the folds.
Assemble the corners with glue
We need to make two identical frames
You can assemble these two parts together using a cardboard piece, tape, or buy a special furniture clip.
The rest of the decor on the outside of the frame depends on your imagination and the materials you have available.
Applications “Cactus in a pot”
We have already talked enough about spring flowers and even remembered some flowers that delight us in early autumn. Now let's remember what flowers grow in our home!
Of all the indoor plants that live on the windowsills of houses and apartments, children are most attracted to cacti. There is nothing more interesting for children than something unusual and forbidden. And what could be more amazing than a flower with thorns, which, moreover, cannot be touched?
In this detailed lesson, we will make the dreams of many curious little ones come true and not only allow them to touch a paper cactus, but also tell them how to make one:
- First, glue the flower pot to the background sheet:
The color, size and shape of the pot depends on your imagination. You can prepare a small pot, a designer pot with decorations, or an original flower pot with a floral pattern. - After this, you need to make blanks for a cactus with spines:
- All components of the future cactus must be carefully glued:
- At the end of the work, the cactus can be decorated with small paper flowers: The applique of flowers growing on the windowsill is ready! Now a safe cactus will appear in your room, which you can not only look at from all sides, but also touch!
How to make paper flowers for March 8 with your own hands
These gorgeous hyacinth flowers will attract attention and lift your spirits even on a cloudy day.
Materials:
- Colored double-sided paper
- Scissors
- Glue
- Wooden skewer
- Ruler
- Pencil
We cut colored paper into strips 2.5 cm wide across an A4 sheet. Draw a line 1 cm from the edge. Before it, make cuts at the same distance from each other, about 1 cm, so that you can then cut them into fringe. Using a pencil, twist each strip.
You will get a sheet with rolls like this.
To make the stem we need a piece of paper 21*2.5 cm.
Roll the triangle into a tight tube and glue the paper
We coat the flower bud blank with glue on the inside and begin to attach it to the stem gradually.
The result will be a flower blank without leaves.
Making leaves for hyacinth. To do this, you need to cut out pieces of paper measuring 8*25 cm and fold them into an accordion, 1 cm each.
Cut out triangles from this piece.
Glue the lower part of the flower along the stem diagonally.
By making flower buds from different sheets of cardboard, you can get a bright and beautiful bouquet.
Another option to beautifully decorate an artificial flower in a pot
Materials:
- Corrugated paper
- Two sheets of white paper
- Plain napkins
- Green double-sided paper
- Liter plastic bottle
- PVA glue
- Wooden skewer
- Scissors
We are preparing a pot to plant our flower in. Cut off the bottom of the plastic bottle and squeeze the white leaf into a ball. Place it inside the plastic blank.
Cut the second leaf in half and twist the rectangle into a tube, and secure the ends with glue. To attach to the workpiece, make cuts.
The flower stem needs to be covered with green paper.
Colored plain napkins need to be cut into equal squares. We apply each square to the end of the stick and bend the edges up. Thus, we glue each element to the stem.
Try to glue each element more tightly to each other.
To make the leaves, take double-sided green paper and cut out long, narrow leaves from it.
Cut out a square sheet of corrugated paper and place our flower in the center. Wrap the future pot with this paper and tie it with a ribbon.
This craft can be given to your mother or grandmother, or taken to school for a competition.
Using this method, you can create a beautiful picture
Works for the competition in the “Creative Start” category: applications “Bouquet for Mom” and “Flower”
Two more works using the appliqué technique from Dasha and Tasi Vasyukov .
Application “Bouquet for Mom”
Performed by Tasya Vasyukova (3 years, 2 months) with the help of her sister Dasha (3 years, 2 months) and her mother.
Materials and tools:
- colored paper; - white cardboard; - scissors; - glue (PVA or glue stick); - pencil.
Operating procedure.
We cut out a vase from colored paper (we took paper with templates already printed on the back side).
Using templates, cut out 4 red, 4 blue flowers and 4 small yellow center circles.
In addition, using the template, we cut out 2 white daisy flowers and 1 large yellow circle in the middle.
Glue the vase to a sheet of cardboard.
Using a pencil, we bend the petals of the flowers and glue the flower in pairs into the flower, gluing the centers.
Glue the flowers above the vase to form a bouquet.
We cut out leaves from green paper (if the children get them all different, that’s even better). Fill in the gaps with leaves.
Our bouquet is ready!
Application "Flower"
Made by Daria Vasyukova (red flower) and Taisiya Vasyukova (blue flower). Mom helped both of them.
Materials and tools:
- toilet paper roll; - colored paper; - white cardboard; - scissors; - glue (PVA or glue stick); - pencil.
Operating procedure.
We cut off a small ring from the sleeve, about 1.5 cm high, cover it on the outside with orange paper, bending it inward about 1.5 cm from each edge.
From yellow paper we cut out 2 rectangles with a length equal to the circumference of our ring and a width 4 times the height of the ring. We bend the blanks in half along the width and cut out the petals along the entire length.
From red, blue or other colored paper, cut out larger petals separately.
We also cut out leaves from green paper.
Using a pencil or scissors, we twist the yellow petals and glue one of the blanks to the inner surface of the ring with the petals inward, and the second to the outer surface with the petals outward.
We curl the edges of the large petals with a pencil and glue the outside of the flower in 2 rows.
From colored paper (we took paper with templates already applied) we cut out a suitable vase, two colored stripes for decoration and one green stem stripe.
Glue a green stem strip and leaves onto a sheet of white cardboard. We glue our vase to the bottom of the stem, and 2 colored stripes to it.
Glue a flower at the top of the stem. If desired, add green leaves to the flower.
Applications are ready.
ALL COMPETITION WORKS
Do-it-yourself topiary for March 8: examples with photos
Gifts for March 8th can be varied, and if you know that your mother or grandmother loves all sorts of home crafts and decor, then a beautiful topiary could be an ideal option.
If you take a ready-made option as a basis, but bring a little of your imagination into it, taking into account the tastes of the person who will receive this gift, you can get a real masterpiece.
Lovers of coffee and flowers will not remain indifferent when they see this version of topiary.
We found ready-made roses from foamiran, then they can be used to create a heavenly topiary. You can supplement them with sisal balls, twigs, pearls, cones
Topiary can be made in the form of a number that is directly related to the holiday.
Make a bright topiary using flower blanks made of paper or thin cardboard.
Corrugated paper will help you create a beautiful and lush decorative tree.
Application “Bouquet for Mom”
Bright spring flowers can be a wonderful gift for March 8th! But where can children get a bouquet for their mother if there is still snow outside and there are only a couple of days left before the holiday? Of course, make it yourself!
With the help of teachers, children in the middle group can make an applique in the form of a wonderful spring bouquet for their mother.
In order to bring such an unusual idea “to life” they will need:
- Hole puncher
- Glue
- Multi-colored paper sheets
- Pencil
- Scissors
- Red felt-tip pen
- Template according to which the bouquet will be made
Step-by-step instruction:
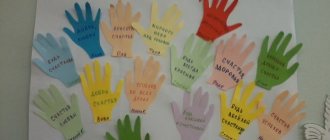
- Place your palm on the white sheet, trace it with a pencil, and carefully cut out along the contour:
- After this, cut out small multi-colored flowers and use a hole punch to make cores for them:
If you want the flowers to be the same size, use templates! - Now you can prepare the base of the bouquet:
- To make the bouquet look more realistic, the bottom of the workpiece needs to be cut so that you get several stems:
- Now you need to glue the palm and the bouquet blank to a sheet of blue cardboard:
- The top of the bouquet should be decorated with flowers:
- And from below you need to wrap your fingers so that it looks as if the bouquet is held tightly in your hand:
- You can paint your toenails with a red felt-tip pen:
Original crafts for March 8
Not everyone will immediately believe that you used cardboard egg packaging for this craft.
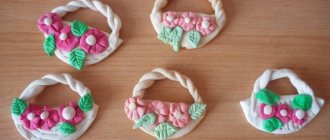
If you come across candies packed in paper baskets, do not rush to throw them away.
You can make an unusual photo frame from thin twigs
Another original surprise is a homemade necklace. Even a child can handle it by giving his mother or sister such an unusual accessory.
If you are making a fastener, you can cut a not very long rope for the base. But if the clasp is not planned, we measure out such a length so that you can then put this decoration over your head.
We fix the colored thread on the rope with a knot and continue winding. We fix it with glue.
Decor may vary.
We fix the thread with wire, winding the required amount onto the rope. He cuts it off with pliers.
Decor in the form of tassels made of bright threads will look original.
An old board can be used to create a beautiful, unusual panel. To do this you will need several dozen nails, thread and wire.