How to paint the Northern Lights in watercolor: a step-by-step drawing lesson for beginners
The Northern Lights are a miracle of nature and its unique phenomenon, which has fascinated people for many centuries. It serves as a source of inspiration for artists and poets who reflect the beauty and charm of the wonderful reflections in the sky in their work. In this step-by-step drawing tutorial we'll look at how to paint the Northern Lights in watercolor. Step-by-step recommendations with step-by-step photos of the drawing process will be clear even to beginners who are just learning the basics of watercolor drawing.
Tools and materials
To draw a beautiful landscape with the northern lights, you will need:
- round brushes: No. 3, No. 12;
- large flat brush;
- watercolor paints (light green, emerald green, lemon, azure blue, red kraplak, ultramarine, burnt umber, burnt sienna, cadmium orange);
- graphite pencil (No. H - No. 2B) for sketching;
- containers with water (one for rinsing brushes, the other for water for diluting watercolors);
- tape (preferably wide masking tape);
- palette;
- A3 sheet of watercolor paper;
- a piece of white paper to check the colors before applying to the painting
How to Paint the Northern Lights in Watercolor: A Step-by-Step Guide
1. Stretch the watercolor paper onto the tablet, which can then be moved and turned over as you work. Sketch the future painting with a graphite pencil, without pressing too hard on the paper so as not to damage its surface. Outline only the main shapes, as well as the lightest and darkest areas, without going into detail.
Here is a processed image of the sketch so that you can better see the basic principle of work at this stage.
2. Using a wide flat brush, generously wet the paper in the area where the sky is planned.
Important! While working on the sky, the surface of the paper must remain damp, so you must work quickly. If necessary, you can moisten the paper while working using a spray bottle. But they should work extremely carefully so as not to blur the drawing.
3. Using a #12 round brush, paint the northern lights area with lemon, light green and azure blue paints. Lift the painting so that the watercolor begins to flow diagonally.
As soon as there is a little space left to the bottom of the northern lights, turn the paper over again so that the paint begins to flow in the opposite direction.
4. Load your brush with more cerulean blue paint and run it along the top edge of the painting. Tilt the paper so that the watercolor flows diagonally.
Without allowing the paint to reach the bottom of the northern lights, turn the paper over so that the watercolor flows in the opposite direction.
5. On the palette, mix red and emerald green watercolors. Place the mixture on a #12 round brush and draw a line along the top edge of the painting.
Again, tilt the paper so that the paint can flow diagonally, and then turn the paper over so that the paint begins to flow to the top edge of the painting.
6. Load a #12 brush with a rich mixture of speckled red and emerald green paint and draw a line along the top edge of the painting. Tilt the paper so that the paint flows diagonally and begins to form the top edges of the northern lights.
Add a little ultramarine to the red kraplak and dilute them well with water. Apply the mixture to a size 12 brush and brush across the bottom of the sky, skirting the northern lights and the edges of the mountains.
Using a round brush No. 3, add a few drops of a mixture of ultramarine and azure blue watercolor diluted in water to the sky near the mountains. Wait until the paint on the painting is completely dry.
7. Add a little red kraplak to ultramarine and dilute this mixture with water.
Using a No. 12 round brush, fill in the mountains and outline the dark areas in the snow.
8. Place light green watercolor diluted in water on a brush number 12 and fill in the hills in the middle ground.
Add a little red speckle to the emerald green, put the mixture on a No. 3 brush and paint the forest at the foot of the mountains. Use a mixture of ultramarine and kraplak with brush No. 3 to paint cracks and irregularities in the mountains.
9. Dilute light green watercolor well in water, use a No. 12 brush and fill in the hills in the foreground, as well as the snow on nearby trees and the roof of the house.
10. Add a few drops of emerald green watercolor to the burnt umber and dilute the paint with water.
Apply the resulting mixture to brush No. 3 and paint the shaded parts of the house.
11. Use lemon watercolor to depict the window and the front of the house.
12. Using a #3 brush, add some cadmium orange to the window.
Depict the structure of the walls of the house, alternately applying stripes with a No. 3 brush of burnt umber, burnt sienna and a mixture of burnt umber and emerald green. Use the same colors to depict the chimney pipe on the roof.
Add a little emerald green and red speck to burnt sienna. Apply this mixture to brush No. 3 and paint the shadows near the porch. Dilute the same mixture in more water and draw shadows under the roof.
With a mixture of ultramarine and red kraplak well diluted in water, deepen the shadows on the snow-covered roof of the house, thereby giving it the necessary shape.
13. In order to depict smoke coming from a chimney, put a little water on brush No. 3, wash the paint over the chimney and blot it with a napkin.
This way you can give the smoke any shape.
14. Add a drop of kraplak to the emerald green watercolor and wash the mixture with water. Place the resulting paint on a brush No. 12 and paint tree branches in the background.
15. Apply a thick mixture of emerald green paint and red speckle paint to a No. 3 brush. Draw the darkest places of the fir trees: branches sticking out from under the snow and deep shadows. Draw some details in the foreground: a fence, dry plants. Darken the forest in the background.
16. Carefully peel off the tape after the work has dried.
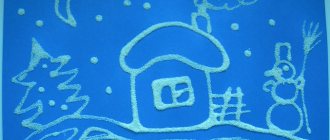
A beautiful watercolor drawing of the northern lights is ready!
The artist Agnes shared her secrets of watercolor creativity.
On the pages of our creative project “Wings of Inspiration” you can also find step-by-step lessons in drawing a watercolor portrait and seascape. We also have many interesting step-by-step pencil drawing lessons. Learning to draw is not difficult - discover the artist within you with our master classes and make sure that watercolor creativity is within the power of everyone!
Painting the Northern Lights in Oil
Before you paint the northern lights with oil, you need to collect the necessary materials and tools: oil paints, canvas, paint thinner, brushes, palette. Since the oil is distinguished by its dense texture, it is better to carry out all manipulations with mixing colors and finding the desired shade on the palette. So, an option for depicting the northern lights using oil paints:
- mix white and green colors on the palette until light green or turquoise is formed (with the addition of blue);
- Using the resulting shade, depict the required position of the northern lights on the canvas, it is better to do this with hatched lines;
- mix dark blue, light blue and green to obtain a very dark indigo color and shade the upper part of the sky with it;
- gradually lightening the color to blue and light purple, fill the middle and lower part of the sky with them;
- mix a light green shade with white and mark the center of the northern lights - you should get its shining part;
- use a dry brush to shade the boundaries of the northern lights - they should smoothly blend into the tone of the sky;
- to create the effect of color dispersion, the lower part of the northern lights should be shaded with vertical short strokes;
- the lower glow is painted with a mixture of white and yellow colors, the deepening of the radiance is painted with violet, the light highlights are painted with white;
- at the end, small drops of white paint are sprayed onto the entire canvas to depict stars.