The broken type of applique is convenient for little children who are just starting to create their first paper crafts. This type of work is considered safe for children, since they do not have to deal with scissors, they simply tear the sheets into slices.
Let's look at examples of master classes with step-by-step instructions and stencils that relate to the topic.
Paper bunny
In the younger group, and even in the middle group, it is better to fill in the existing drawing with torn pieces of paper. For example, take any coloring book with a large image and make the required number of copies or print out templates.
Finely tear the paper strips.
We glue them in the form of a mosaic onto the prepared drawn figure, leaving a distance between the pieces, no need to glue them close to each other.
The eyes and nose are cut out by adults or torn in the same way, but from paper of a different color.
Applique for children steam locomotive
A colorful applique for children “Locomotive” with funny animals can be made in several versions: from plain paper, colored cardboard, or multi-colored felt.
You can put any animals or photos of your family members in the train windows, and, for example, stick a photo of your baby in the driver’s window. And then you will get a wonderful family photo. If there are many relatives, then you can increase the number of carriages. This is a great option for decorating a children's group photo.
This application can be made in the form of a greeting card and given to someone on their birthday.
Here are the materials for the paper appliqué “Train Engine” - a forest background and the details of the train itself. All you need to do is download, print and cut them out for your kids. You will find a link to download application templates at the end of the article.
If you are making an applique with a small child, then first you need to schematically put the parts together on paper to make it easier for the child to understand. And then proceed directly to gluing the parts.
Older children, 4 - 5 years old, should be given the opportunity to assemble a train on their own.
Good luck and interesting activities!
Paper locomotive applique for children
Paper locomotive applique for children
Paper locomotive applique for children
Paper locomotive applique for children
Paper locomotive applique for children
Cartoon about a train from the Children's Corner channel
Snowman in break technique
The torn technique involves more than simply tearing the paper into small pieces. Step-by-step instructions in the next master class will help you understand this matter.
Step by step execution:
- Draw “drifts” on a white sheet of paper:
- With our hands we tear along the pencil line, a little at a time.
- Cut along a straight line with scissors, you will get two pieces of snowdrifts:
- The background will be blue, paste the resulting snowdrifts onto it:
- Place the second one on top of the first element:
- Draw blank parts of the snowman:
- When it is difficult to tear with your hands, cut out circles and then tear the edges with your fingers.
- Glue it, running the bottom circle a little onto the snowdrifts:
- If you have a figured hole punch with a suitable pattern, you will get original “buttons”.
- Cut out a bucket for the snowman's head from orange paper and draw a face:
Lesson summary Volumetric paper applique “Hedgehog made of paper strips.”
Technology lesson notes
3rd grade
Subject
: working with paper.
Product:
Volumetric paper applique “Hedgehog made of paper strips”.
Target:
develop the ability to create three-dimensional appliqué from paper strips.
Tasks:
— educational:
introduce the method of gluing paper strips into “droplets”; teach how to fold leaves “obliquely like an accordion”. Strengthen the ability to collectively analyze a sample and plan the implementation of an application.
— developing:
develop hand motor skills, independence, attention, and the ability to control one’s activities.
- educational:
cultivate the desire to create useful products with your own hands to develop practical skills.
Formed UUD:
- personal:
fostering accuracy, hard work, and a conscientious attitude to work; developing the ability to organize and clean the workplace.
- educational:
systematize and expand children’s ideas about how to work with paper and use them when creating new forms; Follow safety rules when working with glue and scissors.
- regulatory:
carry out step-by-step control over planning actions and independent activities.
- communicative:
allow for the existence of different points of view; adequately use speech means to solve various communicative problems, at the conversation stage, task planning.
Methods:
visual, verbal, practical.
Lesson type:
lesson - workshop.
Equipment:
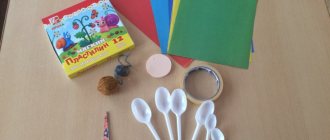
A4 colored cardboard, colored paper, scissors, glue pencil, felt-tip pens, hedgehog template; ready-made sample application.
Equipment for the teacher:
ready-made application sample, assembled and disassembled, hedgehog templates according to the number of students.
Equipment
for students:
A4 colored cardboard, colored paper, scissors, glue pencil, felt-tip pen.
During the classes
| Lesson stages, time dosage | Lesson content |
| 1. Organizational stage 1 min | - Hello guys. Check your readiness for the lesson. On your desks you should have colored cardboard, colored paper, scissors, glue, and markers. Sit down. |
| 2. Statement of the labor task. 2 minutes | - Now I will read you a riddle. Your task is to listen carefully and determine who is being talked about. Angry touchy-feely Lives in the wilderness of the forest. There are a lot of needles And not a single thread. (Hedgehog) -Today in the lesson you will learn how to make a three-dimensional paper applique “Hedgehog from paper strips.” and learn a new way of gluing paper strips into “droplets”; learn how to fold leaves in an accordion-style pattern. |
| 3. Sample analysis. 3 min | 1. name "Hedgehog made of paper strips." 2. rectangular shape. 3. size (landscape sheet). 4. material (hedgehog body template). 5. number of parts: hedgehog body templates - 25; paper strips (droplets) - 32. 6. design of the product (everyone makes their own hedgehog). |
| 4. Work planning. 4 min | Demonstration by teacher 1. Take a black sheet of colored paper and fold it into four parts. Cut along the folded lines into four rectangles. 2. Fold each rectangle several times into 8 strips and cut along the folded lines. From 4 black rectangles you will get 32 stripes. 3. Glue the hedgehog template onto colored cardboard. 4. Glue the strips into “droplets” and glue them along the contour of the hedgehog, starting from the top row. The next rows should be glued 1.5 - 2 cm lower than the previous one. Each person may end up with a different number of rows. 5. You tear colored paper into colorful pieces, make a path of autumn leaves, or make a path of leaves. 6. To make leaves, cut out a strip 5 cm-6 cm wide, fold it like an accordion, draw the outline of a half-sheet and cut out each leaf. Fold it in half and bend it like an accordion. Gently straighten the leaves so that they are voluminous. 7. We cut out different fruits (pear, apple), mushrooms and glue them onto the back of the hedgehog. Glue on the eyes, nose, draw a mouth. Stage 1 – marking — How many parts do we fold a sheet of black paper into? (For 4) - How many stripes do we add to each rectangle? (For 8, there will be a total of 32 strips) Stage 2 – collection of droplets — How do we glue the droplets onto the hedgehog template? (Following the contour of the hedgehog, starting from the top row. The next rows should be glued 1.5 - 2 cm lower than the previous one). Stage 3 - leaf assembly — How to make leaves? ( To make leaves, cut out a strip 5 cm-6 cm wide, fold it like an accordion, draw the outline of a half-sheet and cut out each leaf. Fold it in half and bend it like an accordion. Gently straighten the leaves so that they are voluminous). |
| 5. Safety precautions. 1 min | - Guys, let's remember safety precautions when working with scissors? (Do not work with loose scissors; work only with a serviceable tool: well-adjusted and sharpened scissors; work with scissors only at your workplace; watch the movement of the blades during work; place the scissors with the rings towards you; feed the scissors with the rings forward; do not leave scissors open; store scissors in a case with blades down; do not play with scissors, do not bring scissors to your face; use scissors for their intended purpose). — Who knows the rules for working with glue? (When working with glue, you need to use a brush, if required; take the amount of glue that is required to complete the work at this stage; apply the glue to the middle of the sheet and spread evenly to the edges; the edges should always be well lubricated; when the paper is smeared with glue, you should wait a little for it to get wet and stretch, otherwise there will be wrinkles and folds; The part must first be tried on, and then smeared with glue; Remove excess glue with a soft cloth or napkin, gently pressing it; wash the brush and hands well with soap after work). — Your work will be assessed according to the following criteria: 1. Volume of the composition. 2. Reliability of connection of parts. 3. Completeness of work. — I wish you successful and productive work. |
| 6. Physical education minute 1 min | A hedgehog walked across the clearing. ( Walking in place) He was looking for mushrooms - honey mushrooms ( Look right and left without turning your head) He squinted his eyes and blinked, ( Squint hard) But I didn’t see any mushrooms. (open your eyes wide, spread your arms to the sides) He looked up ( look up, head motionless) Looked down, ( Look down) He puffed quietly himself. ( Say “puff”, “puff”, “puff”.) Looked to the left, ( Look to the left without turning your head) Looked to the right, ( Look to the right without turning your head) Suddenly I saw a great mushroom! ( Close your eyes tightly and open them wide.) He looked back again ( Movements according to the text) Over the left shoulder Through the right one more. The hedgehog stomped along the path. And the fungus carried away on the back. ( Walking in place, with a stomping step.) |
| 7. Independent work. 28 min | I monitor the activities of children: compliance with safety regulations, consistency and correctness of work, organization of the workplace, and seating of students. I orient children in time, providing individual assistance if necessary. |
| 8. Behavior of activity results, reflection. 3 min | -Guys, come to the board with your works, let's see what you got. The first row comes out first. Then the second row. After the third row. Children's work is assessed based on the criteria. Grading. — Raise your hands if you liked the lesson and everything was clear to you. Now raise your hands if you didn’t understand everything and didn’t like the lesson. |
| 9. Cleaning workplaces. 1 min | - Thank you very much for the lesson. You can clean up your workspaces. I control the cleaning of workplaces and give row-by-row assessments. |
Work order
1.
Take a black sheet of colored paper and fold it into four parts. Cut along the folded lines into four rectangles.
2.
Fold each rectangle several times into 8 strips and cut along the folded lines. From 4 black rectangles you will get 32 stripes.
3.
Glue the hedgehog template onto colored cardboard.
4.
Glue the strips into “droplets” and glue them along the contour of the hedgehog, starting from the top row. The next rows should be glued 1.5 - 2 cm lower than the previous one. Each person may end up with a different number of rows.
5.
You tear colored paper into colorful pieces, make a path of autumn leaves, or make a path of leaves.
6.
To make leaves, cut out a strip 5 cm-6 cm wide, fold it like an accordion, draw the outline of a half-sheet and cut out each leaf. Fold it in half and bend it like an accordion. Gently straighten the leaves so that they are voluminous.
7.
Cut out different fruits (pear, apple), mushrooms and glue them onto
the back of a hedgehog. Glue on the eyes, nose, draw a mouth.
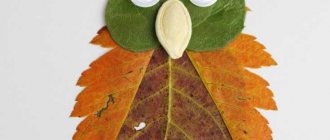
Applications of paintings using the cutting technique
For children in the preparatory group, large works that are completely lined with torn elements are suitable. Look what beautiful pictures your children will have:
It is not necessary to tear, you can randomly cut into uneven flaps:
And this is a task for younger schoolchildren to break off complex elements:
An example of work, when there are contours, the inside is filled neatly and beautifully:
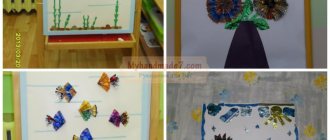
Examples of finished works
For inspiration and ideas, you can look at drawings on the Internet with your children. Examples can be found on various creative sites; it will also be useful to look at art galleries and choose a simple drawing for a further “broken” imitation of the original.
The product of children's creativity can be simple and unpretentious. But this is a very effective means of activating imagination and various skills. And children get great pleasure from working with colored materials. In the process of painstaking work, children become diligent, neat and patient, which is very useful for further development.
Tear technique from napkins
Multi-colored napkins that tear into pieces will give the applique airiness and lightness.
The trees also come out great, the trunk is made as desired: cut, drawn or torn:
But the most beautiful thing is when you roll torn strips of napkins into arbitrary balls.
Tear-off cotton wool applique
Take cotton wool or cotton pads and let the children tear them into small pieces with their hands, which they will then use to paint their own individual picture. Birds, animals, flowers, snow, clouds will look beautiful and tender.
Step by step lay out and glue pieces of cotton wool onto the drawn figures.
And for adult artists it is proposed to complete a large complex image in its entirety: