Semolina applications for children. Master Class
Master class “Pictures from semolina”
Author: Olga Andreevna Fedulova, teacher of additional education MAOU DOCH TsRTYu “Zvezdny” (creative association “Fun Mosaic”), Solikamsk
Description: master class for children of senior preschool and primary school age, for teachers, parents. Semolina pictures are very popular not only among children, but also among adults; they are suitable for family creativity. We begin work on applique with children of senior preschool age and first graders with pictures from semolina. If desired, the cereal can be pre-painted, or ready-made pictures can be painted with gouache. Purpose: making holiday cards for relatives Purpose: making a postcard using semolina applique technique. Objectives: Educational: •Introduce children to one of the options for making an application. •Teach some techniques for working with natural materials. Educators: •to cultivate the artistic and aesthetic taste of children, patience, diligence and accuracy in work. Developmental: •Develop labor skills and abilities. Materials: - colored cardboard - PVA glue - thin brush No. 4 - semolina
Application - what is it for? The application is associated with cognitive activity and has a huge impact on the development of children’s mental and creative abilities. Often, applications are made from salt or river or sea sand, but when working with children, you can use semolina. Semolina resembles sand in its structure, but it is easier to work with because... it is lighter in weight, dries quickly and, if desired, can be painted, which will give the finished product a brighter look. Description of work: 1. It is important to organize the workplace correctly: on the right we place the glue and brush, right in front of us - the sketch, behind it - a sheet of paper with semolina.
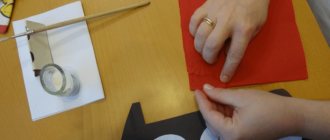
2. We make a sketch of the drawing on colored cardboard. We make the sketch with thin lines, without pressure, otherwise the pencil will be visible (here, so that the drawing is visible in the photograph, the sketch is made very brightly).
3. The edges can be trimmed with curly scissors. This needs to be done at the sketch stage, then, when the application is ready, it will be more difficult to process the edges. 4. We begin the work from the upper left corner. Apply glue to a small area of the design, cover it with semolina, and slowly count to five. My children and I have a chant: “One, two, three, four, five – you can pour some cereal for us!” Her children speak to themselves or in a low voice.
5. Take the cardboard by the edges with both hands and pour the excess cereal back onto the sheet with semolina.
6. We continue to work in stages, gradually applying glue and semolina to the drawing. We work from top to bottom and from left to right. You can apply glue not only along the contour, but also inside the image.
7. If during the work there are areas that are not filled with cereal, carefully apply glue and cereal in dots.
8. There is no need to smooth or slam the cereal during the gluing process. 9. The completed picture can be supplemented with small details if desired. 10. Glue the finished picture onto white paper or cardboard, leaving a small frame around the edges. Ready!
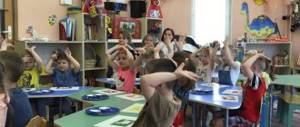
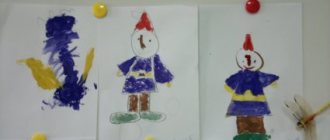
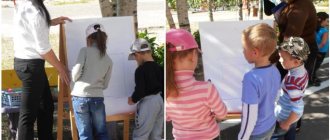
In our city there is a city public organization of disabled people “Luch”, the chairman of which, G.A. Belogub often invites additional education teachers to conduct master classes with children and adults, and several years ago she initiated the creation of a festival for children with disabilities. When I was first offered to participate in a master class that was held at the “Children of the Sun” festival, I had to come up with a simple and short master class in which several children could participate at the same time. This is how the idea of “Semolina Pictures” came about, which I presented to your attention. Here are more works done by first grade children.
We recommend watching:
Semolina applique DIY applique made from natural material for children. Dolphins Semolina applique for children. DIY winter semolina applique for children 5 - 8 years old
Similar articles:
Application made from tea and cereals. Master Class
Application from cereals for younger schoolchildren. Master Class
Application of cereals and seeds for schoolchildren
Cotton ball applique for children
Cereal applique “Teddy Bear”
Creating compositions depicting animals instills in children a love of nature and its inhabitants. One of the brightest representatives of the animal world is the bear. But, he is not only the owner of the forest, but a bright cartoon character, the hero of his favorite fairy tales, a cute, plush friend of most children. By making it, children can begin their acquaintance with the technique of making cereal appliqué.
Invite the children in the middle group to make a composition on the theme “Teddy Bear”, as in the photo:
To make such a picture you need to prepare the following materials:
- Sample.
- White or colored paper, cardboard or plywood board (for the base).
- Carbon copy.
- PVA glue.
- Paints.
- Brush.
- Cereals. For a white bear - rice, for a brown bear - buckwheat.
Step-by-step instruction. We make a stencil. You can print the drawing on a printer, or take a picture from a children's coloring book and transfer it to the base using carbon paper.
Apply glue to the bear's body, without protruding beyond the contours of the drawing.
We make wool by gradually covering the body with grain. For the white handsome man we use rice.
We make brown from buckwheat.
Shake off excess grains. On the contrary, we fill the resulting voids.
After the glue has dried, let the children paint a beautiful landscape. For the northern bear, depict snowdrifts; for the brown bear, depict a forest and raspberry fields. The finished painting can be hung on the wall or gifted to your family and friends.
And here is a teddy bear. A great gift idea for a birthday or Valentine's Day.
Another interesting bear made from rice and buckwheat.
How do you like this option?
And, of course, we can’t do without everyone’s favorite cartoon character.
You can also watch an interesting video in which kids are taught how to make a bear from semolina.
Video: Developmental application from cereals
But this interesting craft can be made from cereals on a paper plate:
It's very easy to do. Take a disposable plate of apple, melon or cucumber.
Draw a goose.
Apply glue gradually and lay out the seeds.
Paint the legs and wings. Make a background.
The sparrow also looks interesting.
And finally, forest animals. Little fox.
Elk.
From cereals and pasta
Pasta is an excellent crafting tool. Many people use them for various decorative purposes, for example, decorating a Christmas tree, making candlesticks and many other crafts. And all because the variety of pasta shapes allows you to do this.
Such crafts are made according to the same principle as those made simply from cereals. To begin with, a template is selected, then the parent determines which parts of the pattern will be made with cereals and which with pasta. Then, using glue and a brush, first large, then small parts are painted one by one, and the prepared material is glued.
However, some types of pasta are difficult to glue due to their weight, so the material chosen for the base of such an application must be durable; ordinary paper will definitely not work, and if you choose cardboard, it will be hard. If you can’t glue the product, you can sew it on. Pasta in the shape of wheels and spirals looks beautiful; you can simply grab them with a few stitches of a needle and thread.
Of course, this part of the process is carried out by parents, especially if the children are very young. If the child is already entering school, then performing such a craft may be a suitable reason to teach the child how to use a needle. Usually the pasta is attached to the finished drawing at the very end of the work.
The advantage of pasta is that it is easy to paint it in the desired color. Therefore, when making crafts from cereals, think about what you can decorate in it and try using pasta for this.
If you've chosen the puppy template, why not add a leash with a wheel-shaped spaghetti 'icon' on it, or why not use them for the snowman's buttons.
Advice
Many stores sell multi-colored pasta - they look great in crafts.
Crafts for hair decorations made from pasta
Pasta can be used not only with cereals, but also as the main material for work. Manufacturers of pasta seem to be specially developing beautiful designs so that craftsmen can use them not only for cooking.
Hair decorations with pasta look especially original. Few people will guess how they were made, but no child will definitely have the same accessory. There are several options for using pasta to make jewelry:
1 Hoop
. All you need is to buy a plain headband, it should not be too thin so that the pattern can fit on it. Pasta in the form of spikelets glued along its entire length looks beautiful, especially if they are pre-painted silver or gold.
2 Crown
. Using the same plain headband, you can make a crown for a little princess. To do this, you need to select several types of pasta; it is convenient to use wheels of different sizes. You need to design the shape in advance, and then glue them in rows.
3 Small hairpins
. A suitable pasta shape for this is bows; they can be decorated in any colors, even with patterns. After this, the bow is attached with glue to a bobby pin or small hairpin so that it is not visible.
You can prepare several hairpins for different outfits. Under a blue dress with white polka dots, make a bow of that color, under a striped one - striped, and so on. The young fashionista will be delighted with such an abundance of jewelry.
Pasta accessories
Pasta can be used to make more than just hair decorations. Everything that girls love to wear, beads, bracelets, earrings, can be made from this material. How much joy a child will have if parents don’t just buy jewelry in a store, but take the time to make it themselves with their children.
The easiest way to make beads is from pasta in a shape that is strung on a thread.
You can use different types, painting them in different colors. It is important that the thread is strong; if it is thick and looks ugly from under the “beads”, you need to match it to the color or simply paint it.
Beads with pasta in the form of bows look beautiful. It is impossible to string them on a thread, so this work is more painstaking and takes more time.
Advice
Each bow must be tied in the middle with a thread, secured to a knot, then move on to the next one.
You can make beads and bracelets by combining pasta with regular beads. You can design not just one thing, but a whole set, complementing it with a hairpin in the same style. Such sets of “jewelry” look stylish and original.
New Year's crafts
The easiest way to use cereal for New Year's crafts is to make New Year's cards with your child, which he can give on his behalf to relatives and friends. To do this, you need to choose a simple New Year-themed drawing template, print it, transfer it to cardboard, and decorate it with cereals.
A common idea is a Christmas tree. You can draw it yourself without using a template. The selected small grain must be painted green in advance, allowed to dry and used for drawing; in this case, it consists of one large part. You can decorate the Christmas tree with beautifully shaped pasta, such as bows.
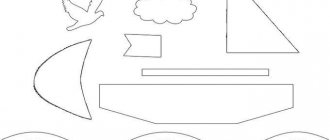
Small crafts that can be hung on a wall, window, or Christmas tree look original. To do this, you need to cut out New Year's figures from cardboard. You can make many different options and hang them together as a continuous garland. Good options would be:
- mitten;
- skates;
- felt boots;
- Christmas decorations.
It’s easy to draw and cut out all these shapes along the contour, and you can decorate them with grains in different ways, because each of them is one continuous piece. For example, the “fur” of a mitten can be made from rice, and the rest from any other cereal. If there are many children in the family, this idea will be a particularly good option, because every child will be able to show creativity; sometimes parents themselves are surprised at how many things little dreamers can come up with.
Christmas tree toys made from cereals
Typical glass Christmas tree decorations are a thing of the past, and there are many creative ideas that can be used. One of the popular ones is the use of cereals
. For many, it is surprising that you can not only decorate a finished ball with it, but make it from scratch.
This craft won’t take much time; if at first glance the idea seems complicated, just try it. Manufacturing takes place in several stages:
- We take a newspaper and roll it into a ball. How much material to take depends on the size of the expected toy. If you are doing it for the first time, you shouldn’t make a big one right away, but you don’t need to make it very small either - it will be uncomfortable to hold in your hands.
- We give the ball the correct round shape using threads. To do this, you just need to start winding them in a circle, periodically changing direction, as if rolling them into a ball. When the shape is smooth, secure the ends of the thread by making a small knot.
- We prepare the cereal that we will use for decoration, pour it into a plate. Buckwheat toys look elegant.
- Spread PVA glue on top of the threads using a brush, envelop it in a plate. If there are empty spaces to which the grains are not attached, lubricate them with glue and add them using tweezers.
- We take spray paint, preferably gold, spray it on the toy, and leave it to dry. It is advisable to match the color of the spray to the color of the cereal used; gold looks good on buckwheat, silver on rice and semolina.
You can choose any animal, imagine what kind of cereal or pasta of a certain shape can be used to make it. All you need to do is turn on your imagination, look at a picture of the animal, think about what its fur, body shape, and other features look like. Let's consider, for example, a hedgehog based on puff pastry, but using this idea, you can come up with your own options:
- Prepare the salt dough: for 2 cups of flour, take 1 cup of salt and 250 water at room temperature. Knead the dough, give it the desired shape. This is easy to do, since the softened salt dough is similar to plasticine.
- For needles, oblong-shaped pasta is best suited - let's take spiral pasta. Let's paint them silver using spray paint. When they dry, you can make needles.
- Visually draw a line that separates the muzzle from the body, lubricate the edges of the pasta with glue, place a “needle,” and press down lightly. We start moving from the muzzle, because if the last row turns out to be uneven, it should not be visible.
- We paint the rest of the dough with silver spray paint, make eyes, a nose, and a mouth. For this you can also take pasta - star crayons; if you don’t paint them, they will stand out well. You can also take beads and place them on glue.
You can decorate such a hedgehog in any way you like: make it a bow out of pasta, put some small craft on its needles, or simply make it colorful.