Irina Kazantseva
Modeling "Bird"
Notes on the section “The World of Arts and Artistic Activities ( Modeling)
)
", on the topic "
Bird "
(NGO "Artistic and Aesthetic Development"
) in the middle group of MBDOU No. 26
Purpose: introducing children to the technique of sculpting a bird
in a constructive way.
Tasks :
Educational: teach children to sculpt a bird
in a constructive way, conveying the oval shape of the body; learn to pull back and pinch small parts: beak, tail, wings; use a stack in your work.
Educational: cultivate a love for birds, a desire to take care of them.
Developmental: develop fine motor skills.
modeling boards
, napkins, sponges, stacks, toy
bird
, recording of M. Rauchwerg’s musical work
“
Bird ”
multimedia.
Preliminary work: looking at illustrations, slides depicting birds, observing nature, solving riddles, memorizing poems about birds.
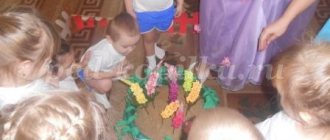
Progress of educational activities:
Children in a group play independently. Suddenly the melody “ Bird”
»
(music by M. Rauchwerg)
.
Educator: Guys, what is this? Where does this music come from? Who do you think this melody is about?
Children: About the bird
.
bird appears on the screen
, which looks around for 20 seconds. Interested children approach the screen. If not all the children paid attention to the screen and did not approach it, then the teacher says:
Educator: Guys, who is our guest? Look at the screen. Let's come closer and find out what the bird
?
A teacher and children approach a screen with a bird
waves its wing and asks:
Birdie
: Guys, I'm bored alone. There are many of you in the group, but I am alone. You have fun together, you are friendly guys. I also want to have friends. Help me find them.
Educator: Guys, let's fold the bird
and geometric shapes.
Didactic game “Collect a bird
from geometric figures
. During the game, the teacher monitors the correct placement of birds
; if necessary, he provides help and support with leading questions. He invites the children, if they wish, to conduct a self-analysis of the actions being performed, to explain why he performed this task in such a way.
Educator: Guys, what else can you make a bird
?
Children's answers (made of clay, plasticine, acorns, paper)
.
Educator: Guys, do you have a desire to help our guest? Children's answers.
Educator: What is needed for this?
Children: You need plasticine, boards, stacks, sponges and napkins.
The teacher draws attention to the fact that everything you need is on the tables. The children take their places.
Educator: Guys, tell me what rules for working with plasticine do you know?
Children: You need to wet your hands with water, work with plasticine in your palms, use napkins.
The teacher draws the children's attention to the oval shape of the body, the elongated nose, beak, and the artistic design of the bird.
.
Children examine the bird
, look at it. The teacher draws the children's attention to body parts, their size and proportions.
Educator: What shape is the head?
How many wings does a bird
?
What birds do you know? How are birds different from cats and dogs? Why does a bird need a beak
?
Guys, let's think about where we should start our work?
Children: You need to divide a piece of plasticine into two parts.
Educator: What shape does the bird’s body have? (Oval)
Children in the air show techniques for sculpting round objects
(rolling a lump of plasticine between their palms in a circular motion)
.
Connect the body and head of the bird
.
Let's compare with a sample of your birds
.
The screen shows the stages of the bird sculpting
.
Educator: We made beautiful birds
, but they are silent and do not tweet.
What do they lack? (Children's answers)
.
Today I will teach you how to make a bird's beak and tail
.
(Show on sample)
.
Let's repeat the new techniques for sculpting in the air
.
Children show modeling
: pulling and pinching and work with plasticine.
Look, guys, what a beautiful bird we got
.
She really wants to fly. Let's play the game "Storm and Birds"
.
Physical education minute.
Goals of the game: development of dexterity, coordination of movements. This game has a general strengthening effect on the body.
Players - they will be “birds”
- must gather together into
a “flock”
. Place chairs at the opposite end of the room - these are their nests on a tall tree.
On your signal " Birds fly away"
!
players begin to run around the room, waving their arms.
As soon as you say "Storm"
, players must run to their
"nests"
and climb into them as quickly as possible to take cover.
But the bad weather does not last long, and after your announcement “The storm is over”
the players must get out of
the “nests” (get off the chairs)
and continue their
“flight”
.
The game is repeated several times.
Educator: Children, let's remember how to sculpt a bird
?
What did we do first? (Children's answers)
.
How did you sculpt the body, beak, tail? (Children show everything in the air)
.
A bird appears on the screen
and sees a flock of various
birds
, molded by children.
The teacher addresses the bird
:
Educator: Look what bird friends the children have made for you
.
The bird thanks the children
: “Thank you very much, now I have new friends. I won't be bored.
Educator: Guys, now you can sculpt such beautiful birds
, teach your friends, parents.
Publications on the topic:
With children 2-3 years old, it is advisable to play games to develop sensory and mathematical concepts. Such games develop children's thinking.
ARTISTIC AND AESTHETIC DEVELOPMENT (STYLE) Topic: “A little bird has flown to us, I’ll give the little bird grains” Goals: – to activate.
Description: the master class is designed for children of senior preschool and primary school age, teachers and parents. The craft is done.
Master class for preschool children. “Dymkovo bird-whistle toy.” Part 1. Modeling.
A fairly common bird in our area is the sparrow. Small, light, agile, jumping on two legs. Sparrows desperately fight with their fellows for food. This bird tolerates our winters quite easily; children often feed the birds with crumbs. In order not to watch the bird from the window, but to place it at home, you need to sculpt a plasticine sparrow.
For modeling we will need the following materials:
- colored plasticine;
- stack.
We need plasticine in the same color as in the picture:
1. Let's start with the head of our bird. Take brown plasticine, separate a piece with a stack and roll the ball in your palms.
2. The second stage is to roll a larger ball from plasticine of the same color as the head. Pull one side out a little. The result was the body along with the base of the tail of our sparrow.
3. We combine both parts and smooth the connection with our fingers for a smooth transition. We have the base of the little sparrow ready.
4. Roll a sausage out of brown plasticine and attach small pieces of black plasticine to the sausage. We draw stripes in a stack. We got a small tail.
5. The resulting tail must be attached to the body, smoothing out the joints.
6. From soft yellow plasticine we form three flat circles. The larger one will be the breast, the two smaller ones will be the cheeks. Let's stick them to the appropriate places according to the picture.
7. Let's make wings for the sparrow. Roll two brown ovals and narrow the ends. We make several black and yellow sausages and place them on the wing as shown in the picture. We draw stripes in a stack along the growth of the feathers, giving the wing a natural look.
8. Attach molded wings to the sides of the body. They turn out to be slightly convex.
9. Let’s add the sparrow’s eyes, to do this we make circles of white and black colors. The beak will be from a small orange triangle, and we will make the paws by connecting three brown sausages at the base for one paw, and three for the second.
10. The desired craft was a success, the plasticine sparrow is finished. The main thing is not to feed him bread by mistake. He's beautiful no matter what!
If you find an error, please select a piece of text and press Ctrl+Enter
.
Plasticine is an ideal material with which small children can bring their wildest fantasies to life. In addition, the pliable and plastic mass serves as an excellent simulator for the development of fine motor skills of children's fingers.
Children often embody their dreams of flying in drawings of birds, but you can’t really play with a drawn bird or airplane. There is a way out - help your young sculptor and show him how to make a bird out of plasticine that he can play with.
Making a bird craft from plasticine without any special skills so that it is a copy of a real bird is a rather difficult task even for parents. To begin with, you should try modeling a cartoon bird from plasticine, which does not have plumage and other characteristic features, which, unfortunately, are difficult to imitate.
So, let's sculpt a funny bird from plasticine! First, soften the modeling mass a little. Roll out the body of the bird from blue plasticine. Decorate his chest with a white spot, tightly pressing the ball rolled into a round layer. Now start sculpting small parts: divide the pink beak with a knife, decorate the spherical eyes made of white plasticine with black pupil balls, make two notches on the slightly flattened ball legs imitating marigolds. Decorate droplet wings made of purple plasticine with two thin stripes of a contrasting color - these will be feathers. Place a large red comb on the bird's head - the bird is ready!
Before giving the bird to your baby to play with, place it in the refrigerator for 5-10 minutes so that the plasticine hardens.
Now you know how to make a bird from plasticine in a few minutes. Believe me, the little dreamer will definitely appreciate his mother’s efforts and will experiment with plasticine more than once. And someday he will definitely surprise you with a masterpiece!
Firebird
- this is a fictional bird, such a miracle is mentioned only in Russian folk tales. We can only guess what she looks like, and together with the children we can imagine a feathered creature of extraordinary beauty. The prefix “heat” tells us that this bird is so beautiful that it dazzles with its beauty, its feathers seem to breathe heat, shimmer and sparkle. By re-reading interesting fairy tales, you can continuously fantasize, and realize the fruits of your creative thoughts in crafts. The firebird can be drawn, molded from plasticine, or made into an applique from paper. All this is proposed in this master class, but plasticine will be used. We will draw a figurine of a beautiful bird on paper, but we will make an applique from three-dimensional plasticine parts.
To sculpt crafts you need to take:
- - cardboard - the basis of the drawing;
- - plasticine of red, orange, yellow colors;
- - a thin toothpick or skewer.
How to make a firebird step by step
1. Choose bright cardboard - the basis of a fairy-tale drawing. Since the firebird should be fiery, it is better to use orange, red and yellow colors to sculpt it. These shades will look very beautiful on a blue background. Take some yellow plasticine and knead it in your hands. Make a small oval flat body, glue it to the cardboard, move it up a little to leave room for the bird’s gorgeous tail. Attach a thin neck and a small head from the same plasticine.
2. Prepare bright blanks for sculpting the wings. Pinch off a few pieces of orange and fiery plasticine, gradually reducing the size. Pull each piece into a sausage.
3. Attach the first row of large feathers to form the bird's wings. Start with the largest piece, then attach the shorter ones in order. Clearly join one end of each piece to the body. Press the tip of the toothpick around the entire perimeter of each feather individually to highlight the design.
4. Glue on the second layer of feathers of the second color, also making them fluffy using a toothpick. Make two wings.
5. Proceed to sculpting the gorgeous bird of paradise tail. In this case, plasticine of the same shades is also suitable for modeling elegant feathers. Pull out the sausage. Make one end long, thin and pointed, press the other with your finger, forming a spatula. Glue on top details in the form of diamonds or droplets of other shades, attach a central dot-ball. Pierce the pieces and press down on top with a toothpick to add relief.
6. Make some long feathers and attach them to the tail.
7. Add other similar details to make a beautiful ponytail.
8. Several small feathers can be glued to the head; follow the same method.
9. And finally, show the feathers on the bird’s body and neck. To do this, also use a sharp tool and rinse the entire surface of the plasticine.
This is how you can bring a fairy tale to life. The beautiful one is ready. Firebird
It turned out bright, and the main secret of successful sculpting is using the most beautiful blocks from the set and a good mood.
How to get schoolchildren interested in modeling?
Why do children practically stop being creative even in elementary school? Yes, lessons, sections, and the computer take a lot of time, but you need to find a couple of hours for fine arts classes. Creativity not only relieves a child’s tired brain, but also gives him real rest for the soul, fills him with positive emotions, and redirects his attention.
The only way to bring back the love of creativity among schoolchildren is to give them a computer presentation on sculpting characters from cult cartoons and games. And if instead of plasticine we teach them to create from polymer clay, then our schoolchildren will be able to make themselves a collection of their favorite characters. Do you know how much plastic collectible figurines cost? Let them do it for themselves! Cheap and useful!
It’s one thing to buy, say, Little Pony or a monster from Ben Ten, but completely different to make it yourself. By the way, there are many videos online where teenagers show how they make various accessories from their favorite computer games with their own hands. Watching such video blogs may well arouse in your child a strong desire to also try his hand at making “fashionable” crafts.
Last school year there was a boom in rubber bracelets, and even boys wove themselves stylish (in their opinion) accessories. That is, in principle, schoolchildren are not against doing something with their hands, but something that would arouse admiration and envy among their classmates.
Question for parents of schoolchildren: do your children engage in any type of fine arts? Do you think that drawing, modeling, and appliqué are for kindergarteners and first-graders?
Scientists have already proven that successful adults were actively creative in childhood: they sang, danced, played musical instruments, and drew. Creativity reveals a person’s personality, develops courage, and awakens imagination. Oddly enough, this helps in a future profession where you need to think outside the box to achieve results.
Firebird
- this is a fictional bird, such a miracle is mentioned only in Russian folk tales. We can only guess what she looks like, and together with the children we can imagine a feathered creature of extraordinary beauty. The prefix “heat” tells us that this bird is so beautiful that it dazzles with its beauty, its feathers seem to breathe heat, shimmer and sparkle. By re-reading interesting fairy tales, you can continuously fantasize, and realize the fruits of your creative thoughts in crafts. The firebird can be drawn, molded from plasticine, or made into an applique from paper. All this is proposed in this master class, but plasticine will be used. We will draw a figurine of a beautiful bird on paper, but we will make an applique from three-dimensional plasticine parts.
To sculpt crafts you need to take:
- - cardboard - the basis of the drawing;
- - plasticine of red, orange, yellow colors;
- - a thin toothpick or skewer.
How to make a firebird step by step
1. Choose bright cardboard - the basis of a fairy-tale drawing. Since the firebird should be fiery, it is better to use orange, red and yellow colors to sculpt it. These shades will look very beautiful on a blue background. Take some yellow plasticine and knead it in your hands. Make a small oval flat body, glue it to the cardboard, move it up a little to leave room for the bird’s gorgeous tail. Attach a thin neck and a small head from the same plasticine.
2. Prepare bright blanks for sculpting the wings. Pinch off a few pieces of orange and fiery plasticine, gradually reducing the size. Pull each piece into a sausage.
3. Attach the first row of large feathers to form the bird's wings. Start with the largest piece, then attach the shorter ones in order. Clearly join one end of each piece to the body. Press the tip of the toothpick around the entire perimeter of each feather individually to highlight the design.
4. Glue on the second layer of feathers of the second color, also making them fluffy using a toothpick. Make two wings.
5. Proceed to sculpting the gorgeous bird of paradise tail. In this case, plasticine of the same shades is also suitable for modeling elegant feathers. Pull out the sausage. Make one end long, thin and pointed, press the other with your finger, forming a spatula. Glue on top details in the form of diamonds or droplets of other shades, attach a central dot-ball. Pierce the pieces and press down on top with a toothpick to add relief.
6. Make some long feathers and attach them to the tail.
7. Add other similar details to make a beautiful ponytail.
8. Several small feathers can be glued to the head; follow the same method.
9. And finally, show the feathers on the bird’s body and neck. To do this, also use a sharp tool and rinse the entire surface of the plasticine.
This is how you can bring a fairy tale to life. The beautiful one is ready. Firebird
It turned out bright, and the main secret of successful sculpting is using the most beautiful blocks from the set and a good mood.
Bright spring bird made of plasticine
In the spring, you really want to create something unusual, bright and impressive with your own hands with your children. Ordinary figures can be turned into painted ornaments using the same plasticine or polymer clay. The latter option is more difficult to process; the formed product will have to be baked at high temperatures, but with plasticine such problems will not arise. And with children it is better to use the modeling mass.
This lesson shows how to combine in one product the modeling of a three-dimensional object and the painted technique, which allows you to paint with a soft mass, as if with paints. Using the example of a spring bird made of plasticine
The process of sculpting an unusual craft is demonstrated step by step.
To create a painted bird, prepare:
- - bright plasticine of any color as desired, for example, pink, as the main one;
- - additional bright pieces to create a pattern: yellow, orange, red, blue and others;
- - tools - a glass and a toothpick.
How to make a bird
1. Choose several bright shades that will allow you to create a unique colorful craft. The main color will be used to the maximum, so it will be needed the most. Several shades of pink will do.
2. Make the main parts of the bird figurine: the head, which will be replaced by a round ball, the body, which will be replaced by a pink drop, and the tail in the form of several oblong cakes. The size of the tail feathers can be gradually reduced. Press your head against the wider part of your body. If you want to get a bird that looks like a peacock, then it is better to make the tail long. The tortillas should not be too thin to maintain their shape.
3. Make a beautiful pattern on the ponytail. Add brighter plasticine by layering it on top of each other in the form of cakes, as well as in the form of droplets, beads and grains. Set the volume using a toothpick.
4. Form a pink blank for the wings. At first it will be simple and inconspicuous. Roll three sausages, connect them together and bend them. Press down on top until the piece is flat. Then make small bright grain details.
5. Apply a pattern identical to the tail pattern on the wings. You can use plasticine of the same color and similar parts. Experiment to achieve a beautiful result.
6. Glue the wings on the sides. Decorate the top ball-head, make eyes and a small beak. Also, the bird may have a bright crest on its head, and it can be made from several feathers, also decorated with colorful patterns.
7. Glue the orange plasticine feet on the bottom.
The bird is ready. If you plan to use the figurine as part of a three-dimensional postcard or panel, then you can apply the design to the tail and crest on only one side, and not glue the second wing at all. If you are interested in a three-dimensional figure, then all operations should be repeated exactly for the reverse side.
Now all that remains is to figure out where to plant your wonderful plasticine warbler. For example, insert a thin skewer from the bottom and decorate a flower pot on the windowsill.
Ptushko Margarita Vladimirovna, 13 years old. "Firebird". MBOU “Fokino Secondary School No. 3”, grade 7b, Fokino, Bryansk region. Head: Head of the Children's Library of Fokino Nina Anatolyevna Gushchanskaya. Competition work
How to make a rooster from plasticine, see.
Did you like the product and want to order the same from the author? Write to us.
More interesting:
See also.
Modeling is one of the most popular creative activities for children. Plasticine remains a favorite, but you can also create beautiful crafts from mastic or salt dough. The right hemisphere of the human brain is responsible for the ability to think creatively; it can be gradually developed by drawing or creating sculptures with your baby. Such activities are quite accessible for children who are already 1 year old. Gradually, crafts can become more complex to arouse cognitive interest.
Together with your children you can learn colors, shapes, different breeds of animals, for example or. And types of birds. For example, you can create a woodpecker from plasticine and talk about the benefits this bird brings.