Lesson 8. Drawing “Beautiful stairs”
Program content. Teach children to draw lines from top to bottom; carry them straight without stopping. Learn to put paint on a brush, dip the entire bristles into the paint; remove the excess drop by touching the edge of the jar with the lint; rinse the brush in water, dry it with a light touch of a cloth to pick up paint of a different color. Continue introducing flowers. Develop aesthetic perception.
Methodology of conducting the lesson. Remind the children that they saw ladders on the site during a walk, in the hall during a physical education lesson. If possible, look at the climbing ladders with the children, pay attention to how bright and beautiful they are.
Tell the children that today they will draw beautiful stairs. Invite them to show with their hands in the air the direction of the lines of the ladder. Show on a piece of paper pinned to the board how to draw lines together with the entire bristle of the brush. Call one of the guys to the board and ask them to draw a ladder. Then show the children how to rinse the brush, dry it on a cloth, and only then apply another paint.
Place the finished drawings on the board (table) and examine them with the children. When viewing works, highlight beautiful color combinations.
Materials. Paper 1/2 landscape sheet size (or A4 size); gouache paints of four colors (for different tables, paints of two colors in different combinations, beautifully combined), jars of water, brushes, paints (for each child).
"Ladder"
Vlad K., 2nd junior group
Connections with other activities and activities. Take a look at the ladders on the site and in the gym with your children. Pay attention to the even bases of the stairs and steps. Include hand movements in parts of the ladder in the process of viewing, emphasizing that they are straight and even.
Option. Drawing “Beautiful striped rug”
Program content. Teach children to draw lines from left to right, to move the brush continuously along the pile; put paint on the brush, rinse the brush thoroughly; paint carefully with another paint, without going into the places where it has already been painted. Develop color perception and consolidate knowledge of colors.
Methodology of conducting the lesson. Attach 3-4 striped (two-color) rugs to a board or large sheet of paper. Draw children's attention to the direction of the stripes. Remove sample mats.
Show children how to draw a striped rug: first draw stripes of the same color from left to right, at a short distance from each other (emphasize the continuity of movement, timely dip the brush in the paint), then rinse the brush well, dry it on a cloth, dip it in another paint and draw stripes of a different color between the already drawn stripes.
At the end of the lesson, look at all the drawings, note the variety of color combinations, and say that the rugs turned out very beautiful.
Admire the works with the guys. You can beautifully arrange the pictures by color.
Materials. 3-4 striped two-color rugs. Square sheets of paper; gouache paints (two different, well-matching paints for each table); jars of water, brushes, rags (for each child).
Connections with other activities and activities. Clarify children's knowledge about colors in educational games. Look at beautiful striped fabrics, runners, scarves.
Notes on the application “Items made from stripes” for the middle group - “Doshkolenok.ru”
Notes on the application “Items made from stripes” for the middle group
Topic: “Cut the strips and stick them into whatever objects you want”
Tasks.
- Teach children to correctly cut a wide strip of paper (about 5 cm), hold scissors correctly, and use them correctly.
- Develop creativity and imagination.
- Foster independence and activity.
- Reinforce techniques for careful use of paper and glue.
Materials.
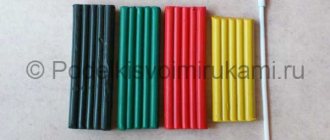
- Strips of colored paper 5 cm wide.
- White paper the size of a ¼ landscape sheet for gluing images (3-4 sheets for each child).
- Scissors, glue, glue brush, napkin, oilcloth (for each child).
Move.
Org. At that moment Dunno comes into the group holding an envelope in his hands.
Educator: Hello Dunno, how glad we are to see you.
Dunno: Hello guys. How are you doing? (Answers) Guys, I went to your kindergarten today and found this envelope, but I don’t understand what’s in it, but let’s see together what’s in there.
Educator: Okay Dunno, we are also interested in seeing what’s in the envelope. (Dunno opens the envelope and takes out strips of colored paper)
Dunno: oh, what is this, I thought there was something interesting here.
Educator: well, what did you want to see?
Dunno: a treasure map, for example.
Educator: Well, Dunno, don’t be upset, you can make a lot of interesting things out of these multi-colored stripes, right kids?
Dunno: yes, guys, tell me what interesting things can be done. (Answers)
Educator: guys, let's remember that we have something similar to these stripes on our site. (Answers: climbing ladder, benches for resting, tables for games, bush fence and trees, etc.)
Educator: yes, guys, all this can be done from these colored pieces of paper, but let’s make the same plot as ours, only paper and give it to Dunno so he can show it to his friends. (Answers)
Educator: guys, look at how you need to hold scissors and cut with them: to cut a wide strip of paper into narrow strips, you need to open the scissors (show how to spread the blades of the scissors, insert the edge of the strip, carefully connect the rings with your fingers, then spread the blades again and push the wide one between them strip of paper, squeeze the rings again and repeat these steps several times until you cut a narrow strip). So you need to cut off several strips.
You can make many objects from the cut strips (the teacher lays out several samples on a flannelgraph: a ladder, a fence, a table, a chair, etc.)
Finger gymnastics
There lived in a house Little gnomes: (children clench and unclench their fists) Currents, Peaks, Faces, Chicks, Miki. (bend their fingers, starting with the big ones) One, two, three, four, five, (bend their fingers, starting with the little fingers) Steel gnomes wash: (rub their fists against each other) Toki - shirts, Chicks - socks, Peaks - handkerchiefs, Miki was smart, Liki - panties, brought water to everyone. (bend their fingers, starting with the big ones)
Independent work of children. Children cut wide strips into narrow strips, lay out the object, and stick it on the sheet. The teacher makes sure that the children hold the scissors correctly. If necessary, reminds and corrects the position of the fingers holding the scissors. Reminds you of careful gluing. At the end of the work, the teacher offers to put their work on the table - let it dry.
Educator: Dunno, did you like our work?
Dunno: yes, thank you guys, I’ll take your work with me to the flower city and show all the shorties, see you again.
Result: Educator guys, what did we do today? What did you like most?
blog.dohcolonoc.ru
Lesson summary for the senior group in fine art (application)
Application on the theme: “Cats on the window”
Program content
1. Teach children to create a plot composition, independently using the mastered cutting techniques with scissors: a cat - from paper folded in half, along the drawn outline; and curtains - in a straight line, obliquely or rounding the corners; decorate the curtains with a pattern according to your plan, select beautiful color combinations.
2.Introduce the art of silhouette.
3. Develop compositional skills - place cut out elements in accordance with the plot.
4.Cultivate interest in the application.
4) Preliminary work: Creating the basis for a story composition with a small group of children. The basis of the composition is one or two sheets of large format paper, representing one or two houses without windows.
5) Materials, tools, equipment.
Paper squares of different colors - “windows”, smaller paper squares for cutting out silhouettes of cats (black, grey, brown, orange, etc.), scissors, glue, glue brushes, felt-tip pens and colored pencils for children to freely choose materials; paper and cloth napkins, boxes for scraps.
Organization and methodology:
I read the children a story by K.D. Ushinsky "Vaska":
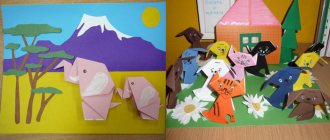
“Kitty-cat - gray pubis. Vasya is affectionate, but cunning, his paws are velvet, his nails are sharp. Vasyutka has sensitive ears, a long mustache, and a silk fur coat.” Together with the children he hums lines from the song “Little Gray Cat” (music by V. Vitlin, music by N. Naydenova) and invite everyone to create a beautiful composition “Cats on the Window” together. I show the children the basis of the future composition - one or two sheets of paper (large format) or parts of wallpaper, telling them that this is a house (or two or three different houses). I attach several squares of different colors to the paper base and explain that these are windows on which cats will sit. I suggest you think about how you can cut cats. After listening and praising the children’s suggestions, I show how you can create the image of a cat from paper folded in half.
— I want to carve a red cat. I take an orange square, fold it in half and from the fold
I draw half a cat: the head is a semicircle, the body is a semi-oval, I’ll add one triangular ear on the head (after all, I’m drawing half a cat). I cut it out, open it, and there is a cat, which can be called Liska or Ryzhulka. (Fold the silhouette in half again and attach it to the flannelgraph or easel.) If any of you think this is very difficult, try cutting out the cat's head separately. Then you need to draw only the torso on half the square. My red cat will sit on a blue window. That's very beautiful. I prepared curtains for this window. Please help me choose which ones are best
— Please choose squares for your cat on the window. Place a small square on a large one and check whether the colors combine beautifully (black on yellow, pink or blue, red on green, blue, light green, gray on pink, blue, red, etc.). First, cut out the cat and glue it to the window, and then make curtains - cut it out and decorate it with a pattern (with felt-tip pens or pencils) as you wish.
Children choose a material and start cutting. I remind you of the sequence of work, please show how the children drew half a cat from the fold line. I suggest checking again whether the colors of the window and the cat combine beautifully (children can choose a different window). I advise you to glue the curtains only at the top so that they can “fly” beautifully and so that the cat can hide behind them.
At the end of the lesson, children transfer their windows with cats to the “house”, move them in search of the most successful placement and carefully glue them.
Summary of GCD for the application “Cats on the Window”
Application on the theme: “Cats on the window”
Program content
1. Teach children to create a plot composition, independently using the mastered cutting techniques with scissors: a cat - from paper folded in half, along the drawn outline; and curtains - in a straight line, obliquely or rounding the corners; decorate the curtains with a pattern according to your plan, select beautiful color combinations.
2.Introduce the art of silhouette.
3. Develop compositional skills - place cut out elements in accordance with the plot.
4.Cultivate interest in the application.
4) Preliminary work: Creating the basis for a story composition with a small group of children. The basis of the composition is one or two sheets of large format paper, representing one or two houses without windows.
5) Materials, tools, equipment.
Paper squares of different colors - “windows”, smaller paper squares for cutting out silhouettes of cats (black, grey, brown, orange, etc.), scissors, glue, glue brushes, felt-tip pens and colored pencils for children to freely choose materials; paper and cloth napkins, boxes for scraps.
Organization and methodology:
I read the children a story by K.D. Ushinsky "Vaska":
“Kitty-cat - gray pubis. Vasya is affectionate, but cunning, his paws are velvet, his nails are sharp. Vasyutka has sensitive ears, a long mustache, and a silk fur coat.” Together with the children he hums lines from the song “Little Gray Cat” (music by V. Vitlin, music by N. Naydenova) and invite everyone to create a beautiful composition “Cats on the Window” together. I show the children the basis of the future composition - one or two sheets of paper (large format) or parts of wallpaper, telling them that this is a house (or two or three different houses). I attach several squares of different colors to the paper base and explain that these are windows on which cats will sit. I suggest you think about how you can cut cats. After listening and praising the children’s suggestions, I show how you can create the image of a cat from paper folded in half.
— I want to carve a red cat. I take an orange square, fold it in half and from the fold
I draw half a cat: the head is a semicircle, the body is a semi-oval, I’ll add one triangular ear on the head (after all, I’m drawing half a cat). I cut it out, open it, and there is a cat, which can be called Liska or Ryzhulka. (Fold the silhouette in half again and attach it to the flannelgraph or easel.) If any of you think this is very difficult, try cutting out the cat's head separately. Then you need to draw only the torso on half the square. My red cat will sit on a blue window. That's very beautiful. I prepared curtains for this window. Please help me choose which ones are best
— Please choose squares for your cat on the window. Place a small square on a large one and check whether the colors combine beautifully (black on yellow, pink or blue, red on green, blue, light green, gray on pink, blue, red, etc.). First, cut out the cat and glue it to the window, and then make curtains - cut it out and decorate it with a pattern (with felt-tip pens or pencils) as you wish.
Children choose a material and start cutting. I remind you of the sequence of work, please show how the children drew half a cat from the fold line. I suggest checking again whether the colors of the window and the cat combine beautifully (children can choose a different window). I advise you to glue the curtains only at the top so that they can “fly” beautifully and so that the cat can hide behind them.
At the end of the lesson, children transfer their windows with cats to the “house”, move them in search of the most successful placement and carefully glue them.
Lesson notes on appliqué “Items made from stripes” for the middle group. Lavrova O.V.
Topic: “Cut the strips and stick them into whatever objects you want”
Tasks.
- Teach children to correctly cut a wide strip of paper (about 5 cm), hold scissors correctly, and use them correctly.
- Develop creativity and imagination.
- Foster independence and activity.
- Reinforce techniques for careful use of paper and glue.
Materials.
- Strips of colored paper 5 cm wide.
- White paper the size of a ¼ landscape sheet for gluing images (3-4 sheets for each child).
- Scissors, glue, glue brush, napkin, oilcloth (for each child).
Move.
Org. At that moment Dunno comes into the group holding an envelope in his hands.
Educator: Hello Dunno, how glad we are to see you.
Dunno: Hello guys. How are you doing? (Answers) Guys, I went to your kindergarten today and found this envelope, but I don’t understand what’s in it, but let’s see together what’s in there.
Educator: Okay Dunno, we are also interested in seeing what’s in the envelope. (Dunno opens the envelope and takes out strips of colored paper)
Dunno: oh, what is this, I thought there was something interesting here.
Educator: well, what did you want to see?
Dunno: a treasure map, for example.
Educator: Well, Dunno, don’t be upset, you can make a lot of interesting things out of these multi-colored stripes, right kids?
Dunno: yes, guys, tell me what interesting things can be done. (Answers)
Educator: guys, let's remember that we have something similar to these stripes on our site. (Answers: climbing ladder, benches for resting, tables for games, bush fence and trees, etc.)
Educator: yes, guys, all this can be done from these colored pieces of paper, but let’s make the same plot as ours, only paper and give it to Dunno so he can show it to his friends. (Answers)
Educator: guys, look at how you need to hold scissors and cut with them: to cut a wide strip of paper into narrow strips, you need to open the scissors (show how to spread the blades of the scissors, insert the edge of the strip, carefully connect the rings with your fingers, then spread the blades again and push the wide one between them strip of paper, squeeze the rings again and repeat these steps several times until you cut a narrow strip). So you need to cut off several strips.
You can make many objects from the cut strips (the teacher lays out several samples on a flannelgraph: a ladder, a fence, a table, a chair, etc.)
Finger gymnastics
There lived in a house Little gnomes: (children clench and unclench their fists) Toki, Peaks, Faces, Chicks, Miki. (bend their fingers, starting with the thumbs) One, two, three, four, five, (bend their fingers, starting with the little fingers) The gnomes began to wash: (rub their fists against each other) Toki - shirts, Chiki - socks, Peaks - handkerchiefs, Miki He was a smart guy, Lika was a pair of pants, He brought water to everyone. (bend fingers, starting with thumbs)
Independent work of children. Children cut wide strips into narrow strips, lay out the object, and stick it on the sheet. The teacher makes sure that the children hold the scissors correctly. If necessary, reminds and corrects the position of the fingers holding the scissors. Reminds you of careful gluing. At the end of the work, the teacher offers to put their work on the table - let it dry.
Educator: Dunno, did you like our work?
Dunno: yes, thank you guys, I’ll take your work with me to the flower city and show all the shorties, see you again.
Result: Educator guys, what did we do today? What did you like most?
a2b2.ru