Mushrooms from plasticine are a model that children begin to sculpt almost first, at 3-4 years old. And then they are sculpted in the senior, preparatory group of the kindergarten, in the elementary grades of the school. And this is no coincidence. On the one hand, making the simplest mushroom is very easy. On the other hand, mushrooms contain such potential for decoration and mastering various sculpting techniques that sculpting them will be interesting for children of any age. While working on these models, you will also get an excellent opportunity to talk with children about edible and inedible mushrooms and introduce them to them. We offer you several options for mushrooms made from plasticine: Porcini mushroom - boletus mushroom from plasticine Boletus - mushroom from plasticine Chanterelles - mushrooms from plasticine Russula - mushroom from plasticine Fly agaric - mushroom from plasticine
You can find out how to mold balls and cylinder legs in the article about the main techniques for modeling from plasticine.
How to make a boletus mushroom from plasticine
The largest “aristocrat” among mushrooms is the porcini mushroom. Let's blind him. Step 1 Sculpt the leg. Take white or light beige plasticine, knead it and roll it into a very thick sausage. If you are sculpting with older children, you can give the leg a slightly pointed cone shape.
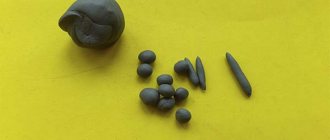
Step 2 Make a hat. Let's roll a fairly large ball out of brown plasticine - approximately the same size as we want to get a hat. Next, take the stack and divide it into unequal parts, as shown in the photo.
We take most of our ball. Let's straighten it a little and push the hole inside with your finger.
For children 3-4 years old, the work can be completed - we connect the cap and the stem and the mushroom is ready.
But we will show you how to make our mushroom more realistic. Let's take a small piece of white or beige plasticine from which we sculpted the leg. Roll it into a ball and flatten it into a flat cake, equal in diameter to the cap. Let's stick this white piece on the underside of the mushroom, and then stick the stem.
Step 3 Make a small mushroom, using the remaining small segment of brown plasticine for the cap.
Step 4 Our mushrooms need a stand. Let's take a piece of green plasticine, mold a ball and flatten it into a cake. Let's attach the mushrooms to this “pedestal”.
Step 5 You can make grass around the mushrooms. Take small pieces of different shades of green and yellow, mix them and roll into a sausage. Flatten the sausage and cut it with a stack.
Let's stick the grass to the base on which the mushrooms stand and bend the “blades of grass.” So we got porcini mushrooms from plasticine.
Here is an old boletus and he is beautiful and great. In a dark hat on one side, the leg is as strong as a stump.
How to make a boletus mushroom from plasticine
The boletus mushroom for children 3-4 years old will be molded in exactly the same way as the porcini mushroom. Only the color of the cap will be different - red-brown. With older children, you can sculpt other features of this mushroom from plasticine. Step1 The leg of the boletus is longer and thinner than that of the white one. In addition, the stems of these mushrooms are speckled with black. Let's blind them. Let's make a sausage from white or beige plasticine. Let's roll out a very thin flagellum from black plasticine, tear off small pieces from it and stick it on the leg. Then we roll the sausage leg again, evening out the specks.
Step 2 We will make the cap the same as that of the porcini mushroom, only a little flatter, and the inside of the cap will be yellow.
Step 3 Place the mushrooms on the stand and make the grass. This is how the boletus mushrooms turned out.
I'm growing in a red cap Among the aspen roots. You will recognize me a mile away, My name is... (boletus).
How to make chanterelle mushrooms from plasticine
For some reason, these elegant and very tasty mushrooms are very rarely molded from plasticine with children. But in vain! After all, sculpting them is a pleasure! Plasticine is only one color, and the technology is very simple. Step 1 Roll out a “mace” from orange plasticine, as shown in the photo.
Step 2 Flatten the top part with your fingers, forming a funnel.
For special naturalism, you can apply notches-plates in a stack.
Step 3 Chanterelles grow in families. Therefore, we will make 3-4 mushrooms of different sizes. We stick them on a green plasticine base and decorate them with blades of grass. You can place a leaf on the hat to make it more picturesque. The leaf can be molded from plasticine or cut out from colored paper. The family of foxes is ready.
In the clearing - like little sisters. Lo and behold - small mushrooms. They are called chanterelles. They are fried, boiled, and put in soup.
How to make russula mushrooms from plasticine
Russulas are very simple mushrooms. Many mushroom pickers don’t even consider them to be mushrooms. But there are always a lot of them in the forest. And it’s very easy to recognize them - you won’t confuse them with any poisonous “doubles”. Russulas wear “outfits” - hats of various colors: red, yellow, pink, purple. But the most delicious are the mushrooms with green caps. They are called “delicacies”. Step 1 We begin to sculpt the russula in the same way as the chanterelle, only from white plasticine. The leg can be made longer than that of chanterelles.
Step 2 Make a hat. Make a ball from plasticine of the chosen color and flatten it into a cake. Let's put a multi-colored hat on the leg. Apply the notch-plates in a stack.
Step 3 Let's make several multi-colored mushrooms, stick them on a plasticine base and decorate with grass.
Along the forest paths there are many white legs in multi-colored hats, noticeable from a distance. Collect, don’t hesitate, This is...(russula)
How to make a fly agaric mushroom from plasticine
Fly agaric is a poisonous mushroom, but what a beauty! It is quite difficult to sculpt. This model is suitable for children from 6-7 years old. Step 1 Let's make a hat. Let's make a cone out of red plasticine. Use your finger to make a notch in the cone, slightly flattening the edges.
Let's make a ball out of white plasticine, flatten it into a cake and stick it to the inside of the hat. You can apply notches-plates in a stack.
Step 2 Sculpt the leg. Roll out a cylinder from white plasticine. From white plasticine we make a small sausage and flatten it. We connect the flattened strip with the cylinder leg, creating a fly agaric “skirt”.
Step 3
Let's stick the hat to the leg and put white spots on the hat.
Step 4 All that remains is to place the fly agaric on a plasticine stand and decorate it with plasticine grass.
Fly agarics are a miracle Are you poisonous? Nonsense! I won’t tear them anyway, since they’re so beautiful!
We will collect all the mushrooms from plasticine in a forest clearing.
Another “all-ages” model is a plasticine snake. We offer several options suitable for children from 3 to 8-9 years old.
How to make a fly agaric from plasticine. Step-by-step lesson on sculpting a mushroom.
If you ask a child if he knows any poisonous mushroom. Of course, he will, first of all, remember the insidious fly agaric. The fly agaric is a companion of Baba Yaga and Koshchei the Immortal, Leshy. They use it to brew a love potion or turn-off potion, make living and dead water, and much more. Sometimes even the fly agaric itself is spiritualized, it becomes a thunderstorm of mushrooms and a villain. In general, fly agarics are well known to children. And to once again remind your child of how dangerous they are, have an informative conversation and a fascinating master class on plasticine modeling. In this sculpting lesson we offer you a detailed guide to creating a fly agaric.
To sculpt a fly agaric you need:
- two blocks of plasticine (red and white);
- green plates (if you want to surround your mushroom with leaves);
- stack and match.
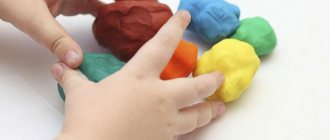
1. Red and white are the only colors of plasticine that we can use to sculpt a mushroom with a chic scarlet cap, a white stem and white dots. If you replace the colors, you will get some other mushroom, but not a fly agaric.
2. Mash the red mass in your hands, cutting off the desired amount from the block for sculpting the hat. Shape into a ball.
3. Press the plasticine on top with your fingers and lower it down, forming a high cone, but the top of this figure should be rounded.
4. Prepare a white cake, focusing on the diameter of the circumference of the fly agaric cap.
5. Attach a white cake to the flat part of the red part, apply in a stack the tubular plates that a poisonous mushroom must have. Pierce the center point with the tip of the tool and move in all directions around the entire circumference.
6. Roll a cone out of soft white plasticine, but longer and thinner. This will be the blank for the leg. Insert a match or stick into the upper part to strengthen it and further secure the cap. Also prepare a flat long cake for the hat.
7. Attach the skirt-shaped piece to the top of the leg, stretching the plasticine evenly around the circumference.
8. Fasten the cap and stem.
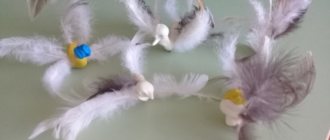
9. Pull some green pieces into thin leaves. Attach to the base of the mushroom.
10. And the last, most interesting point - we need to turn our preparation into a real poisonous, handsome fly agaric. To do this, smear small pieces of plate on your finger and apply to the red head. It is advisable to use droplets with uneven edges.
A handsome man from the forest edge, the poisonous fly agaric made from plasticine is ready. Our mushroom will stand firm by using a match inside the stem.
If you find an error, please select a piece of text and press Ctrl+Enter.
items
Share with friends:
We also recommend watching!
How to make a pumpkin from plasticine.
How to make a Pet Shop from plasticine.
Patrick made of plasticine. Step-by-step master class.
Snowflake made of plasticine. Step-by-step master class.
Chameleon made of plasticine.
How to make the Serpent Gorynych from plasticine.
How to make a rainbow pony out of plasticine.
Meowsim made from plasticine.
How to make a hamster from plasticine.
How to make Barash from plasticine (film “Smeshariki”).
How to make Pinocchio from plasticine. Step by step lesson.
Spider-Man made of plasticine. Modeling lesson with step-by-step photos.
LiveInternetLiveInternet
Mushrooms from plasticine are a model that children begin to sculpt almost first, at 3-4 years old. And then they are sculpted in the senior, preparatory group of the kindergarten, in the elementary grades of the school. And this is no coincidence. On the one hand, making the simplest mushroom is very easy. On the other hand, mushrooms contain such potential for decoration and mastering various sculpting techniques that sculpting them will be interesting for children of any age. While working on these models, you will also get an excellent opportunity to talk with children about edible and inedible mushrooms and introduce them to them. We offer you several options for plasticine mushrooms:
How to make a boletus mushroom from plasticine
The largest “aristocrat” among mushrooms is the porcini mushroom. Let's blind him. Step 1 Sculpt the leg. Take white or light beige plasticine, knead it and roll it into a very thick sausage. If you are sculpting with older children, you can give the leg a slightly pointed cone shape.
Step 2 Make a hat. Let's roll a fairly large ball out of brown plasticine - approximately the same size as we want to get a hat. Next, take the stack and divide it into unequal parts, as shown in the photo.
We take most of our ball. Let's straighten it a little and push the hole inside with your finger.
For children 3-4 years old, the work can be completed - we connect the cap and the stem and the mushroom is ready.
But we will show you how to make our mushroom more realistic. Let's take a small piece of white or beige plasticine from which we sculpted the leg. Roll it into a ball and flatten it into a flat cake, equal in diameter to the cap. Let's stick this white piece on the underside of the mushroom, and then stick the stem.
Step 3 Make a small mushroom, using the remaining small segment of brown plasticine for the cap.
Step 4 Our mushrooms need a stand. Let's take a piece of green plasticine, mold a ball and flatten it into a cake. Let's attach the mushrooms to this “pedestal”.
Step 5 You can make grass around the mushrooms. Take small pieces of different shades of green and yellow, mix them and roll into a sausage. Flatten the sausage and cut it with a stack.
Let's stick the grass to the base on which the mushrooms stand and bend the “blades of grass.” So we got porcini mushrooms from plasticine.
Here is an old boletus and he is beautiful and great. In a dark hat on one side, the leg is as strong as a stump.
How to make a boletus mushroom from plasticine
The boletus mushroom for children 3-4 years old will be molded in exactly the same way as the porcini mushroom.
Only the color of the cap will be different - red-brown. With older children, you can sculpt other features of this mushroom from plasticine. Step1 The leg of the boletus is longer and thinner than that of the white one. In addition, the stems of these mushrooms are speckled with black. Let's blind them. Let's make a sausage from white or beige plasticine. Let's roll out a very thin flagellum from black plasticine, tear off small pieces from it and stick it on the leg. Then we roll the sausage leg again, evening out the specks. Step 2 We will make the cap the same as that of the porcini mushroom, only a little flatter, and the inside of the cap will be yellow.
Step 3 Place the mushrooms on the stand and make the grass. This is how the boletus mushrooms turned out.
I'm growing in a red cap Among the aspen roots. You will recognize me a mile away, My name is... (boletus).
How to make chanterelle mushrooms from plasticine
For some reason, these elegant and very tasty mushrooms are very rarely molded from plasticine with children. But in vain! After all, sculpting them is a pleasure! Plasticine is only one color, and the technology is very simple. Step 1 Roll out a “mace” from orange plasticine, as shown in the photo.
Step 2 Flatten the top part with your fingers, forming a funnel.
For special naturalism, you can apply notches-plates in a stack.
Step 3 Chanterelles grow in families. Therefore, we will make 3-4 mushrooms of different sizes. We stick them on a green plasticine base and decorate them with blades of grass. You can place a leaf on the hat to make it more picturesque. The leaf can be molded from plasticine or cut out from colored paper. The family of foxes is ready.
In the clearing - like little sisters. Lo and behold - small mushrooms. They are called chanterelles. They are fried, boiled, and put in soup.
How to make russula mushrooms from plasticine
Russulas are very simple mushrooms. Many mushroom pickers don’t even consider them to be mushrooms. But there are always a lot of them in the forest. And it’s very easy to recognize them - you won’t confuse them with any poisonous “doubles”. Russulas wear “outfits” - hats of various colors: red, yellow, pink, purple. But the most delicious are the mushrooms with green caps. They are called “delicacies”. Step 1 We begin to sculpt the russula in the same way as the chanterelle, only from white plasticine. The leg can be made longer than that of chanterelles.
Step 2 Make a hat. Make a ball from plasticine of the chosen color and flatten it into a cake. Let's put a multi-colored hat on the leg. Apply the notch-plates in a stack.
Step 3 Let's make several multi-colored mushrooms, stick them on a plasticine base and decorate with grass.
Along the forest paths there are many white legs in multi-colored hats, noticeable from a distance. Collect, don’t hesitate, This is...(russula)
How to make a fly agaric mushroom from plasticine
Fly agaric is a poisonous mushroom, but what a beauty! It is quite difficult to sculpt. This model is suitable for children from 6-7 years old. Step 1 Let's make a hat. Let's make a cone out of red plasticine. Use your finger to make a notch in the cone, slightly flattening the edges.
Let's make a ball out of white plasticine, flatten it into a cake and stick it to the inside of the hat. You can apply notches-plates in a stack.
Step 2 Sculpt the leg. Roll out a cylinder from white plasticine. From white plasticine we make a small sausage and flatten it. We connect the flattened strip with the cylinder leg, creating a fly agaric “skirt”.
Step 3
Let's stick the hat to the leg and put white spots on the hat.
Step 4 All that remains is to place the fly agaric on a plasticine stand and decorate it with plasticine grass.
Fly agarics are a miracle Are you poisonous? Nonsense! I won’t tear them anyway, since they’re so beautiful!
We will collect all the mushrooms from plasticine in a forest clearing.
Source