Greetings, friends! Many children like creative activities: drawing, modeling from plasticine, salt dough, appliques... Today I suggest making crafts and appliques from children's palms !
The kids and I made sun, swan and octopus appliqués from children's hands. The applique of colored palms is very easy to make. From outlined children's hands we create beautiful applications of the sun, birds, animals, people, Christmas trees, snowmen, flowers... The list can go on and on! There is a limitless flight of fantasy here. You can decorate the interior of your apartment with ready-made handicrafts made from palms. We hung the sun appliqué in the room in a visible place, which the children are very proud of, and I signed the swan appliqués that the children made (name, age and date of creation) and put them in the album as a souvenir. In a few years, it will be interesting to see what small hands the daughter had at 2 years old and her son at 5 years old.
Sun applique from children's hands
What is needed to make a sun from palms:
- Yellow cardboard is the basis of our applique
- Colored paper to create rays of sunshine
- Wool threads - you will need them if you want to hang a craft
- Scissors
- Simple pencil
- Glue
- Felt pens, pencils or crayons - to draw the sun's face
Sun applique made from colored palms:
- The first step is to cut out two identical circles - the basis of our sun. The more children take part in creating sun crafts, the larger the circle we make. My children each made their own craft, so we cut out 4 identical circles for them (two circles for each). To make the circles evener, I outlined a regular cocoa can.
- Next, we proceed to the most interesting stage - we trace the children’s palms. The most important thing here is that the child does not move his hand, then tracing the palm will not be difficult. Our colored paper is double-sided, so the finished sun looks beautiful on all sides. If you are wondering which colored paper to choose, I recommend double-sided paper.
- Cut out the palms. To make the cutting process go faster, you can put several sheets of colored paper in a stack and cut it out that way. We got 6 palms each for Lena and Nastya. Then I had to cut out another palm for my daughter, because it wasn’t enough, the hand was small.
- We grease the “wrist” of the palm of colored paper and glue it to our base for the sun, creating multi-colored rays for it.
- Next, we create a loop for our sun so that it can be hung in the room. To do this, we unwind the woolen thread (we took the yellow one), fold it in half, place the ends of the thread on the base of our sun (on the side that will be inside) and glue it. For strength, I glued a small strip of colored paper on top of the woolen threads.
- Next, we lubricate the second part of the base of our sun and place it on the first circle so that the palms are between the two circles.
- Well, our sun applique is almost ready. All that remains is a small detail - to draw the eyes, nose and cheerful smile for our sun.
Now the sun applique craft made from children's hands is ready. You can hang it in the children's room so that it delights us with its presence and warms us with its warm rays when it is raining outside the window and clouds are walking across the sky.
Crafts from palms
One of the most interesting and exciting techniques for children's creativity is the creation of crafts and applications from children's palms. This type of activity greatly reveals the child’s creative potential and opens up opportunities for spiritual, aesthetic and artistic development.
The operating technique is quite simple. From outlined children's hands you can create a beautiful applique of flowers, some bird or animal, a snowman or a Christmas tree. It all depends on your desire and imagination.
Sun applique from children's hands
To work you will need:
- yellow cardboard;
- colored paper;
- scissors;
- glue;
- yellow woolen threads.
Let's get started:
- Cut out two circles of the required size from cardboard.
- We place the child’s palm on a sheet of colored paper, trace the outline and cut it out.
- Glue all the cut out “palms” to one circle and seal with a second circle on the back side.
- We cut yellow woolen threads for the bangs and glue them on.
- From colored paper we cut out eyes, a nose, a mouth, bows and freckles in the form of small flowers. And now our cheerful and warm sun is ready!
Swan applique from children's hands
You will need:
- White paper;
- white cardboard;
- scissors;
- glue;
- simple pencil.
Progress:
On cardboard we sketch the base of the future swan and cut it out.
- We place the child’s hand on a sheet of paper, trace it and cut it out along the contour. We will need a fairly large number of such palms. We glue the “palms” onto the prepared swan base, placing them in several rows.
This is roughly what you should get as a swan.
Craft a Christmas tree from children's paper palms
For work, prepare:
- colored paper;
- a simple pencil;
- scissors;
- glue;
- hole puncher;
- stickers.
Let's get started:
- We cut out about 8 children's “hands” from green paper.
- Glue all the cut out parts in rows onto a sheet of colored paper.
- We should have a Christmas tree.
- Now we need to decorate our Christmas tree. Use a hole punch to make confetti from colored paper.
- We spread glue on the places on the tree where the balls will be located and sprinkle confetti on top. Shake off the excess. Finally, glue the prepared stickers.
Our beautiful Christmas tree is ready!
Create with your children, because hand applique not only develops fine motor skills, hard work and attentiveness in a child, but also cultivates observation, perseverance and imagination.
Source: https://womanadvice.ru/podelki-iz-ladoshek
Swan applique from children's hands
The children and I didn’t stop at the sun craft; they really liked creating crafts from palms, so they continued our creativity. And the next stage for us was the swan applique from children's palms. This swan is quite simple to make and will not take much time to make. The finished handicraft made from palms, as I wrote above, can be signed and kept as a souvenir. After all, children grow up so quickly, and small hands will remain as a memory of what they were like as kids with tiny hands and fingers.
What is needed to make a swan palm craft:
- Colored cardboard is the base on which we will glue the applique. We took blue.
- Sheet of white paper
- Scissors
- Glue
- Simple pencil
- Felt pens, crayons, pencils - to draw the beak and eyes of a swan
- Colored paper - if you don’t want to draw the beak, but glue it from colored paper
Swan applique from children's hands
- First of all, as in the previous craft, we outline the children's palms. This time we only need one palm to create an applique craft.
- Cut out the child's palm. We cut out two palms - one for our son, one for our daughter.
- Lubricate the resulting palm blank with glue
- And glue the palm to the colored cardboard.
- The finishing touch remains - we draw the eyes and beak of the swan.
- The beak, as I said above, can be glued from colored paper. To do this, cut out a small red triangle, coat it with glue and glue it.
The swan applique craft made from children's hands is ready.
Master class of children's drawing - Sun with applique elements:
We will decorate the sun with a wreath of flowers, which we will make from paper and stick on. We make a flower as follows: a square sheet (3 by 3 cm).
- Using a simple pencil, draw a petal so that the base of the petal falls in the middle of the square.
- Cut along the pencil line.
- Let's expand.
- We “curl” the edges of the petals with scissors.
Thus, we make three flowers of different colors from colored paper. Let's stick them on the sun like a wreath.
From colored paper we cut out the centers for the flowers - circles. Let's stick them on.
Cut out leaves from green paper.
We “curl” the leaves with scissors and glue them around the flowers. The wreath is ready.
Children's drawing of the sun is ready!
Marakova Katerina.
Children's drawing “Sun” from palms with applique elements Link to main publication
Source: https://do-by-hands.ru/applikaciya/detskij-risunok-solnyshko-iz-ladoshek-s-elementami-applikacii/
DIY palm applique
Children's first works in terms of art are splashes, bloopers, prints of feet, hands, lips. If your child is really fascinated and amused by the process of creating without the help of a brush, then he will like the appliqué made from palms. There's nothing complicated about it. We trace the palm on a sheet of paper, cut it out, create an additional element and assemble our applique.
Using applications
- Firstly, this is a great way for a child to develop imagination. The baby studies the contours of the body, trains attentiveness and perseverance.
- Secondly, you can decorate a child’s room with such applications, because they look very bright.
- Thirdly, the craft will be a wonderful gift for grandmothers or work for school or kindergarten.
Let's consider several options for creating applications from palms. We draw outlines on paper of any color, cut it out, glue it together, paint it.
Sunflower made from palms
Create a sunflower. Draw a circle and circle your palm many times. Glue it overlapping, paint it - done.
And if you draw a face in the circle, you get the sun. You don’t have to color the work, but cut out palms from colored paper.
Indian
Let's start creating an Indian applique. We cut out the palm and two elements shown in Fig. 1. glue them onto your palm, paint them - the Indian is ready.
Clown using applique technique
Nothing makes a child's childhood more fun than clowns. Let's create such an application together. We draw a circle, and in it is the joyful face of a clown. We draw 6 palms around the circle. Color it, cut it out, overlap it and you’re done.
Undersea world
Everyone in childhood dreams of going to the bottom of the ocean and getting to know the underwater world. Let's create it in the form of an application. We draw 4 palms at random. 2 palms are octopuses, and two are fish. Next, draw two overlapping palms (in the shape of a butterfly) - this will be a crab. We paint the background for the applique with bright colors and glue the figures.
Animals and insects
Now let's look at options for creating animals and insects in applications using your palms. Let's start with the caterpillar. We draw 5 palms overlapping with fingers down so that the thumbs are pointing in one direction. Above the first palm we draw the head of the caterpillar. Let's color it. Glue it together - it's done.
Next, let's look at the technique of creating a frog. Draw 2 palms, a circle for the muzzle, two circles for the eyes and a heart for the eyes. Paint it green and glue it together.
No type of children's crafts would be complete without creating a cute hedgehog. We draw the hedgehog’s body in the shape of a pear, round legs and a muzzle. Around the body we draw 10 slightly overlapping palms so that the fingers point in different directions in a circle.
Gifts for mom from palms
All children want to make gifts for their mother for the holiday of March 8th. There is nothing simpler and more tender than creating flowers with the help of your little hands. Let's consider several options. Trace your palms, paint them with different colors, attach a stem - your flowers are ready.
The child will have more work to do on the next option. We outline two palms in turn, overlapping. We cut out green grass of different sizes and blue petals.
- We assemble an applique in the form of a bouquet of snowdrops, which a child gives to his mother.
A tree with hearts would be a wonderful gift. We trace the hand on brown paper, cut it out, and make a stand in the form of a brown strip measuring 3 x 10 cm. We cut out many multi-colored hearts of different sizes. Glue it together - it's done.
Please your mother on a wonderful holiday with a very simple, but very warm and sincere application “Heart from palms”. Bend your thumb slightly and circle both hands in this position. Connect both palms on colored paper so that a heart is formed - the delicate applique is ready.
Now let's make a 3D application. Cut out two palms of different colors. On one we can make any inscription we wish. Let's start making the connecting material. We take a strip measuring 3 x 20 cm, bend it into an accordion shape, and also make the desired inscription on it. We fasten everything with glue.
We looked at many options for applications created using children's hands. The process of making them is not only very interesting, but also useful for the child, because this is how his imagination develops. Help kids realize their ideas, create and delight your loved ones.
Video master class “Palm application”
Source: https://podelkiruchkami.ru/applikatsiya-iz-ladoshek/
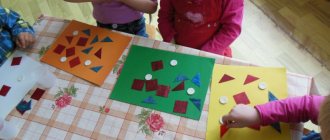
Application “Colored palms”
Very bright solutions can be easily made using paper of different shades. Each child can cut out blanks from sheets of one color or from several at once. Ideas with colored palms vary. It is enough to lay out a panel from the blanks, placing your palms on a white background, or use them as flowers in a clearing. The original option is to make an unusual decoration in the form of a cheerful sun.
To make such a craft, work like this:
- Take a disposable plate (plastic or paper) and paint it yellow.
- Draw or glue eyes, a smile, and a nose made from colored paper.
- Take yellow and orange paper and trace palms on it, 5 pieces on each sheet.
- Cut out the blanks.
- Apply glue to the inner contour of the plate and glue the palms, evenly distributing them around the perimeter of the circle.
It is good to attach a pendant loop to such a craft by gluing it on the back side or making a hole in the material of the plate.
Octopus appliqués with palms
The children did the appliqué of octopuses with their palms six months ago, but I decided to add that to today’s article as well. Applique of octopuses is quite easy to do. In the process of completing it, the son himself learned to trace his palm with a pencil, and tried to cut it out on his own with children's safety scissors. Well, at the end I dressed up the octopus using colored paper and markers. Nastya has the same applique of an octopus made of colored paper in her album, but I traced and cut it out for her myself, since she is still small and doesn’t know how to do it herself.
What you will need to applique the octopus:
- White list
- Colored paper
- Scissors
- Simple pencil
Octopus applique with palms
- On a sheet of colored paper, trace a child’s hand with a simple pencil.
- Cut out a palm from colored paper.
- Glue the colored palm blank to a white sheet.
- Draw the eyes, nose, mouth of the octopus
- And then... we give free rein to the child’s imagination. You can dress up the octopus by gluing a bow, a hat, a skirt, pants, or “hand” the octopus appliques to a bag or phone, creating them from colored paper or drawing them with pencils.
The octopus applique with palms is ready.
That's all I have for today. I hope you and your children liked the crafts and applications made from colored children’s hands: sun, swan, octopuses.
In order not to miss new interesting activities for children, subscribe to blog updates!
Sunny - crafts and drawings from palms
Works of participants in the “Funny Palms” competition: crafts and drawings with suns.
Sun made from palms - double-sided frame for children's photos
Such a frame can not only decorate the interior, lift your spirits and add bright colors even on a cloudy day, but also become a memorable gift for grandparents.
The frame is double, on one side a photograph of one child is inserted into it, and on the other - another.
To make such a photo frame, you need to trace the outlines of children's hands on yellow double-sided paper, cut them out and glue them onto a circle of thick cardboard. Then sew a thick film onto circles of thin cardboard and glue it to the center of the sun on both sides - these are pockets for photographs so that they can be changed.
All that remains is to attach a stick so that this DIY photo frame can be inserted into a flower pot. And if you attach leaves to a stick, the sun will turn into a sunflower.
The work was completed by the Kovalevs Misha (he was 3 years old at the time) and Mila (almost 2 years old) from Dnepropetrovsk, Ukraine. What this frame looks like with children’s photographs inserted into the pockets, see Natalia Dmitrenko’s blog “It’s fun to walk together...”: vmeste-veseley.blogspot.ru/2013/03/blog-post_14.html
And this is a group (collective) craft made from the contours of children’s hands and arms, made in kindergarten by the children of the “Sun” group.
For the idea and photo of this non-competition work, which added to our collection of ideas for handicrafts made from palms, many thanks to Natalya Dmitrenko: vmeste-veseley.blogspot.ru/2014/10/palm-print-crafts.html
Sun - applique from palms
Work by Veniamin Baturo-Lasitsky (5 years), Minsk, Belarus.
Sun (palm drawings)
Works by students of the “Solnyshko” group of the BDOU “General Developmental Kindergarten No. 10” in the city of Gryazovets, Vologda Region. Teachers: Pivneva Olga Alekseevna, Sadovaya Marina Aleksandrovna.
Sun
Silchenko Arseniy (3 years 9 months)
Smiling sun
Balaeva Anastasia (3 years 8 months)
Sunny (drawing)
Boriskov Sergey (5 years old).
Sun (applique)
Materova Anna (3.8 years old), “Center for Additional Education of Children” (BOU DOD “CDOD”), Gryazovets, teacher: Pivneva Olga Alekseevna.
I suggest looking at other articles about handicrafts made from palms:
- For the New Year and Christmas,
- Flowers and trees
etc.
Happy creativity! © Yulia Sherstyuk, https://moreidey.ru
Copying site materials is prohibited and is punishable by law.
All the best! If the article was useful to you, please help the development of the site by sharing a link to it on social networks.
Posting site materials (images and text) on other resources without the written permission of the author is prohibited and punishable by law.
Source: https://moreidey.ru/podelki-dlya-doma/solnyishko-podelki-iz-ladoshek.htm
Friendship tree
Such trees are usually made by a team in kindergartens and schools in order to strengthen the bond between children, create a cozy and kind atmosphere and set the kids up for friendly communication with each other. It’s easy to make such a tree, the main thing is that every child in the group or class takes part
.
Greetings, friends! Many children like creative activities: drawing, modeling from plasticine, salt dough, appliqués... Today I suggest making crafts and appliques from children's palms
! The kids and I made sun, swan and octopus appliqués from children's hands.
The applique of colored palms is very easy to make. From outlined children's hands we create beautiful applications of the sun, birds, animals, people, Christmas trees, snowmen, flowers... The list can go on and on! There is a limitless flight of fantasy here. You can decorate the interior of your apartment with ready-made handicrafts made from palms. We hung the sun appliqué in the room in a visible place, which the children are very proud of, and I signed the swan appliqués that the children made (name, age and date of creation) and put them in the album as a souvenir. In a few years, it will be interesting to see what small hands the daughter had at 2 years old and her son at 5 years old.
Applications from palms with step-by-step design of paintings and crafts
This activity with paper is varied and exciting. It requires the child’s perseverance, the development of motor skills, imagination, color perception, and composition.
With the help of ordinary paper, scissors and glue, kids can make entire pictures with animals and plants. Their parents will help them cope, who will tell, advise and cut out the necessary elements. The child will have to create a picture, embodying his own ideas. You can fantasize endlessly.
In kindergarten, teachers often conduct exciting activities with children using applications in preparatory, junior, middle and even senior groups.
Toddlers can easily use safety scissors, watercolor paints and glue. Which, in turn, allows the child to better perceive the world around him.
Let's take a closer look at how to make simple applications from palms .
Simple pictures of children's hands
Or make a template yourself. Take a colored sheet of paper, trace the outline of the baby’s hand with a simple pencil, and carefully cut out the sample with scissors. At the same time, the child can cope with this work himself.
Scenery
This type of paper craft is especially exciting. Several people together with the child can participate in its creation, and a variety of materials are used to make parts: paper, cardboard, fabric, napkins, cotton pads, watercolors, gel pens, felt-tip pens, etc. To create a picture you will need to make a sun, a tree, butterfly and swan. Let's look at the detailed MK below.
- Description of instructions:
- Having chosen a picture for a sample, prepare a work space, as well as materials for needlework.
- Cut out this sun from the proposed picture, glue it to the base, make rays from your palms.
Now carry out the assembly: lay out the elements in a circle, gluing each one with PVA. Fix the disk in the middle.
To create a swan, cut out a body and wing from white paper. Make the beak red. Draw it with colored pencil or watercolor. Complete the swan applique from your palms with airy wings, for which use napkins or thin chiffon fabric. Make an applique from your palms. Glue them onto the base, as shown in the photo below. For this master class, use beautiful napkins. A swan decorated with chiffon, sparkles and rhinestones will look especially cute on a paper lake. For those who are just starting out, make an applique with your own hands from your palms tree is very simple - cut out a trunk from colored paper and green elements. Glue the template onto the base, then place a lush crown on it. Preschoolers can complete any form of craft.
Sun
The purpose of the lesson is to develop the child’s creative abilities and fine motor skills. Try making a sunshine together.
To create a sun applique from your palms, cut out the required number of orange and yellow parts (blue for clouds). The round disk will serve as a face. To do this, use ready-made stencils by printing the drawing on a printer. If this is not a collective application, then let the child himself come up with the mood for Sunny.
Place the details as you wish. Make the rays the same or different in length. The next option is presented with a cloud and a sun. Other examples for creating a sun and appliqués from palms.
Swan
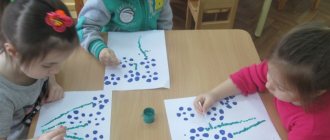
Applications with a swan can be individual or collective. If the kids work separately, let them come up with the design of the swan themselves. But don’t forget that young children always need finished work as an example.
In collective work, we, as a group, design one swan. Each child learns to trace and cut out his own palm, mastering the use of scissors. Then, all together, under the guidance of the teacher, we attach the blanks to the picture.
Below are the following ways to make a swan from palms applique.
Tree
Children really like this type of applique. Collective works look especially interesting. We prepare the tree trunk in advance, and the leaves will be children’s palms.
They can be made from colored paper or handprints can be made with paints and cut out along the outline.
Invite the children to design their palm or write a congratulation or wish. This will be a good idea if the application is thematic.
Butterfly
Add a butterfly applique to your palm composition. As described earlier, use templates. Make the insect's head out of a small circle, and the body into an oval shape. Lay out the butterfly's wings step by step on the base and glue them. The applique from your palms will be more magnificent if you add paper elements.
Finish the butterfly, secure its torso and head. Draw the mustache. Decorate the wings. Choose a design for the wings yourself. It can be made with watercolors, helium pens, felt-tip pens, colored pencils, as well as additional elements from paper and other things.
Below are other bright palm applications on this topic.
Video: Making gifts from palms
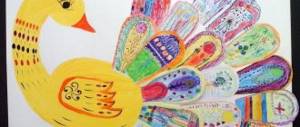
Miracle of the bird
For children who want to make not only an aerial swan, but also something else, the next MK offers a lot of positive things. Namely, a peacock applique made from palms. This work will not take much time and money, since everyone has colored paper, scissors and PVA glue at home.
For a child, such needlework will become an unforgettable event. This technique involves cutting out paper parts and fixing them to a base with glue. To do this, simply follow the detailed description of the work and assembly diagram of the peacock.
Step-by-step instruction:
- Cut out the main parts from colored paper. The more there are, the brighter and more voluminous the peacock’s tail.
- For the torso, neck and head, make the following blanks.
- Glue the parts in a circle in the form of a fan.
- Place them in several rows.
- Glue the blue circle in the middle, then the neck and head. Draw the eyes. Decorate the peacock as desired.
The children's craft is ready. To make the tail more voluminous and the bird’s figure more voluminous, make an applique using small palms and a cotton pad.
- Repeat the procedure previously described.
- Take a cotton pad and paint it with watercolors. Let it dry.
- Glue the circle on top of the tail fan, placing it in the middle.
- Then fix the neck and head part.
The multi-colored peacock is ready. It’s very easy to make appliqués from your palms yourself.
Video: Applications and drawings from palms
This video offers ideas for a “palm” activity. This kind of work is easy and fun to do.
In conclusion, we would like to add that palm appliqués are a great idea not only for kindergarten, but also for spending time at home and for the development of your child.
Source: https://vishivashka.ru/applikatsiya/applikaciya_ladoshek.php
Handprints and outlines
Probably, many years from now, an adult will be interested to know what his palm was like in infancy, and how it changed in size over time. The handprints collected in the album will help you remember the stages of your life's journey. Sometimes mothers place a handprint in a photo frame, but in any case, when making such drawings, gouache or watercolors and a landscape sheet are used. Older children can make their own impressions by first placing their palms on the painted surface, then resting them on clean paper. The baby cannot do this on his own, so his mother comes to his aid.
Another way to capture a palm is to outline it with a pencil, felt-tip pen, etc. The contours of the hand can be drawn on the sheet multiple times, using different colors. The result will be a kind of “growth tree” that can take place on the wall in the nursery. It will be updated periodically. This kind of drawing can be made by tracing the hands of all family members. And if you use fabric and colored threads, you can get interesting embroidery.
Of course, in the examples described above we are hardly talking about the child’s own crafts, because in these cases the creativity comes from the parents, but for an older child this type of needlework will arouse undoubted interest. He is already capable of depicting, albeit clumsily, albeit with significant help from adults, meaningful plots.
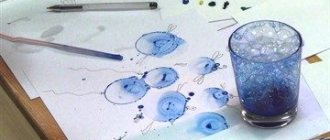
A sheet of colored paper can serve as a canvas for a little artist - here several impressions will be left with the palms of your hands. Black dots and commas will turn your palms into cheerful octopuses. You can draw writhing algae on a sheet with paint-smeared fingers.
You can use your palms to make a fish in an aquarium. Her fins and tail will be depicted with fingerprints. An adult will add eyes and a mouth to the fish. The picture will be complemented by painted bubbles. Children's palms can depict flower buds on paper. Surely the kid will figure out to add stems to them and fill the background of the picture with green grass.
Palms will help to depict a huge number of animals:
- the peacock's tail will be made from several fan-shaped prints;
- the body of a hedgehog or porcupine - from a pair of prints superimposed on each other;
- spider or crab - from symmetrically left handprints;
- the centipede caterpillar will come out of 4-5 prints.