Little children are always interested in developing, learning something new and interesting, as well as making colorful crafts together with adults and enjoying them. An applique would be a great idea for activities with preschoolers. It is the application that will help develop your baby’s creative abilities, perseverance, and most importantly, fine motor skills.
In this article we will look at several master classes with which you can easily make a chicken applique with your own hands. There are many variations of these applications. So, for example, a chicken can be made from the most available materials that you can definitely find at home - from eggs, from geometric shapes or from millet.
Chicken made from geometric shapes
What you will need for work:
- colored paper or cardboard;
- scissors;
- PVA glue or glue stick;
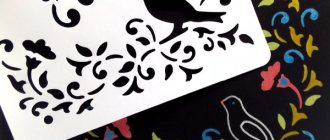
- stencils or templates for applique.
Children can make appliqués from geometric shapes as early as 2-3 years old, that is, as soon as they more or less learn to handle scissors correctly. This technique is quite simple. All that is required of kids who are starting to learn appliqué is to correctly cut out the figure along the contour and glue it in the right sequence.
- First, print out a template for the future chicken.
- Then, together with the baby, we carefully cut out the details; it is important that the baby tries not to go beyond the boundaries of the shapes and improves his skills in using scissors.
- Next, select a sheet of cardboard or colored paper that matches the color and glue the figures step by step to make a small chicken, approximately the same as in the photo.
It is recommended that children in the junior group or middle group in kindergarten become familiar with the application of geometric shapes.
Panel made of textile materials “Hen with chicks”. Master class with step-by-step photos
Application. DIY hen and chicks
Applique made of felt and threads.
Master class with step-by-step photos Author: Liliya Vasilievna Masagutova, teacher of MB preschool educational institution kindergarten No. 6 “Vasilyok”, Shushenskoye settlement, Krasnoyarsk Territory The master class is designed for children of senior preschool age, students, teachers and parents, as well as for anyone who is interested in handicrafts! Purpose: Making appliques from textile materials. Objectives: To introduce the properties of materials. Develop aesthetic perception, creativity, attentiveness, fine motor skills. Cultivate neatness and artistic taste. Purpose: The panel will decorate a children's room, a kindergarten group, and can also be a wonderful holiday gift. Technique: applique made of textile materials. Creating an applique is one of the popular children's creative activities. Many children love to make bright pictures with images of birds, animals, and favorite characters. Felt is a natural soft material. He is warm, sincere, and a pleasure to work with. Felt is similar to thin woolen fabric, but has an advantage over it: the cut edges of the parts do not fray, they do not require additional overcasting or hemming, so the finished applique does not lose its elegant appearance, and in combination with small fluffy balls of yarn - pompoms, you get an unusual living picture. I bring to your attention a master class on making panels from soft and warm materials - felt and pom-poms from "Hen with Chicks" yarn. This plot is a wonderful symbol of family, care, maternal affection, kindness, tenderness.
Bright, fluffy, yellow lumps - little children, our motley quonka.
Like dandelions, in a small basket. The beaks are open, asking for crumbs of bread. I will quietly take the Golden miracle, I am a little chicken, I will not offend you. T. Lavrova Necessary materials: Felt: green (two shades - dark and light), brown (two shades), yellow (two shades), blue, white orange, red, black; White satin ribbon; White and yellow nylon tape; Yellow yarn; PVA glue; Scissors; Wooden frame 50/50 cm; Blue satin crepe for the background.
Step-by-step job description
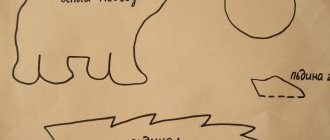
1. Cut out the sun template, transfer it to light yellow felt or secure it with needles, then cut it out. 2. Cut out a circle of a brighter yellow color.
3. Cut out two layers of grass from green and light green felt.
4. Cut out a template for the head and neck of the chicken, divide it into the main parts - beak, comb and beard, then cut out the comb and beard from red felt, and the beak from orange.
5. Cut out the chicken’s neck from dark brown felt.
6. For the cheek, cut out a circle with a diameter of 3 cm. from orange felt, from brown - a circle with a diameter of 2 cm. For the eye, cut out a circle with a diameter of 1 cm from black felt.
7. Cut out the body of the chicken from brown felt, the tail and wings from dark brown. 8. Cut out the paws from orange felt.
9. Cut out the umbrella template and divide it into main parts. 10. Cut out the details of the umbrella dome from blue felt, and the handle from white felt.
11. Glue a ruffle made of nylon tape to the wrong side of the umbrella parts.
12. Glue the handle to the inside of the umbrella. 13. Glue the umbrella handle to the chicken’s wing.
14. Glue the sun and grass onto the prepared base.
15. Glue the chicken’s legs onto the grass.
16. Glue the tail to the wrong side of the body.
Glue the resulting part onto the base. 17. Next, glue on the neck and wing of the chicken and decorate them with thin strips of brown felt. 18. Glue the beak, comb, beard. Then we glue on the cheek and eye of the chicken - first an orange circle, then brown and black. Glue a small speck of white felt onto the black circle.
19. Glue the wing with the umbrella handle, then the upper part. We decorate the umbrella with white felt polka dots.
20. Let's start making chickens. To do this, we wind yellow yarn on the narrow side of an A4 photo frame (about 50 turns, depending on the thickness of the yarn).
21. Cut the yarn from the frame, fold it in half and cut it. We pull the resulting bundle of yarn in seven places, approximately at the same distance. 22. Now we cut the bundle between the constrictions into six parts. 23. Using scissors, we form pompoms of different sizes (three small and three larger). 24. Cut out scallops and beaks from red felt, and eyes from black felt.
25. Cut out legs from orange felt, and wings and tails from yellow felt.
26. Glue paws onto the grass.
27. First glue the larger pompoms, then the small ones.
28. Glue on the scallops, beaks, eyes, wings and tails. 29. We make flowers from white satin ribbon. To do this, we make a blank using needles. 30. Along the edge we lay a stitch “forward needle”. 31. Pull and tie the thread. 32. Cut out stems and leaves from green felt. Glue the flowers. Glue yellow yarn into the centers of the flowers.
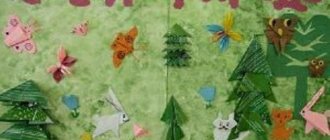
The panel is ready!
Chicken with chickens Where to where? Where to where? Come on, come on, everyone here! Come on, come under mom's wing! Where did it take you? Valentin Berestov
The chicken lost all the chickens on the street. Where, where, where, where, everyone gather here. Pee-wee-wee, the chickens are squeaking, the turkey poults called us. We played worm and listened to a cricket concert. And now we run home to mother - the pockmarked chicken. L. Circle Chick, chick, chick my chickens. Who's playing hide and seek with me? Can't be found or caught, Can't be counted. Somebody ran away, somewhere, You’ll never catch him! L. Lukanova
Templates
We recommend watching:
Chicken using isothread technique Chicken made from salt dough Applique made from paper and natural materials for elementary school Applique from geometric shapes. Chick
Similar articles:
Painting a wooden Easter egg. Master Class
Crafts for Easter for children in the preparatory group
Wedding bouquet made of felt. Master Class
Crafts from disposable plates for children 6-7 years old. Master class with step-by-step photos
DIY crafts made from natural materials for children. Hen
Making chicken and chicken from cereals
For older children who are in the older group or already in the preparatory group, slightly more complicated options for paper crafts, for example, Ryaba chicken made from millet, are perfect.
The difficulty of this craft lies in the fact that you need to carefully glue and take such small grains, which not every child can quickly cope with. This is a very painstaking process - sitting and step by step adding grain to grain, so it sometimes turns out to be a difficult task for children.
- To make such an applique, you need to take a sheet of cardboard of a suitable color (it is advisable that the color of the cardboard is different from the color of the cereal) and sketch a drawing on it that will depict a hen or chick.
- Spread the outline of the future picture with glue and gradually place the cereal on it.
- Then “color” the drawing with the selected cereal (it can be not only millet, you can take absolutely any cereal - rice, buckwheat, as well as dried beans, beans, seeds - there should be no limit to your imagination!).
Application – The chicken has appeared!
First, let's talk about the benefits of the application for children.
It seems to us adults that it could be simpler: we took a pencil and paper, drew bears, quickly cut them out, pasted them on a page and signed them - the fairy tale “The Three Bears”.
For children, such operations as tracing a template, holding it with the left and holding the pencil in the right, or cutting out a rounded shape, turning a square into a circle, or carefully applying glue to small parts, and then placing them in the right place in the picture is a task complex. But how important it is to teach a child to do all these exact actions correctly! Today we will learn how to make a simple applique with a baby. Let's start by teaching him how to correctly place the finished parts on the base and consider the emergence of a chicken from an egg! First, you need to look at pictures or read fairy tales that mention how a chicken appears. Review and discuss them in detail. It is important that the child understands who is in the egg and how the Hen helps the chickens (warms, hatches). Then invite your child to make his own chicken. APPLICATION TEMPLATE.
Download and print the application template files.
ONLINE VIEWING: chick.pdf
- If you do not have a program for reading PDF files
, (Russian version) download it from the official website.
— Free program “ Adobe Acrobat Reader DC”
— A program for reading, printing and reviewing PDF files.
Application manual files are distributed free of charge in electronic PDF format, and only on the website www.asreda.com. Not for commercial use.
Attention! The child must do the craft entirely himself. Your task is to control, explain and give hints.
For the craft we will need:
• Colored cardboard for the base of the application;
• Colored paper (cardboard) or colored felt; • Pencil and scissors; • Plasticine; • Glue. Photo-1. If you are making an applique with a baby, draw all the necessary details on the back of colored paper or felt. You can combine colored paper (cardboard) and felt. On white cardboard, draw two parts of the shell. On yellow cardboard there is a large part of a chicken and a small part of a wing. Photo-2.
Now carefully cut out the parts and ask: “What does this look like?”
Together with your child, place them on a sheet of green cardboard - this is the basis. The chicken part has one wing for now, leave the second wing part on the table. Photo-3. For the template, in the printed file, the chicken part is cut out completely, that is, along with the wings.
Help your child correctly position the future chicken in the egg shell.
Apply glue together and glue the parts.
Photo-4. After this, ask your child the question: “What is this extra detail? What does she look like? If he guessed it, let him safely glue on the second wing; if he finds it difficult, tell him.
We ask the same questions about the small shell-cap, and then glue it onto the chicken’s head. Photo-5.
Now ask: “Is the chicken ready or is there something missing?”
After this, together make the eyes and beak from plasticine. Let the baby think for himself how many eyes need to be made, and what color the beak should be. For the template, in the printed file, the beak is cut out from a triangle, then folded in half and glued .
Place the chicken egg in a nest or on the grass.
Offer ready-made branches or grass parts. Let the child glue them to the bottom of the picture himself.
Photo-6, 7.
Now a surprised little fluffy chicken is looking at us from the appliqué!
It’s not at all difficult to make such an applique, but at the same time we teach the child to correlate details, remember the names of objects and animals, repeat colors with him, and also set tasks for him: what is missing, where does the extra part come from, and other questions on the topic of the craft. Let's learn to think and develop motor skills together!
Good luck! Article on the topic: “ Pied Hen ” - and application .
Article on the topic: “ Chicks ” - crafts made from shells .
__________________ © Obolentseva Anastasia, for www.asreda.com
Napkin applications
The chicken applique made from napkins is quite simple to make and is recommended for children of preschool or primary school age.
The process of making an applique is that the child applies PVA glue to a pre-prepared chicken stencil and glues pieces of napkin. If desired, you can add the same palm wings.
Fabric craft “Baby Chicks”
This craft is more suitable for older children (primary school) who already have the skill of handling a needle.
Making such a craft is not at all difficult. Having cut out a bird template from a suitable fabric, sew it to the base and finish drawing the eyes and beak of the chicken.
Textile babies
This method is suitable for older children, because the work ahead is more complex. An ideal option for teaching a child how to use a needle and thread, but under the strict guidance of an adult.
You should first prepare the pieces of fabric that will be sewn together. A large piece of thick textile or cardboard is used as a base. In the first case, the craft is completely attached with threads, and in the second, it is glued already sewn.
The eyes and beak can be made from suitable fittings or beads.
Panel “Chickens in the meadow”
A small group of kids can be invited to make a joint application on the theme of poultry. Each child makes his own chicken or hen, and then all the birds are glued onto a pre-prepared background. For the background you can choose a meadow, country house, etc.
The children's applique of a chicken in an egg is quite a bit more difficult to complete than the first scheme, since in addition to the chick, you also need to cut out part of the egg from which it has just hatched. With the help of this step-by-step instructions, which describe in detail the process of making the craft, making it will not be difficult.
- First, we also cut out a template of a bird and an egg from colored paper of the desired color.
- Alternatively, you can cut out all the details from a sheet of plain white paper and color them together with your child.
- Then you just need to correctly stick all the elements onto colored cardboard or paper.
- If you wish, you can draw grass, the sun, flowers or any other background nearby - I repeat, there are no limits to your imagination!
Lesson summary on appliqué in the middle group “Birds”
Lesson summary on appliqué in the middle group “Birds”
Target:
teach children to make an applique in the shape of a bird.
Tasks:
educational: to consolidate children’s understanding of the diversity of birds, their structural features, and distinctive features; strengthen the ability to carefully use glue;
developmental: develop fine motor skills of fingers; develop attention, observation, perseverance;
educational: to cultivate friendly attitudes towards nature and its inhabitants.
Material and equipment:
Audio recording “Bird Voices”
, templates made of colored paper: circles 5 cm and 3 cm, 3 semicircles, a colored sheet of cardboard, felt-tip pens, glue, napkin.
Preliminary work:
Reading the fairy tale “Wonderful Houses or a Tale of Winter and Birds”; looking at illustrations of birds.
Progress of the lesson:
-Guys, today we will go on a trip to a forest clearing. We'll go by bus. So, sit down and let's leave together. (Children enter a group that is decorated with images of birds and sit on chairs.)
-Listen, guys, who sings so beautifully? (Children's answers.)
-Where did they hide? Let's find them and see who flew to us today. This is a magpie. Her sides are white. This is a sparrow. A fast jumper.
-What kind of bird is this in a red cap, knocking on a tree with its sharp beak? (Children's answers.)
-And this is a tit, she has a yellow belly. All these birds live next to us both in winter and summer.
- But this bird flew to us from the south. This is a swallow. It flies quickly, catches mosquitoes and other harmful insects.
-Look, guys, what is this unusual bird? I think I know: this bird was made by children from another kindergarten and sent to see the world. Is it really beautiful?
-Yes!
- Do you want me to teach you how to make the same beautiful birds? Just first let’s say what parts our bird consists of. I will show, and you name these parts. (Children's answers.)
Physical school:
Birds are jumping, flying (Children are jumping) Birds are collecting crumbs. (“Peck”) Feathers have been cleaned, Beaks have been cleaned (depict) Birds are flying, singing (waving their arms) Grains are pecking (leaning down) Then they flew and sat down (fly away, sit down) tables)
-Look at what lies in front of you: circles for the body and head, semicircles for the wings and tail.
-Let's stretch our fingers.
Finger gymnastics “Bird feeder”:
We hung feeders,
(Children imitate movements)
Grain was poured into them.
(Imitate movements)
For hungry birds in winter
It's very tasty.
Come to us, tits,
(They bend their fingers one by one, listing the birds)
Pigeon, crossbill and sparrow!
And, of course, we are waiting for your visit
Hen with chicks
The hen with chicks applique is also very suitable for group activities of children, where the children as a whole group make chickens, and the teacher or teacher makes a chicken. The craft can be made from plasticine, cereals (more suitable for older children), and from colored paper.
mother hen
What you will need for work:
- colored cardboard;
- double-sided tape - regular and thick;
- scissors;
- felt-tip pens or pencils, glitter, cotton wool for decorating panels.
Step-by-step instructions for creating a multi-layer applique from colored paper:
- Find a chicken template, print it or translate it, and then cut it out.
- We connect the resulting parts.
- We create the base and background of the panel. To do this, we take thick colored cardboard and glue strips of quilling or paper of a different color along the edges, or we make two sheets of cardboard of different sizes so that the background one is smaller.
- The Ryaba chicken is glued on with tape.
- Cut out the grass in any shape and glue it under the chicken.
- We take the templates with chickens and cut them out, connect all the parts together
- We glue each chicken to the grass with thick double-sided tape, as in the photo.
- The next step is to cut out the eggs, but glue one of them.
- We cut out the rest of the vegetation: tulip and chamomile flowers, a willow twig.
- We assemble and glue the tulip onto the panel.
- We do the same with chamomile. The hen and chicks will sit in the meadow.
- We make willow buds from cotton wool pellets.
- There is room for a second testicle.
- Using a black felt-tip pen, outline or any other coloring material, draw the details on the panel.
- To make the craft look festive, it is decorated with sparkles; they will look good on the eggs. To do this, use the same glitters that are used to decorate real Easter eggs.
- This lesson is suitable for demonstrating to children in the middle group of kindergarten.